Leaderboard


Popular Content
Showing content with the highest reputation on 03/14/2020 in Posts
-
At some point in your OT build you will be using rivets. It may just be for attaching the thigh ammo pack for Basic, the cod tab for EI or all those plus the ab/kidney ones for Centurion. It's honestly pretty easy to attach both kinds of these using basic tools you probably have on hand: A flat-head screwdriver (preferably large), a drill with the correct size bits and a hammer. Removing them will require a thin bladed flat head screwdriver, some heavy-duty pliers and perhaps a drill. Safety gloves and goggles are recommended. For this tutorial I will be using scrap ABS. Now, let's get to it! Split (bifurcated) Rivets Assuming you are (hopefully) aiming for Centurion, you will need 9 (with washers) 6 for the left ab/kidney connection 1 for the lower cod tab 2 for the thigh ammo pack (if not using cap rivets) Head diameter should be 5/16" (8mm). Shank should be 3/8" (9.25mm) long BEFORE YOU START: Make sure you have a very hard surface to hammer on, and I suggest laying down a piece of heavy cloth on top of it so you don't scratch your armor. 1. Carefully mark your hole placement(s). Using a 9/64" bit (about 4mm) drill out the hole 2. Insert rivet, dome side out. Hole will be snug 3. Turn over piece, insert washer onto rivet shank 4. Using the thin end of the screwdriver, insert it into the split and gently hammer it down 5. Continue moving the screwdriver farther up toward the thick part, hammering at each increment to open up the "legs" 6. Use the shaft of the screwdriver to get the widest opening possible. At this point you should be able to 7. use the hammer to flatten it out completely 1 2 3 4 = 5 6 7 = DONE! Single Cap Rivets Single cap (one domed end) rivets were used in the original films to attach the thigh ammo pack to the bottom of the right thigh. Although not a requirement at any level, many like to use them for screen accuracy You will need 2 sets (top and bottom), one for each side Head diameter should be 5/16" (8mm) Again, you will need a hard surface (like the edge of a workbench) to hammer on Reference photo for placement IMPORTANT! Make sure the back edges of the ammo pack tabs are equal distance from the corners of the rear of the ridges on each side! 1. Carefully mark your hole placements. Drill holes. 2. Insert bottom (facing inside). 3. Shank should be facing outward. 4. Place cap on shank. 5. Gently give a few good taps with a hammer until it is set. Cap will flatten out. 1 2 3 4 5 DONE! REMOVING RIVETS Spit type: 1. Using a thin bladed screwdriver, CAREFULLY pry up each side the "legs". POINT SCREWDRIVER AWAY FROM YOU WHEN DOING THIS!!! 2. Using a set of heavy duty pliers, pinch the legs together until they meet 3. Washer will now slide off and rivet can be easily removed 1 2 3 Cap Rivets These are a bit trickier than removing the split type, so take your time to avoid damaging your armor. Safety gloves and goggles are suggested. 1. Using a pair of pliers, grip the cap part (this avoids it spinning). 2. Using a drill bit at least as wide as the shaft of the rivet, CAREFULLY drill through the bottom (base) from the back 3. Once the drill has penetrated the entire rivet, it can be easily removed. 1 2 3 If you have any questions, comments or suggestions, post up here.5 points
-
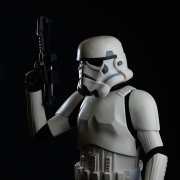
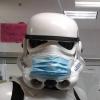
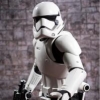
Hi all, As we’re all sharing helmet pics (WIPs, clearance etc.), I thought I’d share a little photography tip for anyone that wants to give it a go. As many of us use smart phones to quickly snap out progress, holding the camera too close to the subject will cause some distortion, leading the the helmet looking “droopy”. Try taking a couple of steps back and zooming in - this will look much closer to how the human eye sees it. [emoji1303][emoji2956] Here’s an example when taking pictures from all angles;3 points
-
Rather than clog the thread I have dumped a bunch of grabs I have taken in a folder here: ---------------------- I haven’t included pics of Jet Troopers, Treadspeeder Drivers it any other troopers as they have no relevance to this thread or FISD. Enjoy! P.S. Thanks to COVID-19 (and Disney)!for bringing forward the digital release of the movie. Sent from my iPhone using Tapatalk Pro3 points
-
Full suit up today (HWT) but the thighs and that look way better. Before the main issue yes these are still my old shims that are falling apart still haven’t got the new abs. Issues I have found is my sniper knee shin likes to move around a lot, Butt plate separates to much in some places going to fully redo its strapping. Any issues you find please point them out.2 points
-
Any one of Greg’s designs would look awesome.2 points
-
Back in 2009 or 2010 I got into playing the Battlefield series games online, and wanted a new screen name which wasn’t related to my previous Lord of the Rings obsession. At that time my go-to name had been “darkelf,” but I wanted something less fantasy-like for my WWII and modern warfare gaming. I decided on a variation of my last name (Mask), and thus became known as “MaskedVengeance.” Fast forward to a decade later in 2019 and I figured the same name, though a bit lengthy, would work for Legion purposes. From time to time I may also refer to myself as “MV” for short. Or you can call me Caleb. =)2 points
-
ukswrath, short for unknown soldiers wrath. Gamer tag since the days of Wolfenstein 3d. A lot of peeps think I'm from the UK for some reason. I know, boring.2 points
-
What if I'm still using a flip phone Nice work Dan1 point
-
Welcome to the FISD Chemi1 point
-
Excellent detail as usual Joseph!1 point
-
Great advise, Jose. [emoji1303] Just to be safe, images from the reference image gallery are probably the best examples to post. [emoji3526] An buttons: Common Ear alignment;1 point
-
Good advice. Is better always put some distance between the camera and whatever we want to photograph, to do that a long focal length is needed, but the digital zoom can give us a similar result at the cost of image resolution. Sent from my GM1900 using Tapatalk1 point
-
If you are using the foam as padding, I wouldn't suggest gluing it directly to your armor. The reason being is that we sweat, plain and simple, and over time the foam will start to smell. When I needed padding under the front of my left calf, I cut a strip of foam, glued Velcro to one side and attached the other side of the Velcro to the area where I needed it to stay. This way I can remove it on occasion and clean it. Once you install the visor you really shouldn't ever need to remove it, so you can use whichever method you like. I use Sugru on all mine. It is available to order in Sweden here.1 point
-
OMG!!!!...Nobody see it before jajajajaja...I can't believe it...I'm working on it...Thanks...1 point
-
Nice job, Chemi! As Glen mentioned, the large ab-button plate will need to be rotated before we can move along, sir. Should be a pretty easy fix!1 point
-
Congratulations Trooper and welcome to the Legion Sent from my SM-G960F using Tapatalk1 point
-
Yes Dan's are the real deal when it comes to accuracy1 point
-
Welcome trooper, we are all effected but the empire will survive so hang tight and we will all be out again soon serving the emperor with pride!1 point
-
Congratulations Trooper!1 point
-
Nice work, just a couple of things you could address while waiting for the DO's Remove excess paint from gum area : Frown is painted gray and does not leave the teeth area. TD screws are very large You may want to try to add some tabs behind the butt plate to help hold it inwards, it is pushing out at present. Ab button paint is a little small, you may also note the corners are not rounded off on the ab plates, also they could be trimmed a little more. Good luck with your application1 point
-
My parcel arrived today, everything accounted for, along with other bits I have been stockpiling for this build: Hope to start on the helmet soon!1 point
-
Yes! - I did it. It was a lot of hard work and attention to detail to get here but totally worth it. I'm ecstatic to join your ranks as an FISD Centurion and to represent my Georgia Garrison as it's newest L3. I could not have done it without you. This forum has been an invaluable resource to me and I relied heavily on the tutorials, advice and feedback posted by members of our detachment. As a new member I read as many forum posts as I could by members who had achieved the rank of EIB and then as EIB I read all I could from members who were Centurion. Every question I had, every concern / issue or obstacle had been experienced before by everyone before me. If you all had not taken the time to document it or to put together Tutorials and PDF's for others benefit I might not have gotten here as quickly as I did. So... I'd like to say Thank You ( to everyone ) for your guidance, support and encouragement. You are all certainly an inspiration to me. Troopers Helping Troopers1 point
-
Welcome back, Philip, and thank you for your Centurion application. CRL and Centurion Application Requirements: All required submission photos are present. Beautiful job on your build sir! . We are pleased to announce your armor displays all the necessary requirements as set out in the CRL. On behalf of the D.O. Staff,congratulations and welcome to Centurion! Way to go, Philip! You really did this armor justice, brother, and thanks for the updated pics. Now get out there and show off that shiny white armor as the newest Centurion in the Georgia Garrison!1 point
-
Was delightfully mischievous in my youth and was called a rascal (at best) often, so I kinda just owned it and it became a nickname. When this song came out, it cemented that as my username on pretty much everything since I started using computers.1 point
-
When I was a kid my uncle would tease me and tell me that my mother, despite not being a terribly religious woman had seriously considered naming me Hesikaya. After many years I asked her about it. Turned out he was right!? Fast forward to the day of the internet and i'm trying to create a cool screen name to use. Every dang one I picked was already taken. So for a good laugh I said to myself I'll bet this one isn't and plugged it in. Lo and behold it wasn't. I've been using it ever since. And most of the time it's available.1 point
-
First person shooters. I died a lot. I'm not sure why I added ski at the end, but it sounded good at the time and, so far, is unique.1 point
-
THERMAL DETONATOR PART 1 Now to tackle this part which I find to be most time-consuming due to the fact that the CRL states "no visible seams" and the darn thing comes in 5 pieces.... The first part of the TD build will focus on the top part, while part 2 will focus on the flat plate, and part 3 will focus on how the back plate joins with the back of the abdomen piece. This is the TD after gluing the 2 end caps and 2 halves together. And after applying epoxy putty to the joints: After the putty dried, it was several repetitions of sanding, , priming, more putty, sanding, priming, more putty, sanding, priming.... And the results: End of Part 11 point
-
1 point
-
Wow - glad to see this thread still chugging! As noted it's a great way to get to know each other1 point
-
It’s based on a song by The Police, though it was actually a Goldfinger cover I was listening to at the time. The Police came to me later.1 point
-
The best dog I’ve ever owned was called Echo. (and I’m Jenny). JenEcho is our kennel name (registered with the Canadian Kennel Club) and it pays homage to my beautiful girl who is long gone from this reality, but who lives forever in my heart.1 point
-
CHEST First up, I wanted to tackle the chest piece, as this to me was the most iconic of the FOTK. To cut out the 6 oval pill holes, I sanded down the indents from the back. By doing this, you are ensured of identical holes once you sand the indents flat. Here's all six of them sanded flat from the back: And this is how it finally looks from the front. Pretty satisfied with it, I must say. Next up, to tackle the chest pill box. I drew the outline of the resin attachment from the back, and then proceeded to cut the rectangle out CAREFULLY. Truly a heart-stopping step. I test-fitted it onto the chest. Glad it was a good fit, and I didn't have much to fill later. Next, I removed the slot from the pillbox, and from the back, I also created notches so that later when I apply epoxy putty around the pillbox, it would hold much better, compared to just the being held by only the rectangular frame of the cut-out. Glued the pillbox in place using CA, and then proceeded to apply 2-part epoxy putty around the back and front. This is how it looked dried and sanded down. That pillbox is not going anywhere! The front after sanding down. And finally, after a coat of primer. Again, pretty satisfied with the result. It does not look like 2 pieces. Calling the chest piece done! Stay tuned for the next part... UPDATE: I realised that my head is small enough for me to slot through the yoke WITH the chest piece attached. As such, I will be fixing the chest piece onto the yoke. I didn't like the way the 2 sharp ends of the chest piece will pop up, and since I can now put my head through, I decided to drill 2 holes onto the yoke, where the chest piece sharp ends are going to be. Then I will glue 2 bolts under the chest piece, go through the yoke, and secure the other side with nuts. Here are the holes: And here is the chest piece attached to the yoke via the 2 bolts. This is how it looks like from the inside. The excess bolt will be shaved off. I reinforced the bolts with epoxy putty, making the sharp ends much stronger, and the bolts secure. Finally, the chest piece with the greeblies added, primed and sanded with 1500 grit. This piece is now ready for the painters.1 point
-
You could possibly remove the additional pieces, and replace them with longer side pieces that under lap both the kidney plate & the abdomen plate. Make the side pieces long enough, so that the abdomen plate overlaps the side pieces by 2-3” both sides. Glue the longer additional pieces to the kidney plate. Bend a curve in the longer side pieces so that they wrap around you torso. Then the abdomen plate sits over the side pieces.1 point
-
Remember to keep sniper knee from getting behind thigh armor. Some add padding to back of thigh armor so it stays closer in the front. Sent from my iPhone using Tapatalk1 point
-
BROW TRIM In looking at the images below, notice that the ANH-Stunt brow generally sits higher above the eye openings, while the Hero brow typically tends to sit lower. ANH Stunt ANH Hero ESB ROTJ Note: Overall the brows seem to ride even lower (especially the center) than the those seen on the ANH Hero bucket.1 point
-
Name: Jeff Rich TK ID: 20980 FISD Forum Name: 11b30b4 Garrison: Georgia Armor: Jimmiroquai Rogue One Helmet: Jimmiroquai Rogue One Undersuit/ Neck Seal: Rogue One -Jimmiroquai Blaster: HFX Rogue One E-11 Height: 6’1” Weight: 225 lbs Boots: Imperial Boots T-7 Canvas Belt: N/A Hand Plates Type: Rogue One -Jimmiroquai Electronics: N/A Holster: N/A Build Thread: https://www.whitearmor.net/forum/topic/44463-11b30b4’s-rotk-build/ EIB Approval: https://www.whitearmor.net/forum/topic/45329-tk-20980-requesting-rotk-eib-status-846/ 501st Profile: http://501st.com/members/displaymemberdetails.php?userID=28607 Front- Arms at Side Back- Arms at Side Left- Arms Raised Right- Arms Raised Ab/Kidney Attachment N/A Butt/Kidney N/A Hand Plates Shoulder Bridge Back Shoulder Bridge Front Back/ Chest Connection Thigh Pack Attachment Knee Plate Drop Box Back Cod and Butt Plate Attachment Interior Strapping Kidney Plate Notch N/A Wrist Side of Forearms Helmet- Front Helmet- Left Helmet- Right Helmet- Back Helmet- Hovi Mic Tip Detail Helmet- Lens Color (Backlit) Helmet Trim (Simulated) Blaster- Right Blaster- Left Neck Seal Thermal Detonator- Back Holster Attachment N/A1 point
-
Hockey jerseys... I love them. Have almost 50 of them.1 point
-
I was in a band in '97-"99, (we never recorded anything) and we wanted cool sounding names at the time, I played (and still do, but not in a band anymore) a 7 strings guitar and also sang so v7sg is short for Vocals & 7 Strings Guitar. Nobody else had it so I kinda stuck with it1 point
-
sylverbard. I've been accused of having a silver tongue when it comes to public speaking and selling people things but i've never been accused of just selling people crap or simply being a yes-man or simply saying what someone wants to hear. i'm honest to a fault. I'm a heraldry student and have some formal training from the Scotland College of Heralds. I can wander through heraldic devices for hours looking at how many ways people found to say 'we's better than you yo!' and i carried that into a minor in art history with a focus on Inuit sculpture (arctic Canada specific) and propaganda artwork psychology. As a fan of dungeons and dragons i have always played bards. or smart fighters. a wizard once. a cleric once. i helped write second edition and 3.0 and 3.5 and worked summers for the major players at Gencon and Origins and in January at a convention called Winter Fantasy in Fort Wayne. I also like Shakespeare and wrote a soliloquy to a girl i liked once. it didn't win her over. At the Interactive (costumed) events i coloured my Bard characters hair silver and had green contacts to go with the elven ears (half-aquatic elf bard) and introduced the writers of the Forgotten Realms to 10 000 gamers at midnight in Indianapolis at the opening of the new convention center. there are embarrassing pics online still i am certain. All that said...i'm a Bard. also a druid but that's not involved. When someone sent me a note addressed to 'the sylver tongued bard' i shortened it because it seemed right. All *that* said, i'm horribly shy, learned to read very late, am dyslexic when it comes to simply mathematics, served my country as a long distance shooter and medic, openly admit i have self esteem and depression issues especially the last few years...but i can hide all that behind the Sylverbard. And i'm going back to school at 46 to become a full Nurse. Sorry to be verbose. And boring. 2020 update: jebus this thread has grown. No, didn't make it in the RN program... life turned upsideways , PTSD reactions to direct patient interventions sort of cut my clinicals off, so I will end up with a 4 year Arts -Interdisciplinary degree, and hopefully start a Masters of Aging Studies soon, with a goal of fixing how we (the people) prepare ourselves for the third act (growing old), plan our future care with regards to sudden unplanned need (dementia, accident, stroke) with no family or friends to give 100% answers, and desired level of continuing care, when we might not be able to speak for ourselves any longer. Also, fix the way government looks at "retirement", move consensus away from treating growing old as a commodity and stop licensing profit-shops to take care of us.1 point
-
It was the nickname my (now ex) girlfriend created in the dark times before Internet, when we were on BBS. Boy that was long ago ... She wanted to mix spicy and spy-see (long story but she kind of stalked me at the time) and she ended up with that. I took it from her and I used it for 20 years ...1 point
-
I got the nickname 'Quad' because back in high school a dear close friend of mine called me her "dragol Mew. I know I spelt that wrong. but its means 'my love' my buddys at the time gave me flack for it and instead of dragul (with her accent they said couldn't hear the L and herd "quadaon") So from there they shortened it to Quad.. (had to edit it my post, spelt to many things wrong) LoL1 point
-
I work for Peel Regional Police.1 point
-
While I was doing my build, Derek (Dday) made a comment and said I was as "blonde as Luke." (I even forget the exact context now, but it was about reshaping one bit or other of the armor to make it fit better.) So, I changed my screenname because it summed up everything I was working on and all those back and forth conversations with everyone always made me laugh and helped so much.1 point
-
Great thread btw- I was in bands most all the way through high school and my fav band then and still now (and mostly my influence to music) was the Beatles. But of course to be different - I merged their worldly sounds with the grunge era and mimicked Nirvana. A lot lol. Most people don't know that before Nirvana was Nirvana - they were PencapChew. Even have a rare song titled it. So virtually anything I do online is hat or some derivation. 510 is my birthday (may 10)1 point
-
Kudos for your job, people like you gave me an extra year with my dad! Really simple for me. Last 4 letters of my last name. Have that nickname since the age of 5-6 years old (I'm 36 at the present). I still remember my friends brainstorming on wanting to give me a nickname. That nickname became more a name for me, except my close family members it's Tolo. I used to signed Tolo on exams at school and get my grades. I was part of the pro wrestling scene at a certain point in my life and my name there was Tolo. I even have it tattooed on my right arm! Sent from my iPhone 6 using Tapatalk1 point
-
DymnDog: Its pronounced "Diamond Dog" because I have been a long time David Bowie fan (based on his Album/Song of the same name) and that was going to be a personalized license plate, but I never got round to it. I've used DymnDog on online forums going back to the 1990's BBS systems and my Xbox Gamertag. I like it, but people often mispronounce it "Dim-Dog?" SMH1 point
-
When I was young I wrote my name with a "S" in front of it for some odd reason (STomas). When I was about 12, I decided the reason for it was be cos I was trying to write "Sir". Around that time I was also being called Tomasu of few friends. So the first time I want on a LAN I put the two together and have been using it since then1 point
-
Well, here we are. Sly, is a nick name my buddy's gave me back in my Clubbing days. I was lucky enough to have some pretty Hot girlfriends and for some reason I had no problem picking up good looking girls. It started off they would say, Look at this sly dog, how does he do it, in the end they just called me Sly. Forgot to mention, 11 is my lucky number, also was born on the 11th. Will eventually just change my forum name to Sly. I can also do a fairly reasonable Sylvester Stallone impersonation. Yo Adrien1 point
-
Cool thread! Tusken for me was my first 501 costume, RTT is the designation for Radiologic Technologist-Therapy, my job (radiation therapist). Zapping cancer patients with radiation.1 point