
Leaderboard


Popular Content
Showing content with the highest reputation on 06/20/2020 in all areas
-
3 points
-
Wanted to share with you all my Millennium Falcon model (don’t tell Vader). Finished it a couple years ago and I maybe obsessed a little too much on getting every detail from the original 5ft ANH filming model. If my house was on fire (knock on wood) this would probably be the first thing I try and rescue lol.2 points
-
That's outstanding! Might be worth a small fortune to LFL or Disney if you're interested, just a thought.2 points
-
So I’m watching Disney Gallery episode 8, and they start talking about the 501st. It brought a tear to my eye. I’m jealous and hate anyone that got to be involved. Nice work, troopers!2 points
-
This will.be a day long remembered.... My BBB day was today! 2 days earlier than expected!!!2 points
-
After a day of convincing myself that I CAN continue to do this, I tackled getting the left thigh to fit me width-wise: shim time. I started by cutting back the backs of the thigh so that there was no overlap. Before, as you can see in some previous fitting photos, there is an overlap at the bottom but not at the top. This would make it hard to make a shim run the full length of the thigh. I was reluctant to cut the backs, but the photo is misleading- here I am not bending the thigh all the way around my leg. When I press the thigh in so it fits more snuggly (still comfortably) there was SIGNIFICANT overlap at the bottom, not captured by the photo (where in the photo, I wasn't pressing on the plastic around my leg all the way). A lot had to be cut back. Before: After: With the backs sufficiently trimmed back, I took measurements between the two halves at the top and bottom of my leg (indicated by the red lines on the picture above). I used this to draft a trapezoidal shim on the thick square of spare ABS plastic that comes with the WTF kit, whose slant height (math anyone?) was equal to the height of the leg from just above the bottom ridge to a little over the top ( I wanted some spare room to later be able to cut or dremel down and shape the top to look more accurate). I even used the score and snap method succesfully for the first time! I really wanted straight lines here because it mattered to get the measurement right, and I did it! Yay! Once the shim was cut, I used some tape just to get a rough idea of how it was going to fit- feels good! Then I started by gluing one half of the shim with an inner cover strip. The gap will later be filled with ABS paste and sanded down to blend the shim to the rest of the thigh. I will glue the other half tomorrow (which may require a bit more force to move the pieces around) and let dry. A small day for progress, but like I say, if I keep moving forward, I'm still making progress to begin with.2 points
-
Thanks for the welcoming words everyone. I realized I tend to not actually post (sticking to reactions/likes to indicate I've seen yours). So I apologize for that preemptively. Possibly because I feel I have little of value to add yet. I do and will mainly try to find answers where questions have already been posed. But I'll also attempt to be somewhat active in posting when the need arises. Side note: I can definitely get lost, in the best possible way, in ukswrath's content. Awe-inspiring builds that I've seen so far.2 points
-
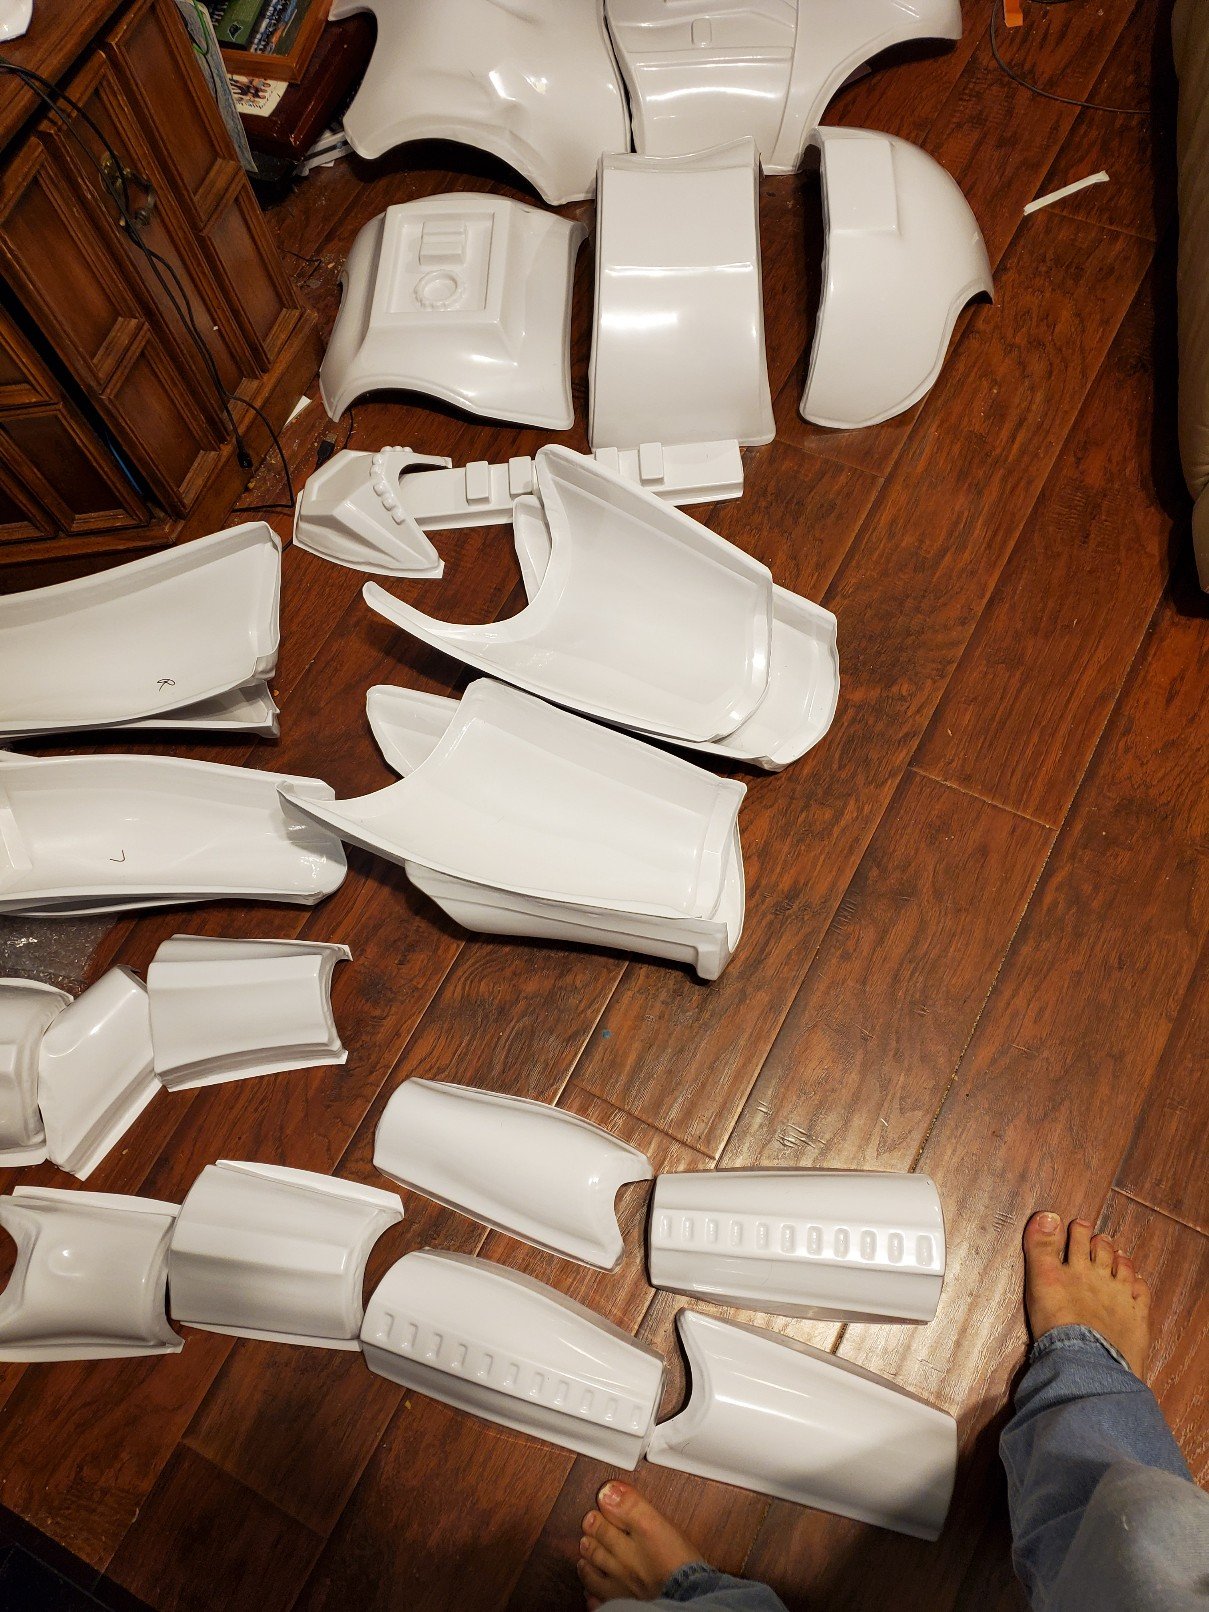
Heeey troopers! It's me again, with yet another build. I've had to fast track this one, so it's taking priority over progress on my 3D printed Shoretrooper (that build is going on over at the Pathfinder's Detachment). I finally have enough pieces printed/welded together that I can share some activity now. I'll begin by saying that this is a build for my 10-year-old son, Cameron. A few years ago, I built a Battle Buddy FOTK conversion for him, and he loved it more than anything. He would have slept in it if I allowed it. He was treated like a rock star everywhere he went in it, and he completely embraced the bada$$ FOTK trooper we all know and love from the movies. He was approved in it for Galactic Academy, and has trooped with me many times- always stealing the show! Earlier this year I was approached by our GML who requested some guidance from me about the FOTK Battle Buddy conversion process. The Garrison was looking to build a kid-sized FOTK for a 5-year-old boy named Jimmy (he has chronic heart conditions) whose only wish was to have a stormtrooper helmet. (Most people don't even consider that something like an entire suit of FOTK armor exists in a child's size, so the best Jimmy could hope for was a FOTK helmet.) However, we ALL know that it's possible! Since I am one of just a few troopers in our Garrison who have taken the journey of the FOTK Battle Buddy build, there was hope that I could help with putting one together for Jimmy. I told my son about Jimmy and his conditions and that I *might* be making another one. My son started to cry, and when I asked him why, he said, "I want Jimmy to have my stormtrooper armor. He's had a hard life, and I want him to feel happy." I was very moved by his reaction, but told him to think about it first. I didn't want Cameron to give his armor away simply because he thought it was something that I wanted him to do. He was very attached to his armor, and I didn't understand how he suddenly could offer it up like that. He said he would think about it, and we didn't discuss it any further. A week later, Cameron brought $60 of his saved allowance (which was pretty much all he had), dumped it on our kitchen counter, and said, "I want to donate this to the American Heart Association." What??? It was such an "out-of-the-blue" gesture for him, and it took me by surprise. Then I remembered Jimmy. So I asked Cameron, "So, is this about Jimmy? The armor?" And he yelled at me, "Yes! I want to help Jimmy! I want to give my armor to him. I haven't changed my mind!" Okay then. He wanted to keep the helmet, though. And that's what happened. Somehow I was chosen to be the person who was the "voice" for the surprises during the Bert's Big Adventure presentation . (Watch out- nerd with a mic!) The Georgia Garrison presented Jimmy with a Battle Buddy first. Jimmy was soooo excited about it! I don't think that the family knew that there was moooooore! After that, Lord Vader presented Jimmy with a FOTK helmet (a lovely Rubies Deluxe conversion crafted by our own Sith Lord, Scott Britt). Jimmy was thrilled! Then came the biggie... the Garrison donated a small case on wheels to hold the armor (just like the one I used for Cameron's armor), and the case was wheeled out in front of Jimmy and his family. I don't think they understood what was being presented until I started pulling out the chest and back plates and said, it's his VERY OWN ARMOR. Jimmy cheered, and the parents started to cry. Cameron suddenly became shy and stood off to the side, a little overwhelmed at all the people and the excitement. Could a mom be any prouder? I think not! And if you're still here... As a gesture of thanks to Cameron, I'm rewarding him with a new set of 3D printed FOTK armor. This set will be more screen accurate than the Battle Buddy for sure. I'm trying to build to 501st specs along the way. I don't know a thing about the FOTK armor, so I'm learning as I go. I bought my files here, and the person who made the files has been very, very, very receptive when I've requested changes to the files for improved accuracy and/or model print improvements. Seriously, if I ask for a change, I usually get a new file within an hour. I don't think he ever sleeps. Most change requests were for improved thickness of the parts. Everything prints out really solid. Here are most of the parts I've printed/assembled so far. Using Armorsmith, I've been able to scale everything down to fit Cameron nicely. Still have lots of sanding and gluing of greeblies before priming these parts. The white stuff on the seams is Apoxie Paste, and it sands like buttah. The shins are two halves (another request I made), and they are attached with heavy white elastic on the outside. I'll be securing them closed on the insides with some elastic and velcro. I love the shape of the FOTK back. Another change that was made per my request was that the yoke and back be formed in one piece. It is incredibly solid and very strong, yet has some flex to it as well (yay for ABS printing!). Cameron loves sliding this piece on. He keeps saying that it's like a Halo backpack. And today was the first day of priming parts! The weather was nice enough today to get a few light coats of filler primer on the biceps. One thing I love about filler primer is how it shows you what you need to work on. Like more fine sanding on those printed buckles. A small step on a much longer journey, but I'm excited about the trip!1 point
-
Hello, fellow troopers! I’m thrilled to be here. My hands still hurt from holding the Lexan scissors too tight and cutting through 2mm acrylic-capped ABS. Do you feel my pain? Ha ha! Anyway, I can’t wait to get out there and troop! If Only You Knew: Well, I thought I needed to buy everything under the sun to make this kit, and after buying way too much stuff, I realized, man, I only need glue, my dremel, some sandpaper, blue tape, and some magnets. A few clamps, too. But I just had way too much stuff lying around that I never, ever used. In that case, I made the job seem harder than it was because I thought I needed all this “stuff.” Top 5 things I learned: 1) Take your time. Accomplish only one “big” thing each day. Today I’m working on the right shin. That’s it. If you go too fast, you will screw up! 2) Don’t start without mentors. Make sure you have some guidance from experienced troopers and send them pictures as you build. 3) Listen to your mentors. If you ignore them, you will make mistakes! Stubbornness does not equal screen-accuracy! 4) Your family may not be as excited about you getting your thigh piece to fit as you are. Don’t be disappointed. Once they see you fully suited up, your appearance will blow them away. 5) When using the dremel and sanding roller, hold the piece tightly against your chest and use smooth, light strokes. Ignore the dog licking your leg no matter what. Oops!: My kit was a little big on me, and after fitting it, the entire torso was sitting too low and the thighs had no room to move. I had to redo my shoulder straps (tighten them up), and cut the neckline on the chest plate to give myself more room, and then take a full inch off the backs of my thighs to get them to fit properly. It was a pretty big challenge, especially when I thought I was nearing completion. Time to "embrace the suck" and take a risk! And so I did... Warnings I received were mostly about being too OCD versus screen-accuracy. Sometimes the screen-accurate way looked ugly to me, but in most cases I got over that and learned to love the asymmetric and wonky nature of these kits. A funny thing happened on my way to the Death Star: I decided to become a stormtrooper after teaching a Star Wars class at the University of Central Florida: https://news.cah.ucf.edu/news/star-wars-telep/ https://www.fox35orlando.com/video/637681 I invited the Makaze Squad to visit my classroom and talk about the 501 and about trooping in Central Florida. After hearing the fun and inspirational stories, I couldn’t help but want to be a part of this great community. That was last October, so it’s been an eventful eight months to say the least. My armor did take a long time to reach me (ABS plastic shortage when I ordered) so I was taking pictures of myself looking like a James Bond henchman from a 60s movie, LOL. I kept telling my friends, my armor will come soon! This is the best I can do for now: Shout Outs: I received great tips and advice from my armor builder, Troopermaster, who treated me like a good friend and answered all my questions as though he was standing by his phone, waiting for me to ask. This was a GREAT first experience with an armor builder, and that made it even more memorable. I also received incredible help from Gary Collins, Sr, his son Gary, Derek Zink, and Daniel Branton. All of these generous troops spent a lot of time answering my questions, sending me pictures and videos, and trying to put me at ease as things didn’t come together as I’d planned. Of course my family put up with me and with stormtrooper parts lying all over my kitchen and formal living room. The place looked like a plastic warehouse and smelled like E6000, ha ha. Finally, I’m really excited to be here, to start trooping, and to put some smiles back on people’s faces during a very challenging time in this world. In that way, I guess we are entertainers and should help make people forget about the cares of the world, at least for a little while. TK-33348, ready for duty!1 point
-
Lifetime Star Wars fan and long time Imperial loyalist. After years of lurking on theRPF, thinking about the 501st, and more recently lurking here; decided to finally pull the trigger on some armor. I had flirted with the idea of pre-built or kits from Anovos, but was never fully convinced. An armor build has always seemed daunting but I put down for an armor/helmet combo from Trooperbay, and I'm excited to finally dip my toes. I've been reading/researching the forums in anticipation (so many well written tutorials/guides/resources) but I'm sure I'll have a million questions on big brown box day. I just thought it was way overdue to come out of the shadows, say hello, and thank all the amazing work that's been put in to the community.1 point
-
What a pain in the backside, paints are a funny thing and I've not had a lot of luck with Rustoleum or enamel based paints, they do seem a lot thicker than auto acrylic paints and being thicker are a bit hard to separate especially on tape. But you are hanging in there and I commend you for not giving up. Good luck moving forward.1 point
-
Just wanted to pop in and say that ordering from Imperial Boots was a fantastic experience. And production and shipping were lightning quick! Ordered on 7 June (Sunday), and received my boots yesterday, 19 June (Friday). Not even 2 full weeks.1 point
-
1 point
-
... Ready to fly... Awesome!!!!1 point
-
Beautiful work! What kit is that?1 point
-
1 point
-
Thanks @gmrhodes13. PlastiDip did NOT work for me. It came up while peeling the tape, I even tried using an X-acto knife to cut the seams, but it was difficult and time-consuming to cut through. My buddy recommended peeling the tape off immediately after spraying, which could have helped, but would require retaping several times. I decided to just pull all the tape off. It stayed on most of the areas I sprayed, but the edges were disgusting. I gave in and just peeled it all off, which was really easy and helps me decide that PlastiDip wasn't the right choice. This setback helped me decide a few things: - I ordered a Rustoleum satin black for the brow and neck trim - I ordered a Rustoleum satin granite, since the primer color is definitely not right, and I realized the smoke gray I already bought is gloss. - I'm going the sand the whole thing down to 220 and start again with white. The clear just isn't glossy enough. - I'm going to pull off all the tape and spray the whole thing to cut down on missed spots due to taping.1 point
-
Here´s some reference for you1 point
-
As per CRL dome head is allowed at highest level. Clips shall be attached with slotted type, flat or dome top style screws, and be black (two per clip). Here´s some reference.1 point
-
Thank you @TheSwede only those little screws that we are uncertain about, everything else we hope is going well so far. These are all the snaps/straps that I'm replacing on my armour, a heap!1 point
-
Thanks. You just need some figures and a camera. That´s the other one I took from the Biker. Of course I am. Let us see, how it looks1 point
-
Congrats, Jason! When you begin, just remember to save ALL the scraps, as these can be used for interior cover strips on the biceps, forearms, thighs and calves. Do you have your under suit yet? To add to the differences between Stunt and Hero- Each ear only has 2 screws, one above the ear bar and one at the base. For Level 2 (and above) the ear bar can only have 3 bumps, not 4 like a Stunt bucket. Also, the interior of the Hovi tips on the Stunt helmet are completely white. On the Hero version, only the raised portions in the back are white and the sides are black. Hero Stunt Looking forward to watching your build! Don't forget- I'm only 30 minutes away, and I can help you get your entire kit trimmed and most of it fitted in a few hours.1 point
-
When you look at reference photos in the Gallery section you'll see that there are wildly inconsistent cuts on the cover strip corners. Some are angled around 45 degrees, others near 60, and some are rounded. There wasn't a set depth of the cuts either, so this will really just be a personal preference decision for you.1 point
-
Now that I know the biceps and forearms are good, I'll cut and sand the coverstrips for them. But first, I must give the forearms a hot water bath. As mentioned before, I will practice with some scrap pieces first to get a feel for the method.1 point
-
Amazing job trooper! I wish I had a professor like you when i was in school.1 point
-
Welcome to the FISD. Be sure to start a build thread the post some pictures. We are all here to help you along the way, be it Basic, EIB or Centurion. I have a Basic build now so I could troop, but I'm working on upgrading to EIB. Good luck to you and we are waiting to help!1 point
-
I was literally about to post that the panic of "I never even built model cars as a kid" just set in...1 point
-
Were there's a will there's a way. Keep up the good work Fred1 point
-
Really the answer will be from your GML (garrison membership liaison) in regards to acceptable gaps, some like little to no gaps. ATA ears are not as defined as most with the trim lines, having 2 pairs is great. To me the gap from top of ear to brow is a little wide, the angle of the ears seem to far forward also. Some really helpful ear tutorials:1 point
-
1 point
-
Yeah I’ve heard of scaling when you print, and that’s what I figured was the case. Since I don’t have a means to print yet that’s why I haven’t done much. Thanks for the link though. This could help!1 point
-
Looking forward to the progress, here are a couple of other thread you may find helpful1 point
-
Crossing fingers for you1 point
-
Can anyone guess what I'm working on today? If you guessed a BELT, you're right! I'm using Tony's outstanding FOTK belt assembly tutorial for this. Cameron's belt is smaller overall, at just 1.5" wide instead of the typical 2" width. And it's currently looking something like this when sandwiched together. Mmmm... FOTK belt sandwich... I sewed the webbing around the female part of the quick-release buckle. Then I realized that I needed to drill a hole into the ab for a snap. My first hole on this... I've made many, many holes in armor, and for some reason, this time seemed to terrify me. Ah well, progress won't happen until holes are made. And thus, the hole was made. And a snap was set into the armor! I set the corresponding snap into the webbing of the belt as well. It fits! That's all I had time for today. Will be painting belt boxes this weekend!1 point
-
This is awesome, wish I had this talent1 point
-
It's good work - thanks for sharing1 point
-
Wow, these are excellent photos!1 point
-
Your services are always appreciated Rudi [emoji120] I'm sure the tab is still very high from all the clone trooper consultations so a waiver on this one is great[emoji23] Sent from my SM-G950F using Tapatalk1 point
-
Small update for the night, got the shin elastics glued in, so I think they are done completely now. I plasti-dipped the back of the helmet with black, I didn't like how see through the plastic was so it should be a bit better now. I did 3 layers, if I need more I can still do more. For those that haven't done it before, here's what I did. Step 0, Wash the helmet out so the plasti-dip can stick Step 1, cover all the holes so nothing gets on the front Step 2, cover the outside, plastic grocery bags might work, make sure to put tape on all the holes. Step 3, follow the instructions on the can, do a fairly light first coat, then a decent thicker 2nd coat. The next pictures are after 2 coats. Wet Dry Step 4, do a 3rd coat, and let dry. You will want to either remove the tape while it is still slightly wet (within an hour or so I'd say), or make sure to score the painted edges of the tape so when you peel it off it doesn't pull the plasti-dip off. My can said to wait 4 hours for the paint to dry. I got a little on the outside , but it will be under the dome, and under an ear, so I'm not worried about it. If you do get an excessive amount of visible black on an outer dome part I would try removing it with a paper towel, or sponge, or even a Popsicle stick. It's made to come off, so it shouldn't be an issue. There ya go, let me know if you have any questions1 point
-
Looking Great Trooper ! You have made a fantastic work with the fixes.1 point
-
Welcome to the FISD. As an owner of a set of first wave Anovos Stormtrooper armor, I would not recommend buying from them. In my opinion the armor is thin, and I'm finding little cracks forming in certain areas of my armor. I've been having to reinforce the spots to halt them from going any further. As mentioned before, there are lots of great build threads out there that will be a valuable resource once you do get a set. Have fun, and good luck on this journey.1 point
-
Good choice for avoiding an0gos... you probably know that 400 page monster at the RPF...1 point
-
Annnnnnd its live on Thingiverse! If you see any changes I need to make or suggestions for new parts I'm open to ideas. https://www.thingiverse.com/thing:44620061 point
-
Welcome to FISD Donzie!!!!Until your BBB day arrives, read all the threads you can ... It will help calm your nerves1 point
-
Wanted to drill out the holes so I had an option to see red light (very small amount), not cannon but cool and can turn on/off as needed. Whoops! Replaced with brass tubing Gutted! Pew Pew button Now with more pew-pew1 point
-
I keep telling myself... marathon, not a sprint. But I'm still trying to make decent time on things, though! Remember how I mentioned earlier that my Bondo-application skills are novice-level? Well, I really found out how bad I am at it when it came time for spot putty. I closely examined everything with a strong light and magnifying glasses. I put spot putty (red areas) where I saw small pinholes or scratches from sanding. The armor looks diseased! I don't mind wet-sanding spot putty, though. It's pretty easy to work with. Wet sanding with a 400 then 800 grit really made the armor silky smooth and eliminated most of the pin holes and scratches. Before and after wet sanding of the chest plate, back plate, and a thigh... Here you can see everything I wet sanded today to silky smoothness. I still need to apply spot putty and wet sand the ab, which is why that part isn't in the pic. But don't you think that the armor looks like it has chicken pox? Overall, I am very happy with my progress (even though my hands are completely shriveled up from hours in the water). I can't find seams or print lines on any of the parts at all! I will apply another coat of filler primer and check for any pinholes I missed from the first round for the next step. I noticed a few tiny areas I want to fill in on the back plate, and I'm sure I'll see others as I proceed. The filler primer really helps to highlight what needs work.1 point
-
Slow progress, but progress nonetheless... I discovered that I actually enjoyed working with the Bondo so much that I slapped it all over the other parts to smooth them out as nicely as I did the chest plate. This took me a few days, and I totally forgot to take pics of the process. Not much really to see on that, though. It's dusty, noisy work sanding it all down. But I am sooooo glad I did! The parts all look seamless now, and the extra weight of the Bondo on the parts gives them strength and a more substantial feel to them. My son is thrilled because it really feels like solid armor. The ab hasn't had any Bondo added to it yet. I wanted to get a coat of filler primer on it so I could better see where I needed to fill in low areas and smooth things out. In normal light, it looks fine, but when the light hits it just right, you can see the horizontal seam in the middle. I couldn't see this at all before I applied the filler primer. Here you can see how the light shows the areas where I need to work. There is no WAY that I'm letting my son go out in armor looking like that! I have to fill in the vertical seam in the middle as well. I glued on the buckle greeblies on the limb parts using E-6000 instead of using CA glue. E-6000 has more flex and I feel it's more resistant to popping apart than CA glue- and these little buckles might get knocked a bit while out walking around. For me, CA glue is just too brittle to hold the buckles, and I don't want to take my chances with it. I Dremeled out the areas where I had extra Bondo in the creases and sprayed everything down with filler primer. I'll be adding spot putty next, followed by a 400 grit wet sand, then another coat of filler primer. It's starting to look like armor now!1 point
-
If you've followed any of my prior build threads, you know how I can get hung up on things looking just right. Even if it's something that no one else will notice. Itty bitty details. This build is no different. <sigh> After priming the chest plate, I noticed that while it looked smooth overall, it still looked veeery slightly lumpy at the seams- especially when the light would hit it just right. The chest plate is such an important piece of this armor that any lumps will really make it look bad (at least to me). So I sanded things down as much as I could without destroying the integrity of the part, but there were still lumps at the seams. Time to bust out the Bondo (and make sure you're wearing a decent respirator when working with it- even outside. The stuff is noxious.)! I'm using Bondo High Bond filler to fill in the low spots and make things smooth all over. The stuff cures and is ready for sanding in a crazy fast 15 minutes! Here is the chest plate after one layer of Bondo and some sanding: There are two colors of blue on there because I had to mix up two batches, and I ended up adding a little more hardener to the second batch. Let's just say that I don't recommend working with this on a warm day. It was 85 degrees outside in the shade where I was working on it, and I ended up having less than 5 minutes work time with the Bondo. I was leisurely smoothing it all on when BAM!- it all hardened up on me in an instant. I thought I would have more work time, but nooooo... gah! As a result, I my application didn't go on as smooth as I'd hoped. Thankfully, it was ready to sand just as quickly, and sanded incredibly easily as well. Once done, I realized that I needed to even things out just a bit more with some more filler. This morning was a much cooler 65 degrees, so I knew I'd have a little more time to smooth the Bondo on just as I wanted it. I was right! With just one small batch, I was able to apply another thin layer of Bondo with plenty of time to spare. I had to wait a little longer for it to be ready for sanding, but that wasn't a big deal. I used 150 grit to knock down the high spots, and 400 to feather the edges in and smooth things all over. It is soooooo smooth now! And yeah, I know I have to do some extra cleanup in the holes and ridges. This is an easy task with a small Dremel bit, and it'll get taken care of next. There are also small pin holes that will get filled with spot putty before the next application of filler primer. And I think it's kind of cool to see the "behind the scenes" of 3D printed parts. You can't tell from the front that this chest plate is comprised of 5 separate prints!1 point
-
More filling and sanding happened this week, and the weather is good today, so that means... Priming!!!! Priming!!! Priming!!! So glad to be at this stage of the build. I like this part very much; all the hard work starts to look like a thing now! I thought I'd share a little shortcut for painting parts. I'm sure some of you already know this tip, but for those who don't, this can help you with spray painting your parts! We all know that some parts are kind of difficult to spray paint. They don't have flat surfaces, or are just oddly shaped. This is a way to get even coverage and eliminate any drips. You'll need some craft foam, hot glue, and coat hanger wires. If you don't have craft foam, styrofoam works nicely, as well as cardboard. You'll want your pieces large/thick enough to put your hanger into. Make sure your coat hanger wire is kind of straightened out. Stress on "kind of" for me because I don't have the patience to straighten out coat hanger wires. Keep the large hook in one end, and put a smaller hook in the other end. Length doesn't matter. Hot glue your foam block right onto the armor. Make sure it's fully cooled before proceeding. Once the hot glue has cooled and your block is secure, put your small hook end firmly into the block. Fishin' for armor! It should look like this when you're ready to move outside to paint. Now hang the larger hook end from a branch, pole, or whatever location where you can spray from all sides. Lucky me, we have a nice tree right outside of our garage with some relatively low branches. The length of the coat hanger puts the part exactly at eye level for me to paint. Before and just a few minutes after, I've got the first coat of primer done. And I love seeing the chest plate finally look like one part instead of a bunch of smaller assembled bits. I have a bunch of these coat wires, but not enough to paint all the armor at once. While these dry, I can easily hang them in my garage. I will leave the foam glued to the armor until I've completely finished the filling/sanding/painting process, so I can quickly hook up my parts again when necessary for paint. Using the foam and coat hanger method to paint parts allows for quick, even, drip-free coats. It also makes for keeping the parts off the ground and clean while they dry. The foam easily can be removed from the armor once everything is all painted. At this stage, I'm also out of filler primer. Boo!!! More will be arriving next Saturday, so the rest of the armor bits will just have to wait for their primer coats. In the meantime, once the primer has cured, I'll be applying spot putty, wet sanding, then applying gloss white. Can't wait!1 point
-
Hi all We will be adding a few new rules to the Ongoing Sales & Project Orders section of our forums. These are not being implemented because of any wrong doing, but rather to bring the sale of armor on our boards in to line with other sales items. These will eliminate any grey area and are general common sense that our armorers have adhered to in the past These will be published in the October News letter and the rules added to the section on the 8th October Rule 10 is only amended 10) Merchandise and or armor must be "in-hand" and ready to ship before accepting payment . Interest threads are allowed to determine selling order. New rules 13) Armor vendors must be on the vetted makers list and only the armorer can list their products. No agents 3rd party or shills. 14) Photos of armor kit or completed build are to be posted in the sales thread along with price and expected time frame for delivery. 15) Only armor relating directly to the Detachment can be advertised in this section, no costumes outside the FISD CRL's This section amended to clean up excess info not required. Please note when paying for any product and/or services: PayPal is always going to be a safe way to send any payment. However, you must understand NEVER to send any payment via the "Gift" option for any product, work or services. PayPal will not cover any transaction under the "Gift" option at all. Always use the "Goods and Services", option when sending payments so, that you have recourse through PayPal if any problems should arise during or after the transaction. NOTE: You have a 90 window with PayPal to file a dispute/claim. Never send cash and/or money orders. These can easily be lost and never the reach the proper person. Plus you have no record for any recourse.1 point


.thumb.jpg.77bd551337f7adc46a4b151e703df6be.jpg)


.thumb.png.69856e02550a2e6d07e44a2b1bda020c.png)


