Leaderboard


Popular Content
Showing content with the highest reputation on 09/06/2020 in all areas
-
Hey Dan, that's awesome, and thorough, thanks very much. I'll make adjustments once the paint has dried and touch base again. My can of Goof Off arrived yesterday, so it will get swift use. Thank you! Sent from my Pixel 4 XL using Tapatalk2 points
-
Man, it's nail biting season...2 points
-
WARNING: The following content may be controversial! DISCLAIMER: These are my opinions from years of experience, pure and simple. Over the years I have noticed many future Troopers doing an OT (Original Trilogy) TK ask about return edges before, during (and after) their build... If this is a subject that you are curious about, grab a cup of coffee or a tall glass of frosty blue milk (this is a long post, lol) and read on.... QUESTION: "What are they, what do they do, and should I leave them, trim them down some or remove them"? ANSWER: Return edges are part of the molding process and provide strength in certain areas on the edges of your armor. They also provide a heftier look to some pieces. To help you decide whether or not to keep them is why I started this thread. Here I will attempt to go into a few details about them. Know in advance that as mentioned I personally am NOT a fan of them in many areas for several reasons (listed below). Some people love them and some may disagree with my opinions... many of you may trooped for years with no problems which is AWESOME, but many folks have had issues and questions. 1. In most areas they are not screen accurate- In looking at the screen caps and film used armor photos below you will notice their scarcity. 2. They can (and in many cases will) get very uncomfortable- Many folks like the "thicker" look it gives their armor, but they can cut into you, especially in the area where your arm bends ("armor bite") and the groin area (chafing). As Troopers we do a lot of walking and arm bending carrying a weapon, so keep this in mind. 3. If aiming for higher levels they can cause fitting issues- Examples: A. If you leave them on your forearm openings and glue on the cover strips, they will need to be completely removed at the wrists for Centurion level, making the opening too wide. This can lead to you having to remove the cover strips, reduce the sides of the forearms and re-attach the strips. Quite a pain in the posterior plate to say the least. *** See EXAMPLE 1 below. B. If they are overly thick on the bottoms of your shoulder bells, they can prevent them from lying snug against the biceps. 4. They can cause splits/cracks- Especially on some armor areas. ABS is designed to flex, and in some cases a small amount of return edge is fine, but too much can cause stress on those areas. *** See EXAMPLE 2 below Over time that stress will take it's toll somewhere, and that is usually the return edge. Anovos armor is especially prone to this on the sides of the chest/back plates and neck openings. I suggest shimming these on the rear with ABS strips and E-6000 to prevent it. Let's start with the chest plate: Note how the ones below (including the back plate) have either no or minimal edges with no cracks or splits. Now here is a screen used one with a pretty prominent edge, Notice the stress crack. Now, onto the ab/kidney/back plate: To keep them in line and prevent them from overlapping, it is suggested that you LEAVE a fair amount of the edges on the top/bottoms of the kidney and bottom of the back plate, especially if using the "classic" strapping method. Yes, these can split/crack as well but not normally. Shoulder Bells Trimming off the entire edge on the bottoms is not only screen accurate (first two photos), it allows them to rest close to the bicep (bottom photo). Third photo shows "suggested" trim lines (red) of an untrimmed bicep. My recommendation is the blue line. Biceps/forearms For sheer comfort and a sleeker look, I recommend removing ALL of the top and bottom edges before fitting/gluing them. First, no one sees the tops (covered by the shoulder bell) and the bottoms can cut into your arms (armor bite). Suggested cut lines in red. Again, if you do get armor bite you will have to take them both completely apart, remove the edge and re-fit. Better to think ahead. Some (myself included) like to leave a bit of the return edge on the outside of the top of the forearm for a thicker look. However, I highly suggest removing all from the inside part (the "scoop") where your arm bends. Again, an armor bite issue. This should also be done BEFORE final fitting. Here are some screen used examples: For level 3 (Centurion) all of the return edge on the wrist opening must be removed, including the area inside the "hump" as seen below: Posterior (butt) plate: Again, it is suggested that you leave some of the return edge on the top (and bottom in most cases) to keep it from riding under/over the kidney. Now, the BOTTOM of the posterior plate is where we often find splitting issues. Should you leave some return edge? Sure! BUT(T), when trimming the corners, (see below) be SURE not to give it a sharp angle... this is where the trouble usually starts. Instead, give it a slightly rounded angle (as shown in green). Thigh tops The tops of the thighs are where we see a lot of questions. I recommend removing all the return edges from the entire upper parts, and here is why: As mentioned above, you will be doing a lot of walking. If you have the edges (or at least a large portion of them) intact, the friction and inside facing angles can really chafe the heck out of you, especially on the inside of the groin area. (Ouch). If there are sharp edges/points on the tops (below) these will poke into you. When trimming these, just follow the existing line. Also, if you do your final fitting, glue everything together and find this out afterward, you will have to take the entire thing apart, remove the return edges, trim down the sides and then re-build/glue them back together. The reason is that afterward the opening will be entirely too large and you will have a giant gap all the way around. Not a good look. Easier to do it beforehand, trust me. As seen below, there were no return edges (or at least minimal ones) used in the films. Sniper knee plate The bottom of this piece is an area often not trimmed enough. To allow it to sit flat (or very close to flat) against the top of the calf enough for the glue to adhere properly I suggest removing most if not all of the bottom edge. Note how in the first and third photos how the sniper knee is parallel to the front of the calf. Last up, a photo that best illustrates my point about return edges and how they were not really present in many places on ANH armor. *** Example 1. of what happens when you have to reduce the return edge(s) after attaching cover strips. NOTE: For the example below I am using an ATA bicep (first 3 photos). Be aware that ATA makes the "suggested" cut line on their return edges pretty slim (a GREAT thing in my opinion). As seen on the armor in the 4th photo, if followed, the "suggested" cut line makes the return edges much wider (red line). Top view Bottom view For the purposes of this tutorial, we will assume that the ATA has those wider suggested return edges. Okay, let's say you really like the thicker look the return edges give your armor, so you left them pretty wide during fitting and then glued on the cover strips. Enough to get your arm through with a little extra room. Should be good to go, correct? BUT, you find that after having your arm bent for a while they cut into you (armor bite), so you find you have to reduce or remove most or all of it. No biggie, right? Just break out the Lexan scissors or Dremel and cut away, leaving the cover strips attached. Easy! So you remove it and then you run into the fact that the opening is now enormous. This is not a good look, and can result in the piece(s) jangling around and not being approvable at higher levels (or even Basic depending on your GML). What I am getting at with the above info. is that if you decide to remove them, it's better to do it before final fitting/gluing. Side note: Many biceps have an unusual shape at the tops (in red, below) normally located on the inside. This can be completely removed. Doing this will not affect approval at any level, and is screen accurate. It sits under the shoulder bell so no one sees it anyway! Screen used bicep USELESS TRIVIA: Many have asked about the "thumbprint" that many armorers have on the left bicep (screen used example below). Some think it is so you can tell them apart, but I was speaking with Brian Muir a few years ago (he sculpted the original armor used in ANH) and asked him about it: "To be honest, I have no idea... it was not in my original sculpt, and must have been a mistake in casting". There you have it. *** EXAMPLE 2: What causes cracks/splits: ABS bends pretty well, just as it's designed to. BUT, when there are return edges involved that changes the game. For the below example I used a 2 inch wide strip of ABS with a 1/2 inch "return edge". Looks pretty solid, right? That's because the edge provides stability. Now I am bending it up/in to simulate use over time. (More than it normally gets bent in many cases, but only to prove a point). That stress has got to go somewhere, and it's the return edge that takes it all and gives way, again causing cracks/splits. The red arrow shows a weak area where the stress in concentrated and cracks can form. Even if trimmed off afterward that area will be prone to splitting, so a small shim behind it is suggested. To sum it up, return edges are not meant to bend a lot. I suggest inspecting your armor occasionally to spot any existing/potential cracks/splits so that you can catch them before they get worse. I hope this helps answer any basic questions you may have, and always feel free to ask more detailed ones here or offer differing opinions.1 point
-
This is a mini tutorial about the use of Neodymium ("rare earth") magnets. As you may have read here in different build threads, these little devils are invaluable when constructing a set of TK armor. BUT.. there are a few things to consider before purchasing and then using them... For purposes of this tutorial, I will be referring to magnets that are 7/8 inches (23mm) in diameter and 1/8 inch (4mm) thick, (as seen below) with a strength of N40. First, know that these things are STRONG! (Imagine a regular magnet the same size, but 10 times more powerful). This is a good thing for our purposes, but you should know a few quick facts first: 1. I mentioned that these are strong already, but know that the strength is such that they can (and will) jump up to 8 inches to reconnect with each other or another metal object. If your finger is between the magnets and this happens, it can cause injury, from bruising to serious cuts. They also can (and will) shatter if allowed to connect from a distance, and flying chips can cause eye injuries. In a word, be careful. I highly suggest wearing eye protection. That is up to you, but please read this post from Glen located below. 2. Due to the strong magnetic field, those with pacemakers or the like should take extra caution when handling these. 3. Whatever you do, keep these away from children. Now that I've scared you a bit, on with the show! When considering what size to buy for your build, I cannot recommend the 7/8 x 1/8 size enough. The reason being is that you will only need one on each side of the connection you are gluing, and they have a large surface area. Anything smaller (or thinner) and you run the risk of having to "double up" (stack) them to get the proper adhesion, and the thinner ones shatter more easily. When you receive them, they will have little plastic separators between each one. To get them apart, the easiest (and safest) way is to slide them. As you separate them, again, be sure to keep them as far apart as possible to prevent shattering or injury. (Save the plastic inserts). After separating them, I strongly recommend doing one of 2 things... 1. Wrapping each one in masking or painter's tape, (this will prevent them from scratching your armor) or 2. Making mini "sachets" for each one. The tape method is quick and easy, but the sachets are really handy if you have the time. To make them: Cut 4" (10cm) squares from a piece of fairly thick cloth, (not t-shirt type material) for as many magnets as you have. Place one magnet in each one**, and secure it with a zip-tie. (I used a rubber band for the photo, which will not work in real life). This gives you a "handle". NOTES: **Be SURE that you do half facing one direction out and half facing the other (north/south poles). Otherwise they won't adhere. Using a sachet will not prevent them from shattering. Cricket added a great example photo and tips in a post below. After you have applied the E-6000** to the seam you are gluing, place one magnet on the top of the cover strip, and carefully add one to the opposite side (inside). To keep the cover strip tight to the join along the entire length, I suggest placing magnets every 3-4 inches apart. If you see any areas where the cover strips are not flush with the armor, add more magnets. For the ends, you can use clamps as seen above. Be sure they have rubber or plastic on the ends, though. After the E-6000 has cured (usually 12-24 hours) it's time to remove the magnets! IMPORTANT! I have found the best way to remove them is this: First, remove the clamps. Then, using one hand, grasp the magnet on the top closest to the end. Using the other hand, SLIDE the one on the inside out, keeping them well apart. Stack them using the plastic separators they came with. Now, it's time to look at that perfect seam and think "Hey, I'm one step closer to approval"! NOTES: ** As the vast majority of TKs will tell you, E-6000 is really the best adhesive out there for armor. Unless you are an experienced builder, if you choose to use CA (super) glue, know that if it drips, you run the risk of it running onto your armor or causing the magnets/sachets to adhere to your seam. You have been warned. 1. There is no such thing as having "too many magnets". I know they are not cheap, but the more you have the more pieces you can glue at one time. I recommend having no less than 12. 2. There are many sources to purchase this size magnet, and the prices can run up to $3.00 each. But, you can find them on eBay most of the time for a lot less. This seller for instance offers them for $9.99 for six, which includes postage. https://www.ebay.com/itm/6pcs-Super-Strong-Neodymium-Rare-earth-Magnet-Disc-for-sale-7-8-dia-x-1-8-thick/281060567507?ssPageName=STRK%3AMEBIDX%3AIT&_trksid=p2057872.m2749.l2649 Another good source is here: https://totalelement.com/products/3-4-x-1-8-inch-neodymium-rare-earth-disc-magnets-n52-8-pack Tim (PICTreed) found a great site that is a fantastic magnet source here: https://appliedmagnets.com/neodymium-disc-magnets-1-in-x-1-8-in-w-countersunk-hole-p-601.html 3. When you have completed your build, please consider "paying it forward" to someone in your Garrison/Squad who is starting their build by selling them your magnets at a reduced price. "Troopers helping Troopers"!1 point
-
After being asked a gazillion times about how I built my magnetic shin closures, I've finally compiled everything from my TK build and put it all in one post! Let me begin by stating that I followed the tutorial here for the most part when building these magnetic shins. However, I deviated from it in order to make the closures super strong by using a magnet-to-magnet closure rather than the magnet-to-steel method outlined in the tutorial. I have worn the magnetic shins I made for my RS Props TK out on over a dozen troops, and I have never had them come apart on me. I've only had to reglue magnets twice on these shins over a two-year period: a single magnet came off after being handled a lot (opened and closed dozens and dozens of times at an armor party by those who were trying to figure out how they work), and regluing a single magnet after trooping underwater for a few hours (well, not exactly underwater, but it was a parade where it rained for HOURS and I had to walk in the rain the entire time- for hours I tell you! My boots took days to dry out!). The small amount of maintenance I've had to do on these over 2 years of trooping is quite minimal. Once you get this mod on your kit, I swear you'll never go back to anything less than a magnetic closure on your shins. STEP 1: There are many steps necessary to build magnetic shins, so I begin with making a critical component for them: ABS buttons. The buttons are necessary to hold one half of the magnet assembly in place on the inside of the shin. I'm using 12mm x 3mm n50 magnets. You'll need a total of 20 magnets for the shins (10 on each shin). I strongly suggest buying more than 20, though. I've found that they can easily break, and you'll want backups on hand! You can find them in bulk- and cheap!- on eBay. First, I begin by making a template with a hole in it that is slightly larger than the magnets I will be using. I trace the magnet on a sheet of ABS. Here's what it looks like when done. Yeah, I know my hole isn't perfectly round. It's not terribly important for it to be perfect. I used two magnets to make each button. One on top to help me see where my hole template needed to go, and one underneath to form the button shape. Heat up one section of the ABS sheet using a heat gun on LOW until it gets slightly warpy. You can even leave the magnets attached to the ABS while you heat it up. Once the plastic is soft, quickly press it onto a flat surface, pressing the hole template around the exposed magnet. This is what it looks like on the top and underneath when you're done. And here's how it looks from the side so you can see how the magnets attach to the plastic. See how the bottom magnet sits flush in the new ABS button? I spent about forty minutes repeating the process until I ended up with 10 buttons. I will cut down and shape the buttons to fit each shin later. There will be five buttons installed on each shin. Still lots of work to do, but it's a pretty good start! STEP 2: Another step necessary for how I make my magnetic shin closures is to make sure that the backs of the shins meet up as perfectly as possible. This is to avoid any unnecessary strain on the magnets. This was acheived by some gentle shaping via a hot water bath. Before putting the shins in the water, since I don't have any cover strips installed on the outsides, I reinforce the closure with blue tape. The e6000 gets really soft when subjected to boiling water, and I don't want to weaken the join in the front. Blue tape holds up nicely for this application! Here's a before and after of my shins so you can see how the backs line up a bit better. I will be doing some further fine tuning on the lengths at the bottom later as I move along in my fitting. STEP 3: This stage involves making and securing the "holes" part of the closures for the magnets. I begin by cutting out two 3/4" x 12" strips of ABS. You should have this when you're done. Next make a lengthwise mark in the center of each strip to help keep your holes lined up in the middle. Then mark 3/4" in from each end. That will be the center point for the magnets on the end. I like using magnets with holes in the middle for this, so I can easily find the 'crosshairs'. Trace the magnet. I like to use extra magnets underneath to help keep it secure while I trace. Next, find and mark the center of the strip. It should be at the 6" point. From there, measure 2 5/8" from the center mark on either side. Mark and trace your magnets. When you're done, your plastic strips should look something like this: Next, I used my drill press and a step bit to drill out the holes. It went really quickly! When you're done, you should have two strips with holes in them that can easily fit the magnets. The next part is where people tend to get confused, so I took this photo to show what goes where. The "hole" strip will be glued to the inside half of the shin on the inside. It sounds kind of confusing, but it's not all that bad. Remember that the "hole" strip will be hidden! I begin with my left shin. I mark the center of each hole to assist when I line up the edge of the shin. Next, I test fit the strip on the shin to verify placement, clamping on both ends. Then I apply e6000 to the area of the strip that will be in contact with the shin, clamp and add magnets. This is what it looks like when glued together: Here's the right shin after gluing, but before I added the magnets. Here are both shins as the e6000 cures. I'll be allowing a few days for this to cure, which will give me ample time to get my ABS buttons ready for installation. STEP 4: Once the glue had cured on the hole strips inside the shins, I removed the magnets and clamps. With a light behind the shins, you can see how the hole strips are mounted, hidden inside. Using that light as my guide, I traced the approximate location of the holes with a pencil. This helps me to get a good idea of where my holes are going to be drilled. Yep. I'm going to make some Swiss cheese of my shins. Using a small Dremel sanding band, I carefully cut a notch out, just large enough for a magnet to fit through. Here's what it looks like at this stage when the shins are closed. I'm just focusing on drilling out the holes on the inside edge, following the holes of the hole strip that was glued in. I'm not ready to drill the outer half of the shins yet. Next to clean up my buttons that will hold my magnets. I rough trimmed them all to start. Then cleaned up the corners with a Dremel. I don't want anything poking at my legs! *Important!* If you want to make sure your magnets stay stuck on your shins, you must use e6000! CA glue will not keep the magnets stuck to the buttons; they will fail. I have heard this from several troopers when I have been contacted about their magnets not holding up. I repeat, use e6000 for this next step! I applied a liberal amount of e6000 to the inside of each button, then put the magnet inside to get all cozy. Make sure that you've got the polarity of all the magnets in the same orientation before gluing! Wipe away any excess glue from the top. To make sure that the magnets are firmly mounted in the buttons, I use the magnet intended on going on the opposite side of the shin to clamp it. In the pic below, you can see how I've got all the matched magnet buttons and magnets together as they cure. Back to the shins now. I like this ridge (where the pencil is pointing) to line up at the tops. For me, it makes the closure in the back look much cleaner if this is lined up. I tape it off there to make sure that the opposite side doesn't shift while I'm making my marks for completing the holes. I have an OttLite that fits nicely inside the shin to provide a clear light so I can make outlines for where I'm going to drill out the rest of the holes. Holes were already present on the left side in the photo below. I made sure that I drilled out the holes very conservatively as I went. I used an extra magnet to make sure that the hole was just the correct size for it to fit through. Now time to attach the outer cover strip! I use a 25mm cover strip on my shins for this. I taped off the edge of the inside half to keep any glue from transferring over. Then making sure that the cover strip was straight, I clamped the heck out of it. Praying to the TK gods that it doesn't shift!!!! Now time to wait for everything to cure really, really well. I am going to give these 3-4 days to fully cure just to be on the safe side! STEP 5: One shin is complete, with the outer rear 25mm cover strip glued into place. Woo! Here's a look from the inside, before magnets are installed. Be sure to clean up all excess glue from the inside edges in order to have a clean closure when you're done. If there's extra glue in there, it may not close correctly. I've tucked the outside cover strip to the inside so you can see how the magnets on the "cover strip" half are glued on. No magnets yet. I add a dab of e6000 to the magnet (be sure to check the polarization of the magnet before gluing!!!), and set it so that it fits inside the semi circle and on the outer cover strip. Like this: I wiped away the excess glue from the magnets and then positioned the inner "hole strip" over the magnets to ensure everything is lined up correctly as it dries. I tape the tops and bottoms of the shin to ensure it doesn't shift around during this stage. I'm not completely happy with how the inside cover strip is cooperating here. It sits flat on the top and bottom, but it pulls away in the middle a bit off to the right. I will have to heat bend this before installing the magnets onto the "hole strip". :/ Ideally, the inside cover strip should be sitting completely against the outside part of the shin, and it doesn't want to do that right now. This additional stress could cause the magnets to fail. It's annoying, but I'll need to address this before proceeding any further. Gah! Using the magnet buttons I created earlier, I clamp the magnets into place while the glue cures. Once the glue has fully cured, I'll reshape that inner strip to prepare it for the final magnet button installation. STEP 6: Now that the e6000 has had lots and lots of time to cure, it's time to attach the other halves of the magnets. Make sure that the halves are super clean and free of extra dried glue. It will prevent the shins from closing well. You can do this by touch. Rub all of it off where you feel it. Once everything is cleaned off, close the "hole" half over the "magnet" half. Your shin should be closing correctly at this point. The "holes" should lock around the magnets and prevent the shin from opening at all, even without the additional magnets at this point. If the "hole" strip is not fully engaged over the magnets, you won't have a very strong bond between the magnets to keep the shin locked. Easy part next! Apply e6000 around the prepared ABS button. No need to go crazy with the stuff. You don't want it oozing all around in there. And stick it on! This part goes really quickly. For additional strength, I add some extra magnets on top. Check those clean closures! Left shin. Right shin. I will open these up in a few hours just to make sure that there isn't any extra e6000 that has spilled out and might lock those shins closed where I don't want them locked. Now to allow several days to dry, and these shins will be good to go! Here's a short video so you can see them in action. Have you tried this on your own shins? Loved it? Hated it? Made a few mods of your own to improve this method? Comment below and let me know! Cheers- Cricket TK-104011 point
-
I’ve always been a Star Wars fan ever since that summer in 1977 when I saw ANH in the theater with my family. I was nine years old. I can still vaguely remember talking to my younger brother in the back seat of the car after the movie about how neat the “guys in white” were! I was hooked! 43 years later, I’m still fascinated by the Star Wars universe, the great story and the rich imaginations of the creators of the characters, the ships and their interactions. To me, the series universe goes unrivaled in the science fiction world! I’ve always had an interest in development of a quality set of armor (I know COSTUME isn’t the preferred term) and I’m certainly not getting any younger, so why the heck not? Another strong reason why I want to peruse this endeavor is a personal incentive to loose some weight and become become healthier! I’m 52, just under 6 feet tall and around the beginning of March of this year I weighed about 286 lbs. and am of pretty stocky build. About eight weeks ago, I began a physician assisted weight loss program And have lost about 18 pounds so far! I’m proud of my efforts and am sticking to my program faithfully. My blood pressure is down and my diabetic blood sugar numbers are better than they’ve been in a long time. I certainly feel better. I am committed to becoming an Imperial Stormtrooper one day soon, but REFUSE to be a FAT one! I have more respect for the character than that. I suppose I could just be an X-Wing pilot (Porkins, Ha!) until then. But, I’m committed to get to around 200-210 at least, but I’ll never be a screen actor sized 176 lb stormtrooper! I’m a general dentist from Lubbock, TX and have been in practicing for 19 years. Three of those years was on active duty USAF (dental corps) and also deployment in 2003 for the air campaign of Operation Iraqi Freedom. I am proud of my military background and experience with them. I have also been an active radio controlled scale modeler since high school. I build and fly RC Jets and WWII scale planes as my passion for that hobby. With my hand skills and eye for details as both a dentist and long-time modeler, I am very confident in my capabilities in assembling my own armor sets from vacu-formed pulls and fitting parts to my frame. I have already seen many online videos about kit assembly and expected quality for upper level acceptance and approval to 501st and FISD levels. I just need detailed photos and I can “make it look like that.” I am also very interested in 3D printing accessories as well, but am a complete novice at that. Please accept my interest and goals of becoming a proud and active member in time. Looks like I have a lot of work to do! Bryan1 point
-
Good afternoon everyone, new to all of this, but a die hard Star Wars fan and bounty hunter fan since I was a kid. I'm Wayne, been a nurse for 18 going on 19 years, was watching some of the behind the scenes from Mandolorian on Disney+ last night and my mouth about dropped open when they called the 501st and you guys from the So. Cal area stood in as extras... my heart dropped when I found out there's an Inland Empire Squad and right on it I was. Been talking to a few of the guys who actually were in that Mandolorian episode and I'm just giddy like I'm 10 years old again at even just the thought of I could build my own armor and look like I walked off a set and be a part of this kind of thing. SO EXCITED about this. Anyhow, a little bit about me, I grew up in so cal, literally 5 blocks from disneyland, lived here all my life, spent 3 years in the US Army stationed first in an OSUT unit for basic training and AIT at Fort Sill Oklahoma (am a 13B artilleryman by training), then permanent duty at Fort Bliss in El Paso Texas for the remainder of my enlistment. I got out of the Army and wanted to be a police officer, sought my education and graduated in 2000 with my first AS degree in criminal justice. Took the EMT course over that summer and fell in love with the medical field. 2 years later found me in the LVN/LPN program, started working after graduation as a registry nurse in the acute hospitals taking assignments first in a gero-psych unit as a med nurse, then one night got asked if I had any ER experience by the shift sup, got sent to ED to assist the two RN's there. From that point I got pushed into ICU to take 2 patients, med/surg and tele units and of course ER. Did that for four years, then in 2007 we had a shift in nursing to RN only. Went through Cancer with my dad in 2009 which put my RN off a bit, then finally returned to school in 2013 to pursue my RN licensing. In 2017 I graduated the RN program, quickly started my bachelors degree and finished it last year in June, took a year off and am now pursuing my Masters in nursing education which will last a year and a half. I have, since I was a kid, always wanted to be a storm trooper, and even one year a home-made Boba Fett costume had me out trick or treating. This is super cool that this even exists and even more cool that there's a squad right here where I live, which I was totally unaware of. The guys on the Inland Empire said this might be the best for the first run costume to get started. I'm super stoked to get going on this... So giddy right now it's not even funny that I MAY even be just ABLE to do this, let alone it's something that I actually can do... yay!!! -Wayne.1 point
-
Thank you! I think I mistakenly looked at a paint guide for the ANH Hero, instead of Stunt. I'll double-check in future. Sent from my Pixel 4 XL using Tapatalk1 point
-
Welcome Bryan! Lubbock - No way! I grew up in Amarillo! We would’ve practically been neighbors in the middle-of-nowhere Panhandle Texas. Congrats on your progress with your health goals! Keep up the good work on that front! As Mario said, check out the Getting Started thread! We’ll be here along your journey to encourage and help you out, with both your build and your health goals! Caleb Sent from my iPhone using Tapatalk1 point
-
Hi Bryan, great introduction, welcome to FISD. Glad to read you're achieving you health personal goals and soon a dream of become an Imperial Stormtrooper as all of us have done. Browse the forum, ask questions, we are here to help. If you haven't already done, I would recommend you to take a look to the getting started section. There is a lot of information there that I'm sure can be helpful. Cheeks.1 point
-
Welcome to the FISD Bryan!1 point
-
You are "real stormtroopers" Just because you aren't on screen doesn't mean any different in my mind. When some of you guys know more than what the film-makers do, that says something. Ability to walk on set and be ready to go says it all in my mind as far as 'reality'. Difference is film-makers do this on a huge budget to make their stormtroopers, you guys do it all yourselves without that budget of millions. I'd say that's real to me. -Wayne.1 point
-
I heard about 501st at least a few years ago, was something I kept telling myeslf, hey I'd love to do that. Seemed like it was always other places never near me. Never really looked into it to see that there were guys in my area already doing it. This bug bit 40 something years ago sitting in a movie theatre watching EP IV.... long time coming. -Wayne.1 point
-
I was looking at the pictures again and I can see how you would see it because of how much they blend in. Lol Trust me the way to go. But with my TD I also did rivets.. I really wanted to do something else so I always had the option to remove it, but I couldn’t think of any great way to attach it.1 point
-
Oh they must just be above the barrel and blend into your undersuit! I was thinking of doing rivets too! How did you attach the TD?1 point
-
Welcome aboard, Wayne. You’ve come to the the right place. :-) Best wishes Dan1 point
-
Great looking build, Will! One of us should be with you soon.1 point
-
We’re glad to have you with us Wayne1 point
-
Welcome to the FISD, Wayne! Great introduction, by the way! That behind the scenes bit of the Mandalorian was brilliant - it's awesome when the film makers refer to the 501st members as "real" stormtroopers. There are a lot of great sources of info on this site - be it forum posts and other troopers. So take your time to do some research and then ask lots of questions. We are here to help.1 point
-
I got a kink like that, it was smaller but it was easy to remove, if it's on the inside part of the forearm it won't be as noticeable. I'd use a heat gun on low and a sandbag or stuffed animal that you don't care about. Or if you can find something harder that matched that curve, maybe even an orange. Then very very slowly add heat to the part. User gravity to help, have the part horizontal supported by two objects with the round object on top, and just heat a small section at a time. If the heat gun is adjustable put it to 180*, if not keep it on low. Be very very patient, once abs is warped a little it will warp a lot very quickly if you let it. Good luck!1 point
-
I've not seen that before but I haven't seen anyone using twine wrapped around while heating. I'd probably try slightly heating an area with a heat gun and using something hard and curved inside to press that area out, also have something flat on the outside to stop it going too far, moving both these pieces around should gently push it out, then keep going in another area. ABS is really weird when its heated and has a mind of its own, a twitch to far with heat and you've got a molten mess. I just find more control with a heat gun as it's direct in one area not a whole piece. Wishing you luck fixing this.1 point
-
Welcome aboard Wayne, you got some great history there sir. Plenty of support here to make your Stormtrooper dreams come true. You are going to love it here. Sent from my iPhone using Tapatalk1 point
-
Bitten by the costuming bug, sounds familiar1 point
-
There are some great stories here and this won't be ranked among them . : ) A simple tale it is. Not being the tech type I've only ever join 2 forums the UKGarrison and this one! So to the name, my first TK armor kit was meant to be a sandy but the more I looked into it the Clean Tk s seemed to get more opportunities and didn't have the expense of making the back pack! It was cheaper ( and easier ) to add some abb buttons and change the knee! And so I became clean trooper!1 point
-
First one's not even in hand yet and i'm downloading and doing some logistics in regards to the two 3d printers I have, Mickey Bukowski pointed me at the shortrooper 3d print... downloading it all now but taking a break. There's a ton of files for that one, wow... That's gonna be second on my list.... -Wayne.1 point
-
Well... I'll be starting with any luck this next weekend. Procured my first build today. It's shipping from Florida tuesday, with any luck they'll be delivering it by the weekend. Also working with Brian Payne on a few other items, picked up the boots as IB is only open as it would seem twice a year figured pick them up now and not have to be the footless Stormtrooper... he also pointed me to the voice changer with speakers to install in the bucket... so well on my way, just nothing in hand... yet. -Wayne.1 point
-
Hey trooper, Neat work so far - well done. [emoji1303] For the vocoder, I’ll like a thread I put together a while back; https://www.whitearmor.net/forum/topic/48252-anh-tk-vocoder-examples/ As per the thread, the vast majority of ANH stunt stormtroopers has the “fuller” vocoder paint. As such, I’d consider extending your 2nd and 6th bars; Approximate example below: For the frown, recent changes to the CRL ask that frown paint does not leave the teeth area. As such, you might consider bringing the paint back a touch in certain areas. Appropriate example below; Keep up the good work. :-) Dan1 point
-
Lol this is how it all starts [emoji23]1 point
-
Thanks - it's great to be here! Yes, I purchased the brackets (and everything else) in February when the world was relatively normal. However, I already know what my next build will be (HELP ME), so I'll hit you up.1 point
-
Amazing story, thanks for sharing.1 point
-
My TK number is 73705. Used number that would IMO match letters in my last name1 point
-
Welcome to FISD Wayne! It's great to have you aboard.1 point
-
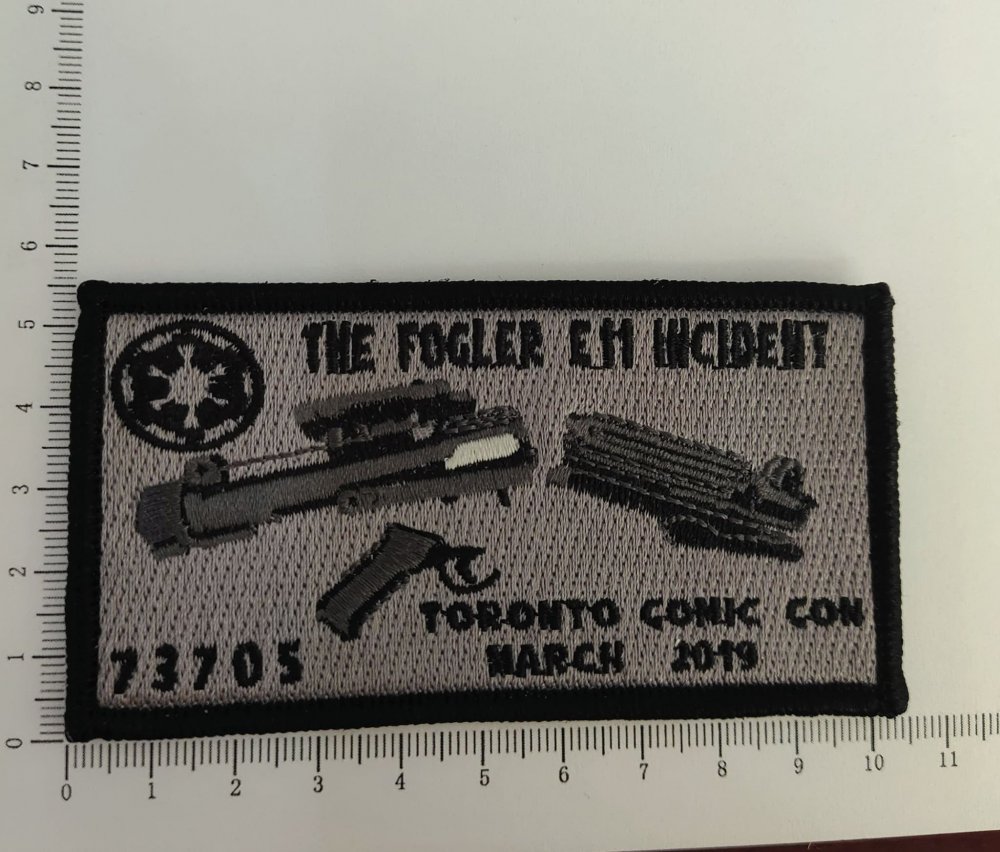
My nickname is Blaster and this how I got it. At Toronto Comic Con 2019 (Fan Expo's March show), Dan Fogler was one of the guest. It was arrange the he would come to our booth so we provided an escort: 2 or 3 Stormtroopers, Vader, couple of Officers and 3 handlers. Upon arriving at our booth he started to do his shtick; jumping onto Jabba's throne, sticking DLT-19 heavy blaster rifle into Jabba's mouth. Then shouting out "force hold" a blaster would be handed to him where he would say "pew-pew" then toss it aside, he did it a couple of times. He then turns to me and "force hold", I hand him my E-11; wasn't going to be the "sore-thumb" and not participate, where he then as he's about to do his "pew-pew" I hear him say not this piece of crap or something along those lines and tosses my blaster aside (my blaster at the time was metal and plastic and a gift) it breaks in 3 places. At that point it went dead silent and he realized what he had done and picks up a piece goes to me and offers to pay for it (yes he made restitution for it). Now he did have a video of the incident on his instagram page but all post there have been taken down for whatever reason. Command staff was able to get me a new E-11 through his making restitution but never again will I or anyone else inour Garrison hand him a prop. So if you read this this is how I got my nickname but also be wary about handing him a prop. On a lighter note I made a patch to commemorate what had happen.
 1 point
 -
Post from 501st legion forum: https://www.501st.com/forum/viewtopic.php?f=11&t=106862&p=1352596#p1352596 Halloo! It has been five years since our last drive for donations to pay for Legion hosting costs. Over the past five years, we have shifted our servers to the AWS (Amazon Web Services) architecture, utilizing Cloudfront CDN, RDS databasing, Route53 DNS, and AWS Firewall security, as well as regular backups and the storage thereof. We adopted a Google GSuite account to provide a more efficient email solution that also allows us to utilize an API to allow for opt-out, expanded our domain registration account with both Amazon and GoDaddy. And not least, we have taken on six detachments (FISD, IOC, MEPD, BHG, SLD and soon-to-be SP) to be hosted under the Legion account. We push an average of 650G of traffic a month between the main site, Databank, the forums, and the hosted detachment sites. Our last drive in 2015 raised funds to cover the Legion's hosting bills for the period of February 2015 through August 2020, and it was a drive for only 501st.com. It is time for us to pass the bucket again - combining the drives for the Legion and six hosted detachments. Our first goal is just to keep the lights on for one year for 501st.com and the six detachments, no contract, paid month to month. Our second goal would allow us to lock in a contract with some price savings for three years, while our third (stretch) goal would allow us to go beyond that as well as explore other services and/or enfolding more detachments (if they choose) under the AWS account. Please make sure you are logged into the forums, and then take a moment to visit the donation page, and make a small contribution to help fund the site: https://www.501st.com/donate/ There you will be able to make a donation and see how we are progressing at meeting the goals for this drive. If anyone has any questions - feel free to post here, or to email us at [email protected]. Thanks You! ~C Rhaethe Legion Webmaster NOTE this is open to members and no members alike, anyone can donate "troopers helping troopers"1 point
-
Hello there, Wayne! Welcome to FISD! You’re on the right track working with Justin; he’s the man! I actually got my strapping kit from him, and he’s been super helpful with my ANH Stunt build. As Mario said, the Getting Started is a great place to begin, and you’ll have all of us here helping you along the way! And of course SoCal is a hotspot for Legion members. Again, welcome! Sent from my iPhone using Tapatalk1 point
-
Just edited your post as your images couldn't be seen. "direct link" works best for posting images Great work, good luck with approval1 point
-
Looks great! Good luck! Are you not bothering with the side plates until EIB? According to the CRL, you're fine without them for level 1, so why not lol. I think your center ammo boxes look a little closely spaced, compared to the others. But again, the CRL doesn't say anything about spacing! How did you attach them? I haven't decided yet... So excited for you!1 point
-
Thanks guys, all of you, I've been already talking it up with one of the local members here Justin Reed, he's putting me on the path of procuring my first build an ANH trooper kit already i'm antsy... waiting to be admitted, hoping they have a kit that will fit me i'm 6' and 205 lbs, so he said that would be my best bet with my height/weight locally, any input you all have is appreciated. I'm so giddy it's not even funny... It's weird 501st has been something i've heard of for years and always thought nothing local it's always "other places" that have a 501st... watching mandolorian behind the scenes last night and "Inland Empire" guys were on that set and I totally had to do a double take and was like whut... you mean to tell me there's a squad HERE??? in my area... been on it all morning and afternoon talking to peeps on the FB page getting set in the right directions... -Wayne.1 point
-
Welcome to FISD Wayne, happy to have you here, browse the Forum, specially the Getting Started Section , ask questions and let us know how we can help.1 point
-
Hello and welcome aboard, good luck with the journey, research is the key1 point
-
Thanks for the exact markings on the pictures. I repainted all the teeth new. I hope it is to your satisfaction. If not, I try it again1 point
-
Welcome to FISD! You won’t find a better place with more friendly and helpful folks than right here! Good luck on your journey!1 point
-
Sent you a PM, @MomoSS.1 point
-
To the future troopers like myself who are building their first kits and to the members trying to get approved, remember that being in the first 1k for EIB is not something to worry about! Rushing to get the job done goes against the spirit of why EIB exists in the first place. It's supposed to award patience and attention to detail. Something that I feel many people (including myself) are forgetting, and rushing our first builds/making changes to our armor just runs the risk of doing something dumb in the name of saving time and cutting corners... sometimes the wrong corners! We may not get in the first 1k, but the real important thing is the experience of building the armor and take the time to really learn it and appreciate it. If you are not within the first 1k EIB but really wanted to get in that bracket, don't be disappointed. Instead, look at the next step. We have what, 500 more centurions to go for 1k? Now that is a bracket everyone reading this thread can strive for. We got so many people pumped with this competition to reach for EIB, why not continue the momentum and make for 1k Centurions! Now that would be a truly amazing milestone not just for FISD, but to the entire Star Wars costuming community! TL/DR: Don't rush it, don't worry about it, just focus on getting to Centurion1 point
-
If you wanna wear a pauldron without building a Sandie, you can convert your TK to a Heavy Weapons Trooper (HWT), and actually switch back and forth. Basically you just need to make a backpack, get some ammo pouches, and slightly adjust the belt. I’m actually doing that myself right now, in case you wanna check out my HWT thread. Great job on your build so far! Sent from my iPhone using Tapatalk1 point
-
How to attach flexible hand guards to rubber gloves For those aiming for Expert Infantry/Centurion level or just screen accuracy, the flexible hand guards will be need to be attached to your rubber (chemical style) gloves. Many folks have asked me the best way to do this, so here is my preferred method. Note that I am using the silicone guards that I make which have a heavy-duty cloth backing in order for glue to adhere to, but this should work for most other types including ones made from natural latex. ****Instructions for Nomex gloves at bottom Supplies needed: 1. E-6000 glue- I highly recommend using this product instead of CA (super) glue or epoxy, both of which can (and will) get brittle over time, causing the bond to fail. 2. Rough grit sandpaper (80 to 120 grit) 3. 2 or more heavy books. 4. Thin point Sharpie marker or soft lead pencil. 5. Blue painter's tape. Step one- Determine placement. The front end of the guard should sit right at the end of your knuckles, and in the center of the back of your hand. NOTE: Placing them too far forward will put undue stress on the glue in that area when you bend your fingers down and may cause separation. Step two- After measuring both sides and determining proper alignment, attach the blue tape to mark where the bottoms will be. Note distance between end of guard and bottom of glove fingers. Reference image Make sure that there are no wrinkles in the rubber glove. Step three- Using the Sharpie or pencil, mark a line around the guards. Step four- Sand down the area inside your lines. Doing this will rough-up the surface and allow for better adhesion. NOTE: Clean the area thoroughly afterward and allow it to dry. Step five- Place a generous amount of E-6000 around the perimeters and inside, then rub it around the entire center/edges to even it out (you can go a little heavier on the edges). Leave a small area around the edge to prevent seepage. Step six- Lay the gloves side by side and place the hand guards glue down in the outlined areas. Place at least TWO large books or other heavy, flat objects in top. This is necessary for proper adhesion. IMPORTANT: Leave them under the weight for at least 12-24 hours to allow the glue to completely cure/set. If you do have any seepage of the E-6000 it can be removed by rubbing it off with your thumb. DONE! NOMEX GLOVES- When attaching to Nomex gloves, use the same method as above But be SURE to put a piece of wax paper inside the gloves. Otherwise, the glue will seep through and bond them closed. NOTE: Please be aware that Nomex gloves are not permitted for Expert Infantry/Centurion approval.1 point
-
Satchets. Justjoseph63 has a tutorial in his magnets thread.1 point
-
Thanks! I used some thin, non stretchy fabric. Kind of like cotton duck cloth, but thinner? And small zip ties. Use one color for one polarity, another color for the mate to keep pairs easy to match.1 point
-
Could I add a suggestion to your great info piece? When making magnet sachets, it's a really good idea to make sure that you've got polarity-correct pairs. An easy way to help identify magnet pairs is to assemble them using fabric with high-contrast colors. Kind of like this:1 point