Leaderboard


Popular Content
Showing content with the highest reputation on 03/31/2020 in Posts
-
WOW! If you don't know the difference between an ANH and ROTJ detonator by now, I would refrain from commenting. Both detonators Glen posted are ANH and are the same one, except one photo was taken when it had paint on and the other with paint removed, but both are 100% ANH. This is an ROTJ for your future reference. Let me know if you need more help identifying any trooper parts3 points
-
Hey Tony, things are going well, been building a ton so I kinda forgot to post updates! Here we go! Spats Here they are, just need to put the clip greeblie on. I glued the one side, and stuck some Velcro on the other, so that they can be taken on and off. Ab Plate The ab plate was pretty easy, I started by cutting the back in half with a blade. Next, I cut a 2 inch cover strip. I still have to trim the top off, but overall looking pretty nice. I also plan to take about that much off to fit me. Legs I made the strapping for the legs, simply used 1 inch webbing and folded it over, to make a loop, and set a snap on the end. This isn't screen accurate, but is still very practical. And those are held up by a leather belt. Here's a picture of the legs on me. They look quite good, still figuring out how to attach the gaskets, whether I should just attach them to the thigh or to sew them to the leggings. They are just taped to my legs in the photo. Chest I decided it was time to tackle the chest plate situation. I copied what Anovos does and installed risers into the chest plate. I cut out 8 triangles out of scrap ABS, and glued 4 and another 4 together. Stuck some Velcro on, and boom! Chest plate almost done. I say almost as there is a small gap between the chest and the yoke. And that is pretty much it for now. Until next time3 points
-
BBB DAY!!!!!!!3 points
-
Just received my shipping information from 3D-Props! This little box of goodies is on the way. Sent from my iPhone using Tapatalk2 points
-
Thank you guys, this build has been super enjoyable so far!2 points
-
Touched up the vocoder before putting away the paint:2 points
-
Congratulations fellow AP wearer. Sent from my iPhone using Tapatalk2 points
-
Bright suns troopers! Just had my BBB day, and could not be more excited about this build! Love the look of the Rogue One TK's and looking forward to being able to troop as one someday (if I'm ever allowed to leave my house again) For the bucket I purchased a Black Series helmet that I am in the process of converting. I'll upload some photos hopefully here in the next couple days. As of right now I have filed out all the slots, but was unhappy with how they turned out. So with some help from some Bondo I've filled them back in and have an idea of a way to do those parts differently than other ways I've seen it done...hopefully it works hahaha. I've also begun the painting of my helmet, however it hasn't gone great...Due to what I can only assume is cold temperatures, the paint has dried with a wrinkly look to it. Can anyone help me out with why that my be happening? Would it be cold temperature, or is there something else wrong I may be doing? Looking forward to this build, and thank you in advance to everyone willing to help me, cause I'm sure I'll be needing a lot1 point
-
Well someone is going to have their hands full1 point
-
Hi Kalin, congratulations for your BBB day !! About your problem, I had the same issue when modding a Rubie's E11 blaster for a fellow recruit and found out that painting at night or in a cloud and cold day , paint got that wrinkly look. i had to sand it again, apply primer and repaint in a sunny day. cheers.1 point
-
Hi, congratulations for your BBB Day future Trooper. Looking forward for your advance. Take a look to the ANH build threads to find out some tips and make all questions here. Remember post photos of your doubts. Here you can find tons of info and experienced troopers willing to help. Cheers.1 point
-
Take your time and most of all....have fun!1 point
-
Woooo, excellent, Big Brown Box Day!!!, Ask before cut anything Sent from my GM1900 using Tapatalk1 point
-
Jajajaja ... Gracias hermano @justjoseph63 ... Really, now, I have an arm bigger than the other because the sandpaper job, Best regards...1 point
-
WOW! Nice job on those shims, mi hermano!1 point
-
Looking great Jayke coming along nicely1 point
-
Hello @justjoseph63 ....This 2 images are ok?...Best regards...1 point
-
We have a 3D printing section here. Not sure if it is what you are looking for but probably worth a gander if you have not done so yet: https://www.whitearmor.net/forum/forum/201-3d-parts-and-technical/1 point
-
Really nice job on those fixes, Jose! Sha Sha will be with you shortly, but could you post up 2 extra photos while you wait? We need clear close-ups of the areas shown below (no need to get suited up). Thanks!!1 point
-
I’m gonna do the ears tomorrow, how does this look? Sorry I feel like I’m being repetitive, just want to get it right
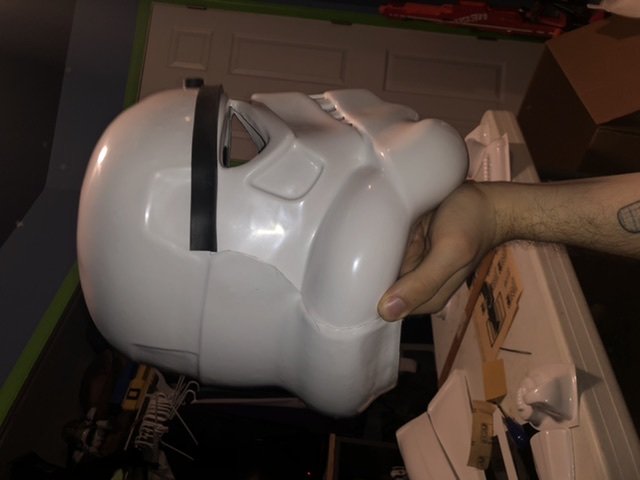 1 point
 -
Hey trooper, Personally, I’d get some magnets and try adjusting the alignment. To my eye, I’d try something like below. Imagine the little green circle is a pivot point - I’d bring the nose down a little, which will also reduce the gap you have between the faceplate and the back section. I agree with Mario regarding trying the ears against the helmet. Here’s part of my helmet build video series where I talk about rough trimming the ears to help get the alignment right.1 point
-
Got a few small things done today. Ended up priming and painting my shield parts. And tinkered around with my pauldron and ammo pouch. I’ll share more once everything is dry tomorrow. Essentially I wanted to be able to put the pauldron and ammo pouch on and take it off without much effort. The biggest problem was trying to find a way to make them stay on without moving. Easy fix. Just use magnets. I ended up gluing the three magnets in place on the pauldron itself and then three more under the chest plate. I put some black loop Velcro on the magnets to keep things soft. The ammo pouch was a little trickier. I cut one piece of ABS that slid under the two existing pouch straps. Then I cut three small pieces glued together to use as a riser. I cut two long strips and ran those under the chest plate. To hold the pouch, risers, and mount together I drilled four holes all the way into the pouch and fed four Chicago fittings through from the inside and screwed them from the outside. After these pictures I spread the ammo pouch mount magnets out a bit more and then created some more ABS plates to house the magnets. It’s darn strong and holds the ammo pouch in the perfect position without moving. I’ll have to see how well it’ll play with my yoke once I get it. I will have to slide this mount in between the yoke and chest but it’s not very thick and is very well hidden by the pouch itself. The MP40 leather pouch is pretty darn big and I played around with the placement a lot. I actually moved it up slightly from where it is in the photo below. But it’s still a huge pouch and is a lot bigger than what the toys use in terms of proportion. I’m on the fence if I like it or not. I will suit up tomorrow and see how it all looks together. Sent from my iPhone using Tapatalk1 point
-
Thank you Sha Sha for reviewing my EIB application and everyone for the kind words! I am definitely going for Centurion and working on my back gap, thigh gap, shoulder gap, and drop boxes. Being a bit taller makes things interesting. haha For the ab buttons, I am a bit confused because I do see the requirement is "Ab button paint shall not extend beyond the bottom of the actual raised button", but none of the buttons extend beyond the raised button. There is a slight white raise around each button. Let me know if I'm not understanding something correctly! haha1 point
-
Looking good!1 point
-
Congratulations trooper!!!! Regards...1 point
-
Looks perfect now, the refference Glen used I think is a ROTJ TD completely different , ANH TD have less gaps and the end caps are thicker, to be safe only use ANH refference photos1 point
-
Good Progress Jayke1 point
-
The rest came today1 point
-
I disagree on the belly buttons they are in proportion and look perfect! making them smaller would look off, look at the spacing between each button almost same as the original you posted, your basing yourself on the tiny exposed bump, also no two were painted the same , your comparisation photo actually proves his button are correct size when you compare the spacing between each button ect... Mark (AP)1 point
-
The only thing I got was some of my parts being painted at the car workshop. Should be a week or 2 to go...1 point
-
Nice work, you may just want to check the gaps between your TD end caps and centre panel, looks a little narrow. With stickers you can add with soapy water but it takes a while to push the liquid out and get them to stick well. I just try to put them on as is and aim for getting them in the right position from a corner, you can still remove if you make a mistake.1 point
-
OK, I know its been a while, but life got a bit crazy and then this whole COVID-19 thing came along I have been working on things so here is a bit of an update. Thermal Detonator assembled: I have also painted the inside of the bucket and started on the frown. Looking to start the vocoder next and then the stickers for the traps and tears. Also going to Sugru the lens and mesh in place. QUESTION: Any tips and trick for getting the stickers placed easier and properly? Cheers, Antony1 point
-
Congratulations trooper, Welcome to the ranks.1 point
-
Congratulations Trooper Well done !! Welcome to EIB, don't stop your way to Centurion, almost there too.1 point
-
Congratulations and welcome to the EI ranks trooper1 point
-
Hi William, Thanks for your patience with your application, and thank you for the quick fix with the sniper knee! CRL and EIB Application Requirements All required photos are now in and, after review, we are pleased to welcome you to Expert Infantry rank. On behalf of Joseph and myself, many congratulations! Other-Armor Fit/Assembly In this area we review observations made by your fellow troopers and the DO team. Some observations may lead to suggestions to improve the overall look of your armor. Note that we consider both text (CRL) and pictures (screen caps/reference images) when reviewing submissions You've done a fantastic job with your build, so we have just a couple suggestions to improve your look. First, since you are rather tall, gaps in the armor are inevitable, but we like to see troopers minimize them and even them out. You do have a somewhat significant gap between your back piece and kidney piece, so you might see what you can do to adjust the strapping to minimize it. Since you're now also a pro with the hot water bath, you could also see if you're able to straighten out the tabs at the top of the back piece to get it to sit lower. I did the reverse on my own build (bent the back tabs to get the back piece to sit higher) since I'm very short. You can also see if you can simply lengthen the white elastic strapping connecting the back and chest. Reference Image: Next, another spacing issue. From the front your thigh and calf pieces look pretty even, but from the rear you have a pretty significant gap at the knees with a smaller one between the butt plate and thighs. This may just be due to your particular proportions, but if you can drop your thighs just a touch without impeding your mobility, it would make things look a bit cleaner. Reference Images: Finally, a suggestion with your ammo pack location. Ideally we like to see the thigh ammo pack centered. On applications where it is extremely off kilter we do require them to center it, but since yours are fairly close, we're leaving it as a suggestion. Reference Images: Centurion Requirements In this section we prepare you for Centurion. More photos may be requested in the future that allow us to make better decisions on possible adjustments. If there are any areas of concern they will be discussed here. Because Centurion photos show much more detail than EIB, items to pertaining to Centurion might be seen there and not here. We try to point out all that we can from what is seen, but the final accuracy is the responsibility of the trooper. Starting from the top, the L3 CRL states: There should be a minimal gap between the shoulder armor and the chest/back plates. The gap at the front looks great, but you have a larger gap in the rear. Things you can do to help minimize it is to shorten the strapping holding the bells on, and trimming off all of the lower return edge on your shoulder bells. It may even simply be a matter of how you're holding your arms when you're taking your photos. Reference Image: Next, the L3 CRL states: Drop boxes are vertically aligned with the end of the ammo belt with minimal gap between belt and box. Your drop boxes will need to be moved so they align with the ends of the plastic part of the belt, and it also appears the elastic could be shortened just a touch. Reference Image: Finally, it pains me because your ab buttons are just so perfect, but you'll need to strip back some of the paint. The L3 CRL states: Ab button paint shall not extend beyond the bottom of the actual raised button. While extremely clean, the paint on your ab buttons is a bit too big. If you take a look at reference photos, you'll see that they should err on the side of being a bit too small. This should be pretty easily fixable with a bit of mineral spirits or paint thinner. Reference Image: And that's it! We have full confidence in your ability to make these few small changes, so we hope to see your Centurion application soon. Congratulations again!1 point
-
i'll try to send you a postcard from germany...i hope mailservice still works without problems. update: on the way....1 point
-
So this is where I will be logging my T-21 build for my Rogue One Kit. Not a lot of stuff at this time but I am sure I will be filling this thread in the coming weeks. So first let me say that I will be using Spool86's kit. NOTE: Version 2 of the RO T-21 is on page 2 of this build. For anyone interested, my ROTK build is here: And my RO Crystal Patrol Pack Build is here: There are a few difference with the RO variant of this BFG. 1. There is a scout tactical light on the right side like a lot of the RO weapons. 2. I have found reference pictures with a black sling and pictures with no sling. 3. From all the pictures I have found, the stock looks black but this could be the lighting. Here is a pic with the black sling I will add more pics tomorrow but I wanted to get this thread started. I welcome input from everyone. Thanks for the interest.1 point
-
Excellent build and thread. Thank you for sharing. Sent from my iPhone using Tapatalk1 point
-
Was asked to do this for work: Hoping everyone stays healthy and safe.1 point
-
One side done. Cheek vents look much better!1 point
-
Intergalactic supply (Jason hill) has a very positive reputation within the gunnery corps, in fact he was on my shortlist with only wtf being the other name. I have purchased both a gunner and a navy lid from him both of which cleared straight out of the box. Perhaps it's time to take him off the avoid list as I wouldn't have used him if I had noticed earlier.1 point
-
I had no idea Intergalactic Supply was recasting. He has posted numerous videos and pics of his sculpt and build work before casting, on FB. Is this specifically TK/TD armor or is it other Star Wars armor? I know he offers TI, IG, IN, and Rebel helmets.1 point


-Copy.thumb.jpeg.8715a83cb32a3e6745f879885b26e712.jpeg)