Leaderboard


Popular Content
Showing content with the highest reputation on 03/16/2020 in all areas
-
Help Medical Professionals in the fight against Covid-19! When a hospital in Brescia, Italy ran out of life-saving respirator valves, local 3D printing stepped in to help! [BBC] [3D Printing Media Network] According to Twitter, the hospital's ICU supplier was not happy and refused to supply the blueprints. [source] As a preventative measure of the same situation happening in your local area, there is now crowdsource project where people can volunteer about their 3D printers and to assist in designing other necessary medical supplies if needed. I know a lot of people here have 3D printers or are design expertise. Please consider joining Project Open Air, where you commit to volunteering the usage of your 3D Printer in case the respirator shortfall hits your local hospital. Google Document where people list what they have However, do wait until you are called upon, since some printers and materials are not suitable for medical useage. However, every little bit helps (testing models, etc). Mods LMK if this is not appropriate.. I originally wanted to post in the 3D printer area but I don't know it well enough.5 points
-
Hi all, As we’re all sharing helmet pics (WIPs, clearance etc.), I thought I’d share a little photography tip for anyone that wants to give it a go. As many of us use smart phones to quickly snap out progress, holding the camera too close to the subject will cause some distortion, leading the the helmet looking “droopy”. Try taking a couple of steps back and zooming in - this will look much closer to how the human eye sees it. [emoji1303][emoji2956] Here’s an example when taking pictures from all angles;2 points
-
This is why, in the photography industry, zoom lenses (or high mm primes) are used for portraits. To minimize distortion. Luckily many smartphones now have multiple camera lenses to capture different focal lengths. Use the zoom one. Another pro-tip: Do NOT use any portrait-type mode on smartphones when taking photos of builds. The false bokeh (blur) can be applied incorrectly, and in general will hide details which we might want to see. Sent from my iPhone using Tapatalk2 points
-
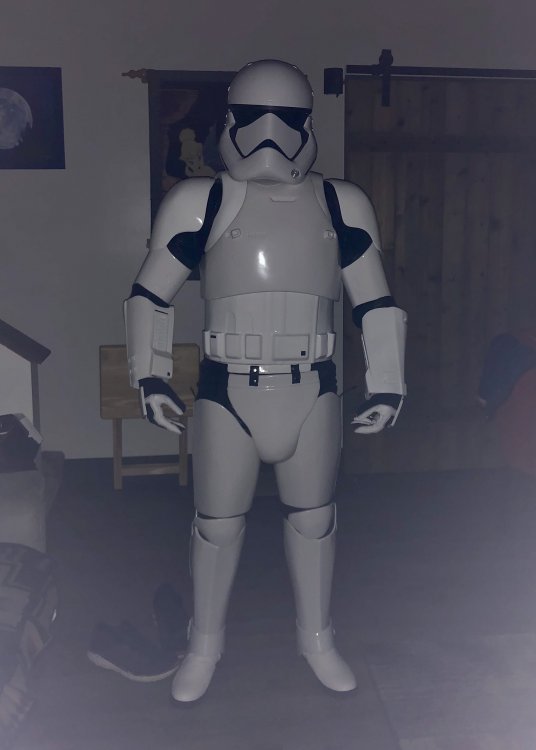
Blaster has been printed and assembled. Just waiting on screw hardware ordered from eBay. Of course it’s coming from China, so that’s going to be a long wait I think. This Corona virus thing has really Put the brakes on commerce and my build process. Although I have been making a bit more progress. I installed @ukswrath sound system into my bucket, which works perfectly! I highly recommend it! Also added fans. It’s all loaded up now. I’ve also Plastic Welded the ab section and re-sanded and painted. Seems to be much better now, no cracks (yet). Now it looks as though I might have to do the same for the top of the shoulder bands because it is now starting to crack. Unfortunately it is the older 4-piece construction that 850 AW made before they upgraded it to a 2-piece. Considering ordering the newer piece instead of constantly fixing this one. I received my harness, neck seal, and gasket set from GeekyPink. It is also amazing! Fits perfectly. I went ahead and mounted the clips and snaps to the armor for a first time full suit-up test. Things fit pretty well surprisingly. Unfortunately, the power went out in the middle of dressing up, so we had to take pictures in the dark, lol. -just my luck. I didn’t bother with the belt at that point because it was dark and I couldn’t see a thing. And my snaps kept popping off for my butt plate, so I’ll have to address that. I did have a very hard time fitting the gaskets into the bicep armor and decided to re-order a set. This time I have the gaskets to wear when sizing and constructing them. (I should have waited i the first place, lesson learned) Anyway, still much more work to be done before final paint and finish. But that’s where I’m at for now. The quarantine on the weekends Is kind of a blessing in disguise because I’ve gotten so much done with my FOTK as well as almost completing a Jawa costume for my wife! I keep moving forward. Stay safe everyone!
 2 points
 -
Looks great. What color did you use for the inner bolt? Very realistic.2 points
-
Something like that existed, but depends of the look you are going for, in our case farther is better Sent from my GM1900 using Tapatalk2 points
-
Testfit For my liking the shins seem to be a little to "fat" compared to the tighs.2 points
-
doing a little painting for a customer............2 points
-
While there are a number of ways to attach the lenses inside your bucket, I found the easiest and fastest is to use a product called SUGRU. It is a kneadable glue, sort of like play-doh (plasticine) that is super easy to work with, and will hold forever. It does keep somewhat of a pliable consistency after drying, can be removed if you ever need to and does not emit heat during the curing process like CA or Epoxy glue. It is available online (like here on Amazon) and in many craft shops, usually in packets of 3. It comes in a variety of colors, but I suggest using the black. HINT: This can be done if you have already built your helmet, but it is easier if the face plate has not been attached. This whole process will take you less than 10 minutes to attach both lenses. Here is a photo of one of the individual packets, and the contents rolled into a ball. In this instance I am using 1 packet per lens. You will need a craft (popsicle) stick, sharpened at one end: Here is the trimmed eye opening from the inside: The next step is to roll the SUGRU into a small "snake" shape about 7 inches in length. (No longer). After that, you simply press it into the outside edges of the eye opening. Note that I left an open spot at the top. I recommend this for ventilation purposes. (Helps keep your lenses from fogging up). Place the lens evenly over the opening. Using a craft (popsicle) stick, push the glue firmly into place around the outside, making contact with both lens and helmet surface. Don't worry if it seeps through to the front. Hint: This glue is strong stuff. You don't need a crazy amount of contact surface. It will not come off unless you take it off. Turn the faceplate over, and any glue that has seeped through (see red circle) can be easily removed with the sharpened end of the craft stick. Allow 24 hours for it to dry, and you are DONE!1 point
-
Hello!!! I'm from the Spanish Garrison and I just want to be polite, and that's why I wrote the post to greet you all... I'm only 2 days old at the Garrison and I'm crazy for putting on the armor...But unfortunately, the horrible CORONAVIRUS( COVID-19), forces us not to leave home, to prevent it from spreading...Well, we will win this battle, I'm sure...I will be able to troop very soon... Best regards...Chemi.1 point
-
Greetings fellow troopers! My kid's school is trying to collect postcards from countries outside the United States for a geography project. The postcards don't need to be 501st related, preferably of something near and dear to the region they are from to help them with their geography. If there's any chance someone would kindly send us some postcards from another country the class would greatly appreciate it. If you can help us out please reply below so we can keep an eye on the mailbox and not duplicate our efforts. The project ends the last day of April 2020. Thank you troopers! TK41469 Address: Mrs. Teresa's Class -X C/O Highland Free School 510 S Highland Ave Tucson, AZ 857191 point
-
At some point in your OT build you will be using rivets. It may just be for attaching the thigh ammo pack for Basic, the cod tab for EI or all those plus the ab/kidney ones for Centurion. It's honestly pretty easy to attach both kinds of these using basic tools you probably have on hand: A flat-head screwdriver (preferably large), a drill with the correct size bits and a hammer. Removing them will require a thin bladed flat head screwdriver, some heavy-duty pliers and perhaps a drill. Safety gloves and goggles are recommended. For this tutorial I will be using scrap ABS. Now, let's get to it! Split (bifurcated) Rivets Assuming you are (hopefully) aiming for Centurion, you will need 9 (with washers) 6 for the left ab/kidney connection 1 for the lower cod tab 2 for the thigh ammo pack (if not using cap rivets) Head diameter should be 5/16" (8mm). Shank should be 3/8" (9.25mm) long BEFORE YOU START: Make sure you have a very hard surface to hammer on, and I suggest laying down a piece of heavy cloth on top of it so you don't scratch your armor. 1. Carefully mark your hole placement(s). Using a 9/64" bit (about 4mm) drill out the hole 2. Insert rivet, dome side out. Hole will be snug 3. Turn over piece, insert washer onto rivet shank 4. Using the thin end of the screwdriver, insert it into the split and gently hammer it down 5. Continue moving the screwdriver farther up toward the thick part, hammering at each increment to open up the "legs" 6. Use the shaft of the screwdriver to get the widest opening possible. At this point you should be able to 7. use the hammer to flatten it out completely 1 2 3 4 = 5 6 7 = DONE! Single Cap Rivets Single cap (one domed end) rivets were used in the original films to attach the thigh ammo pack to the bottom of the right thigh. Although not a requirement at any level, many like to use them for screen accuracy You will need 2 sets (top and bottom), one for each side Head diameter should be 5/16" (8mm) Again, you will need a hard surface (like the edge of a workbench) to hammer on Reference photo for placement IMPORTANT! Make sure the back edges of the ammo pack tabs are equal distance from the corners of the rear of the ridges on each side! 1. Carefully mark your hole placements. Drill holes. 2. Insert bottom (facing inside). 3. Shank should be facing outward. 4. Place cap on shank. 5. Gently give a few good taps with a hammer until it is set. Cap will flatten out. 1 2 3 4 5 DONE! REMOVING RIVETS Spit type: 1. Using a thin bladed screwdriver, CAREFULLY pry up each side the "legs". POINT SCREWDRIVER AWAY FROM YOU WHEN DOING THIS!!! 2. Using a set of heavy duty pliers, pinch the legs together until they meet 3. Washer will now slide off and rivet can be easily removed 1 2 3 Cap Rivets These are a bit trickier than removing the split type, so take your time to avoid damaging your armor. Safety gloves and goggles are suggested. 1. Using a pair of pliers, grip the cap part (this avoids it spinning). 2. Using a drill bit at least as wide as the shaft of the rivet, CAREFULLY drill through the bottom (base) from the back 3. Once the drill has penetrated the entire rivet, it can be easily removed. 1 2 3 If you have any questions, comments or suggestions, post up here.1 point
-
Proceeding beautifully, nice work1 point
-
Congratulations trooper and welcome to the ranks1 point
-
Congrats!!!1 point
-
Added my name to the list. With all the nerds in our natural habitat (indoors), this should be green lit by the legion (fingers crossed)1 point
-
I've added my name to the printer list. I'll help if they need me!1 point
-
I am just starting to source the parts to build a pack. The oil pan that seems to be favoured here isn’t available here in Australia. I have found this one though: ---------------- Now obviously the handle and spout on the bottom would have to be removed and any resulting holes filled. Would the slightly rounded bottom that would leave me with be any problem?1 point
-
Amazing Work, keep it up !!1 point
-
Nice work Jasper. Looking great1 point
-
Technically, SE-14R has been an option for ANH Hero for a while now1 point
-
SHOULDER TABS I am using @ukswrath's metal tabs. They are really nice to work with. I marked out where the top of the shoulder bell would be, and cut a slot for the tab to go through, and bent the tab to conform to the inside of the shoulders. Then I fixed 2 snaps onto the should tabs. Measuring a straight line from the snaps, I cut another 2 slots for where the webbing will go later. Here are the 3 holes: It is ok that there are gaps in the slot where the tab goes through, as I will be filling it up later. But the 2 side slots need to be clean as they will be exposed against the white armour later against the black webbing, so do take care. Here is how the inside looks. I shortened the tabs. You might want to leave it long. I just didn't want too much weight or material but I think if you left it, it would strengthen the shoulders more. I also rounded the corners so it wouldn't tear my gaskets or inner suit as I am wearing it. The other side done too. Then I proceeded to glue the 2 tabs and let dry overnight. After dry, I filled up the center gap with epoxy putty. And after priming. Will probably have another layer of putty to smoothen it out more, but essentially, this is done.1 point
-
Congratulations Trooper, Welcome to the Legion. Enjoy being a Bad Guy Doing Good !! And Yes!! Go for your next goal EIB and Centurion.1 point
-
Yes, the armours appear to be of OT lineage. Possibly even from ANH lineage judging by this picture where the butt plate appears separate from the kidney plate. Also the chestplate looks way different from the awful FX-inspired R1 chestplate. (BTW, it seems they put the kidney plate upside down! The notch seems to be facing upwards instead of downwards) The top view of the abdomen is very much different from what a R1 armour looks like (not perfectly rounded, two pieces assembly w/ seams at sides, no opening at the back, ...) Also the arms are strapped in a perfect OT style, with no gap whatsoever between biceps and forearms. And like Andy said, the shoulder straps are OT style and the backplate doesn't have any slots where they would fit in like R1 does. I'd say the only odd thing is the detonator in the first pic. In the end it could be that those armours were created using 3D scans taken directly from the LFL archives... Basically the way it should have been in the first place for R1. But that's enough ranting from my part already!1 point
-
Thanks to all of your help, I am now an official 501st member! Very proud to be TK 90913 and in the Central California Garrison. Couldn't have done it without all of you! Now time for me to work towards Expert Infantry and Centurion! I'm sure I'll have more questions for all of you coming very soon! Haha1 point
-
Hello all, are these eye holes good? Going to put in the visor piece once the painting is done in a couple of days, will sand them down a bit but just wanna check I didn't leave too much of a lip:1 point
-
As far as I know, there was a "6 feet rule" in the filming industry back then (not sure if still is). In other words, go no closer than 6 feet and then use the zoom.1 point
-
Updated my chest piece with 2 bolts at the sharp end. See the update for details. I realised that my head is small enough to go through the neck hole with the yoke AND chest attached. As such, I will be fixing the chest piece onto the yoke permanently. I will also be joining one side of the underarm to connect the yoke and the chest piece, leaving the other side functional for magnets later. So to wear, I would put my hand into the fixed arm hole, put my head through the neck hole, and then slot my other arm through the functional arm hole, and close it with magnets.1 point
-
Hey Shinyarmour1 PM incoming.1 point
-
FYI, if you trim ~1.5mm off a split rivet you can set it inside a line 40 snap:1 point
-
It was pointed out after I started trooping that the lenses in my helmet, although correct, were allowing people to see my eyes inside. I might get to painting the inside of the helmet black but in the short term I wanted to trim the lenses down and add some mesh. Previously just had the one sheet of film taped on either side. I used some leftover chicago screws and magnets to attach the lense. Took a while to experiment with sizes and mounting to not leave any visible gap but maybe allow some airflow. Next I was given some mesh from JG member FarEast, it provides good blocking of eyes but only slightly darkens view. Cutting out the matching shape was easy enough, but bending the mesh to fit the mound and eye openings was really hard. Several attempts and ended up with not a perfect fit but close enough.1 point
-
Philip Aitken 41808 EIB Letter Joseph http://www.whitearmor.net/eib/certificates/41808-eib.png 2731 point
-
So much better!1 point
-
his waist is only 31" at belly button level basicalIy 8" short, It's trimmed to movie size couldnt make it any smaller which would have affected the AB and kidney alignment, I recomended to add some foam on front of AB plate and in the kidney plate to keep the integrity of the movie look. Mark (AP)1 point
-
My impression is that your kidney plate is not overlapping your ab plate, it's just not perfectly flush with it because of curvature. You can do a few things to line these up like adding a tab made out of ABS and a slot to slide it into, or even putting velcro on the tab, which keeps the two parts nice and level with each other. As Joseph said, minimal gap between ABS belt and drop boxes. I think if you should a photo of the inside of the thighs, they may ease back on this request. You may need to sand them just a bit to ensure they don't poke you and stand out a little less.1 point
-
Almost there, sir, and you'll have that TK number under your name soon! In the first photo below it looks as if the left drop box could come down a little, as it sits too close to the ammo pack above it, but in the second (older) pic it looks perfect! There should be a minimal gap between the boxes and ABS belt but they should not sit over it. References Although he didn't ding you on it, the thigh cover strips should not go beyond the raised ridges at the bottom. Reference images1 point
-
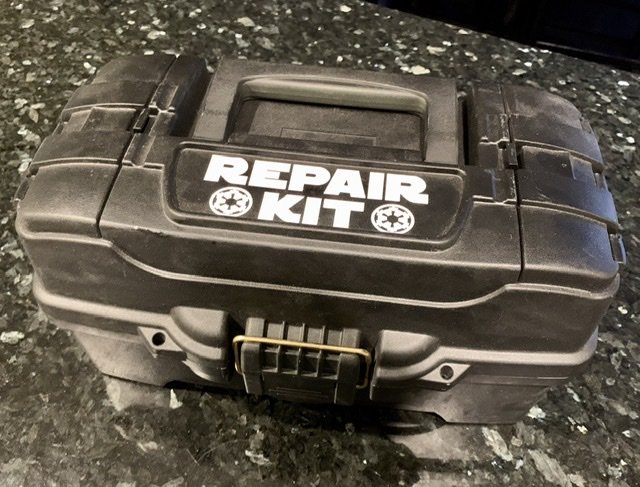
I painted up a tackle box that I take with me on troops: It has most of the things in Joseph’s list. I also carry white/black/silver paint pens and sharpies for emergency scratch repairs.
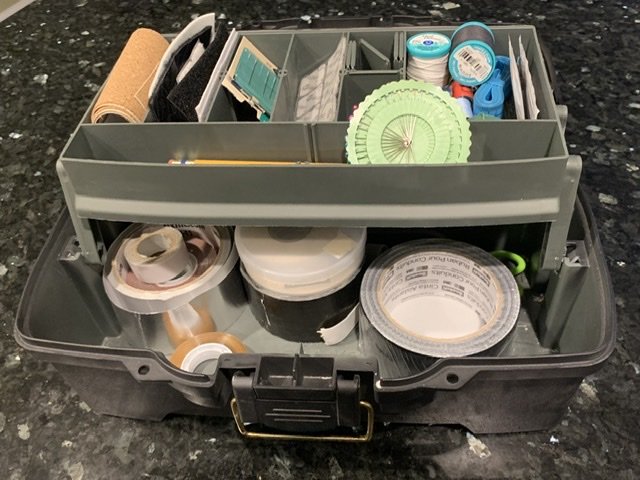 1 point


-Copy.thumb.jpeg.8715a83cb32a3e6745f879885b26e712.jpeg)