Leaderboard


Popular Content
Showing content with the highest reputation on 09/17/2020 in Posts
-
I bought this just before I started to pursue my Expert Infantry badge. I ended up getting #891. Congratulations again, to all who were part of this glorious March to 1000. Sent from my iPhone using Tapatalk6 points
-
Congratulations, all! Thank you, to each and every Trooper who has come before #1000 for being a part of it, via hands-on help, online guidance, posting a build thread, mentoring another Trooper, or earning EIB themselves. They say it takes a village to raise a child. It certainly takes a Detachment to earn EIB. Spread the word, encourage others, spread some smiles. TROOPERS HELPING TROOPERS!5 points
-
Att all who are currently building the R1 TK We have finalised the update on the CRL with an extensive re write and the addition of more approved accessories. Please note that if you are currently working on this build, you have an option on which version of the CRL you follow as we will have a 3 month grace period to cover you. Expires 17th December Option 1. Continue with the now outdated CRL (only available to those who started their build before the CRL update) prior to 16th September 2020. Option 2. Work to the new CRL. All new R1 TK builds from today 17 Sept 2020, must use the new CRL To be honest there are only a couple of things that have changed from basic, but they will effect approval by your GML so if you are using the old version, I have attached a PDF copy of it below as you may need to supply it along with your submission when applying for basic approval. The bulk of the changes effect Expert Infantry and Centurion handled locally by our Deployment officers. The CRL link here on FISD and on legion boards is now officially the latest 2020 version Old R1 TK CRL Rogue One Stormtrooper.pdf4 points
-
Bravo to staff, members, and all in between, I’m so proud of this group for achieving this goal. Congratulations to all the first 1000 EIBs, here’s to many more3 points
-
Congratulations all. Honored to be a part of this.3 points
-
Lets celebrate the 1000 EI's first before we ramp up anything for Centurion500 You guys can easily work out how many spots there are based on the approval numbers in the centurion application thread.3 points
-
Oh, soon...very soon. I’ve knocked out the the blaster adjustment that was requested for Centurion, but I have a couple of minor tweaks in other areas before submission. I put a check mark by one of those today as well.3 points
-
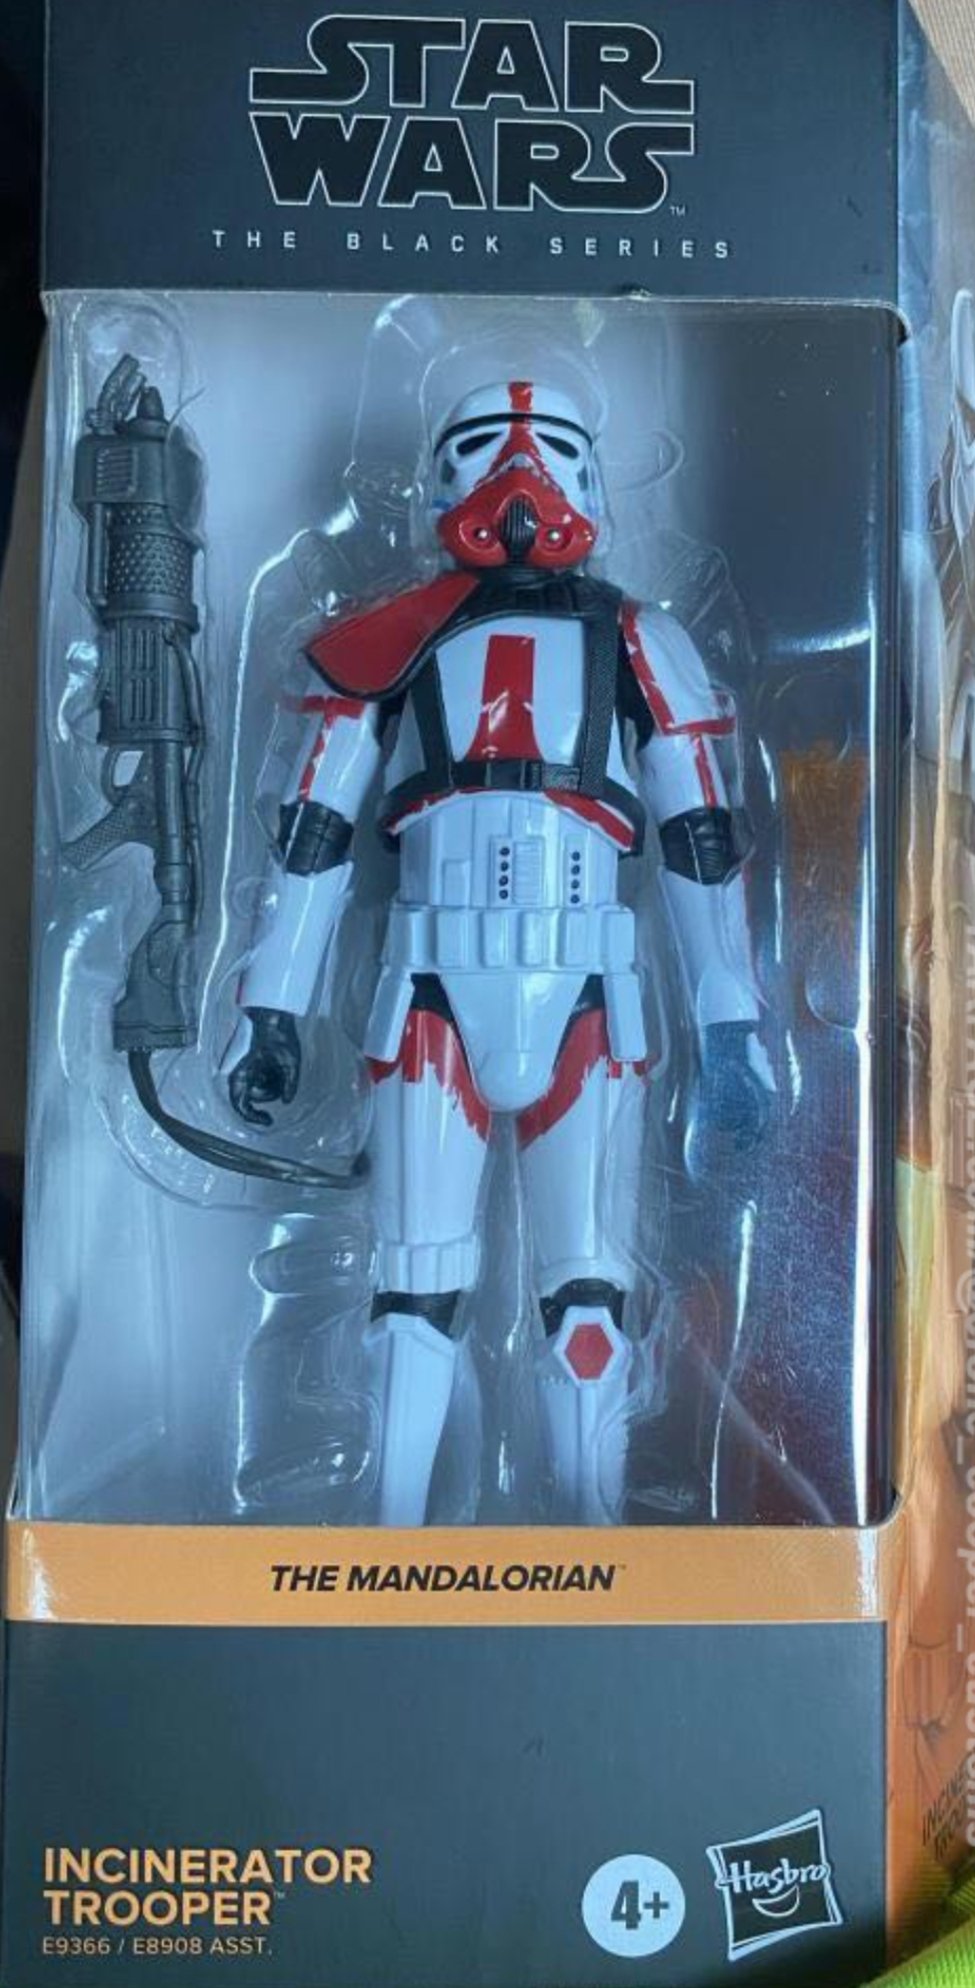
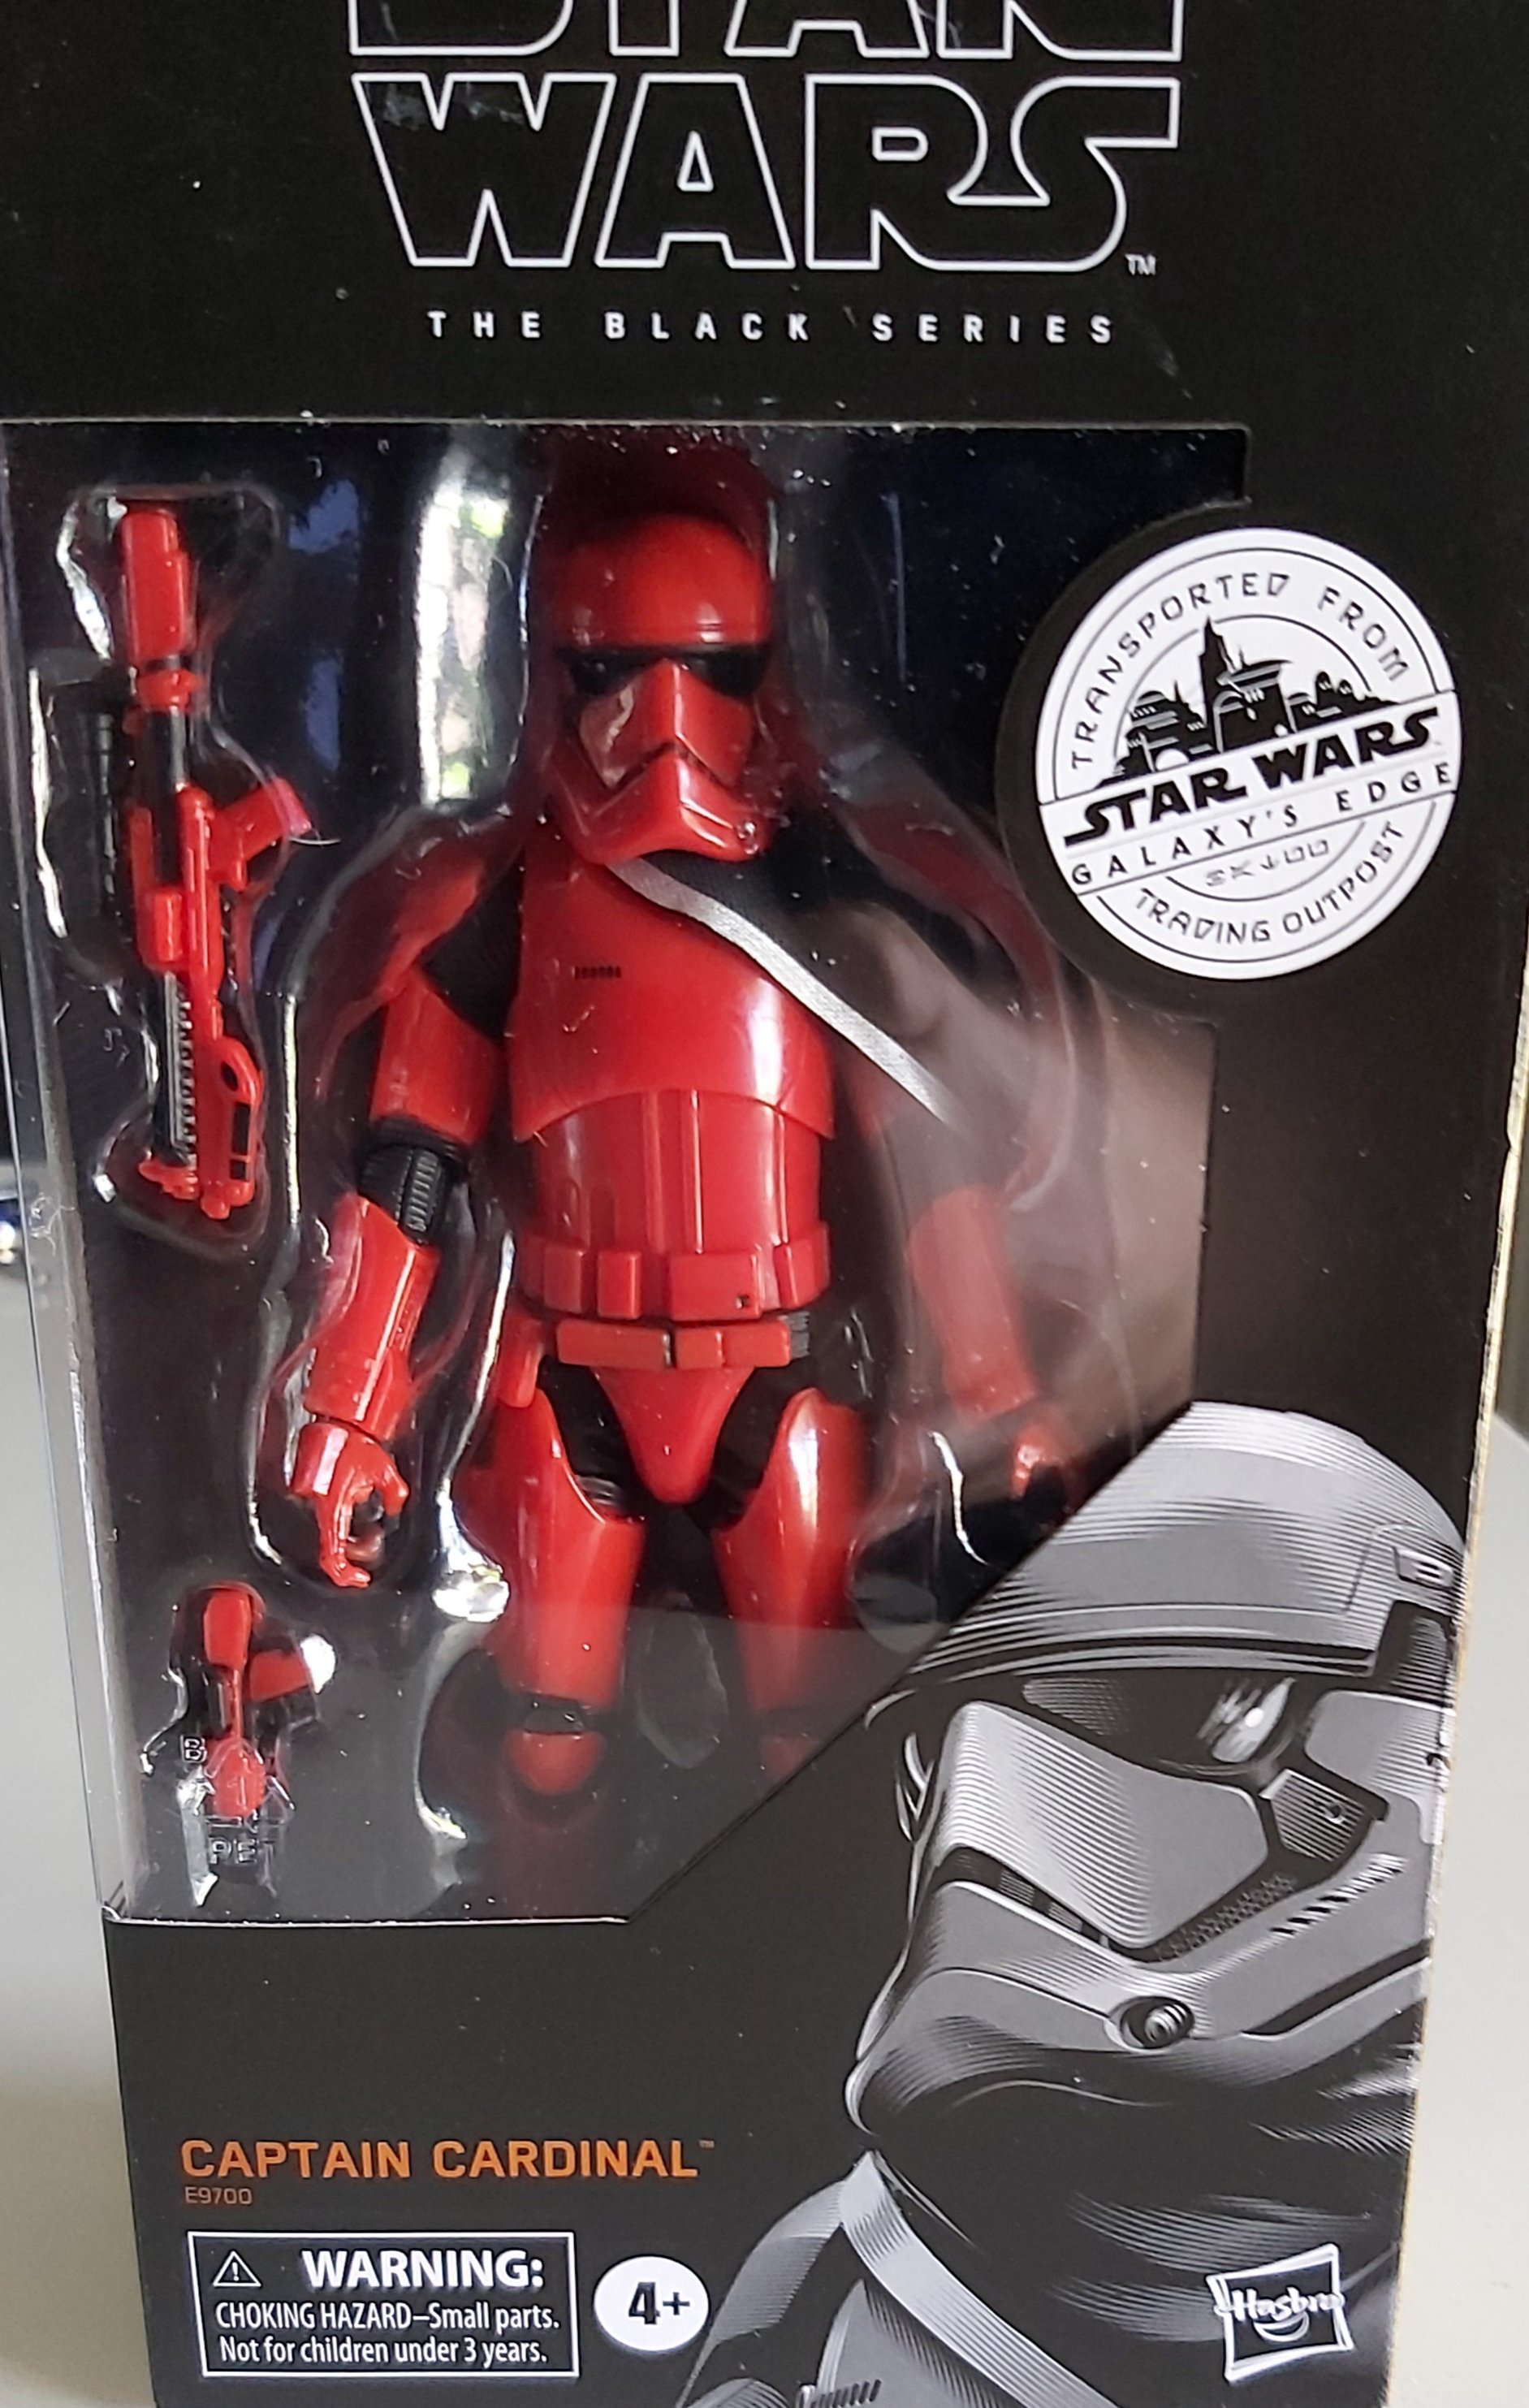
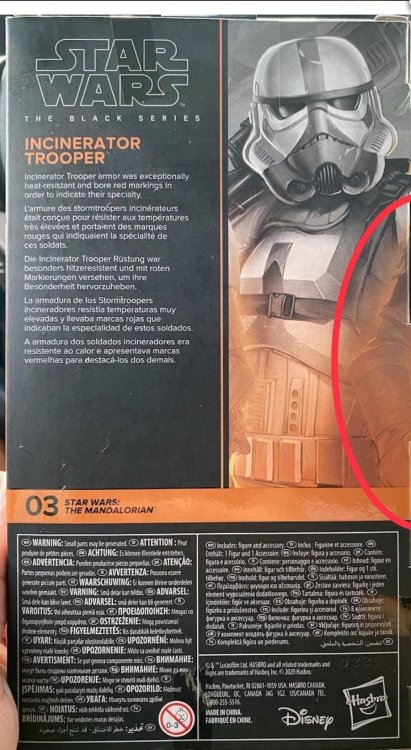
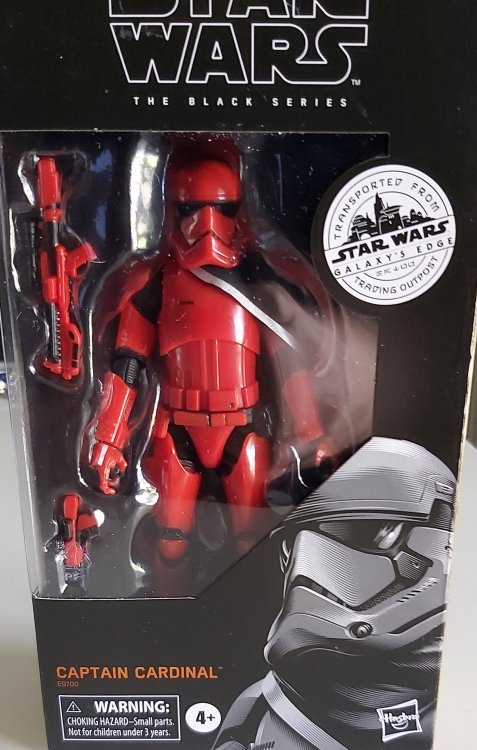
Black Series Incinerator Trooper coming to a store near you soon

 2 points
 -
It is with great pleasure that I extend to you the distinction of being the 1000 Expert Infantry award recipient. The first was Scott M. back in 2007, so this has been 13 years in the making. What an excellent way to complete the first M peritus pedes quinos, so to speak. Yes, we'll work on a better way to describe you and your cohort in due time. Congratulations on a job well done, and may you inspire others to follow.2 points
-
I am blown away by the deep dive in to the archives by Glen to get the history of the Expert Infantry program unearthed, truly an immense undertaking that speaks to his dauntless character. I hope this gets copied out of the newsletter and posted to a sticky in the EI area as a memorial. A few fine points: after trying out the "Mark" system no one was happy as "Mark" didn't seem to mean anything, so we went with "Elite". This caused some to think that we were being "Elitist" so once again we had to change it. At that point I took it upon myself to create a name and theme that best matched our lineage, as much of our branding is either from the U.S. Army infantry branch, or the 501st Legion scheme seen in Revenge of the Sith. Thank you so much for doing this, as it brought a tear to my eye for the memories.2 points
-
Dan the height of the bicep looks good however, the gap between the shoulder bell and the shoulder strap looks too large. The shoulder bell should almost be touching. I agree it looks like you can cut some off the forearms. Here are some reference pics for you.2 points
-
I'm making my armor pre-centurion ready so when I do finish it, all I will need for centurion status is rubber gaskets...thats the plan anyway. As soon as I get basic approval im gonna finish an F-11D and immediately go to request EIB and once I get that then I'll need to go hunting for rubber gaskets for centurion. Hopefully it will all go to plan.2 points
-
Same. Just enjoying my EIB status for a while before I take that further step of joining the elite Centurion badge. [emoji1591][emoji16][emoji1591] Sent from my SM-G920F using Tapatalk2 points
-
Light for this year that only brought darkness ... I hope this is the first celebration of many others during this 2020 ... A big hug to all those who were left behind and to their families ... This goes for them too . And of course, thanks to all the staff and all the people who made this possible ... Great job guys.2 points
-
Thermal Detonator #1 As always, please feel free to chime in with comments or concerns. Ok, managed to find a little time today to work on the TD caps and control panel. I realized as I was working, I was forgetting to take photos. I'll try to take more as I continue on. Most of you know, but I'll mention anyway, ATA caps and control panel come untrimmed and are made to fit a 2" diameter pipe (from what I understand, a little smaller than other kits). I was able to pick up some white 2" PVC pipe, but work on that will be next weekend. I used the reference below as a measurement guide. I also borrowed some tricks from Caleb's (MaskedVengeance) build thread. Caps were first. No photos, but I marked a line at 20mm with a pencil and used lexan scissors to trim away excess, a few mm short of my line. I then added tape from the guideline to the top of the cap, leaving the few mm's I needed to trim exposed. First I used a Dremel, with 60 grit sanding barrel to knock down the excess to 1mm or less from the edge of the tape. I then used a 180 grit sanding sponge, followed by 220 grit paper to finish off. Control Panel came next. First was removing the side "bulbs" (my made up name for them). For the left side in the photo below, I cut as far as I could to the left while still clearing the raised bulb, so that the entire length of control panel is flat. I eyeball centered the piece between lines on my cutting mat and used a piece of tape aligned with vertical lines on the mat to create a somewhat straight, perpendicular line as a cut line. Not sure if this is the best/easiest method, but it came to me and I went with it. I then added a few more layers of tape so my cut line had a raised edge. Used the x-acto knife to lightly score first, two or three passes, then used the utility knife for a couple more passes and snapped away. Unfortunately, I didn't get photos of the taping process, just the end result below. For the other side (right side), I measured about 124mm from the left edge, marked about 4 points along the arc with pencil and then added tape to connect the dots and create the cut line. The reference photo above shows 122mm, but I went a couple additional mm's for when I clean up the edges. Used the same x-acto, utility knife and snap method. For the top and bottom cuts, I used a tailor's tape around the arc. At one end, I started the tape measure as far as I could go to where the curve reverses to the flat trim (hope that makes sense) and made a pencil mark, stretched the tape around arc to the top and made another mark. Repeated for the other end. I then clamped a metal ruler (again, no photos, sorry) connecting the marks on the right and left to use as a cut line and again, used the score and snap method. The photo reference above lists 95mm from top to bottom of the arc, however with the ATA control panel, there was only 90mm, I'm assuming due to these being made for 2" diameter pipe. I'm also assuming this will be ok for approval since it should still be proportional and the reference photo measurements are approximate. Today's end results. The edges of the control panel are still very rough, I didn't have time for sanding and cleaning them up. That will happen next time. I didn't set it up with this in mind, but when I was taking the below photo, it looked like a face. So...I added eyeballs. Probably matches the look on my face working with ABS today for the first time.2 points
-
Thank you for the kind words Paul, was a fun visit through the past, it's a shame some info and images are no longer available but still I'm sure others will enjoy the read1 point
-
I'm still laughing it looks like me when making a review.1 point
-
@11b30b4 850Armorworks has upgraded their ENTIRE shop (multiple 3D printers, new paint booth) and has just begun production of a rotocast ROTK helmet, and it comes with your choice of printed hovi mics. They are also working on upgrading ROTK armor parts slowly but surely. Because of Hurricane Sally, they are shutdown, but they will be back up and running as soon as possible. Their IG has been documenting everything, and it's impressive.1 point
-
Love that eyeball face. Haha. Nice work. I plan on posting Part 2 of my TD build hopefully on Monday, as it is mostly drafted now, and I just need to finish and add in some graphics. And surprise surprise, there will actually be a Part 3 once I get feedback on a TD clip question I have. Sent from my iPhone using Tapatalk1 point
-
Black strip on the Jim kits is about 3/4" wide if I recall correctly. I will measure it and get some pics for you this week.1 point
-
I think you also hung the bicep from the shoulder bell, so once you move the shoulder bell, it should also raise the bicep a bit. That may help with the clearance of the forearm but if the forearm is hitting the inside crease of the bend of your arm at the elbow, trimming will most likely be needed. I will also not that my forearms do hit the tops of my hand plate depending on where my arm is hanging so if you do choose to trim the forearms, I would take it from the elbow end not the hand end. Good luck.1 point
-
Got someone to take some quick photos of me in my armour today. My sniper knee fix and belt adjustment looks way better with the changes Main issues I see is that I wore my shoulder bells wrong and my shims need to be replaced discoloured and not completely working Sent from my iPhone using Tapatalk1 point
-
It's love/hate...1 point
-
You normally have to be actually working on EI or Centurion to be grandfathered in but really depends on what the DO's say when you actually apply. You love that blade putty
 1 point
 -
WOW we actually got these in Australia, thank you Big W
 1 point
 -
Hey Sha!. Thanks for checking in. I wasn't waiting on you. Just busy with work and haven't had a chance to get the armor on. Do you need a pic of me in the armor, or would it dressed on the mannequin be ok? I know what the answer to that will be, but thought I would roll the dice.... I'll get some pics ASAP1 point
-
Congrats on Expert Infantry!!!1 point
-
It's time to begin fitting and trimming armour pieces. I realised last night that the only item I had not bought was pop rivets to assemble the helmet and holster, so as Vader says: I've been looking over other build threads each day and building the courage to assemble my first piece. I think I'll first tackle the forearms, then biceps. I've been using break time while I wait for paint or glue to dry (glueing foam and velcro into my helmet) to make cover strips (still need to make inner strips) and plan snaps and strapping - I plan to use ABS to reinforce elastic ends and snap mounts. I also have brackets to install, so all this will make time fly while I wait for pop rivets to arrive in the mail. But first, sanding and shaping of armour pieces before fitting.1 point
-
Perfect! Just go easy trimming and yanking1 point
-
Hello @all many thanks for that really detailed Feedback, it really makes it easy to improve my costume. I'm very happy that i got EI approved and i'm very excited to make the needed changes for Centurion approvement. A few years ago i never would have thought that i would run around in an armor (plastic) costume, but i really fell in love with the FOTK. The FISD community with all the detailed WIP Threads was so helpfull and inspirational for us (at this point of course many thanks again @ukswrath, we literally learned your building Thread by heart). It was a lot of fun to build it. I'm already at making changes regarding the forarms (i think i will 3D Print a TLJ/TROS Version). What makes me speechless and very proud, that i can also be part of the #1000. Thanks for all the kind words and congratulations to the FISD to hit the #1000 <3 With kind regards - and everyone stay healthy!1 point
-
Here is an image/link from my own build which might be helpful to you. I find that visuals are always helpful. =)1 point
-
I'm almost there!1 point
-
Working on that after a short break!1 point
-
I'm happy for all the troopers that made it to this milestone. I wish I could have been a part of it but theres Centurion 500. Im definitely going for that!1 point
-
1 point
-
Congratulations all and a massive thank you to all the staff and peps who made this milestone possible .1 point
-
Yes! Woo hoo! Now on to 1,500.1 point
-
Congratulations FISD! This was a very exciting moment to be a part of! It makes me very proud to be an FISD member, Attache, part of the 1000 EI, and member of the 501st Legion. Thank you to everyone who has helped make this moment possible!1 point
-
Finalizing yoke, chest and backplate. It appears the backplate on the figure has the circle part painted red. Since this is the only reference, do I need to paint this red or keep it black. Here is my backpiece: The black circle only has a light coat on it right now until I get confirmation on red or black. For the upper torso that is now painted but not assembled, here are the reference photos. I will post the final torso photos of my build this weekend including shoulder bells, biceps and forearms. Sneak peak of upper body parts going through final painting. This paint is very shiny, but I am concerned about is scratching or rubbing off. Typically I do not add a clear coat or some sort of protectant since I usually paint white over white. Anyone got any recommendations. I was just going to leave it as is, but I am concerned about the chest plate rubbing on the abs.1 point
-
Affirmative sir! If there were a top 10 of most common missed details on approvals, that would have to be near the top. Along with fully painting ATA ab buttons to the edges. I KNOW I'll miss my share of details, but hoping to avoid some of the common ones for sure.1 point
-
The tube stripes and vents worked well; much less cleaning up required than I expected. I may even leave the tube stripes a little haggard to give them a more authentic look. There was a little paint bleed here and there, so I'll clean them a little once all the paint has cured fully. Very happy with the results!1 point
-
It definitely helps knowing what to expect before getting started. Even then, the unexpected is sure to pop up every so often. I couldn't even imaging trying to do this without research. Thanks so much, Glen. It was both nerve-wracking AND exciting finally putting scissors and blades to plastic!1 point
-
It’s been a couple of days of bad painting weather, so I figured I’d post pics of the taped off helmet for you all to peruse (and point out if I made an error). This is all with the vinyl tape recommended by Firedog (Thanks!)1 point
-
Back at it again. Really slowed down while I did some problem solving and had some paint issues (which are extra frustrating at this stage). I'll post some photos and descriptions of my progress and hangups later this week, but as a bit of a teaser...1 point
-
I've had a few Jim kits and not had any issues cleaning with soapy water but each to their own1 point
-
I actually used mustard XD1 point