Leaderboard


Popular Content
Showing content with the highest reputation on 08/02/2020 in all areas
-
Paul has all his stuff available on the “Mr Paul’s Total Grunt fb group, as well as the “Shoretrooper Fam” fb group. Someday I want to build an AT-ACT, so that’s how I found him. Sent from my iPhone using Tapatalk2 points
-
Slightly longer answer - Jim "Jimmiroquai" Tripon's flexible fiberglass kit is probably as close to the screen used injection molded material as we're going to get due to the incredible cost of the tooling. I've seen a couple of makers coming out with CHEAP ABS kits and in my opinion, they just don't look as good. You can't pull the kind of detail you need in ABS, so there ends up being a weird mix of 3D printed, resin cast, and ABS parts. People also assume because of the white ABS that like ANH, they won't have to paint these suits, which is DEFINITELY the most difficult part (strapping is probably #2, as there really isn't much to the assembly or trimming like there is with ANH), but with the mix of materials, you absolutely should paint the entire suit and helmet to match. As for helmets, the BS conversion was a great option when they were like $80USD on Amazon, but I've seen prices fluctuated up to $300 lately, which is absolutely not worth it for the amount of work that needs to go in. I know 850 is not currently offering a helmet, and that HSP is offering a resin (I believe) one, with separate detail pieces. It looks okay. Nico Henderson's 3D file went up in price (to $70 now, I believe?) but I've seen some absolutely beautifully finished ones, so I daresay it's worth the price if you intend to sand and paint it properly (god I hate print lines). Jim's helmet appears to be a cleaned up version of the BS (there are a few telltale signs like the mic tip area for one) and is one solid piece of fiberglass - I reinforced mine with additional resin and am pretty darn happy with the quality and details. Jim's isn't perfect, but the sculpts and proportions on both "legit" ABS makers I've seen just don't look quite right to me, in addition to being the wrong material. I recently saw that one was approved at Basic (I think the 1st ABS ROTK), so it can be done, but will take a lot of work - probably more than Jim's. The downside to Jim's is that it isn't cheap by comparison and shipping outside the Philippines can be pricey - I got mine as part of a large group order that bundled shipping, which reduced cost quite a bit. Just some food for thought when deciding between ANH, Jim's ROTK, and an ABS ROTK.2 points
-
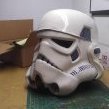
I've decided that I'm going to try an emulate the "move along" helmet (real original I know) but with a twist: I am going to try and replicate the way it looks now. current day. Although, If it had never lost it's ears. I'm planning to paint the entire helmet with a khaki green to replicate the HDPE showing through the cracks in the white paint. Obviously this will not be a helmet for trooping but a display piece that (maybe) I can fool some house guests into believing it is the real deal for fun I've been building models for the past 5 years and I'm not new to weathering and painting techniques so I'm expecting myself to do a decent job on this less than decent kit. Here are some photos of what I have done so far compared to the surviving original helmet Not bad for a first attempt in my opinion, however I'd like to think I could do better on a second attempt. I would like to eventually try this out on a real HDPE helmet kit but I'm getting ahead of myself2 points
-
The elastic is both brown AND black. The way it is fixed to SU costume is with the brown side facing downwards and black side facing up. That applies to the DT, ST, TK and fair to assume Tanker and ATACT.2 points
-
EXPERT INFANTRY PHOTO CHECKLIST (for all non-FO TK costumes) Mandatory Information: PHOTO GUIDELINES ___ Armor Maker Photo size- At least 800 X 600 (preferably 1280 X 960) ___ Helmet Maker Good lighting ___ Blaster Maker A neutral (solid) background color is suggested, more info in this thread ___ Permission photos social media: Yes ___ Approved TK costume link: NOTE: you must be an approved 501st Stormtrooper to post an Expert Infantry request, you can request TK access here Please post a link to your approved TK costume from your membership profile into your EI application, instructions in first post of this thread IMPORTANT!- Example photos can be seen below, but all photos MUST be 800 x 600 or larger to show details. PDF Available for download/printing here:EXPERT INFANTRY PHOTO CHECKLIST.pdf Optional information: ___ Full name ___ Height/weight *** ___ Boot maker ___ Canvas belt supplier ___ Hand guard supplier ___ Holster maker *** Although not mandatory, including this information helps a LOT. Troopers come in different shapes/sizes, and we can make certain allowances in some cases. Please be aware that all photos listed below are required for approval Full Body 1. ___ Front (Arms flat by side) 2. ___ Back (Arms flat by side) 3. ___ Left side (Arms raised) 4. ___ Right side (Arms raised) 5. ___ Left side detail (arms raised showing ab/kidney connection clearly) 6. ___ Right side detail (arms raised showing ab/kidney connection clearly) 7. ___ Action shot Armor Details 8. ___ Abdomen button plates (close-up) 9. ___ Cod and posterior plate connections showing rivet/snaps (exterior) 10. ___ Interior strapping 11. ___ Wrist openings (close-up) 12. ___ Close-up of ab/kidney rivets 13. ___ "Han" snap 14. ___ Left sniper knee plate close up 15. ___ Right sniper knee plate close up 16. ___ Left thigh ammo pack rivet close up 17. ___ Right thigh ammo pack rivet close up Helmet Details 18. ___ Front 19. ___ Left side 20. ___ Right side 21. ___ Rear 22. ___ Back-lit shot showing lens color 23. ___ Close-up of Hovi tips Accessories 24. ___ Neck seal 25. ___ TD (Thermal Detonator) front 26. ___ TD Rear, showing close up of screw type. 27. ___ Holster attachment 28. ___ ABS/canvas belt (rear) 29. ___ Boots (showing tops and sides) 30. ___ Rubber gloves Blaster Details 31. ___ Left side 32. ___ Right side 33. ___ Rear showing D-ring Important! IF A PARTICULAR DETAIL IS NOT CLEARLY VISIBLE, THE APPLICANT WILL BE ASKED TO PROVIDE ADDITIONAL PHOTOS. Model: Arthur (giskard8) TK 39093 Armor type: ANH Hero FULL BODY 1. 2. 3. 4. 5. 6. 7. ARMOR DETAILS 8. 9. 10. 11. 12. 13 14. 15. 16. 17. HELMET 18. 19. 20. 21. 22. 23. ACCESSORIES 24. 25. (front) 26. (rear) 27. 28. 29. 30. BLASTER 31. 32. 33. A big shout-out (and many thanks) to Andrew (Sly11) for doing the PDF for this!1 point
-
Ok I have been collecting bits for several years, this part from here, that part from there. (Details later) and yesterday, my biggest box finally arrived, my KB A- FOTK kit. The build can finally begin! (I’m sure there will be things I’m missing) Next, find time to sort and label things and continue researching others KB builds to get a better feel for how these kits go together. Parts: Armor - KB Props (May the 4th A-) Helmet - Anovos Standard (FA and TLJ) {also got a KB FA helmet, but I may sell it} Gaskets - Geeky Pink’s (Then perhaps rubber ones) Neckseal - Geeky Pinks or Anovos (have both) Belt - Belts of the First Order Belt Pouches - Trooperbay Gloves - Imperial Boots Boots - Imperial Boots Metal Holster - R2Dan (order request posted, no response at the moment) F-11D - Imperial Factory printed 5th Horseman and Anovos F-11D guts - BlastFX (in the T5H at some point) SE-44C - Imperial Factory printed 5th Horseman Voice Amp - TRamp1 point
-
Wow good tip! It's not too hot out, but maybe I'll just bring them in a little, to be safe. Thanks!1 point
-
Now be very very careful leaving in the sun, pieces can distort if it's too hot. Really depends on how flexible the fiberglass still is, I've had two different lots from Jim and one was a lot softer than the other, had a bicep which started out round distort oval, managed to save with wrapping tape around and leaving. With the putty as it does contain acetone it may very well have reacted with the primer, or the primer may still have been a little soft, or was too hot1 point
-
One of the notes I've had was about the clips on my TD being rounded off when they should be straight. I took the time to cut off the rounded portion and move the panel up against the clips so I wouldn't have to drill new holes. I might not have cut it so close to the screws had I used the proper cutting tool and didn't nearly hack off my hand. Be safe troopers! Always use the right tool for the job not just the closest one to your person... Here it is. BEFORE AFTER Reference1 point
-
Okay cool that makes sense thanks! I also realized that I needed to trim off a tad more return edge off the "knee" part of the shin pieces. Actually I would say that it's more from the original cut line than the actual return edge. Hopefully that will help more with the fitting.1 point
-
I think AP is a bit large around the mid section and the right forearm can be funny to fit. I had to do the same on my TD build to make it fit better and look more screen accurate on me. The sizing is probably great for an average body Shape.1 point
-
Hi mate. Yes I sell the metal brackets with the elastic needed to make them function correctly. I have new stock of them coming in soon.1 point
-
Here's the jacket from the book... https://twitter.com/DelReyStarWars/status/900823044331110400?s=091 point
-
This feed was crucial for me and approval of EI with minimal corrections! Sent from my iPhone using Tapatalk1 point
-
Lovely attention to detail. I really liked how are you following the specific cut lines of the original helmet you’re copying, like the eyes and the teeth. Very good! :-) Lovely idea to go the Mock-HDPE route, too. I’ve done the same recently and it’s great fun. :-) Dan1 point
-
looking good!1 point
-
Looking sharp sir, good luck.1 point
-
Great armor Martyn... Good luck with your application!!!1 point
-
Well done Justin!!! Next stop EIB!!!1 point
-
Correct, align the tops and then trim the bottoms to suit1 point
-
Congratulations trooper1 point
-
Congratulations Justin.1 point
-
Received my approval today! Thanks to all for the kind words and encouragement! Next up, EIB and Centurion!1 point
-
Looking Great Martyn, one of us will be with you shortly.1 point
-
First cut is often the hardest1 point
-
My application for EIB is in!! [emoji1695][emoji29][emoji1695] Sent from my SM-G920F using Tapatalk1 point
-
Well my journey with Anovos has come to an end and I will continue to follow this thread and wish you all the best outcome. Let’s just say we have reached an agreement that was satisfactory to both parties involved and that is all I am permitted to say on the matter.1 point
-
I have spoken with the LMO's and they are ok with this to go ahead. There are a few things they would like to see in your thread with regards to research. 1. TFA helmet is what the LMO's are leaning towards as this is a TFA era character that was gone before TLJ (yeah I know Hasbro used the TLJ helmet, but it's a conversation you and I can have) 2. They would like to see research from cross-referencing as cardinal has a description in the book and now the action figure that should take care of any parts that are different from the standard Storm troopers. Good luck Shawn, I'm looking forward to this build and am here to help you with the CRL.1 point
-
Happy to be here among the Elite! Who's next?1 point
-
For those interested appears we made 500 in September 2015 And number 500 was1 point
-
Congratulations Scott.1 point
-
Congratulations on EIB Scott! Good luck on your journey to Centurion!1 point
-
It's nail biting stuff!1 point
-
Excellent point! You can also say that we are 98.2% of the way there ;-) 1.8% left - almost there!!!1 point
-
Your EIB badge is waiting for you mate!1 point
-
Just waiting for my 501st access to be granted on here, then I will be aiming for my EIB. [emoji1303][emoji16] Sent from my SM-G920F using Tapatalk1 point
-
18 spots and counting down . Last approved EIB Scott (TK41469)1 point
-
I love the sound of armour clanking in the morning lol. It's an endearing fact of life, embrace it, we all have the same issue and its sounds great when you are marching along in a group of other TK's. If it is giving you troubles with walking it may needs some minor tweaks and trimming, so my suggestion is to suit up and have some photos taken so we can check your alignment, spacing and offer some advice that might make a difference to your overall comfort.1 point
-
We are quite a few away from 1000 for centurion BUT getting close to 500 and there may be something special in the works for those who have earned that level shhh1 point
-
Here´s some reference for you1 point
-
Thanks Guys After looking at the different pieces, I decided to start with the plastic hard guards instead. Because I'm going Centurion, I'll be using the silicon hand guards, so it won't matter if I make a mistake on the plastic ones. This was a good opportunity for me to get to know the ABS strength for cutting and sanding with various grits. I'm using the score and snap method, followed by sanding with 120g, 240g and smoothing out with 400g. After getting used to the plastic strength, cutting and sanding method, I then moved onto the Shoulder bells.1 point
-
Short answer: no1 point