Leaderboard


Popular Content
Showing content with the highest reputation on 07/06/2020 in all areas
-
Attention all members and loyal citizens, Ask not what your detachment can do for you but what you can do for your detachment! Right, now I hopefully have your attention, we got a real easy way that any member can be part of the forum clean up crew, and help out making this place a tiny bit better by doing what many of you already do and that's simply peruse the forums. The task we have is monumental for any one person, but together, many hands make light work and you can feel confident that you played a part in the 2020 FISD term. Here's all you need to do. Find a post while surfing the forums with any of the following, please post a link to it in this thread. and that's it. Job done. What am I looking for? Photobuket water marks across images in a post. Watermarks in general that cover an Image that is advertising in nature. (Members are allowed to watermark photos and images they themselves have taken as long as they don't obstruct the image) Post where the images no longer work or just have info like 12034056.jpeg and nothing else. Broken links in a post that go no where, usually found in older post from years gone by. These generally don't help anyone so may be considered no use or obsolete. Please note we do not require links from anything already residing in the Archive or Trash compactor sections at the bottom of the forum. What happens once you have posted a link here to the thread with the issues. A member of the clean up crew ie. a staff member, will take a look at your link and see if we can rectify the situation by correcting the image, re-instate the broken link, or consider archive the post or thread. We are not in the practice of deleting but rather preserving our history. Once a staff member has attended to the links in question that hopefully will start populating this thread, they will respond to make all aware your post has been attended to. If you have any questions regarding the process, you can also ask those in this new thread. Happy forum surfing3 points
-
Howdy, my name is John, and I'm located in Texas. I never imagined I would be a stormtrooper, as I have a Scout and a completed Imperial Gunner, but a member of my garrison is selling his armor, and based on the measurements and his asking price, I couldn't pass it up. I've ordered new boots from Imperial Boots and a custom neckseal, as well as a compression 2 piece undersuit. The only thing I'm missing is a bucket! Hopefully I can get one at a decent price.3 points
-
More updates... Removing the painted on trap/tear details was a paaaaaaain. Just work slow and steady until they're gone. I'll be applying the decal set I got from TrooperBay! Looks pretty nice, but was not cheap ($26USD?!). I'm going to apply them using some decal application fluid so I can "float" them into place, then used a squeegee to remove any excess liquid. I like to use a small screwdriver to help position the decal so I don't have to touch the adhesive with my fingers. And there's the first one on there - actually fits pretty well considering it was clearly not made to fit exactly. They're symmetrical (the helmet isn't) and not quite "tall" enough, but really not bad. And two... Time for the front traps - these fit pretty well also, but were obviously a little crooked if you follow the shape. Just trimmed off the excess at the bottom, as it's hidden by the brow trim anyways. Decal application really isn't that exciting, but here it is with all of them on! Next up was spraying the frown black. Started masking... Then layed down some rattle can Satin black: Did about 3 coats from different angles... Removed the masking... yikes, gotta clean up that overspray and mask more carefully... And boom, more or less finished result: Time for finishing touches like the mic tips, lens, and interior assembly, but I knocked a big portion of the helmet build out this weekend... sweet!3 points
-
I had a window of drier weather today, so I took the leap and decided to get things painted. I moved our cars out of the garage, turned on the new shop lights, and also turned on a fan because it was still about 90 degrees. But with the humidity at just 50%, I knew that I could get a lot done. The fan mostly helped to keep the overspray out of the garage itself. Here are all the parts on their hangers. I still had a few pieces to prime before painting. This was the "dry zone". Out of frame, and to the right, is another garage door opening. That's where I did my painting to keep the other parts free from overspray. After almost 3 hours, I suddenly heard thunder, and I checked my local weather radar. A huge storm cloud was headed my way! Luckily, all the parts had been covered with white gloss, and I was just waiting for things to gas off enough for the 2k clear coat. So everything went onto garage hanging storage at the back wall of our garage until the weather cleared up. I was pretty happy with how things looked at this point. The armor looked nice, and if I wasn't such a perfectionist, I could have called the armor "done" for white paint. I ran some errands after this, and noticed that the rain never happened. Realizing that I still had about an hour of time left to paint, I pulled out all the parts again, popped the 2K Gloss, and began to apply the final clear coat. And while I thought the gloss white was shiny on its own, the 2K Gloss was blindingly glossy! This stuff is remarkably gorgeous. In the pic below of the back plate with the 2K Gloss applied, you can see the reflection of my car. Shiiiineeeeyyyyyy!!!! And the chest is also just as glossy. Swoon. The pics don't really do justice to the shine on these parts, so you'll just have to take my word for it. I used 2 cans to cover most of the parts in 2K Gloss. I have two more, thankfully. I still have to fix some paint hiccups on the ab, belt boxes, and thermal detonator. One can should be more than enough for those. And I'll have an extra can on hand for future touch-ups. Now to wait for a week or so for things to cure really well. Then it'll be time to polish. I am thrilled to be done with the bulk of this part of the build!3 points
-
Well I'm beginning the third part of my life as a Rogue One TK. The first being a Mandalorian Merc and second being a Biker Scout. Things have been on hold due to COVID 19 but we're starting back up slowly For the armor, I'm using 850 Armor Works R1TK kit Stole Images from Jeff For the helmet we used Nicos R1 3D File and it's currently printing We got the hovi mics and put those together The helmet is PETG as well as Jeff's Armor he's working on (11b30b4) That's all for now. More to come2 points
-
Well it’s...Something. I aligned the left ear closer to what it should be and installed the right. Due to fatal errors I made when trimming the cap and face, this is the only way the right ear can sit without showing the gap between the cap and face. So...Is it even acceptable at this point or is it gonna be a display piece? I’ll have everything I learned from this build and more as well as learning from the beyond stupid mistakes I made filed away for when I do my actual build. Thankfully, if this one isn’t acceptable, I didn’t pay full price for the kit. My nerves are shot from the ears and I don’t think I can align them any better than I have them.2 points
-
Daniel Carmona Mir TK-19587 EIB A4 Mario ¡¡thanks for everything!! http://www.whitearmor.net/eib/certificates/19587-eib.png 2892 points
-
Just a small tip I learned; A simple way to make the rim of the mic tip white (instead of masking and painting it) is to sand down the rim with sandpaper, revealing the white underneath. That is, if you are using white resin-cast mic tips. Best of luck on your build.2 points
-
Hi folks! So I've had several questions regarding how I did my helmet lenses and so I thought I'd put a little guide up for anyone that may be interested in the process I used for their own builds. I think it came out rather slick with a neat end look while being solid and easily replaceable. Here is a shot of what this technique looks like when completed from the inside: Materials: Sugru moldable rubber Shade 3 flexible welding visor - https://www.amazon.com/gp/product/B00209I0UG M3x20mm screws and acorn nuts Index cards Pencil Xacto knife Micro ruler Scissors 220 grit sandpaper Drill Dremel and/or belt sander Vise Thin black heat shrink tubing Step 1: Create eye socket templates I don't have a picture of this first step but you see me using mine in later steps. So all you do here is take an index card, ho ld it flush over the eye opening inside the helmet then with a pencil trace the opening from the outside. Make sure it is centered on the index card because you are now going to extend it for overlap margin. With the socket outline traced on the card, using a ruler measure half an inch out from the outline and place a mark, do this many times tracing around the outline so you're basically making the original socket outline half an inch larger on all sides. Then simply draw a new line around this outer outline and cut the template out with a scissor. Make sure you label what eye socket each label pertains to, and store these for future needs even after this project is done in case you want to cut new replacement lenses, switch out colors, etc. Step 2: Shape a rubber mounting surface In this next step you are creating a rubber mounting surface that the lenses will bolt onto and create a flush connection to the eye sockets. Take your Sugru (I used like 5-6 packets per socket) and create a nice think outline around the whole inside of the socket. You'll want to ensure that the rubber around the socket's plastic mold is slightly taller so when you rest a lens onto it is sitting flush on the rubber bed. You have a lot of time to work with the rubber before it starts to set so take your time and get the outline right. Important last step here, after you're happy with the rubber mount take an index card (or two to make it thicker), lay it against the rubber outline and press down lightly to ensure that you have an even surface all around to avoid having an uneven mounting surface outline. Step 3: Cut your mounting bolts I used five bolts per lens, you may want less or more but found that to be a happy place for getting the connection tight. Ok so here you are going to take your M3x20mm (you don't need to use this specific bolt size, can be M4, M2, whatever, just something you're happy with size wise) and cut them so you have a set that will have even height protruding upwards from where you will be mounting them. The gist is you will be adding these bolts to the rubber mold you created in step 2 with more rubber, but first you need to look at where each bolt is going to rest and measure how far over the rubber they are sitting uncut. Since the topography of the helmet here varies, some bolts will be extending quite far, others not so much, and you want an even extension from all bolts. I wanted about 8mm of extension to bolt into so I held a screw in the place it will be mounted, measured how far above the rubber it sticks out to calculate how much I needed to cut (so if it stuck out 13mm I cut 5mm off). Keep track of where these screws are going to be mounted since you measured it for that spot! As I was measuring and cutting, I placed them on my templates at the spot they will be mounted. To cut them down I just put a nut on the screw exposing the amount after the nut equaling how much needed trimmed, then put it on a vise and dremeled that excess off. You may find a cutting solution that works better for you, but I found that easy. Careful handling these little bolts after cutting them, they will be very hot! NOTE: Never cut metal bolts that are already mounted in your helmet, besides making a mess their heat will likely melt the plastic creating a huge problem. Step 4: Mount your bolts Now that you have your rubber mounting surface and your bolts cut for specific locations around the surface, it's time to attach the bolts. Using Sugru again put a nice wad on the bottom of the bolts, then just mold them to the mount at the correct locations where they were measured. Get the attachment between the mount and the bolt nice and tight, use more Sugru liberally and work it in. The one thing to be careful of is to not have any Sugru on the bolt that goes over the height of your mounting rubber from step 2, otherwise the lens will stop bolting in too high and not rest on the flush surface you created. However, being rubber this stuff can very easily be trimmed with a Xacto knife, so you can just snip any excess off to keep your base mount surface flush. After you've finished mounting all your bolts, you may want to double check you didn't get rubber smudges on your helmet and clean it off well, don't worry if you do, it will remove without much effort. Clean your hands thoroughly as well! Now that you have your cool rubber mount with sized bolts, you need to let that rubber set for 24 hours. Step 5: Add mounting points to your templates After you've allowed your rubber to set overnight, you'll be taking your two socket templates and marking where the bolts you mounted relate to it. Simply press the template down onto the bolts to make impressions on the paper where the bolt tips are, then punch through those holes with a pencil. Afterwards, place the paper template into the actual bolts to ensure that all the bolts align right with your template and your template rests nicely into the mounting surface you've created. This is a preview of what your lens will look like when you cut them to the template shape and drill the holes! Step 6: Cut and shape the welding lenses I used a shade 3 welding lens which is flexible and fairly easy to cut, after looking around and trying a few options I found the one linked above in the materials list to be the best for this project. Ok so what you're going to do now is rest your templates onto the lens stock, trace the outline lightly with your Xacto knife (just enough so you can see where you need to cut), then cut out each shape with your scissors. Your cut lens will be a little rough, so curve it more naturally by (carefully) running it down a belt sander or Dremel tool. You just want to make the shape of the lens natural and curve to make the template and avoid any sharp points (your eyes don't like sharp points). After that, take some sandpaper and sand the edges all down nicely so they are nice and smooth. For the last step, place your paper template back onto the cut lens, then with the Xacto knife mark where each hold is going to go. Take your drill and open up each hole, making them plenty big enough for the bolts to go through with some room for flex, but not too large that your acorn nut won't compress down against it. Note that while doing all this, be careful not to scratch the lens surface by a stray cut or tool. Step 7: Mount your lenses Ok almost there! Here you simply need to push the lenses down through the bolts and screw in your acorn nuts to secure the lenses down into place. You may need to bend the lens a bit to get the fit to work, here is where making those holes a little bigger than needed helps. Whatever you do, try to not allow the tops of your bolts to scratch your lens. To hide any excess exposed bolt shaft I cut very small pieces of black heat shrink tube and put them on the bolts then put the acorn nuts back on and screwed down tightly. Conclusion: Ok so this may not be the easiest method of creating and mounting lenses, but the end result is pretty nice (in my opinion), and I like the effect having the acorn bolts gives. You have a well sealed lens over your sockets without any gaps by virtue of the rubber mounting surface and bolts securing them into place. The lenses themselves aren't flimsy and are high quality, plus easily cleaned with mineral spirits if heavily soiled, or just your standard glass wipes. Another plus is you can easily replace them just just unbolting them! I hope this guide helps anyone interested in this type of technique, cheers!1 point
-
Heeey troopers! It's me again, with yet another build. I've had to fast track this one, so it's taking priority over progress on my 3D printed Shoretrooper (that build is going on over at the Pathfinder's Detachment). I finally have enough pieces printed/welded together that I can share some activity now. I'll begin by saying that this is a build for my 10-year-old son, Cameron. A few years ago, I built a Battle Buddy FOTK conversion for him, and he loved it more than anything. He would have slept in it if I allowed it. He was treated like a rock star everywhere he went in it, and he completely embraced the bada$$ FOTK trooper we all know and love from the movies. He was approved in it for Galactic Academy, and has trooped with me many times- always stealing the show! Earlier this year I was approached by our GML who requested some guidance from me about the FOTK Battle Buddy conversion process. The Garrison was looking to build a kid-sized FOTK for a 5-year-old boy named Jimmy (he has chronic heart conditions) whose only wish was to have a stormtrooper helmet. (Most people don't even consider that something like an entire suit of FOTK armor exists in a child's size, so the best Jimmy could hope for was a FOTK helmet.) However, we ALL know that it's possible! Since I am one of just a few troopers in our Garrison who have taken the journey of the FOTK Battle Buddy build, there was hope that I could help with putting one together for Jimmy. I told my son about Jimmy and his conditions and that I *might* be making another one. My son started to cry, and when I asked him why, he said, "I want Jimmy to have my stormtrooper armor. He's had a hard life, and I want him to feel happy." I was very moved by his reaction, but told him to think about it first. I didn't want Cameron to give his armor away simply because he thought it was something that I wanted him to do. He was very attached to his armor, and I didn't understand how he suddenly could offer it up like that. He said he would think about it, and we didn't discuss it any further. A week later, Cameron brought $60 of his saved allowance (which was pretty much all he had), dumped it on our kitchen counter, and said, "I want to donate this to the American Heart Association." What??? It was such an "out-of-the-blue" gesture for him, and it took me by surprise. Then I remembered Jimmy. So I asked Cameron, "So, is this about Jimmy? The armor?" And he yelled at me, "Yes! I want to help Jimmy! I want to give my armor to him. I haven't changed my mind!" Okay then. He wanted to keep the helmet, though. And that's what happened. Somehow I was chosen to be the person who was the "voice" for the surprises during the Bert's Big Adventure presentation . (Watch out- nerd with a mic!) The Georgia Garrison presented Jimmy with a Battle Buddy first. Jimmy was soooo excited about it! I don't think that the family knew that there was moooooore! After that, Lord Vader presented Jimmy with a FOTK helmet (a lovely Rubies Deluxe conversion crafted by our own Sith Lord, Scott Britt). Jimmy was thrilled! Then came the biggie... the Garrison donated a small case on wheels to hold the armor (just like the one I used for Cameron's armor), and the case was wheeled out in front of Jimmy and his family. I don't think they understood what was being presented until I started pulling out the chest and back plates and said, it's his VERY OWN ARMOR. Jimmy cheered, and the parents started to cry. Cameron suddenly became shy and stood off to the side, a little overwhelmed at all the people and the excitement. Could a mom be any prouder? I think not! And if you're still here... As a gesture of thanks to Cameron, I'm rewarding him with a new set of 3D printed FOTK armor. This set will be more screen accurate than the Battle Buddy for sure. I'm trying to build to 501st specs along the way. I don't know a thing about the FOTK armor, so I'm learning as I go. I bought my files here, and the person who made the files has been very, very, very receptive when I've requested changes to the files for improved accuracy and/or model print improvements. Seriously, if I ask for a change, I usually get a new file within an hour. I don't think he ever sleeps. Most change requests were for improved thickness of the parts. Everything prints out really solid. Here are most of the parts I've printed/assembled so far. Using Armorsmith, I've been able to scale everything down to fit Cameron nicely. Still have lots of sanding and gluing of greeblies before priming these parts. The white stuff on the seams is Apoxie Paste, and it sands like buttah. The shins are two halves (another request I made), and they are attached with heavy white elastic on the outside. I'll be securing them closed on the insides with some elastic and velcro. I love the shape of the FOTK back. Another change that was made per my request was that the yoke and back be formed in one piece. It is incredibly solid and very strong, yet has some flex to it as well (yay for ABS printing!). Cameron loves sliding this piece on. He keeps saying that it's like a Halo backpack. And today was the first day of priming parts! The weather was nice enough today to get a few light coats of filler primer on the biceps. One thing I love about filler primer is how it shows you what you need to work on. Like more fine sanding on those printed buckles. A small step on a much longer journey, but I'm excited about the trip!1 point
-
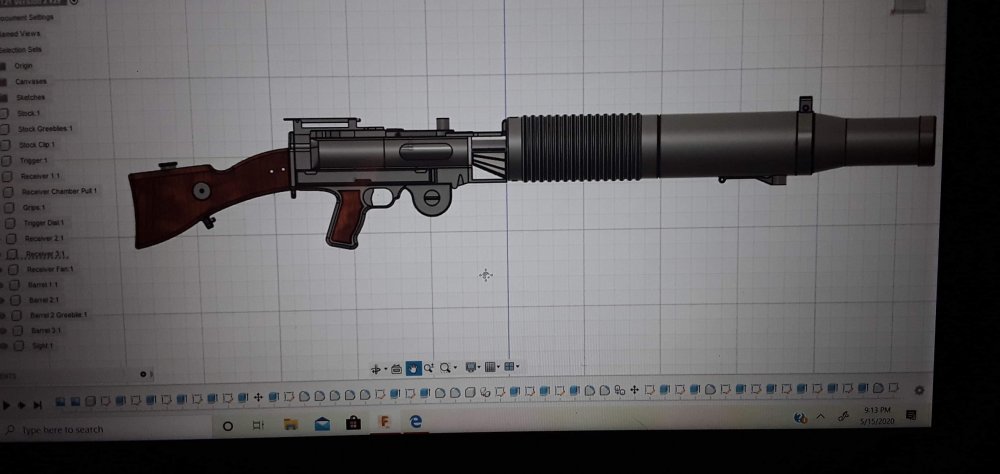
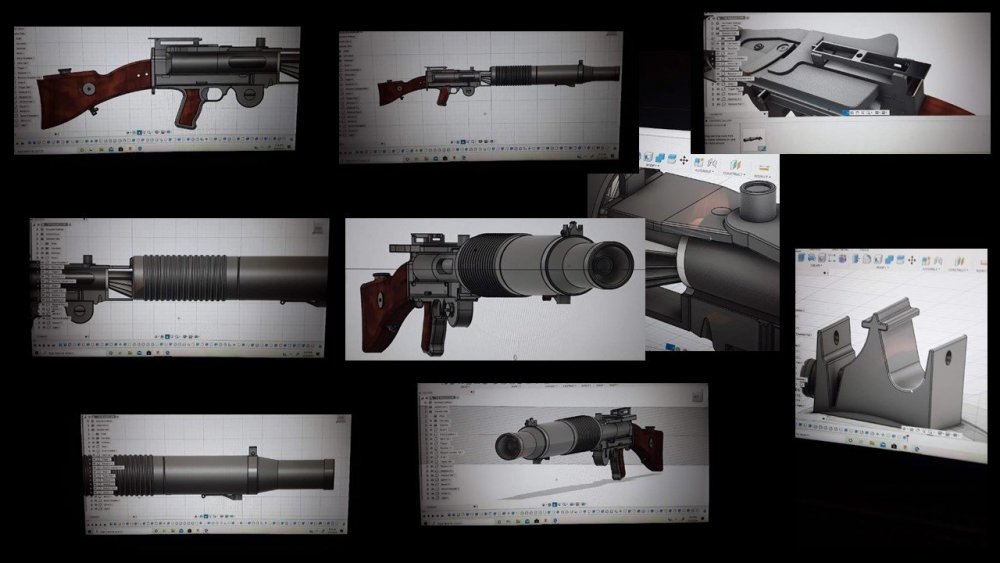
I am brand new to the forum, but had to reach out to the community. I finally, after 2 months of work, finished the modelling for a custom T-21. The first of 25 or so pieces is currently 3d printing. I really need more printers.
 1 point
 -
I received my BBB from Head Shot Props over the holiday weekend. Already had my B grade helmet kit from the sale around Easter. Now I've got the armor to go with it! I laid it all out yesterday to see what I've got. This will be my first stormtrooper build and first 501st attempt. I've got experience working on a mando but this will be a whole different adventure! I plan to get: Gloves from Endor Finders Boots from Imperial Boots Undersuit from Jim Tripon (don't know of any other options, especially stateside) Hovi tips and audio system from Ukswrath I'll think about a blaster later, but do want to get one in the future. Anything I'm missing at this point? Sent from my LM-V600 using Tapatalk1 point
-
Hi all! I've been talking about making a Phasma kit since TFA came out. I've love Phasma and her story, and finally pulled the trigger on buying a KB Prop kit! I have a 3D Printer and plan on making a TLJ version Baton. Super excited to join the group!1 point
-
Name : Fernando baro 501st ID : 29415 FISD forun name : Bareta Garrison : Spanish garrison Armor : Armour Factory (kit) Helmet : Armour Factory(kit) Blaster : Armour Factory Height : 177cm Weight : 82kg Boots : Armour Factory Canvas Belt : Armour Factory Hand Plates : Armour Factory Neck Seal : Armour Factory Holster : Armour Factor https://501st.com/members/displaymemberdetails.php?userID=325931 point
-
I taped off the neck seal and sprayed a few coats of satin black. I peeled the tape off and there aren't any issues that need touching up! Very happy this worked out! Tomorrow I'll peel off ALL the tape and figure out what needs touching up. I'll do the gray spots that I messed up with the marker, and then tape again after a couple days to fix over spray on the white.1 point
-
Noting better than BBB's. Will be looking forward to the progress and future approval, I have not seen one of these Head Shot kits before. Good luck with the build1 point
-
Ahh, very good! That will be a lot less work. I’m currently working on some armor that is 3D print, so it will be quite the project, but yes you should do well with your armor! Looking forward to more Phasma! Sent from my iPhone using Tapatalk1 point
-
FYI Brit is only making the prop from 3D print not the armor, that is coming from KB Hello Brit and welcome aboard, looking forward to seeing the BBB photos when your kit arrives1 point
-
Roughing the surfaces prior to glue will help the glue adhere, E6000 can also take some time to dry, at least 24 hours if not more, some pieces I've had to leave for several days depending on thickness and weather. A combination of clamps, magnets and even painters tape can be helpful. Even a metal rule or two, enough strength to hold pieces down but will allow it to curve to the armor pieces.1 point
-
Hi, In addition to what @Blast 'Em! Shane recommend I would suggest what worked for me. use an additional piece of woor or metal to press the hole cover side to side and let it dry for about 48 hours. Hope this can help.1 point
-
Obviously I've been away from my own build for a while as well, and perhaps you simply haven't been updating your thread, but every time I see your name on Tapatalk I hope that it's you posting progress. Haha. Hopefully life has been ok on your end; things have been crazy for me. Hopefully I'll have an update in the next couple of days. It usually takes me several days just to write my posts. Haha.1 point
-
So HSP is making the armor now and looks like 850 is starting on the helmet.1 point
-
Haha yeah I've found the same thing. I didn't use as much glue as I could have on my biceps and forearms, but then I switched to using lots of glue on the thighs and shins. Thankfully E6000 isn't too bad to remove if it gets anywhere or squeezes out around your cover strips. @TKSpartan recommended using a cotton rag and just rubbing it over the glue. Friction from the rag will heat up the glue and it should ball up and fall off the ABS.1 point
-
These should help give you a good idea...1 point
-
this is my latest RT-97C build during our "Circuit Breaker" time. files are from Thingverse, no moving parts. please enjoy.1 point
-
Hi ,Jonathan that little guy looks powerful !! I'm attaching a couple of photos that can clarify the challenge with the Ab/Kidney Rivets, remember that it's recommended to have some reference photos when building the armor to have a better idea of how thing keep together. If I can make a suggestion to fix this, I can suggest what I did in a case like this: 1- remove the rivets, Ab and Kidney 2- fill in the holes with ABS paste, (you can glue a small square of abs behind to give support.) Sand and polish to give finish. 3- Measure, mark down and drill new holes (make it first in the AB side) 4- Place the new split rivets (Ab side first) 5- Align Ab to Kidney plate and mark down the new holes to the kidney armor. 6- place the new split rivets in kidney plate. It could sounds intimidating, but I'm sure you have the skills to achieve this. Hope this can help.1 point
-
Your youngling is adorable! Hey, you might want to take another look at your split rivets at the kidney/ab connection. If you're going for higher level approval, they will need to be positioned differently. I'm on mobile right now and can't access my reference pics to show you what I mean. Can anyone post a good reference for kidney/ab rivet positioning?1 point
-
Hola Fernando, me alegra ver que te has animado ya a presentarte a Eib, sigue las instrucciones y pon atención en los detalles de colocación porque la armadura y el trabajo en ella se le ve muy bien. Sube las fotos que te faltan y mucha suerte, tómate las opiniones como mejoras importantes para mejorar la armadura y lo que necesites recuerda: Trooper helping Troopers !! Pregunta que estamos para ayudarnos Hello Fernando, I am glad to see that you have already decided to introduce yourself to Eib, follow the instructions and pay attention to the placement details because the armor and the work on it looks very good. Upload the missing photos and good luck, take the opinions as important improvements to improve the armor and what you need remember: Trooper helping Troopers !! Asking if you need any help1 point
-
Perfecto Fernando. Mario estará contigo en breve. Perfect Fernando. Mario will be with you soon .1 point
-
Hecho.Espero que sirvan gracias1 point
-
Welcome to the FISD Vin Sent from my SM-G981B using Tapatalk1 point
-
Maybe poke around the Ongoing sales section. There are a few members selling those components. Also worth to check out the "getting started" section and especially thios thread: (you got 2 very good sources of armor in the UK btw)1 point
-
Very nice! (So is that awesome snap setter.)1 point
-
Caleb did a review on it and it looks really nice. And thanks again for the info on all the parts and your recommendations! I'm going to think about everything and take into account all the things we're talking about with durability, accuracy and cost. I appreciate it!1 point
-
Butt snaps installed and made the shape of the butt match the kidney a bit better: My velcro strapping system for my kidney to ab was not a good idea. You had to be exact everytime you strapped it on and the velcro still gave "play" when you applied pressure to tighten the torso, the kidney plate sides would easily overlap the ab plate sides. So i decided to make a snap closure system (the split rivets lost paint during the hammering process): Since I cut new "notches" on the kidney plate, I will have to cut the sides of the buttplate to make it match. Also, everyone meet the little guy that's slowed down my build LOL!1 point
-
Here's an updated version of my D-ring. Hope everything is fine! And many thanks for reviewing!1 point
-
For Centurion level, the requirements for the E-11 are listed towards the bottom of the CRL page here, Luke. When deciding on which type you prefer, it comes down to a few things: 1. Rubber- Good points: Basically indestructible, and many (but not all) are approvable at Centurion level. A nice choice when you want to let someone hold it for a photo. Bad points: Not as screen accurate/realistic. (But then again, 99% of the public won't notice) . Can cost several hundred dollars for a quality one. 2. Doopydoos- Good points: Fairly inexpensive and can be modified to look incredibly realistic with some attention to detail and replacement parts. Great for those with mild OCD (like myself) and a lot of time on their hands to do this. Bad points: Being made of resin, they need to be handled a little more carefully. I personally never let anyone hold my weapons, saying something along the lines of "The Emperor/Lord Vader forbids it" or "It's against Imperial regulations" when they ask. I have built and trooped with several DD resin E-11's through the years and never had a breakage issue. Long wait times for delivery (often out of stock). 3. 3D print- Good points: Relatively inexpensive. Can be very accurate depending on the designer and can be modified in certain cases for a more realistic appearance. Bad points: Can be somewhat fragile (like the resin type). Also, depending on the printing method there can/will be a LOT (think hours and hours) of sanding/filling involved to smooth out all the print lines, a requirement for Centurion level. A lot of it also depends on your budget. Being a little lot on the OCD side,I modified the heck out of my last DD build using a real Sterling magazine (modified) link here. I also used this same seller to replace the resin folding stock, rear cap, cocking handle, magazine well, front sight assembly and a bunch of other items with metal ones. This may seem a little extreme, but being an accuracy nut it was worth it. And, of course, I personally would never do a DD build without one of Tino's crazy-accurate E-11 finishing kits.1 point
-
Hi Luke, For E11 Blaster reference you may want to look this Thread I use a Praetorian Blasters Rubber E11 , and have moded a Hasbro E11 with the Doopy Doos conversion resina Kit and have seen some videos in You Tube about Doopy Doos E11 kit. In my opinion: Rubber Blaster is better for Trooping , it resist falls and shocks, while the resin, although it looks strong, can suffer fractures when falling or hitting. Obviously the cost is a big difference between both. I have read some trooper to have both, but it's your choice. Hope this can help.1 point
-
This E-11 is all pepakura made? Wooooow, your skills are very impressive!1 point
-
A little more progress Sent from my iPhone using Tapatalk1 point
-
Amazing detail you are working to, very impressive1 point
-
Why print something twice when you can print it three times! The change to the helmet part reminded me of the TD issue I had. So I've done the same thing, and also worked out how to get a bit of a better result at the expense a really slow progress bar. The results is still not perfect, you can see where there's some artefacts caused by Meshmixer reducing the mesh after the cut, you get to watch the progress bar of it ruining your part . I wish it wouldn't but I don't know how to turn it off. Also it would seem luck is on my side, maybe, need to print the part and check first. This is some standard UK guttering down pipe. You might remember it from such uses as the Shoretrooper Pringle cans, and OTTK TDs. And its about 1mm smaller than the hole *should* be, aka perfect. Obviously I need to actually hold parts and try it first. Yesterday I printed the tube stripe sections of the helmet. I was a bit nervous of these but due to cutting the helmet up to account for them I was able to orient it so they came out super clean. I also got all premature and got out the airbrush. The fit test got me all excited so I've started prepping them for a metal paint look. First job some gloss black primer. You can still see some of the tiny DLP layer lines in a few places and some grit that only appeared when painted, after they were air dusted and brushed down before painting However no ones going to be sticking the face as close as I do to them so I doubt you'll see them. Next stage will be some Alclad High gloss black then some Alcad Chrome. I am also considering moulding and casting one of them after the high gloss stage and trying an aluminium cold cast. And by considering, I know I will I just need to buy some silicone that's not about 18 months old. Maybe the stuff I have will work, I might get lucky but twice in a week seems like pushing it.1 point
-
Hola Fernando. Soy Chemi(Valladolid). En primer lugar, bienvenido al FISD. Me alegra mucho que quieras subir de nivel tu armadura... Puedes ponerte en contacto conmigo para todo lo que necesites... Si quieres, indícanos que armadura tienes(fabricante, acabado...) y nos ponemos a tu disposición...También si quieres, puedes ponerte en contacto conmigo y te paso la información que necesites, o incluso mediante este mismo hilo... Ayuda no te va a faltar, te lo aseguro. Un saludo Fernando...1 point
-
Greetings Luke, and welcome to FISD! I would follow Shane’s lead regarding return edges, and here’s a link to Joseph’s thread which he referenced! https://www.whitearmor.net/forum/topic/48166-return-edges-101-ottk/ I look forward to building alongside you, and I am also in the middle of my own ANH Stunt TK build! Sent from my iPhone using Tapatalk1 point
-
Don't overlook the awesomeness of baking soda and CA glue to make CA cement as a filler. Have you tried it yet? It cures the CA glue almost instantly and fills, resulting in a weld stronger than the parts themselves. And it sands like a dream. I applied a small bead of glue to the inside edges of the parts, then apply another more liberal bead to the inside (hidden) surface areas when you hold the parts together. Typically I would tape off the outer areas to help keep the parts lined up and to reduce oozing on the outside of the part. Once the liberal bead of CA glue is applied, then generously sprinkle the baking soda all over the bead while holding the pieces together. I apply enough so that I can smoosh it down with my finger (wearing gloves) and along the bead line, pushing the baking soda into the joints a little bit. It really works nicely.1 point
-
I keep telling myself... marathon, not a sprint. But I'm still trying to make decent time on things, though! Remember how I mentioned earlier that my Bondo-application skills are novice-level? Well, I really found out how bad I am at it when it came time for spot putty. I closely examined everything with a strong light and magnifying glasses. I put spot putty (red areas) where I saw small pinholes or scratches from sanding. The armor looks diseased! I don't mind wet-sanding spot putty, though. It's pretty easy to work with. Wet sanding with a 400 then 800 grit really made the armor silky smooth and eliminated most of the pin holes and scratches. Before and after wet sanding of the chest plate, back plate, and a thigh... Here you can see everything I wet sanded today to silky smoothness. I still need to apply spot putty and wet sand the ab, which is why that part isn't in the pic. But don't you think that the armor looks like it has chicken pox? Overall, I am very happy with my progress (even though my hands are completely shriveled up from hours in the water). I can't find seams or print lines on any of the parts at all! I will apply another coat of filler primer and check for any pinholes I missed from the first round for the next step. I noticed a few tiny areas I want to fill in on the back plate, and I'm sure I'll see others as I proceed. The filler primer really helps to highlight what needs work.1 point
-
More filling and sanding happened this week, and the weather is good today, so that means... Priming!!!! Priming!!! Priming!!! So glad to be at this stage of the build. I like this part very much; all the hard work starts to look like a thing now! I thought I'd share a little shortcut for painting parts. I'm sure some of you already know this tip, but for those who don't, this can help you with spray painting your parts! We all know that some parts are kind of difficult to spray paint. They don't have flat surfaces, or are just oddly shaped. This is a way to get even coverage and eliminate any drips. You'll need some craft foam, hot glue, and coat hanger wires. If you don't have craft foam, styrofoam works nicely, as well as cardboard. You'll want your pieces large/thick enough to put your hanger into. Make sure your coat hanger wire is kind of straightened out. Stress on "kind of" for me because I don't have the patience to straighten out coat hanger wires. Keep the large hook in one end, and put a smaller hook in the other end. Length doesn't matter. Hot glue your foam block right onto the armor. Make sure it's fully cooled before proceeding. Once the hot glue has cooled and your block is secure, put your small hook end firmly into the block. Fishin' for armor! It should look like this when you're ready to move outside to paint. Now hang the larger hook end from a branch, pole, or whatever location where you can spray from all sides. Lucky me, we have a nice tree right outside of our garage with some relatively low branches. The length of the coat hanger puts the part exactly at eye level for me to paint. Before and just a few minutes after, I've got the first coat of primer done. And I love seeing the chest plate finally look like one part instead of a bunch of smaller assembled bits. I have a bunch of these coat wires, but not enough to paint all the armor at once. While these dry, I can easily hang them in my garage. I will leave the foam glued to the armor until I've completely finished the filling/sanding/painting process, so I can quickly hook up my parts again when necessary for paint. Using the foam and coat hanger method to paint parts allows for quick, even, drip-free coats. It also makes for keeping the parts off the ground and clean while they dry. The foam easily can be removed from the armor once everything is all painted. At this stage, I'm also out of filler primer. Boo!!! More will be arriving next Saturday, so the rest of the armor bits will just have to wait for their primer coats. In the meantime, once the primer has cured, I'll be applying spot putty, wet sanding, then applying gloss white. Can't wait!1 point
-
Hey Tony! Thanks for checking in. Progress has been made of sorts. Not on the armor yet, though. I was battling a massive sinus infection over the past few weeks that had me flat. It messed up my balance so badly that I couldn't leave bed. No fun feeling like I've had one too many, when I've not had anything to drink since early March. :/ At any rate, I finally started feeling better this week (my balance returned, yay!), but it's slow going. Here's what has been making the most progress lately: the scaled down (76%) F-11D! I was able to conquer white ABS, so the entire blaster is ABS printed. I used Germain's amazing files and instruction guide for assembly. I am so impressed by all the details that he put into the PDF assembly guide. Seriously, if you haven't seen it, go give it a look. It makes putting this blaster together completely effortless. I've thanked him privately, but I'll also thank him here, too- because he deserves it! Germain, THANK YOU for such detailed files that print like a dream, and clear, detailed instruction guide for it all. You ROCK! Because the blaster is reduced in size, I am using smaller hex button screws for the build. Fortunately, all I needed to do was go one size down for everything. So if the blaster needs an M3 screw, an M2 fits perfectly on this blaster. And I had to use shorter screws, but that was an easy thing to do since I own a decent assortment of small black hex button screws. Here are the first semi-assembled parts. So fun to see this come together! My son is super excited to help me finish it. Hoping to knock out some sanding/priming of the armor this weekend. Fingers crossed for good weather!1 point
-
Wow! Your son truly embodies Troopers helping Troopers. Please give him my best1 point
-
So this is where I will be logging my T-21 build for my Rogue One Kit. Not a lot of stuff at this time but I am sure I will be filling this thread in the coming weeks. So first let me say that I will be using Spool86's kit. NOTE: Version 2 of the RO T-21 is on page 2 of this build. For anyone interested, my ROTK build is here: And my RO Crystal Patrol Pack Build is here: There are a few difference with the RO variant of this BFG. 1. There is a scout tactical light on the right side like a lot of the RO weapons. 2. I have found reference pictures with a black sling and pictures with no sling. 3. From all the pictures I have found, the stock looks black but this could be the lighting. Here is a pic with the black sling I will add more pics tomorrow but I wanted to get this thread started. I welcome input from everyone. Thanks for the interest.1 point