


kamikaze
-
Posts
92 -
Joined
-
Last visited
-
Days Won
2


-

HOWTO: Super clean helmet electronics/interior build
kamikaze replied to kamikaze's topic in Tutorials, Tips and HOWTOs
I guess I should mention that after you peel off the back and stick it, you don't really move it. So you can cut off long strips and play with their size/shape aligning next to the last stuck on piece first if you want, then when you think you're good with it peel off the back and secure it in place. It's hard to describe this but when putting two strips together on the bucket, the one going in can be placed almost into the side edge of the next one, such that when you place it down finally you can just apply a bit of pressure with your finger between the two of them and create a fairly seamless join... I guess what I'm getting at is this avoids creating small gaps between your lines. Another tip is what to do with the very top of the bucket. You really don't cover 100% of the internal with neoprene, maybe go up 80-90% of the height. The very top crown of the bucket will be a small open zone, maybe 4"-6" in diameter depending on how your project went. This is where a nice piece of circular helmet padding finishes up the deal perfectly (and makes for a nice comfort). Generally speaking, step one is lining the helmet with the neoprene, step two is using pads on the top for that part, but also placed around the helmet as needed to create a very snug and secure/comfortable fit. -
HOWTO: Super clean helmet electronics/interior build
kamikaze replied to kamikaze's topic in Tutorials, Tips and HOWTOs
Yeah so the product I used and linked in the details has one side neoprene, and the other side of it you peel off and it is a sticky tape side, so you cut a strip of desired length from the roll, peel off the back, then you can place it where you want. It takes a bit of practice to get the strips cut and aligned right, but there's a lot of give in the product so you can shimmy things in easily. Start slow and practice with cutting strips and aligning them. Eventually you'll be faced with a taper situation since buckets have non-square geometry to them. It may be frustrating at first but just take your time and in the end it will look great. I've done many buckets now like this and they all turn out just awesome in the end. -
HOWTO: Super clean helmet electronics/interior build
kamikaze replied to kamikaze's topic in Tutorials, Tips and HOWTOs
The underside of the neoprene strips I used is an adhesive layer, so it just sticks in place. It's pretty strong too, I haven't had it peel off any even after several years now. -
HOWTO: Super clean helmet electronics/interior build
kamikaze replied to kamikaze's topic in Tutorials, Tips and HOWTOs
So I haven't made a video showing how to do that, but I do have a write up thread here that goes through the process I use for hard lenses that are removable. You can find it here: -
HOWTO: Super clean helmet electronics/interior build
kamikaze replied to kamikaze's topic in Tutorials, Tips and HOWTOs
Hey! Thanks so much for the kind comments, I'm glad you like how the build came out and hope it may inspire people to do similar things with their buckets as well. Cheers and thanks again. -
Painting armor to a showroom car like finish
kamikaze replied to kamikaze's topic in Assembly, Mods, and Painting
Heya. Well, four years later it is holding up pretty well. The main issue is where two pieces meet and there is solid connection between two edges. Over time small chips of wear are observed at these spots, which I then hit up with a clear enamel. It makes for a little bit of natural and three dimensional armor wear, which I kind of like. -
HOWTO: Super clean helmet electronics/interior build
kamikaze replied to kamikaze's topic in Tutorials, Tips and HOWTOs
-
HOWTO: Super clean helmet electronics/interior build
kamikaze replied to kamikaze's topic in Tutorials, Tips and HOWTOs
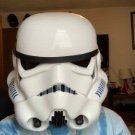
I looked at all my WIP workshop photos, the only thing that comes close is this one that was before I installed the electronics. Shows the raw neoprene, no padding, and before a bunch of clean up. Hopefully it helps. -
Hey,
I have a couple more questions about the neoprene. Did you use all 50 ft of it?
Did you line the entire helmet or did you work around the electronics (like in your video)?
Thanks
-
Hey there - overall I think I used maybe 1/3 of the roll or so. I did line pretty much the entire helmet except for the very top where the electronics are mounted and where the top padding would cover it. Hope this helps. :)
-
-
HOWTO: Super clean helmet electronics/interior build
kamikaze replied to kamikaze's topic in Tutorials, Tips and HOWTOs
No I run them in parallel, not series. This provides constant voltage to each fan and allows me to quick disconnect one or more if I just want 2 for instance, or doesn't shut the whole loop down if one breaks, a problem with your christmas tree style series lights. -
HOWTO: Super clean helmet electronics/interior build
kamikaze replied to kamikaze's topic in Tutorials, Tips and HOWTOs
I do something a bit differently. I craft a piece of steel that is the shape of the mouth and bend it so it can lay inside laying "flat" against the teeth with the appropriate bend in the middle. I paint that flat black, and mount it with Sugru such that it is offset by 1/4" from the teeth opening. The Sugru rubber "feet" it lays against are visually hidden from looking through the teeth at the front. On top of the back side of this plate goes the neoprene. This seals the mouth off entirely and gives a very nice structural depth to the teeth mesh versus having it see-through. Pictures are hard to do this justice but I'll see if I can't find a good angle that illustrates the end result. -
HOWTO: Super clean helmet electronics/interior build
kamikaze replied to kamikaze's topic in Tutorials, Tips and HOWTOs
Glad you like it! I have another guide up for how I do lenses in my helmets. Lately the only thing I change is rather than steel bolts I use black nylon ones that i can safely trim inside the helmet without overheating the paint and plastic, makes for better cuts to exact size after the lenses are placed on them. I plan to update my YouTube channel soon with more videos especially one for lenses as that's something which gets asked at lot. Anyway, for now you can check out this guide I posted up here on FISD: -
Request your Centurion Certificate here:
kamikaze replied to justjoseph63's topic in Request Centurion Status
Derrick Meade 11778 Centurion Letter Size Tony http://www.whitearmor.net/eib/certificates/11778-centurion.png -
Request your EIB Certificate here:
kamikaze replied to justjoseph63's topic in Request Expert Infantry Status
Derrick Meade 11778 EIB Letter Size Tony http://www.whitearmor.net/eib/certificates/11778-eib.png -
Now that is some real nice looking armor, very good job!

