Leaderboard


Popular Content
Showing content with the highest reputation on 01/03/2019 in all areas
-
Sorry for the late. Here's my 2 cents. We have never used exact measurements for anything so I would encourage throwing out the idea. Regarding the brow, merely stating "there should be a visible gap between the upper eye lid and brow trim but no more than a pencil in width" should be sufficient. This enforces the gap theory but also allows for slight variations. L3 btw Ear angle. Since I'm the responsible party for bringing this to the forefront of level requirement I am all for it however, as mentioned already I'm not sure it's possible with all armors hence the reason I never insisted we add it to the CRL. I stick by my thought as "highly suggested" at L3. I like Germain's idea regarding the no elbo gap also, though again I'm not sure this would be possible with all troopers. I've always called for "minimal gap between the bicep and forearm" and in my opinion only the wording should state that. L3 We already have a minimal gap policy at the shoulders for L3 so maybe changing it to "minimal gap between shoulder bells and shoulder, back & chest plates". "D" rings have gotten completely out of control so agreeing with Joseph here stating "the "D" ring should resemble the original Sterling in size and shape", or something similar. L35 points
-
For anyone looking at centurion build currently, follow the current CRL. Do not go by the suggestions stated as at the moment they are only suggestions. If you have any questions about a look or appearance of your build for approval reach out to one of the DOs. They'll make sure to point you in the right direction as they'll be approving your EIB and centurion.4 points
-
OK, folks, we need to note that these are only suggestions at this point, and would have to be approved before becoming official CRL policies. Also, with regard to many of them, they only apply to level 2 and above, NOT basic approval. We all joined the 501st to get out and troop, put smiles on people's faces and let's face it, live out the dream of being the most iconic (and imho coolest) SW characters ever! Expert Infantry and Centurion are not requirements, but those that (hopefully) pursue them should be aware that certain guidelines must be met. Will the average person on the street notice that we have gaps, misaligned armor, or ears that aren't angled correctly? Of course not! But, those of us who want to go the extra mile need to realize that certain criteria must be met to attain those levels. Will those who have already attained those levels be required to change their armor? In a word, no, as they will be "grandfathered" in. As I have explained before in this thread, the reasoning behind my suggestions is simply to help those on their way to levels 2 and 3, which would give them some guidelines to go by and avoid them being asked to change certain items to advance in rank. All that being said, I honestly encourage each and every one of you to apply for at least Expert Infantry level (or above). Even if you have issues, we are here to help you get that badge under your name!3 points
-
Thanks. Bucket is 99%. Just need to paint the screws white. I think they should just award Centurion to anyone with enough patience to not throw their helmet across the room while installing the S-trim. What a pain! Pics to follow.3 points
-
I adjusted my brow, not as easy as I’d hoped. I raised it to 5mm. I personally don’t like it as much but it still looks very cool. This is an AM ARMOR bucket. I was careful to rake the ears correctly when I started. I do need a new brow trim now though…little slip with the knife. Saved my finger though, the force was with me.3 points
-
I think making people work for Centurion is a good thing - as so long as the requirements are easily backed up by reference images. Many times the angle of the picture / lens / whatever can make things look very different. I think basic and EIB are good as is for the most part (I always thought s-trim and rubber hand guards should be EIB, but that is me). Anyway, not my point here - what I like is the idea of listing more items as "ideal". I think more things like this should be part of the CRL. For example - the ear screws may not need to line up with the trap, but ideally they should. This gives the builder a good guide of what to strive for - not getting it absolutely perfect will not affect their Centurion approval - but it is the ideal goal. The more of this guidance right in the CRL, the better, IMO. We are, after all, judging someone's work based on a few digital pictures - we can't always be sure down to the mm. Well, unless your name is Dan. I'm on board with the tube stripe direction requirement. Another thing to keep in mind - people will get discouraged if Centurion is a moving target. I've seen a bit of this in other detachments. Centurion requirements need to be well defined (which they are, until people start piping up about what is "ideal" and confuses applicants), but also somewhat static and predictable. I'm not saying that changes can't be made, I just think changes should happen on a regular schedule - like once a year at a certain date. Proposed changes should be in the CRL as "ideal" or "proposed" standards for a few months. This is so someone starting a build will know what is expected from them in 2 or 3 months time when they are actually finished and applying for upper level approval. My two cents.3 points
-
Thanks Joseph. I think this has been said twice already (at least), but needs to be mentioned again so it's clear: EI is meant to be a bump up from basic approval with a moderate amount of time/effort. Various tweaks to make the basic costume look good. Centurion is trying to get as accurate as we can without falling in to the pit of actual prop replication (e.g. flubs, crappy paint, etc.). Usually details like this start off at Centurion first because that's the intent of that program. Nothing should ever go to EI unless it's already a Centurion item that has become so common place and easy to do that it gets moved off as not being challenging enough. Hope that helps...2 points
-
It’s the unofficial ”TK rite of passage” ”first rule of S-trim is you don’t talk about S-trim”2 points
-
HAHAHA. Yep, my sentiment exactly. It was one of those "surprise, no one warned me about this one!" treats. It gets easier with practice - may I suggest a few drops of E6000?2 points
-
That's why my first question for every self-proclaimed "biggest Star Wars Fan EVAR" is "Alright, so then which version of the Stormtrooper am I?" Jokingly- I'm not trying to be a jerk, but I like to have fun with the super-nerds. I laugh it off when they get it wrong, and usually there's jokes about having a Silver Nerd Card v. a Platinum one. I've had only one guy get it right thus far. I then promptly told him he needed to join the ranks because clearly he was just as nerdy as we all are. For EIB and Centurion, I don't mind the strict requirements, because they are for us, they are not required in any way, and it's really just a matter of personal choice. Sure, we get bragging rights, but I've never run into anyone who considered themselves above anyone who wasn't EIB/Centurion. I do see your point in that high accuracy is good for the higher ranks, but we also don't want to raise the bar so high that it excludes people for factors they can't control (ie you have to be a certain height, or else nothing will fit right, regardless of what you do). So I agree generally with your point and do thank you for making it, because it is something to consider when updating CRLs.2 points
-
He’s my FISD BFF so take a step back, I’m territorial with my friends. I already have to share him with Greg, he doesn’t need more friends! Oh I mean yea Matt’s kinda cool... Sent from my iPhone using Tapatalk2 points
-
Thanks so much, Joseph! Yes I totally see what you mean about the TD clips. Once the glue dries I'll make sure to squeeze them together a little tighter and, if I can, trim them down a little. Also, as per your suggestion, I flipped the S-trim around. I like it WAAAY better! Are both ways acceptable, or did I simply have mine on backwards? Either way, thanks for pointing it out!2 points
-
APPROVED. Woohoo! Costume #6 for the 501st is DONE. (well, never done, but... LOL) https://www.501st.com/members/displaymember.php?userID=20931&costumeID=122 Now I gotta talk to my GWL about getting those roster photos updated...2 points
-
Some good points have been made in the last couple of posts. We are not the RPF, we should not be making too many constant changes that start to discourage members from aiming higher. Prop replication is not what the Legion or FISD strives for, although we are reasonably close to the mark. Continuity is the best tool we have for the little things that are easy enough to be done. Size is a great example and cant be discriminated against, so please always bare in mind any changes you make should always be in the spirit of EIB and Centurion. (the different brow heights is good, the ear angles can be far more difficult to fix if not impossible in some cases so be wise with your suggestions. We cant judge a member on the armour they purchased we can only guide and help them build it the best they can, please dont forget this. Paul's suggestion of looking at CRL adjustments quarterly is far more feasible for better stability and uniformity plus easier on GML's etc, remember what I said about the RPF. AND... hopefully we hit the March to 1000 EIB early enough in the year to celebrate with some special merch.2 points
-
I think we have to bare in mind too that not everyone has the ideal shape and size, I know I'd prefer not to have any gaps around my knees, my elbows or shoulders but those are dictated by my height and my armor and there's not much I can do about it unless I was to try purchase a few longer pieces from another kit which may fit my size but may not match the colour of my original armor. My size is the reason that although I was the first TLJ-E approved my photos where not used in the CRL because of gaps around my knees and there was another applicant at the same time who didn't have those gaps so his where the preferred photos. Was I a little offended by this YES and I don't think many wouldn't, but if you make a level not achievable because of someone's size then I think you are excluding a lot of people.2 points
-
I am just starting my build and am going for centurion as well. Let’s do this!2 points
-
Whilst this accuracy is all well and good when it comes down to it, this is not a replica group. I don't feel we should be enforcing the exact angle of the ear or brow height at anything less than Centurion. Troopers should, for the most part, look the same. If we're down to such minutiae as the brow gap being 5mm off or the ears being off by ~10° then I'd suggest we're already doing a pretty decent job. Provide the information, those who wish to built to it will always exist but I don't feel this level of detail should be overly enforced.2 points
-
A long while ago i begin to make a stomtrooper armor, and try to make her most accurate ! So i prepare item to item1 point
-
Any measurements for brow height were simply examples and an initial thought process. As previously stated, an exact measurement was not the intention - a visible gap between the eyes and the brow would allude more to the majority of screen used Stunts.1 point
-
Well, by the numbers it can be argued that Centurion is too easy to achieve currently. Nearly 33% of EI go Centurion, where you'd expect it to be under 25%, maybe even 10%.1 point
-
Looks like the additional tube stripe police have you covered. ;-) Keep up the good work. [emoji1303]1 point
-
Congrats on approval!1 point
-
16-17?! Unacceptable! I will tell Dan to revise your application Greg! ps just joking Brendan1 point
-
Thanks, all! As part of my promise to share, I have links here to all the 3D printed parts that I used in creating the pack. They can be downloaded, printed (you can Print yourself, from various vendors via Thingiverse with just a click, or save the model and upload it to Shapeways, etc.). Or if you know Fusion360 you can have direct access to the models, where you can copy them into your own account for tweaking to your needs. These models should work well without any need for modification, for anyone using the recommended configuration in UKsWrath's HWT Pack build thread: The Pop-It plastic storage set (generic Tupperware, essentially) from Amazon, the Photo box from Michael's, generic baby wipes (those should mostly be the same size, or close enough to still work), and a cup with similar faceting to the one I used. If you're using different base materials, obviously they'll need to be tweaked to fit your exact base boxes, or possibly won't work at all without extensive remodeling. I'll probably make a few design refinements here and there as I go forward (the screw holes are a little small, for one thing, and I have a couple of other tweaks noted below), but since my pack is done and approved at this point, I don't really plan to make any substantial changes. Feel free to ask, but no promises. I do kinda have a hankering to make the side panel for the radio box, which would be really simple to whip out. I'll update this post when I finish that, of course. Thingiverse Project link (project includes all parts): https://www.thingiverse.com/thing:3331824 THE PARTS: Faceted Mount: (for the cup assembly bottom right, holds the facets cup in place at a slight angle so it comes down more flat on the pack): Fusion360 link to model: https://a360.co/2F2Cpff Cylinder Mount: (for the baby wipes container top center... I'll probably make a second part to this for the inside, to hold it even more firmly with less movement) Fusion360 link to model: https://a360.co/2FaIOE2 Button Panel: (for the XE-41 Pop-It box top left... you'll still need to glue rubber bumpers to this, although I suppose if there are enough requests I could model plastic ones right onto the plate) Fusion360 link to model: https://a360.co/2TsxYNP Vent Panel: (for the XE-51 Pop-It box top right... you'll need to glue the separate slats from the following model in place) Fusion360 link to model: https://a360.co/2Tsz6B3 Vent Panel Slats: (for the Vent Panel on the XE-51 Pop-it box top right... print 6 of these) Fusion360 link to model: https://a360.co/2ToGcGD Arch Panel: (for the XE-61 Pop-It box center right) Fusion360 link to model: https://a360.co/2TqcFw6 Radio Box Plate: (For the Michael's Photo Box bottom left. Note: depending on your printer's size, you may need to split this into 2 parts, as I did for mine.) Fusion360 link to model: https://a360.co/2F79Kor I'll copy all of this info into a separate thread, as well, perhaps one in the 3D forum in addition to (or instead of?) here.1 point
-
Mother f***ing s trim proof photo.1 point
-
You bet. That is exactly what I did - 16 to 17mm.1 point
-
Yeahhh...the S trim fell off... Didn't glue it, sigh. I have pics but I need to find a spot to host them as I am out of room on here apparently. Getting IMGUR set up now.1 point
-
Looking good. Yeah, the brow does appear to be a bit low - sounds like the new ideal is about 5mm above the eyes for a stunt. You might be asked to move the tube stripes up a little. Not for basic approval, but just for screen accuracy - there is at least one DO ( @CableGuy ) who is a stickler for tube stripes, so you might get the comment.1 point
-
How do you eat an elephant? One bite at a time.... You're getting close.....keep chugging.....1 point
-
Trudging along. Feeling a bit like I'll never get it all strapped together to a satisfactory level. My advisor in the Carida Academy is also our GML () so I'm going to see if I can meet up with him soon to get chest, shoulder bell, cod, and thigh placement really nailed down. It's quite hard for me to adjust alone, or without real-time feedback. Y'all are too far away! My Han snap is now a snap , and the kidney notch reinforcements are curing. Say, where's that to-do list?? Glue buttons to ab Attach snaps to ab and belt, add drop boxes Size cod and connect to ab Cod to butt elastic (soft stuff) Polish and paint ab repair seam Ab to kidney strapping, Butt to kidney mounts and strapping Create lens and mesh mounts, Install lenses and mounts Polish bucket, Install ears, Paint bucket, Install frown mesh Hovi mic things galore Trim shoulder tops, Connect shoulders Heat form and reinforce shoulder straps (?) Apply straps to chest Size bell strap, Sew in offset shoulder bell snap, Trim shoulder bells (12" from bottom of ridge, 5" from side of ridge?) Thigh ammo pack, Sniper knee, Make neck seal bib So. Gotta take it in bites! Make the strapping I know the lengths of (ab connections primarily), do another fitting of everything, make more strapping, and work on those darn mounts for inside my bucket whenever I possibly can. I kept forgetting to bring epoxy putty back from work so had completely stalled on those and since the rest of the bucket is kinda waiting on those... no bucket work. But now I have them! And a few free hours tonight! I got this!1 point
-
Awesome news Kalani, congratulations We'll be seeing you at L2 and L3 I suspect1 point
-
Remind me never to troop with you, I’m not centurion nor do I plan on it but I’m gonna be super weirded out thinking about how your talking to yourself about my armor. Lol Sent from my iPhone using Tapatalk1 point
-
There's only a couple makers of Rogue One Death Troopers at the moment- I'd head over to the Spec Ops Detachment, which is what they're under: https://specops501st.com/ They'll know best and be able to help you out. Now, if you mean the zombie Stormtroopers, from the book Death Troopers (which came first, incidentally), then you're in the right place: check out the vetted vendors list for a TK kit, and then you'll assemble mostly normally, but add weathering, broken bits, gore, etc. Check out the build thread section for both normal and zombie troopers. Just, whatever you do, STAY AWAY FROM EBAY, and other commercially available sources. For a full list of reasons, see the vetted maker list and this thread.1 point
-
To my eyes that is FX armor.1 point
-
Ukswrath makes excellent points, and I think it all comes down to simple copyediting of the CRLs. What Tony is suggesting is that the wording of the CRLs could be tweaked to strongly encourage the changes put forth in this thread -- especially when using the CRLs as a building guide as so many of us aspiring to higher levels do -- while at the same time not shutting out folks for whom these changes would be difficult or impossible depending on their armor maker, their body size, and body mechanics. Then again, I'm a professional editor, so of course I'd see it that way... <g> Meanwhile, despite my initial concern that having followed existing CRLs when building my bucket I'd now have to take it apart and redo the brow and ears, in looking at my helmet I think I'm already pretty close to the suggestions put forth in this thread, which is a relief. A.J.1 point
-
Thanks for the input ! Believe it or not, at the moment i am testing with a tube already :-)... Gesendet von iPhone mit Tapatalk1 point
-
I recall one builder, fairly recent, describing he would attempt to manage electronics with a functioning spring by inserting a hollow tube inside the spring and having the electronics sit inside the tube. Such that when the spring is engaged, the tube and electronics inside remain stationary. There must be a series of related considerations that need to be taken into account to make this work this way ... ponder and execute with baby steps and caution. Happy researching and wishing you wise approaches on this challenge. Sent from my SM-G390W using Tapatalk1 point
-
Hi again ... going deeper now with the insulation sleeve of the resistor wires. Tino, how do you get out the interior of the red sleeved wire that came with your completion set, like you had as seen in the below picture from your 2016 build? Sent from my SM-G390W using Tapatalk1 point
-
Great job sir.1 point
-
We'll be here when you're ready Garrett1 point
-
Hi all! The paint has finished drying, so I screwed the mounting clips on and did a test fit. With everything fitting alright, I had my first date with E6000. I've read about all it's wonderfulness. Happy to finally be acquainted! Matt, do you think the paint turned out well enough? I thought so, so I went ahead and glued, but if not, I'll peel the faceplate off and go with the spray paint. In the meantime, on to the forearms. Onwards!1 point
-
Haha!! You win!1 point
-
More updates to report this holiday season - central capacitors are created and test fitted through backplate and sitting next to outer cylinders. This is really detailed work; loving every moment. Check it out. Its kinda cool to see the rear part of the cylinders without end caps which showcases the rear vent slits' side 'C' shape. I also have 'the wings' created and test fitted. No wing stubs just yet. Thanks for dropping by [emoji1] Sent from my SM-G390W using Tapatalk1 point
-
Are you talking to me..? If so....ok....understod...just a bit busy looking for those droids..there WAS someone in the pod, the tracks go on in that direction1 point
-
Not sure it's appropriate for me to comment on this since my TK has not yet been approved (I'm reeeeeeally close, though). However, one thing that's bothered me just a bit is the photo that is always used to illustrate the ear-screw angle aligning with the back of the trap -- the green line that is aligned with the trap doesn't go through the centers of both screws. I pulled the image up in Photoshop and added a new line as closely as I could directly through the centers of the screw heads, and it gives a somewhat different angle. It's a really lo-res image so seeing the screws clearly is tough, but I think the red line is closer to the actual angle of the screws.
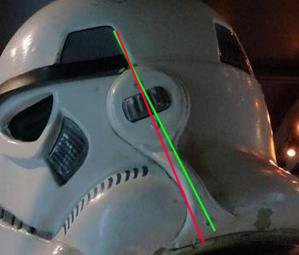 1 point
 -
Thank you for this =)1 point
-
Here it is, unboxed. I started painting/decaling the helmet last night and hope to have it finished today, other than the lens and grill. I hate Humbrol paint after being spoiled by years of painting miniatures with acrylics. The paint is still tacky from last night. It's a fully trimmed kit but I am 5'9" and I know AP's kits come large so I am guessing there will be some more adjustment needed. I am going to search for a good, detailed build thread that shows fitting and where each type of fastener is used.
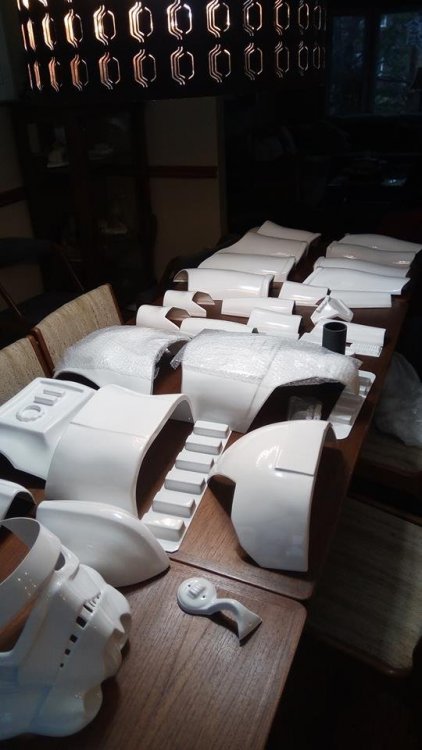 1 point
 -
Just remeber EIB is meant to be an easy step towards accuracy. Not all troopers are captured by FISD who apply for basic, plus in some cases dependent on how they trimmed and assembled their helmet, it may not be possible to realign the sides and give the kind of gap you are looking for. You certainly cant put a measurement in or GML's will have a field day knocking back basic application because a member is 2mm out. So what would be the outcome if a member was not able to get the gap due to trim and mount etc? Would the expectation be, replace your helmet. Also to consider, some Makers send their helmets pre-assembled, I can just see Paul TM losing his cookies over a gap too big small or no gap at all. Just my 2 cents1 point
-
My opinion on the brow and CRL change. For basic - as before Expert Infantry - maybe Centurion - Definetly1 point
-
1 point