Leaderboard


Popular Content
Showing content with the highest reputation on 11/29/2018 in all areas
-
The sales thread for our new First Order Detachment shirt variant will go live shortly Please stand by3 points
-
Nice work, I do prefer a heat gun over water bath, there is more control but you really do have to practice before using one. I've seen a few local troopers with RS armor have issues with the shins cracking at the top due to stress opening, you can either glue some strips of ABS behind or use ABS paste, both will help it cracking further. Looking good.2 points
-
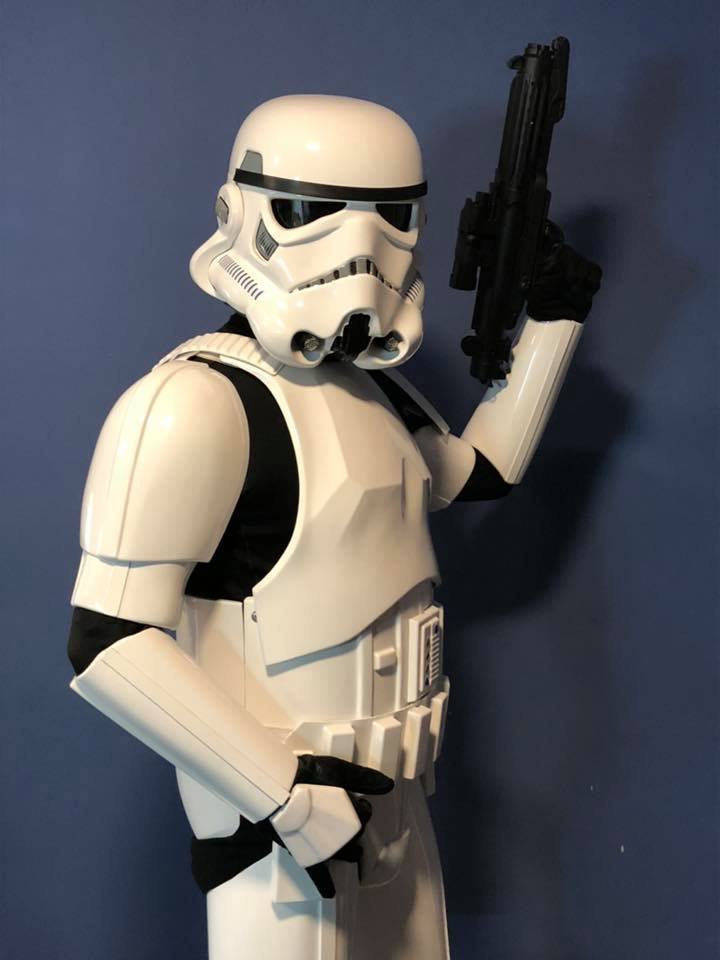
Not a progress update - it’s been a busy work week. Took a few new photos tonight wearing my undersuit though. So I still have the question about back plate height for you fine folk. Is it too low? I need to straighten the back shoulder tabs and tighten the shoulder straps. That should bring the chest and back plates in a bit. I’m undecided whether to heat bath or heat gun the parts. I’ll mull it over tomorrow. I need to heat treat the posterior plate as it’s flaring a bit, and I think a bit more of the return edge can be removed. It’s also giving armour bites between my legs which isn’t cool, so I’ll need to round or reduce that section. Looking at Tony’s (ukswrath) tutorial, the tail (for want of a better term) of his posterior plate is quite narrow compared to mine. This weekend the goal is to finish strapping the shoulder bells, glue the shoulder covers and sort out the right hand side torso strapping. Sent from my DH77 using Tapatalk1 point
-
Thanks. Yeah I love the display. I might try and get my certificates framed too like this.1 point
-
Hello all, From the onset of setting out to modify my doopydoos power cylinders, I quickly realized it was just a simple representation of the real thing. I did a few mods right from the get-go: backplate shape, bottom plate width and thickness reduced.I also found the power cylinder lop-sided, weird. It was tilted to one side! As for additions, I filed away the resin end caps to replace them with metal plumbing valve caps. I sanded 2mm in their height. I then threaded the end caps to the resin outer cylinders. I then installed the bolt and nuts from Tinos completion set. I also created the ceramic tube that is inside the outer cylinders. Sometimes I wish I had a drill press to get precision vertical drilling, oh well. More pictures to come! Sent from my SM-G390W using Tapatalk1 point
-
1 point
-
I built mine all through here mostly. Took lots of pictures asked lots of questions and got all the way to Centeruion.1 point
-
I’ve got velcro and I’ve got no problems. I also find it easy to adjust if you have issues with mobility. Leave the lengths long so you can have plenty of room for adjustments. Rather then regular snaps just adjust the velcro. Do what you think will be best for you. Velcro fails so do snaps. Nothing is permanent might as well have some play room while your doing it. Sent from my iPhone using Tapatalk1 point
-
This would be for OT Stormtrooper not FO which is the main subject of the thread1 point
-
Great news I did receive a very nice email back from them thanking me for my honesty and for forwarding your info. It is strange that in the same email 3 different delivery dates had been given, I would think you will be on the last of the shipping which should be summer but cross fingers I am wrong, hopefully not to much longer for everyone to actually see these kits1 point
-
Quick update, while I play the waiting game: Ordered an two piece undersuit from stormtropperundersuit. It's already on it's way from UK so I hope I'll have it by next week. Also ordered the RS Strapping and Belt (Andrea knows how to sell stuff ). And I'm waiting for my E 6000 to arrive. There seems to be no alternative in Germany and importing it from US was cheaper than buying one of Amazon. Yes, with shipping! While I'm waiting for all this to arrive I started to annoy our neighbors and went outside at 5°C for sanding down the edges. So much better now. The limit for putting it on and off is my elbow that colides with the lower return edges. Although not needed I wanted to give it a little depth. Looks good, but the ends where the two halves meet, are twisted or sticking out. Guess I won't have a level edge if I stick to the lower return edge. I also marked the meassurements Rob gave in the vlog and like I expected: My arm's to big. Is it better to adjust the inner or the outer half to fit my arm? Or evenly? It's not much but about 1 centimeter. Feels like it fits fine like that, but as mentioned: The elbow thing for slipping in and out.1 point
-
Shins look awesome to me. Like was suggested, I'd also trim the bottoms to match. Are the shins being held together with the tape or do they stay closed by themselves? One piece of advice I found helpful is that you'll have a much easier time with the shin closures if you're able to bend them into shape so that they stay closed naturally rather than having to be forced closed with Velcro, bra straps, etc. Side note: I recently got added to the DO team so I will be eagerly awaiting your EIB and Centurion submissions.1 point
-
Your effort in designing this certificate paid off; people are using it. Although it has a different style than the level 2 and 3 certificates, I loved Freddy's idea of all three in one frame.1 point
-
Thought about setting up something like a 'FISD Armor Reference' years ago. But considering how time-consuming and complex the work was just for this blaster reference, I skipped the attempt. Sorry.1 point
-
I had the opportunity to give Dan the prototype to compare it with his Anovos TFA and Sideshow TLJ helmet. It seems that my helmet is slightly bigger but proportionwise it is pretty good All the best Dino1 point
-
Wow, this will be ridiculously helpful when I'm ready to build my blaster. Are there similar baseline "all-in-one" reference photo or build documents for ANH armor?1 point
-
Good news everyone! My package has been shipped. Not sure how long it’ll take but I’m assuming it’ll take a month to get here. Sent from my iPhone using Tapatalk1 point
-
Good ol' fashioned squeal-a-little-and-frantically-push-them-back-out dents. Truly an important part of every great build.1 point
-
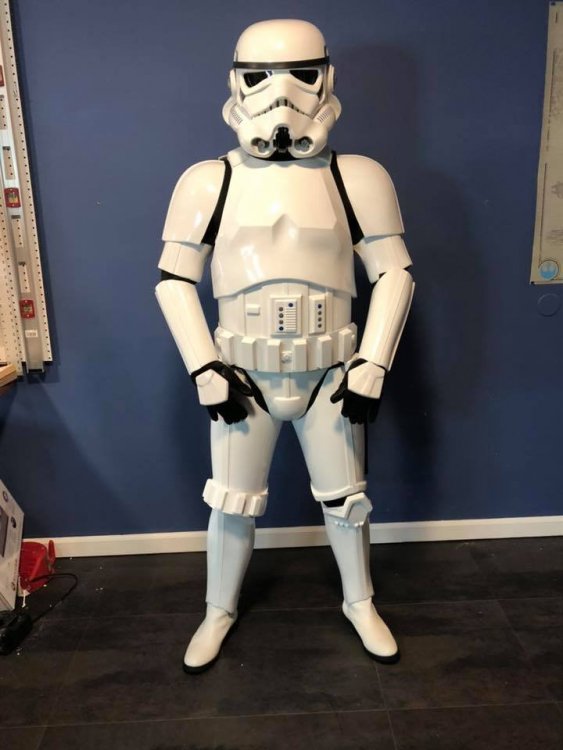
It's official, got my GML approval tonight. TK42191 reporting for duty!
 1 point
 -
We here in the Imperial army do not cry. We simply cut onions. Sent from my 5054N using Tapatalk1 point
-
Snaps 'n' straps, part I Hi gang; I'm back, but only briefly. Since last time, another work assignment popped up, so no armor building for me for while. Plus that Thanksgiving thing with a house full of family most of the week. Plus a trip of my own. Plus some household repairs. All that's past, and for a day or two I have some "me" time before the next round of time-demands rolls in tomorrow (and for a full week after that). So I'm picking up where I left off. As Lou suggested in one of the last posts regarding my shin issue, I'm gonna let the shin reshaping go until the armor is complete. I'm sure there will be lots of tweaks I'll want to do once I can wear this stuff, so I'll tackle it all at once. So, the key to getting the armor actually on my body is the get it to hold together. That means it's time to do snaps and straps. After thinking about it for months during the rest of my build, I decided on webbing snap plates over ABS squares. Being a woodworker, I love jigs for making things. So, to ensure that my snap plates are uniform in overall size and hole placement, I whipped up a simple jig out of scrap wood. You'll see the whole jig shortly, but the first part of the jig I used was a piece cut to the dimensions of the snap plates I wanted. Using that, I cut out all the webbing plates that would get double snaps. This was just a simple matter of holding the wooden template up to the webbing and using it as a guide for my scissors. After cutting each piece, I then heat-sealed the raw edges with a grill lighter. If you haven't done this yet, a tip: Seal those edges immediately after cutting. Webbing unravels almost instantly upon cutting, and will certainly start coming apart if the fresh-cut webbing plates are handled, so seal the edges right away. Then it was just keep going till I had all the webbing plates I needed for the double snaps -- two dozen. Actually, that's a couple more than I really needed, but I wanted some extras. (I also plan to use some single snaps here and there, mostly on the Forearms and Shoulder Bells, but I'll do those later.) The eagle-eyed among you have probably already noticed that my cutting template has a pair of holes in it. Those are measured and drilled exactly centered, so no matter which way I flip that little piece of wood, the holes will be in the same place. The key reason for the hole guide -- which I'll also use for the straps -- is so snap locations are the same on each plate. Then, using the same template for the ends of the straps, the male and female parts of the snap pairs will mate perfectly. To make the holes, I placed each webbing plate in the corner of the jig, put the hole guide template on top, and then poked the business end of a cordless soldering iron down into the guide holes and through the webbing. The soldering iron creates and heat-seals the holes in a single action, and it took only a couple minutes to do all two dozen webbing pieces. Let's take a look at that jig. It's just a length of oak scrap (any hardwood will do), with some thinner pieces of oak glued on the edges of one corner to act as fences for aligning the webbing plate in the jig. Those thin strips are just glued in place to form a nesting corner. Once the glue dried I snugged the hole guide into the corner, and poked the soldering iron through the holes to mark the jig, and then drilled a couple larger holes in the base of the jig for the tip of the soldering iron to go down into. Worked like a charm. After all the holes were done, it was just working my way through setting snaps. Finally, all my double snap plates are done and ready for gluing. At this point, I'll adjust the jig to make that handful of single snaps I need. Up next is gluing the plates into the armor, after which I'll do the straps to fit all the snap plates. That'll have to wait for a week, though. Got more company coming later this week, followed by another trip of my own (Grandson birthday!). After that, however, I have absolutely nothing on my to-do list until Christmas. Unless I get a surprise work assignment, I think I may enjoy a White Christmas -- that is, I'm thinking I will finally have my armor done in time to welcome Santa.1 point
-
I wouldn't angle it - it would look funny. Padding does a great job of keeping things fitting nice. All depends on how much room you have - I had the opposite issue - large at the wrist and tight at the elbow. I was able to get away with reshaping the elbow end a bit with a hot water bath. Are you planning to use inner coverstrips on your arms? This helps strengthen areas where the seams are not butted up against each other. The build is looking great.1 point
-
So, after a LONG time I finally got back to the build. I finished it a couple weeks back, debuted it "unofficially" at two troops to work out the kinks. I was approved tonight!1 point
-
And the ultimate goal has been achieved thanks to everyone who followed me until now and supported me whenever I was in trouble! It feels really weird to know that now is the time where I can't really do more for my TK.. Apart from two smaller adjustments that still need to be done, and maybe one day I might get a DLT-19 if I ever get bored of my trusty E-11 (will probably never happen ). So for now, I am looking forward to lots of troops and I'll also save some money for now - but the next costume is already in sight Thanks for standing by and reading, Freddy1 point
-
Thats totally fine! :-) Today I'll meet Dan and will compare my prototype with his Gentle Giant TLJ 1:1 helmet and will post comparison pictures :-)1 point
-
1 point
-
Yes, nothing new. Last excuse was the 5 month delay to change the bucks to steel and I have no faith they will make their Fall 2018 estimate. Even funnier and/or sad depending on how you look at it are the updates for their Kylo Ren costume updates, now follow me on this..... March 9th, 2018: This item has completed production and is on its way to our fulfillment center. We anticipate receiving these items into our fulfillment center in March and have adjusted our schedule to Spring 2018 shipping to customers to reflect this. Ok, great it's finished with production and on the way to the fulfillment center on March 9. June 10th, 2018: This Ensemble is currently undergoing safety testing and remains on schedule to begin delivery to customers in Spring and into Summer 2018. Ok, June and it must have arrived at the fulfillment center and is undergoing safety testing. August 23rd, 2018: This ensemble remains on track to ship Summer 2018 into Fall. The final approvals are currently in process and we expect these items to arrive to our Fulfillment Center very soon. Once a firm date has been established that shipping to customers will begin, you will be notified via a separate update. Wait, What? In march they were finished and shipping to the fulfillment center but now in August, 5 months later they are going to be at the fulfillment center very soon. This is a very slow boat. Latest Update: September 4th, 2018 The production of these items has been completed this season. We are awaiting notification from our manufacturer as to when these ensembles will be loaded upon a ship to be delivered to us, a journey that may take several weeks. As it is unlikely that these items will arrive to our Fulfillment Center prior to the end of the Summer season due to this transit time, this ensemble is currently on track to ship Fall 2018. Once I have a firm date that shipping to customers will begin, I will notify you in a separate update. Again, What? These were finished and shipping to the fulfillment center in March, then August and now in September they are waiting to see when they will even be loaded onto a ship. Damn, at this point Anovos get your stories straight. I haven't minded waiting from the start with them and still don't but you would think someone there would get their notifications and stories straight. I like Anovos but their communication is the worst.1 point
-
I use rubber gloves all the time and have several pairs of thin cotton liners which soak up the sweat which I swap out during a full day trooping, they make a big difference on those over 35 deg C troops we do here1 point
-
Hello Jonathan, My 2 cents, just as the guys said above it’s not going to be cheap. But you can start by combing through all the recent built threads on this forum first, this will certainly take you some time, but after that you will be fairly familiar with all the tricks and the get-arounds for building a TK costume. Use this extra time to save up, and check out our buy and sell section on a regular basis, you might be able to find a pre-owned but not yet build kit for a little less than what it cost originally (sometimes people just let them go due to lack of time to start a project or other issues). Planing and actually building a costume till it’s ready to troop will takes months (if not years, from somome I know from my garrison). Just a warm reminder on joining the Legion, it's not just about getting into a costume and look cool, it’s also about your love for Star Wars and to share this love with others, and while doing so, give a little back to the community (you have to be prepared to give up some time for charities and stuffs). Good luck.1 point
-
Perfectly normal question. Personally if it was me and I wanted to get involved I’d join my garrison and help out. Through that you’ll make friends and learn some tricks while saving your money. I don’t think anyone should put themselves in financial danger for this hobby. Although I love doing it, I waited until I had the money to build armor. I’m set in my job and could afford the cost. Had I know about helping out on troops as a non costume person I would have joined earlier. And if it’s not being in a costume that bothers you, you’d probably be able to pick up a cheap Officer outfit used somewhere. If you want to troop with a covered face I’d say go the Jawa route to start. I got one custom made to CRL standards for my daughter for $350 plus the cost of a cheap pair of boots. You could do that and eventually sell it when you have the money for a TK. Sent from my iPhone using Tapatalk1 point