Leaderboard


Popular Content
Showing content with the highest reputation on 10/07/2019 in all areas
-
If I may, I shall add a little background to the story of EIB and Centurion wihtout going into all the explicit details. If we go back in time to the early days of the first produced fan armour "FX", it was all that was available so everyone sported FX armour. Later on some armour became available that had screen linage and molds were taken and more accurate armour produced. Expert infantry was introduced as a way to make FX armour a little more screen accurate than it was. If we move on in time and having more accurate armour available again, Centurion was introduced as a new higher level of accuracy. Think rivets paint colours snaps how the armour is trimmed etc etc. Now FISD has never had a problem with those that had EIB going the extra mile to achieve Centurion, those numbers are pretty good, but we still have very few that build TK armour making the minor difference and applying for EIB, considering the total number of TK's in the legion. Due to this, we offer more incentives for a member to want to build to the EI spec, be it the exclusive EI coin or the ability to build all our TK costumes to that next level and receive the additional stars for doing so. In recent times we introduced the March to 1000 campaign, yet another inducement that includes special merch in order to entice more troopers to step up and make the very easy changes required to meet the Expert Infantry level. There is much more to this story but I didn't want to create a TLDR post5 points
-
Touched up the frown as suggested: removed paint from gum, extended frown on each side. EDIT -- Attachments removed.4 points
-
Still tweaking things. Added a wireless mic and sewed on my new garrison patch! Sent from my Pixel 3 XL using Tapatalk2 points
-
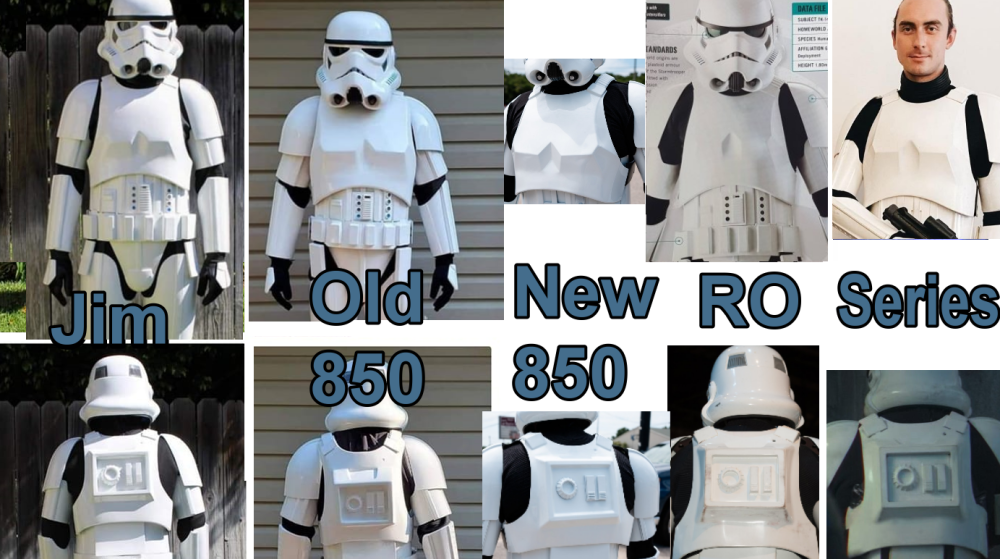
Rogue One TK Sources (updated 8-10-2020) Since I keep seeing these questions popping up from time to time, I figured I would make this simple for everyone. I do not have experience with some of these sources so if any of you do please chime in. Further, I am not pushing or supporting any of these sources, I am just providing you all the list and what they provide, and you choose who and what you want to go with. Lastly, If I do have experience with a specific source, I will note that and my overall experience with them. I am not pushing any sources, rather supplying you a list to work from if you are having a hard time finding stuff. Please feel free to add to this or provide "creative" comments. ROTK Sources Jimmiroquai Armor, Helmet, Under Suit jimmiroquai@yahoo.com Jim was the first source for ROTK armor and is considered very accurate. The armor is flexible fiberglass and requires painting. I have a full set or armor, helmet, and under suit from Jim and I like everything. 850 Armor Works Armor, Helmet, Under Suit https://850armorworks.com/ 850 AW is offering vacuum formed ROTK armor. They produce this armor in ABS and it looks accurate from the pictures I have seen. They also offer a resin helmet and undersuit now. Helmet Nico Henderson Helmet 3D print files https://www.facebook.com/nico.heath Etsy Nicolai DesertFareCosplay https://www.etsy.com/au/listing/784808040/rogue-one-stormtroopersolo-mimban Nico designs extremely accurate helmets, his Shoretrooper helmet is considered the most accurate available and now he has designed a ROTK helmet that is extremely accurate and all the greebles are separate so you can print and paint them before attaching them. You will need to message him on FB. I have his ROTK helmet files and find them to be outstanding. Suggested print orientations https://www.whitearmor.net/forum/topic/53519-recommended-printing-positions-for-nicos-tk-helmet/ Updated files TKModder421 https://www.whitearmor.net/forum/topic/53406-modifying-the-nico-helmet/ OxProps https://www.thingiverse.com/thing:4227844 Armor akira-yuming Armor 3D print files https://www.cgtrader.com/3d-print-models/art/other/star-wars-rogue-one-tk-first-imperial-stormtrooper-armor ( Build thread Jason @BigJasoni build thread https://www.whitearmor.net/forum/topic/49826-the-bigjasonis-rotk-3d-print-build-thread/Green Rogue One TK lenses to fit the Nico Henderson helmet Mr Paul's Shoretrooper Build https://www.facebook.com/totalgrunt Updated 3D files Jason @BigJasoni updated kidney plate https://www.whitearmor.net/forum/topic/52974-rogue-one-new-generation-eib-centurion-kidney-plate/ Jason @BigJasoni updated belt boxes https://drive.google.com/drive/folders/19k-95YPTsiBJzHGIumsGLYQjQlx_S0p4 Jeff @11b30b4 updated ab greebles https://www.thingiverse.com/thing:3973969 Jeff @11b30b4 updated handplates https://www.thingiverse.com/thing:3910278 Hasbro Black Series Helmet Amazon and others Very nice helmet that will require significant alteration to be 501st approved. I have one and I am planning on altering it for use with my 850 AW armor. Build threads updating Jeff @11b30b4 updating Black Series helmet https://www.whitearmor.net/forum/topic/48054-11b30b4-tutorial-rotk-black-series-helmet-mod/ Colin @OddViking327 updating Black Series helmet https://www.whitearmor.net/forum/topic/52589-modifying-a-black-series-helmet-for-accuracy/ Updating Colin @OddViking327 vent/traps updated 3D files https://www.thingiverse.com/thing:5455582 Please Note HeadShotProps is temporarily suspended as a recommended vendor, until they are back to normal and gain positive feedback from our members. HeadShotProps Armor, Helmet https://www.etsy.com/listing/830810037/rogue-one-stormtrooper-armor-kit?ref=shop_home_feat_4 The armor is vacuum formed and looks very similar to 850AW, although the TD looks better in the pics than the 850AW TD. The helmet looks to be a nice pull, this helmet is roto cast with greebles Soft Goods Other than the previously noted sources many of the soft goods are available from these sources: Dark Side Closet Under Suit https://www.facebook.com/TheDarkSideCloset/ I have messaged them for pricing and shipping, and they are very responsive. Geeky Pink’s Gaskets Under Suit https://www.facebook.com/GeekyPinksPhantasticGaskets/ You will need to message here and provide specifications. Imperial Boots RO Boots, Gloves, Strapping https://www.imperialboots.com/ I have a set of boots and gloves from IB. I love the boots, the gloves are not the highest quality. Endor Finders RO Gloves https://www.endorfinders.com/ I have a set of gloves from EF and I love them. Katarra8 RO Pauldrons https://www.etsy.com/listing/150178963/classic-star-wars-stormtrooper-shoulder?ref=shop_home_feat_3&frs=1 I have a RO Orange Pauldron from Katarra8 and I love it. Veeds Pauldrons RO Pauldrons https://www.facebook.com/pages/category/Product-Service/Veeds-Pauldrons-305552456469495/ I do not have any of Veeds’ Pauldrons but he is highly reviewed and respected. Sheev's Emporium RO Undersuit and Gaskets https://www.facebook.com/sheevsemporium I do not have any of Sheev's goods but I do know they have been very active in the Shoretrooper community and the quality seems to nearly screen accurate. Crow Props RO Boots https://crowprops.bigcartel.com/product/fo-r1-tk E-11s Bryan @trooper96 3D print files https://www.printables.com/model/155855-st-sterling-l2a1-aeg-and-rogue-one-e-11-conversion Sterling conversion https://www.printables.com/model/168104-rogue-one-e-11-conversion-kit-for-sterling-smg-mk4 Hyperfirm Weaponry (HFx Productions) GOING OUT OF BUSINESS, NOT TAKING ANY NEW ORDERS RO E-11 https://www.facebook.com/HFx-Productions-1669859386576227/ I have a B-Grade RO E-11 from Hyperfirm and love it. Praetorian Blasters RO E-11 https://www.facebook.com/BlasterMaker/ I do not own a PB RO E-11 but it looks awesome. S&T Full Metal Airsoft Sterling E-11 RO E-11 https://www.evike.com/products/61969/ While most of the E-11s used in RO were made using the S&T Full Metal airsoft Sterling, this E-11 is not very accurate for RO. The scope, counter, and power cylinders are all wrong and there is not a light rail or tactical light. DoopyDoo’s RO E-11 parts https://www.doopydoos.com/star-wars-props-31-c.asp It has been noted that some of the E-11s used in RO were equipped with a DoopyDoo cast of the M.H.R. Co. M38 Telescope from Sherman M4 Tank (1943 version with wide front foot). War Machine RO E-11 parts http://www.warmachinepaintball.com/online-store-replicas/ If you are looking to make a full “all metal” RO E-11, look no further. War Machine makes everything you would ever need. Bulldog Props RO E-11 parts https://www.facebook.com/BulldogPropsJapan/ Brian makes resin casts of the M.H.R. Co. M38 Telescope from Sherman M4 Tank (1943 version with wide front foot) that are completely accurate and disassemble-able. I own one and love it. I have done a full review of it on FISD. Shear Tech RO E-11, Rubber RO Handguards https://www.facebook.com/sheartech/ I am not real familiar with these guys but the E-11 looks nice and the rubber hand guards are nice as well. Picatinny Rail ROTK / FOTK E-11/F11D Picatinny Rail - (evike.com) - Link (purchase) E-11/F-11D Picatinny Rail - (justloseph63) - Link (purchase) E-11/F-11D Picatinny Rail - (m416gelblaster) - Link (purchase) F-11D Picatinny Rail - (themaninthesuitcase) - Link 3D files E-11 Picatinny Rail - (TK14082) -Link Part of Rogue One 3D files While there are a lot more sources out there this is a fairly good list for anyone to work from. I did not include sources like static burst communication kits or urethane rubber shoulder straps sources, but they are out there and if you are looking for that stuff you should be able to find them. I hope this helps those of you who are looking to embark on your ROTK journey. Rough comparison Chest / Back
 1 point
 -
Due to changing time commitments, our former detachment executive officer @justjoseph63 has asked to step down from his position. He has graciously offered to continue helping the Deployment Officer team with the Expert Infantry / Centurion programs. Please accompany me in extending the deepest FISD thanks for all of his amazing efforts throughout the year as executive officer. Without his help many of our programs, updates, and merchandise would not have been able to launch! Joseph, you're an absolute gem to work with and FISD is lucky to have you. You're the embodiment of troopers helping troopers I am pleased to announce that the vacancy position will be filled by our very own Brien, aka @Harbinger. Brien has been doing a knock out job as our Merchandise and Branding Officer and has shown quite the knack for organizational skills. Please join me in giving him a big FISD welcome as our new detachment executive officer1 point
-
Hi troopers. As per the title, here’s a little overview of my recently built and finished HDPE lid from DA Props. I’ve put my years of research into this to try and construct and finish this using original methods. Whilst it’s not always possible to capture things in a photo, hopefully the video helps to show the 1976 vibe running through this helmet. Dan1 point
-
Good morning everyone. I am going to start making mods to my armor to apply for Centurion and had a few questions. First, I know there should be no return edges at the wrist. One of my forearms has two ridges, while one has only one. I used the image from my EIB Certification for reference. Should I trim out the spot the arrow is pointing to? Next, I know there should be no seams where the shims are on my back plate. I was going to make an ABS paste and fill them, but I was able to purchase a spare backplate from another armor maker. My concern is the color between the two. I know it’s probably hard to tell in the picture, but do you think the colors are okay? Your thoughts and advice are greatly appreciated. Sent from my iPhone using Tapatalk1 point
-
010 - October 5, 2019 - Star Wars Reads Day - Farmington Hills, MI A group shot from left to right: TK - Me, Kylo - Jay Dobry, TI - Mark Steeby, Mando - Scott Larkin, Mara Jade - Gloria Northrup, Mando - Rachel Devine, TK - Ron Zill, and Teen costume winner: Jedi With a young Kylo Ren: Left to right - Rachel Devine, Scott Larkin, Me. I like this pic with the mercs! Kylo fighting with a shadow of his younder self. - Scott Larkin Me high-fiving a young attendee of the event. Still looking for those droids..... (me) Look, sir, droids. (Ron Zill) Lord Vader made me work with these guys. We don't need their help... well, maybe we do. Scott Larkins as Mando. Exploring the library to let people know there is Imperial presence keeping order. Also, I just like the shot over my shoulder with Edgar B (Ed Be) in the distance. My wife Rachael took a great shot. Picture with one of the elders from my church, Steve Ilmer. I am TK on left. Ron Zill is TK on the right. That guy is everywhere. Mandos working to keep order in the lobby. Rachel Devin on the left. Scott Larkins on the right. Nice group shot welcoming guests to library. From left to right: Ron Zill as TK, Edgar B as TI, Rachel Devine as Mando, Gloria Northrup as Mara Jade, and Scott Larkins as Mando.1 point
-
Happy Fall greetings Troopers! Please join me in welcoming TK - 91973 Aaron to the Stormtrooper Hall of Fame! https://www.whitearmor.net/forum/topic/46328-6-ocmano-tk91973s-troop-log/?do=findComment&comment=6698161 point
-
Both excellent choices obviosly but....you can’t beat the feeling of handling a helmet kit straight from the moulds taken from an original helmet, oh how I wish they would do a HDPE run. So my recomendation, RS first then TM and then....and so on1 point
-
Pretty good...pretty good naaah...what I ment to say was: Impressive...most Impressive1 point
-
Location: Seattle WA - Woodland Park Zoo Event: Downs Syndrome Buddy Walk Date: 10-06-2019 Garrison: Titan Buddy walk is always fun. Last year went as Vader, which was fun, but I think I was avoided quite a bit since I was 'scary'. TKs looked like they were having much more fun, so decided to do TK this year. Was a good decision! We had a really large turnout this year, which overloaded our roster list! A great problem to have. Made a lot of new buddies. Hard to see down, but you make due.1 point
-
Nothing here either.1 point
-
Agreed - or maybe just your handguards up a bit. I use a small hair tie as an additional strap around my wrist to keep them in the right place , they look like they're almost down over your fingers... That should help close the "gap" too. Otherwise, looking good!1 point
-
looking good, great work!!1 point
-
Another little update. So sadly our group hasn’t been able to meet up due to a lot of conflicting schedules. But I haven’t let this stopped me! Now that I got one project done, time to go full force on this. Just got my boots in last week from Imperial Boots. As always, the boots are great. Today I was able to file out the teeth and vents. Some small progress, but it’s something! Next step is to reinforce the helmet a bit on its top side.1 point
-
My eldest daughter's name is Amidala. Sent from my LYA-L29 using Tapatalk1 point
-
Progress over the weekend. i initially tried to do the washers on the split rivets but they wouldn’t fit. The extra support slat I put on made it too thick to get the rivets to actually split and hold. So I tried snaps, and they fit. 20mm strips of nylon and the snap caps set, I put the clam shell together. Now it was time to close the shell. I decided just to add one more snap on the right side in order to make sure the shell stayed secure. I used blue tape to help secure the snap while the glue set. I’ll have to trim the right side bottom a tad, but IT FITS!!!!!! Behold the exterior. Next I went to work on the thighs. That sounds bad. I used CA glue to meld the thigh shims together. I didn’t want to deal with waiting for the E6000 to set. But it worked, even tho I did manage to superglue myself to my thigh. The armor thigh. This was not an American Pie 2 scenario. As as you can see above there is some work to be done in order to take care of the slat gap. I was debating ABS paste, but then I grabbed the heat gun and a spare piece of ABS. After I flattened it out I traced the gap and did some trimming. I’ll upload the result tomorrow once it sets. I’ve also set the front thigh cover strips and trimmed the fangs from the thighs. Original: now: Finally, I painted the buttons. They’ll go on this week after I clean them up. Updates to follow!!1 point
-
I've attached mine on the backpack strap and also on the pauldron. I had a snap on the stop of my shoulder strap and then a second around the armpit that attached to the ammo puch with an elastic strap. When I did it on the pauldron I put a snap on the pauldron and it le tit hang. It has worked fine both ways.1 point
-
Yes. Centurion is awarded once, to the person. Nothing stopping you from getting Centurion for all your costumes, in fact many have several. If you care about screen accuracy that is usually enough motivation, but you are correct no official perks for multiple Centurion awards.1 point
-
13) 10-5-19 -- Scranton, Pa., BetaCon 91 point
-
Update. ..... I found an assembled left bicep in the box(knew I'd seen one) but it was SDS overlap construction....... cut it open but I think it's a lost cause.. ... thanks to RWA Inow have a serious of left and right biceps and the strapping kit arrived a few weeks ago........ More trimming ahead I think i got the left and right leg parts matched up ........ Bicep and forearm are SDS overlap construction before i spoit them apart so they are to be replaced with the RWA parts Sent from my SM-G975F using Tapatalk1 point
-
Hit my 25 Troop milestone today. Please find link to my troop log below. For the Empire - TK201871 point
-
25. 06/10/2019 - Brixhibition Hobart Day 2 Sent from my SM-G960F using Tapatalk1 point
-
Helmet just about done!1 point
-
Requesting the 25 milestone. SupRsloth's Troop Log1 point
-
Official First Order character standees for TROS Sent from my iPhone using Tapatalk Pro1 point
-
1 point
-
15 troops so far1 point
-
Hey David welcome to the FISD and beautiful job on your helmet.1 point
-
Submitting completed Basic HWT TK to my GML tonight for approval! Sent from my iPhone using Tapatalk1 point
-
Ukswrath, thanks brother. I also found another RO E-11 maker. I will add them to the list.1 point
-
Also, Hyperfirm is no longer around - Praetorian effectively took over for them. If you can find one secondhand, they're still great blasters, but no new orders are being taken. In other news, THANK YOU for posting this - it will be SUPER helpful for new recruits!1 point
-
MMcFett, you are correct. i thought they were doing a helmet at one point but that was HSP. I have corrected the OP.1 point
-
Yep yep yep! Thank you! I have done 3 troops! Woo hoo! Sent from my SM-G955U using Tapatalk1 point
-
Hi, yes I did! I love it. Everyone on here was so nice and extremely helpful. Don't think I would have made it without all of you. Sent from my SM-G955U using Tapatalk1 point
-
Hey guys, i did some research on this a while back. The slide show that Pablo Hidalgo was showing was before the visual guide was actually published. This picture was replace with the Crystal Patrol Duty pic. There was a plan to have two spacetroopers in RO but someone stole one of the backpacks the morning of shooting and so they were dropped from shooting. If you listen closely to Pablo, he explains this.1 point
-
Shin armor stress crack suggestions, as promised… Ok, while at DragonCon I ran into Plainsrunner from the Alabama garrison in his Mimban Trooper, his wife came up with a unique and simple solution for the shin armor to prevent cracking. As we know, the two halves of the shin armor clam shell together nicely. Note this picture and see how the right side is on the outside along the front seam. The cover strip is molded into this half. The left side butts up to the right side edge and has a piece that is overlapped by the right side. So what this enterprising lady did was leave the two halves separate and added 2 strips of elastic on the inside of the armor to hold the front closed but allowing for flex and spread. This method would mean that you would need to hard mount the knee plate to only one side of the shin armor and then possibly add some Velcro on the other half but when he was wearing the armor, it looked great and prevented cracks. Here is a graphic I made to explain this method. This is the inside of the shin armor. Side A has the cover strip and is on the outside of the front seam. Side B sits inside of Side A and has the internal overlap strip. Note the placement of the two 1” elastic straps. Another method a a friend of mine used was a product similar to Velcro and made by 3M called Dual Lock which was attached to the inside of both halves and then locked in place before putting the armor on. I hope these options help you all out. I will get back on the tutorial soon.1 point
-
Before I do anything I will ask you guys first. Thank you!1 point
-
Location: Seattle WA Event: Mariners Baseball Star Wars Night Date: 05-31-2019 Garrison: Titan This was a pretty big event, and had pretty good turn out. The weather was a bit muggy, but once we got into the Stadium the breeze was real nice. A little smaller crowd turnout than last year, but that was probably because the Mariners were in a bit of a slump. I'm the TK just to the back of Vader. Luckily he was taller than I am. Found some miniature versions. Some were a little scared, but the Ewok always seemed to be able to get them to come for pictures. Rebel sympathizer decided to point the finger at me. Hope she enjoys the detention cell. Found a General Grievous. Only real issue I had was the garter system snaps on my right thigh kept popping loose when we would move. Went ahead and just put some E6000 in the snaps so the straps stay on the thigh. Don't really see a reason to remove the straps as they just velcro around the belt. E11 just looks so small, Might start packing the DLT-19 again in the future.1 point
-
I only posted this a few months ago, which is why you may not have seen it. The best diagram I have is from Jeff (wingnut65) of the Tampa Bay Squad (below). The only difference in mine is that I use 2 snaps on the shoulder bell to shoulder bridge connection.1 point
-
3f. Calf closure Straps and Fasteners (aka bra hooks) In this section I'll be illustrating how to create the rear calf closure strap & hook assemblies instead of using the Anovos supplied velcro. Either one is excepted at all level of approval but the Straps and hooks are the most accurate. Here's a reference picture I'll be using 3/4" white elastic and size 3 bra fasteners. You'll need a sewing machine and or needle and thread. For the adventurous I have a tutorial on how to make the hooks from scratch, though not considered entirely screen accurate. Starting with the elastic cut six 4" sections. Checking the fit before sewing. Fold one end over 1" and sew in place. Now hand sew in the fasteners to the folded side of the elastic. Fasteners After sewing Ready to glue1 point