

Bullseye
-
Posts
136 -
Joined
-
Last visited
About Bullseye

Recent Profile Visitors
2,252 profile views


-
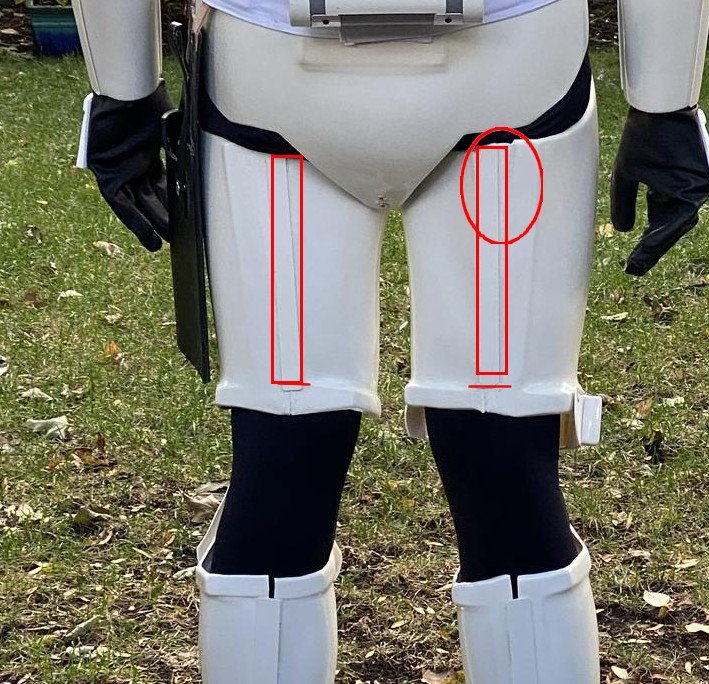
 I went back to 100, 400, 800, 1500, 2000, and 2500 grit sandpaper on the back left thigh ridges. The result is was a small split along the seam of the shim. As you can see, I’d already taped off where the ABS paste was going to go. I find that when using external (visible) areas where ABS is going to be applied, minimizing the spread of the ABS saves a LOT of time and energy. You can see the extent of the external work I did below. If you look mid left in the photo you’ll see a small ABS line from a fill I did during this process. You can see how contained it is. This makes blending the ABS fill considerably easier and limits the collateral damage from your sanding. In addition to the exterior ABS I did a little shoring up on the inside of the thigh for extra support. It ain’t pretty, but it does the job. I’ll sand away any snags once it’s hardened, but because this is on the interior I really don’t care how it looks. It’s just added thickness and support for the sanded areas. Once the ABS hardened I grabbed by 100 grit and got to work. Once it was sufficiently sanded I grabbed my 400 grit and did another thorough sand. I followed this with lighter touches on the 800, 1500, 2000 and 2500 grits. The result is definitely getting there! Compared to where I started this is night and day. Depending on the light, the ridges can be less or more noticeable so there’s still some work to do. With the bowing of the shim I have in the left thigh, I’ll probably always have a slightly noticeable “bump” there, but it shouldn’t be too bad. I’ll keep at it. Hopefully have some final photos once these are polished up for everyone to see by the weekend.
 -
Thanks Glen. We're on the same page then. I'm already planning on further sanding these ridges down. Still got a ways to go on them, but I'm happy with the progress. Always appreciate your help. More photos to follow once I finish my day job work.
-
My kit's already been approved. I'm just making the changes for myself and to try for a higher level of accuracy. When you say the ridge, do you mean the ridge on both sides or on the left? The left is going to take more sanding for sure, but I'm pretty sure I can smooth it out. As for the right, that one's looking pretty good the upper 3/4. I need to sand down the bottom a bit, but overall it's coming together.
-
Mods - can we rename this thread to “Fixing Unnecessary Back Raised Thigh Ridges - Getting Rid of Armor Ridges” might be easier for people to follow and use in the future.
-
With the sanding ongoing I wanted to post some photos and some of the surprises I’ve found while doing this ridge thigh fix. As you can see from the above photo at the top of the thread the ridges are very pronounced on this armor. I decided to sand out rather than cut out the ridges because I initially thought that would be the least intrusive method of fixing this issue while maintaining the integrity of the original thigh abs vacuum mold. As I’ve gone further into this fix I’m glad that’s what I decided to do. Because of my upper quad and thigh thickness I already had to shim the thighs to make them fit me. So there’s already an additional ridge caused by the flat nature of the shim I cut from the spare ABS provide by the kit manufacturer. Using another piece flat or even semi flat ABS would simple create another ridge I’d have to deal with. The first thing I did was to pencil mark and tape off the ridge I was going to fix. you can see from the photo how pronounced the ridge is, and the pencil marks were added to help guide the removal. I grabbed my dremel and got to work using the “bullet” sander-head on the left of the below photo. It’s a finer sanding surface because I wasn’t sure how much pressure and grit I needed. Just as a warning, I’ve spent 100s of hours at this point using the Dremel and I’m pretty adept at it. If you’re just starting out I can’t stress enough how important it is to practice first and take your time before launching into sanding with the Dremel. If you’re worried USE 100 GRIT SANDPAPER AND DON’T DESTROY YOUR ARMOR. After my first Dremeling I also used 100, 400, 800, and 1500 grit sandpaper to smoothing things out so I could measure my progress. I also LADLED on ABS paste on the inside of the thigh to add support for the area I was sanding. Here’s where I was after day 1. Left back thigh Right back thigh. As you can see, the ridge is still noticeable though not as bad as before. You can also see toward the top where the abs paste has settled in. Seeing that I hadn’t gone aggressive enough on the sanding, I grabbed the Dremel again, this time with the barrel head sander and got back to work. One quick note on the barrel head - it’s a great no nonsense get to the point sander but it has spots that are more prevalent than others. The result was a few deeper lines on sanding than we wanted, but nothing that couldn’t be fixed. Just FYI. Here’s what it looked like immediately after I barrel sanded it. You can the deeper etchings on the armor, so keep this in mind if you decide to use a Dremel and the barrel head sander for this project. This condition post Dremel was consistent on both sides. That said, the thighs were much more rounded than before and I was feeling pretty stoked. Next I grabbed my 100 grit and sanded in a cross pattern against the grain that the Dremel had left. This helped clear up some of the deeper etchings and get rid of the remaining burs. After that I took the 400 grit and went to town on the ridges on both sides. I used a circular motion and Miyagi style up and down motion on the ridge and against the prior sanding directions. I’m really happy with the results this far. Left Right The right ridge is barely noticeable. The left needs some more TLC, but I’ll probably only use 400 grit on that from here out. One thing to keep In mind about this fix remains the thigh shim I spoke of earlier. Look at the left thigh and you can see where the straight ABS shim is and how there’s an additional ridge I’m trying to sand down. A little more hard/wet sanding with 400 grit ought to do the trick. More progress photos to come as the repairs continue. EIB here I come.
-
Thanks as always Glen. After reading the threads you posted, I decided the best method was simply to grind/sand down the ridges. I mixed up some ABS paste and reinforced the space behind the area where I was sanding. I sanded through the most obvious aspects of the ridge with my dremel and some 120 grit sandpaper. Since then I've used 400, 800, and 1500 grit to smooth it out. Once the ABS that's behind (and now through the sanded area) hardens I'll give it another go to smooth it out further and fill in air bubbles. I've got a few photos I'll post later and then post some additional photos where I tape off and fix any of the air bubbles I'll inevitably have to deal with from the filler ABS. On the plus side, this allows me to fixup some minor flaws on the back of the thigh shims that've bugged me for a while (despite the fact that only I can see them). For anyone following this, I decided to sand down the ridge and ABS fill-in because I didn't want to have to modify the already snug fit of the thigh. If I'd cut out the whole back thigh ridge I would've needed to completely resize the thigh. By carefully and selectively sanding I've only gone after the obvious flaw in the armor and have minimized the impact to the armor as a whole. Just keep in mind that I have LIBERALLY spread ABS past on the inside of the thigh behind the sanding to reinforce the armor. Also, be very careful as to where you're sanding. I initially taped off the area I was sanding so that I stayed "within the lines" and didn't accidentally start sanding or dremeling away from the targeted area. Photos to come.
-
Now that I’ve been trooping for a bit I’ve made some adjustments to my armor for better fit. I’m pretty happy with it and am planning to submit the kit for EIB and later for Centurion. That said, my thighs are a bit bigger and the rear cover strips probably need to be expanded from their current 20mm. Here’s a photo from my Pre-Approval thread for reference. It was suggested that I expand the rear cover strips to hide the modding I’d done a bit better. How wide can I go on these cover strips for Centurion? I have enough spare abs to go to 40mm but that seems excessive. Is 30-35mm ok? Appreciate everyone’s help.
-
Polishing Kidney Shims - Dremel Buffer?
Bullseye replied to Bullseye's topic in Assembly, Mods, and Painting
Ya know.... if you're gonna use common sense..... That's a good idea and I wish I'd thought of it. I've gotten pretty adept with the dremel and it comes with the buffing insert, so I'm going to scuff up a piece of scrap ABS and see what the tolerances are. I'll post a how to if it works. thanks all! -
I'm trying to polish up my kidney shims and wanted to ask some polishing advice. I dropped a bit of weight over the last year and needed to bring the shims in a bit. Its done, and now I've got to clean them up. I'm using Novus to give it the proper shine, but I wanted to ask if anyone's used the buffer on their Dremel to polish their shims or their armor. I'd like to speed up the process a bit, but I obviously don't want to damage the armor. Thoughts would be appreciated.
-
Bullseye changed their profile photo
-
Funny thing happened on my way to the Death Star.... I started down this path over three years ago, and its been a long, weird journey. Full disclosure, ever since I was a tween, I repeatedly and annoyingly told my parents that the only thing I wanted for any type of present for my birthday/holiday/whatever was a Stormtrooper suit. I continued to do this into my adolescent adulthood with no success, and eventually I gave up on the idea. But, for some reason, when I saw the trailer for Inferno Squadron in the Battlefront II, I was taken right back to being 10. I researched everything I could find, thinking there was a way to hand build this myself. The further I dug, I suddenly came to realize that my original desire to be a character from my childhood was not only possible, but semi-affordable. So I took the plunge. There were several issues I chose to ignore. 1) I'm 6'3-6'4" not 5'10" as the original troopers were; 2) I'd never worked with plastics in this manner; 3) I didn't know a soul who'd built one before; 4) finding someone who made taller trooper armor at that time was very, very difficult. Finally settling on a kit from the UK (DA Props) which had a strong following and a host of taller troopers in the UK garrison advising me the kit would work, I purchased. The fact that I'd never done anything like this did not dissuade me from convincing myself I could assemble my armor in record time and be ready to trick or treat with my kids two months away. Obviously, this did not go as I optimistically planned. From the outset I made error after error, miss-cut after miss-cut and eventually convinced myself that I'd flushed too much money down the armor rabbit hole. There were starts and stops as work and family put the kit on the back burner. But I kept at it and the wonderful folks on this board kept giving advice and support for my build. When Celebration finally came to my hometown of Chicago, that finally pushed my to complete my armor. Now I'm fearless with a heat gun, aggressive with CA glue, unafraid of ABS paste, and don't even blink at the prospect of too much sanding. In short, I'm still as dumb as I was at the outset, but now I've got "experience" on my side. While it's not yet perfect, and I've got mods I need to accomplish to satisfy my own OCD, my Stunt TK was approved for trooping by the Midwest Garrison and I was approved a TK number. As an aside, I still can't believe "Bullseye" wasn't ironically taken as a handle. My thanks to everyone for their help. Look forward to trooping with you soon. Dave TK 84098 "Bullseye" (Troopin' with my boys this Halloween)
-
_ENG_Cyrex Requesting ANH Stunt TK Pre-Approval (RS)
Bullseye replied to _ENG_Cyrex's topic in Request TK Pre-Approval
I know the feeling. Let me know if I can be of any help! -
How do I shrink my profile photo to fit the profile .49MB limit
Bullseye replied to Bullseye's topic in Forum Help & Support
This should be pinned!!!! Thank you! This has been bugging me for years! -
I'm not the savviest trooper when it comes to image processing. I've got a number of photos that I want to use for background and profile shots, but they're too big to fit the storage/space limit for the picture. I've got a mac and a pc, so any guidance on how to shrink a profile pic to acceptable upload size would be appreciated! Thanks!
-
TK84098 requesting clearance. ANH Stunt Midwest Garrison https://www.501st.com/members/displaymemberdetails.php?userID=33016
-
Bullseye Requesting ANH Stunt TK Pre-Approval (DA Props)
Bullseye replied to Bullseye's topic in Request TK Pre-Approval
TK84098 reporting for duty!! Next stop EIB!
