Leaderboard


Popular Content
Showing content with the highest reputation on 02/15/2021 in Posts
-
Just changed my google settings to be located in Japan and here are the results for 'laser cutting online' : - fractory.com - ponoko.com - sculpteo.com - cotter.co - oshcut.com - laserboost.com - onlinelasercutting.com.au - sendcutsend.com Haven't tried any of these myself, it is just what google came up with. Keeping fingers crossed...2 points
-
Well.....I did my best to repair the holes..... Using this reference: I have made measurements and marked with pencil on the AB plate side where I intend to make the new holes: Would like so confirmation of this looks alright. I have a habit of jumping the gun. And since this is the last thing I need to do before I submit for basic I am anxious ha ha.2 points
-
Troopers!! please welcome to the ranks Centurion # 493- KC Grim TK 57899 of the Southern California Garrison . Congratulations! Just 7 to go !!2 points
-
Last ditch attempt with imgur and. ......it worked! I don't know why but I've managed to post pictures in the EIB section! Absolutely thrilled that it now works and to be honest, quite surprised! !!!!!2 points
-
Not much of an update on the blasters but just thought to share my progress working out how to make my own power cylinders. Lots of material testing and sorting out dimensions I am happy with. Got my 10BA bolts and nuts. Sourced some local resistors here in Japan and still on the hunt for better braided wire. The red stuff I got cheap from ebay is just nylon sheathing. Good for making things cheaply but the detail is lacking. Made my crude templates for the base plate in MS Publisher. Trying to learn some CAD draw so I can make files to send to a laser cutting company.2 points
-
Greetings all, Part of the Dewback Ridge garrison in the Roswell, New Mexico area.. Yes that Roswell! I started with an Inferno Squad but for some reason I just didn't get the right feel. I have already ordered Armor from WTF and will be hitting up a few of you guys that make soft parts to complete the build. Excited for this build and to be part of the community! DJ1 point
-
Hi Friends,My name is Mike. I started the journey to join the 501st back in 2015 with help from Big Gulp and Culp. Due to life being... well, life... I was not able to finish my TK kit until today (thanks to Culp and Andrew for helping me through the final touches). I am reintroducing myself to the group so I can begin the application to join DSG.Hope to troop with you all soon!Sincerely,Mike S.1 point
-
Great to see what can be done with foam1 point
-
For those of you who have followed some of my topics recently, you’ll notice I have done a bit of toing and froing on whether I should build the suit myself or getting the commission build. In the end, I’ve decided on the latter and after extensive research, I will be ordering from RS and strongly feel this is the right choice. If anyone has ever ordered a commission build from RS, I’d be interested to know how you found the process (e.g. sending measurements, adjustments you’ve had to make when receiving the suit etc)and if there is anything I need to consider? I know there will be a longer lead time for the build due to their recent fire and this doesn’t bother me. I am interested though on how much work I will need to do at my end once receiving the armour, what after sales support they offer (if applicable) and if I can achieve Centurion level with 501st. Thanks all.1 point
-
With the exception of one costume I've pretty much have built every other. There's something satisfying about doing it yourself then taking it to L2 and L3, very rewarding. This is strictly my opinion of course. The FISD will support you either way you decide to go.1 point
-
Congratulations Trooper !! Welcome to EIB .1 point
-
Congratulations Craig, welcome to Expert Infantry1 point
-
Just a quick mock up of the pack before I spend several days printing parts. These are scaled to 90% to match the relative sizing of the oil pan. I don’t think a HWT has come across my GMLs desk yet, so he may be looking to the detachment for advice at some point. So, with all that in mind, am I on the right track here? Sent from my iPhone using Tapatalk1 point
-
Thank you! I’m already working on it Sent from my iPhone using Tapatalk1 point
-
Congratulations Craig!!!! Next stop, centurion !!!1 point
-
For discussion of Phasma TFA / TLJ CRL only. Please keep this thread on topic TFA - https://databank.501st.com/databank/Costuming:TK_TFA_captain_phasma TLJ - https://databank.501st.com/databank/Costuming:TK_TFA_captain_phasma_TLJ1 point
-
thank you very much. Proud to be a part of the Centurion ranks. I will make these final adjustments and dressing issues. Easily done things. again. Thank you all very much. KC TK-578991 point
-
HAHA this is a great thread. @gmrhodes13 imagine seeing this character at a troop.1 point
-
I wish I could tell you with 100 percent certainty if this was the best route for you. It's a big investment and for the most part.....my experience is the most negative review that I know of and my negative review isnt even that bad. I don't regret it one bit. It did suck since I paid a lot of money for it to be build only for me to spend a lot of money on supplies to tear part of it apart and adjust. The cool thing about RS is that you can always buy parts incase you damage something if you did have to modify. And thank you! Things are going okay in the US. It's been interesting here to say the least. Ha ha. If you do end up getting the fully built TK and absolutely decide you need to adjust, I'd be more than happy to send you pictures and steps i did to achieve a better fitting kit. I gotchu ***Added*** Also if you decided after getting the built RS and in the future you wanted to build your own......you have a professionally built kit to use a very accurate reference.1 point
-
Taking Action Photos - Using the Right Background It makes our job a lot easier editing your images into frames if you use a contrasting blank background when taking your action photos for your EI applications. Contrasting is not using a white/light or black/dark background while wearing black and white, it just doesn't work. Also taking photos outdoors, in sunlight, in the garden or in front of brick walls really makes our job harder. A simple solution is using a colored sheet or a tarpaulin. Here are a few examples of backgrounds which make our job difficult Here are a few examples of backgrounds which make our job much eaiser If possible please try to use a contrasting background when taking your photos, your GML's and GWL's with also thank you for it
 1 point
 -
Unfortunately some of the threads are void of images as the links are broken. I'll fix the photobucket water marks though so they will be easy to see.1 point
-
Sweet! The paint color on the lower half really pulls the whole thing together. And the black wash gives it that real world weathered look. As always, fantastic work Tino. Its fun trying to imagine what the rest of the armor would look like.1 point
-
What an amazing write up. I’m going to start working on these for a centurion approval. Looks like I might need to trim my ab plate to reduce the gap and better align the snap. The rest is easily adjusted. Looking forward to getting it all done and posting those new pics. Thank you! And thank you too Glenn.1 point
-
Congratulations and welcome to the EI ranks trooper1 point
-
Hi Craig, Thanks for your application and the quick turnaround with the frown paint fix and additional photos. CRL and EIB Application Requirements All required photos are now in and, after review, we are pleased to welcome you to Expert Infantry rank. On behalf of the DO team and myself, many congratulations! Other-Armor Fit/Assembly In this area we review observations made by your fellow troopers and the DO team. Some observations may lead to suggestions to improve the overall look of your armor. Note that we consider both text (CRL) and pictures (screen caps/reference images) when reviewing submissions. Starting from the top, we noticed that your tube stripe decals are lifting a bit, so just make sure those are laying nice and flat: Reference Image: Additionally, your ear screws could be countersunk to sit more flush. Reference Image: Next, as was already pointed out, your shoulder straps are floating a little high. You might be able to correct this simply by making sure the white elastic is over the rear of the straps, or you can do a hot water bath to increase the curve of the straps. Reference Image: Next, your shoulder bells are sitting a little high. Note that on your kit the tops of your shoulder bells appear to be floating above your shoulders, when ideally they should sit on top. Reference Images: On the rear, your back plate and shoulder bells are overlapping each other. It's correct that we want minimal gap between the shoulder bells and back/chest plates, but we should avoid overlapping. Reference images: Continuing down, there appears to be a bit of elastic between your hand plate and the forearm. Not sure if this is necessary strapping with the way your kit is assembled, but I'm not aware of the existence of this strapping on the screen-used suits, so worth mentioning. Reference Image: Moving along, as already mentioned, your TD is sitting a bit high: Reference Images: Next, the paint on your TD screws could use a light touchup. It's certainly screen-accurate to have them weathered, but in general we tend more towards the 'fresh off the Death Star' look. Reference Image: Similarly, it's screen accurate to have a worn/weathered belt, but it's a bit sloppy to have loose threads hanging out, so we're suggesting you snip those off. Reference Image: Next, similar to the TD screw paint, your thigh rivet could use another coat of white paint just so in blends in better. Reference Image: Finally, a couple dressing issues on your leg armor. First, your right thigh is hanging a bit lower than your left, and ideally everything is as symmetric as possible. On my own kit, I had the same issue so I added an additional piece of strapping to the rear of my right thigh only to keep it from sagging. Of course once you take a step everything is going to shift around, but we like to have everyone looking their best in their L2 and L3 applications. And as was already pointed out, your right calf closure has come open, so just make sure everything is closed when you take your Centurion photos. Reference Images: Centurion Requirements In this section we prepare you for Centurion. More photos may be requested in the future that allow us to make better decisions on possible adjustments. If there are any areas of concern they will be discussed here. Because Centurion photos show much more detail than EIB, items to pertaining to Centurion might be seen there and not here. We try to point out all that we can from what is seen, but the final accuracy is the responsibility of the trooper. Again starting with the helmet, the L3 CRL states: Thanks for the updated photos of your ab/kidney. For EIB it's ok to have a slight gap, but for Centurion, there should be no gap. Additionally, the tops will need to align, as stated in the L3 CRL: Ideally there no gap between the abdomen and kidney armor. Abdominal and Kidney Plate align horizontally at top. In your case I think this is definitely just a dressing issue since we already know you can close the gap even more than necessary, and of course everything will sit better when you're wearing your actual undersuit. So just double check the alignment before taking your Centurion photos. Reference Images: Next, the L3 CRL states: Drop boxes are vertically aligned with the end of the ammo belt with minimal gap between belt and box. As was already pointed out, your dropboxes tend to wander a bit inwards sometimes. They actually look perfect in your Pajama TK photo, so it could be simply the photo angle, or you might need to add a drop of glue to the drop box elastic to keep them in place. Reference photos: Finally, unfortunately your ab snap is placed too far inwards. This isn't something that's explicitly pointed out in the CRL text, but we do use reference photos when doing our reviews. In order to fix this, you would need to drill out the snap, set a new one in the proper location, then fill the old hole with ABS paste. It's a bit tedious but many troopers have done similar fixes and if done correctly, it's totally invisible. Another slightly unorthodox suggestion would be to trim some excess off your ab plate so that the snap is sitting in the correct place relative to the edge of the right side of the Ab. This is a relatively drastic change and I'm only suggesting it because you appear to have a lot of room in your ab/kidney area based on the amount of overlap you had in your submission photos. Again, I'd think pretty hard before doing this because it could also misalign the right side seam, but it's an avenue you can consider. We won't break out the ruler to confirm the placement for your Centurion submission, but it should look visually correct when compared to the reference photos. Reference photos: And that's it! You have a great build that fits you really well, there are just a few items to take care of before your Centurion application. Until then, please accept our hearty congratulations in reaching the rank of EIB!1 point
-
Original TFA CRL discussion from 2015 2017 re write of CRL thread TLJ Phasma original CRL thread https://www.whitearmor.net/forum/topic/43616-tlj-captain-phasma-crl-thread/?tab=comments#comment-5865661 point
-
I really really appreciate it. Money isn't exactly tight. Just limited per month. I am able to save quite a bit after bills. And I am patient. So price isn't really an issue because I have nothing but time to save.1 point
-
Here is the mock up of my chest and back plate. I think 2 inches is too far under the shoulder bridge and I think the width of the tabs under the mounting slots needs to be the same....All thoughts and opinions on this are welcome! Thanks to all for the help....1 point
-
Hello and welcome aboard, looking forward to seeing our BBB photos soon. Here is a great thread jam packed with info Good luck1 point
-
I use imgur app to upload the images but the computer version of imgur and forums to post...1 point
-
Hello Steven, Welcome to the club!1 point
-
Hello Mike, Welcome back to FISD.1 point
-
Hi Mike and we are glad you made it back. Good luck with your approval!1 point
-
Nice work on getting rid of print lines on that blaster. It's a shame ATA has never updated their detonator, it is a lot smaller than a lot of other makers. Here's a couple of references on the TD to show the rotation of the detonator on the belt. I would agree and cut your brackets, you don't want the control panel too high, notice the raised O is fully visible so adjust the placement of the panel to that.1 point
-
Hello again! It's been a few weeks since my last post. I did have to make the wife happy and get some interior painting done, so that is all behind me now. During that time I actually finished up my 3d printed blaster which I didn't really document. It came out really good, but lots of priming, sanding, painting. I think part of this is my reluctance to start on that other ear LOL. I also started on the TD. Now the clips. I got a set of Ukswraths clips. Now I have the common problem of a 2inch pipe being an ATA kit. I was reading MV's part 2 of his TD build on how to handle the gap (I was hoping part 3 was ready). So what I did was mounted one to a test piece. Then I bent it at the blue arrow using a 1 1/2 piece of pipe. I was much happier with the results. Now it does bring the clip a little too high up in the front. So my thoughts are to trim down the clip as shown below. I think this would be acceptable comparing it to the real example above. And allow for more of a proper placement of the panel. Though I would like to get others thoughts before I proceed.1 point
-
Also forgot to mention but whether hand painting or air brushing if you use a coat of white first it will help fill any gaps in the templates so when you paint the blue it shouldn't run into any gaps1 point
-
Okay, today we will finally see the color on that last unpainted piece of the helmet. But first to the teeth... Before painting the teeth, I first had to do the lower face. The two-toned paint job on this helmet helps to make it look like the lower section is a removable part that can be changed if damaged. I wanted this to have a metal-like appearance to give the impression of a new unpainted part and that these helmets are being made from Durasteel. A simple silver paint was not sufficient, so I checked my cans of Humbrol Metal Cote but 27001 was too bright and the rest was too dark. More weathering (later) will help to darken the silver. Hard to see on these photos but the brush strokes and the 2 layers of polished Humbrol Metal Cote really worked good. List of modifications so far: 1 - Blast Shield 2 - Black Interior 3 - Two-tone paint job Have a nice weekend Troopers and Cadets1 point
-
Ok, I think maybe it's time for an update! while playing around with my back light red side light, I also had to decide where to put a battery. I chose to put them in the magazine, making it into a Power Pack, and my power pack will magnetically attach and transfer power to the weapon it's self. making for easy quick swap outs, should I find I need to do that. but this all required some reworking of the magazine file to work. and in the process of doing that, I chose to take a little creative license and make it more, Star Wars. this is what I came up with, and settled on for my first build. though I took it a lot further, and maybe will attempt to build like this at some point, I just wanted something to work out the kinks with. this may be the final future version...1 point
-
Nice work, a few tweaks you could make: Watch the rotation of the forearms to biceps, cover strips should align Butt plate is being pushed backwards a touch, I came up with some V taps to help keep it in alignment. Also right drop box is not aligned with the end of the plastic belt section. You just glue the bottom tab and leave the top free to move on the kidney You have a lot of overlap on the backplate to kidney, you may be able to adjust the strapping to solve this. You could also trim a little of your TD clips, they are showing under the belt You shins are sitting high on the boots, you may be able to bring these down a little to allow more room at the knees. Also shoulder bells could be rotated a little more to be closer to the chestplate1 point
-
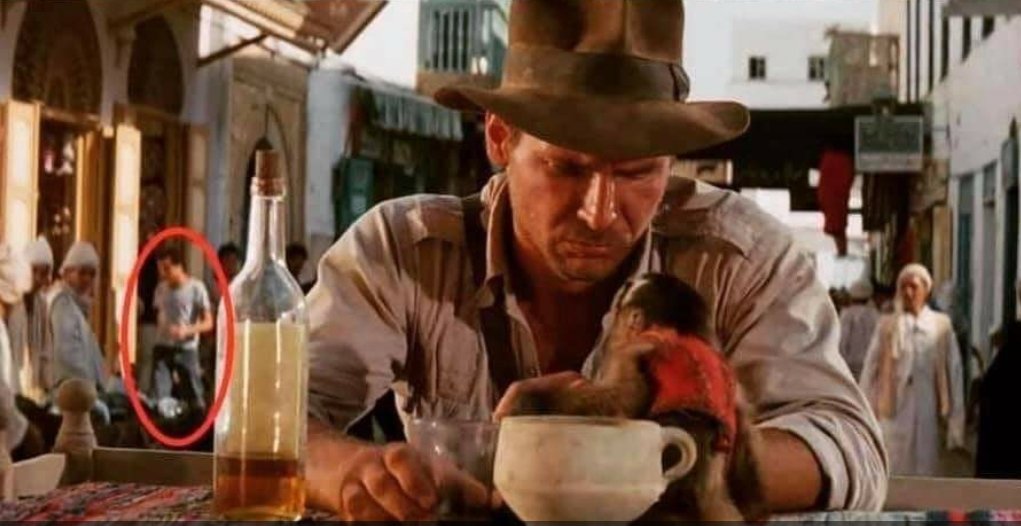
Apparently the guy also appeared in Indiana Jones
 1 point
 -
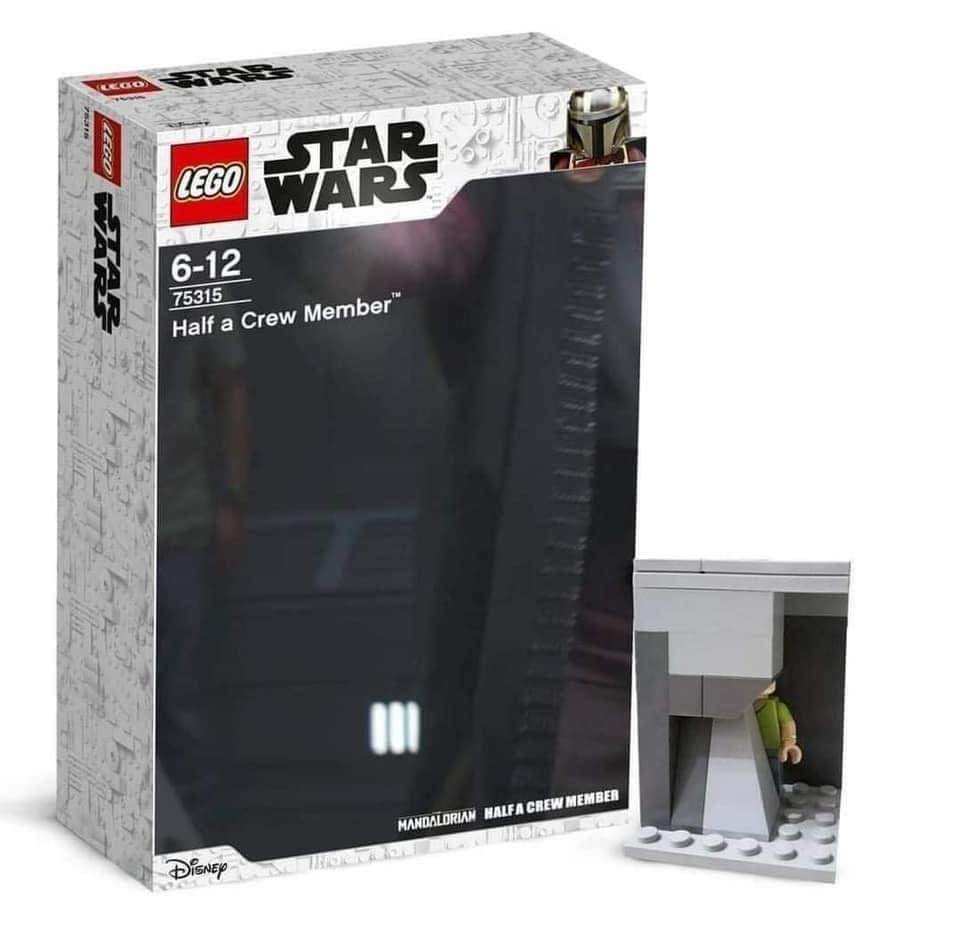
We've been joking about this in command, must be real, he has his own figure, and a Lego figure
 1 point
 -
Got my bucket done today! Now on to my armor.....1 point
-
One side done. Cheek vents look much better!1 point
-
Small thin flat files, you can normally get them in sets, round ones are good for curved corners too https://www.harborfreight.com/12-piece-precision-needle-file-set-4614.html
 1 point
 -
The Deployment Office concur1 point
-
9. Strapping Part 2: Ab Width Sizing for Curvy People, Split rivets, Han Snap and Other Particularities. While I hover around 125lbs and 130lbs, I have a relatively wide frame for my height. I have fairly wide shoulders and hips, and a relatively narrow waist. TKs however, have a torso that is almost perfectly tube shaped. This means that I have a LOT of room width wise between my abs piece and by kidney piece; and much more on the top part of the armour compared to the bottom. I want to accommodate for this and have a set of armour that moves with me, while still keeping the TK look and not look too curvy. I first taped all by torso armour together, and then fitted my abs and kidney armour to where it fits me more comfortably, while not looking too "curvy" for the TK look. I overlapped the kidney over the extra material that I need to remove from my abs. I quickly realized that the joint of the overlap is a diagonal line as I am wider on the bottom than top, and not a straight one. uh-oh, that is no good. To correct this, I first measured the angle of the diagonal line, then replicated that angle into a line on my kidney, and then drawing a line from the top to bottom. I then trimmed off this "triangle" piece of armour. Then, overapping my abs armour with my kidney again, I doubled checked to make sure that the seam line is now straight, which it is. I then marked the line of the overlap and trimmed by abs piece to it. All in all, I removed almost 4 inches of width from my abs. I still have room where I will be securing my AKER and phone for TrooperTalk as I do not have enough room in my chest piece to do so there. Then, on the left hand side of my ab armour, I measured 10mm from the edge, and 20 mm from the top and bottom of my abs to mark the place for my top and bottom rivets. I then took the middle between those two rivets and then marked my middle rivet. I lined up my abs and kidney and did the same marking on my kidney, 10mm from the edge. Then, after double checking my marks, using a small drill bit (I eye-balled the size, I'm not very familiar with power tools in general ) and drilled holes. I then used 3 1/2 inch black nylon webbing, cut it to 40 mm long and sealed the edges. I marked two spots ( 10mm from the edge, 20mm apart in the middle) and poked holes with the same method described in Part 1 of strapping. I connected my ab and kidney on the left size using these webbing and the split rivets. I threaded the rivets through the armour, then the webbing on the inside and hammered flat. TA-DAH! ^Inside ^Outside Then, I measured around 10mm from the edge of the bottom of the cod, and eyeballed the center. I then drilled a hole there and put in a split rivet there. I put in a small piece of black webbing in the back to add some thickness and protect the armour from the rivet. For my Han Snap, I measured the marked the spot on the top right hand side of my abs. I then drilled a hole and assembled the male snap facing the inside of the armour. I am actually using this snap functionally as well for closing the right side of my armour. (note how short and little my abs are after sizing ) Then, after looking at the reference imaged I placed two hole on the bottom of my posterior plate, then drilled holes and assembled two male snaps facing inwards. These two snaps will be functional as well for me, connecting to the snap plate in my cod. To be continued.. Sorry life has been really busy and will be even busier soon. So I will try to catch up this thread as fast as I can but it may take a while. In the meantime! I LOOOVED my first troop as TK-62639! here's a cheeky photo of me (shortie) with the ever so handsome TK-21887 at the Canada Day parade! Outer Rim Garrison ROCKS!1 point