Leaderboard


Popular Content
Showing content with the highest reputation on 09/10/2020 in all areas
-
Sep 2020 It has indeed been a long time since we have awarded a member this accolade, and it's rarity makes it all that more important to an awardee and the detachment at large. Anthony Paladino TK10666( aka Redforce) is one such trooper worthy of this accolade for his meritorious behavior. Anthony has continued to support his fellow troopers through the attache system, initially earning him the attache award. Anthony again stepped up recently to helm a rather large patch run which ran its course in a record time from the first post in the sales thread, to the last package posted. Not only has this run just wrapped up but Anthony is now helping Joseph with the 11' Victory 1000 patch run, educating him on his excellent system of organising and shipping packages, lets also add to this that he has also offered to write up a "How to" of what he does to make a merch run fast and efficient, something the detachment will continue to benefit from now, and into the future. Please join me in congratulating Anthony on this achievement of excellence. With unquestioned loyalty TK11469 "Sly11" DL9 points
-
OK troopers, we currently have the applicant for EI #999 in review! However, several recent troopers have unfortunately not yet added the requested photos needed to complete their submission. What does this mean? While we cannot guarantee it, the next Trooper to submit for Expert infantry (with correct armor details, of course) could very well be # 1000! HINT! Please follow the guidelines as set forth in the CRLs. For examples of the details we look for when doing approvals, look here. Also, it is imperative that you submit all required photographs and information as seen here. Even if you don't get to be #1000, if approved you will still get your EI badge and be one step closer to Centurion!8 points
-
Good luck to the troopers who go for 1000 and above!5 points
-
Att all budding R1 TK's out there, There will be an update to the Rogue One TK Happening over the next week. This is not a simple or basic update, but a complete re write of the CRL bringing it up to date and eliminating many of the grey areas. A lot of conscious effort has gone into this update, with much thanks to member TK20980 (Jeff) who was the detachments first Centurion lvl R1TK and was reviewed initially by the staff and our attaches. It will leave behind some of the current allowable ANH components as the CRL was originally written before the movie release. Back then we had limited assets available to reference and limited vendors supplying armour and parts so it has long needed this update. Of course this has all well and truly changed so we are now in the position to bring you the CRL it really should be. Answers to questions you may have. What If I have started my R1 TK build? This will not be a problem as a grace period will be given to all those currently building this costume for basic approval. The GML's will be informed of this and will assess you off the current version of the CRL. How long is the grace period? As in the past we have given a 3 month grace period, so if you are only just now deciding you might like to build this armour, act fast and get the ball rolling or you will need to refer to the new more accurate and understandable CRL that will supersede the current version. This will be initiated once the LMO's are satisfied with the re write. The DO's will keep a copy on hand so it will remain available to you until such time as it is replaced. When will the new CRL be ready and available? I am expecting the process may take a couple of weeks once I have updated the back end document and the LMO's have had sufficient time to review and green light it. This draft may be subject to a few changes on their request but once it goes live the old version will disappear from the CRL lists across legion, hence why the DO's will keep a copy. If you have any questions, please ask.4 points
-
Good luck troopers, bring us home.3 points
-
Looks awesome!! :-)3 points
-
COSTUME INFORMATION Armor: ANOVOS TFA beta kit Chestplate seam mod (wings cutted and reassembled) Chestplate chestslot mod (cutted and reworked) Biceps detail mod (3 step stairs) Shoulder bracket mod (àla Ukswrath) accurate fabric behind detail holes replaced front Belt Boxes with resin Belt Boxes (made by R2Dan) replaced Handguards with resin Handguards (made by R2Dan) Helmet: ANOVOS TLJ Standard Line Gaskets: ANOVOS Belt: Belts of The First Order Belt Pouches: custom made (by me) Holster: working metal holster (made by R2Dan) Undersuit: shiny pants and black top from Amazon Neckseal: custom made (by me) Boots: Imperial Boots Gloves: Imperial Boots F-11D Blaster: 3D Printed (files by The5thHorseman) Name: Daniela Hofmann Height: 166cm (5‘5“) Weight: 68kg (150 lbs) TKID: 72216 Garrison: German Garrison Basic Approval: https://www.501st.com/members/displaymember.php?userID=23851&costumeID=408 Basic Shots (Guideline Points 1-5): Chest (Guideline Points 6-10): Detonator (Guideline Points 11-13): Shoulders (Guideline Points 14): Biceps (Guideline Points 15): Forearms (Guideline Points 16-18): Abdomen (Guideline Points 19-21): Cod (Guideline Points 22): Posterior (Guideline Points 23): Thighs (Guideline Points 24): Shins (Guideline Points 25): Ankle Spats (Guideline Points 26): Helmet Details (Guideline Points 27-30): Neckseal (Guideline Points 31): Undergarments (Guideline Points 32): Shoulder Gaskets (Guideline Points 33): Knee Gaskets (Guideline Points 34): Gloves (Guideline Points 35-36): Belt (Guideline Points 37-38): Boots (Guideline Points 39): Blaster Details (Guideline Points 40-45): To prevent confusion: We (Daniela TK-72216, Sebastian TK-51337 and Richard TK-40193) built our stormtroopers together last year - the local Rise of Skywalker premiere was our first troop as FOTKs. In January we submitted our armors for basic approval and passed it. We then decided to update the few parts that we hadn't initially built to the Level 2 and Level 3 standards and are now appliying for the next levels of approvement. Since we built the armors together almost every mechanism, closure method and solution to strapping problems is the same - there are small individual differences but nothing major. We took our new approvement photos before a green screen in our living room with a set up to lights over a couple of days so lighting and background should be consistent in all three of our applications. Thank you very much for your time!2 points
-
Hi Daniela, thank you for your EIB app. One of us will be with you shortly, meanwhile It will be needed to update the posted photos according to the EIB Photo check list requirement so we can see more in detail your armor. PHOTO GUIDELINES Photo size- At least 800 X 600 (preferably 1280 X 960) Thank you.2 points
-
Hi Sebastian, thank you for your EIB app. One of us will be with you shortly, meanwhile It will be needed to update the posted photos according to the EIB Photo check list requirement so we can see more in detail your armor. PHOTO GUIDELINES Photo size- At least 800 X 600 (preferably 1280 X 960) Thank you.2 points
-
Well… as you might have guessed by my dropping off the radar for the past few months that things didn’t go as planned. She wasn’t approved. The paint was deemed “too aluminum.” The fit, it was remarked, was perfect, it was just the paint. “Just.” 2020- the gift that keeps on giving. Seriously, so many things, worldwide, state-wide, local and personal, first the world imploded around me and then my life imploded. Just ugh. Screw. This. Year. I wrote at least five drafts of an update, edited them heavily, and deleted them without posting. I really struggled with what to say and how to say it. I even drafted a sales post for her, but I deleted that, too. The moral of this story and the tl;dr version is this: You have to shell out for the spray chrome: it’s the price of entry. Know this from the beginning, budget it in from the start and you’ll go far. I’ve come to the conclusion based on others’ experiences that Al-Clad is not great for longevity and will likely need to be re-done as much as once a year. For that reason, I don’t recommend it. (If a Shiny Sister or Brother in the future cracks this code and makes it work, then by all means, disregard this, but as of now, and my own experiences and knowledge, I don’t actively recommend it). I ended up sending her to Chrome Factory, LLC in Las Vegas. I couldn’t let her beat me. I’m just too stubborn. Never underestimate how stubborn I am. I am mostly happy with CF. I am a bit hesitant to recommend them based on my experience, but I haven’t written them off completely. I would perhaps look into the spray chrome place back East (I forget the name, but other Phasmas have used them). The Good: The spray chrome is beautiful. It’s incredibly reflective, it’s chrome, it’s pretty durable- fingerprints and smudges aren’t automatic and rub off very easily, light scoots across the hardwood floors don’t scratch it up, scraping away dried liquid latex with various household brushes, fingers, and fingernails didn’t do anything to the chrome underneath (speaking of the blasters here, more on those later). The price was reasonable ($1.5k for spray chrome (plus $200 for old paint removal/prep) which is from my research, a good price if not the industry standard). He’s done several other Phasmas before and also Cylons from Battlestar Galactica. He knows his way around costumes and the lingo and unique challenges that goes with them. The Bad: I felt a few parts were bit sloppy and two sets of pieces were completely missed (yet they were wrapped up meticulously in plastic wrap like all the other parts, so it should have been noticed. I admit I have high standards. (Photos of all this below). Despite me telling him about four or five times (in writing, we were conversing via e-mail) that parts of the blasters were to remain black- they returned entirely chromed. The communication was good in the beginning, but broke down later (which, at this point, I’m just convinced in a prerequisite to be a 501st level vendor as I hear it like a broken record so often across the board with rare exceptions). I am mostly willing to blame COVID for a lot of the following issues: It was supposed to be a timeline of 4 – 6 weeks. I was fully excepting and okay with 6 – 10 weeks. After the six week mark, I started messaging him asking for status. It was always “done and ready to go” and was going to go out that Friday/that Monday/within a few days. We did this about three times, but no BBB on my doorstep and no tracking. The last time I asked if there was tracking for that last “I shipped it,” I never got a reply, but about four days later I had my BBB on my doorstep. Like I said, I’m mostly willing to blame COVID as this was all happening in late March/April when things really started going down. He was unable to work and tired to, got caught, kicked out of the shop for a while, there was a gap before he could get back in, etc. I wouldn’t worry too much about this if you send it in in the future, assuming we don’t go on full on lockdown again. The riffle also arrived to him broke, he fixed it, and it was broken again upon return to me. I stuck a dowel in it and re-glued it and I think that will do the trick now that it’s not being shipped anymore. (I believe this is a design issue, not the fault of CF). Toes and knees were missed, but will probably blend overall (laying it all out on the floor together they seem to kind of meld in). Smudge/scrape on bottom of inner shin. On the inside, so I’m not worried. Drip on the front of the shin. You can really see the reflectiveness of the chrome here, considering you can nearly make out my phone case. (It says “I am SHERLOCKED” in case you were wondering, for all my fellow BBC Sherlock fans). Underside of the helmet not chrome. Further changes, updates, and projects for completion: I fixed the riffle as I said, with the dowel down the body shaft and into the butt stock. I punched a hole for the dowel with my soldering iron and used a combo of E6000 and CA Glue to glue it back together. I used liquid latex again to mask off all the blaster parts to remain chrome and hit them with a coat of sandable primer and then glossy black. Liquid latex still sucks to get off even if it’s not weeks later. Which, by the way, don’t wait weeks, it’s a damn nightmare. Though waiting just long enough for the paint to dry (in 100+ F degree heat) and then trying to peel it off was only marginally better, so… just know you’re in for a challenge, thumbs rubbed raw and you’ll need patience. I also found a scrub brush like for the kitchen sink worked decently well in loosening and taking up the last bits. You do have to put muscle into it regardless. I’ll be touching up any black parts that scratched off/got missed with some black acrylic paint. Riffle mostly done, still some more latex to clean off. That stuff is stubborn, as you can see by the large pile of tiny scraps. Pistol is also mostly done, looking a bit better than the rifle, probably because it’s smaller and had less to deal with. I tightened the neck opening on the cape, just added an extra fold and sewed it down (it was just slightly big and showing a bit more shoulder than was ideal). I really love this cape. I tightened one shoulder connection. I added a Mr. Clean Magic Eraser (which I keep around for Jawa masks) into the front of each ankle spat for stabilization. I added the lens back in the helmet (I removed it for chroming purposes). I re-added a couple of Velcro connections I had removed for chroming- back to chest, yoke to chest. E6000 does not really like the chrome, so I roughed up the connection to help it adhere. I’m not entirely sure the yoke/chest connection will work or hold, so I might end up with a snap set up. We’ll see. If I were doing it from the start again, I’d probably just work out a snap set up and be done from the start. A couple of the Velcro connections for the gaskets inside a bicep came loose, so I re-glued it with a combo of E6000 and CA Glue. I also think I’ll try and remove the gaskets only when I have to. Less stress on the Velcro connections plus easier to get on and off. I ditched my second set of gloves (Nomex) and swapped them for stretchy compression ones (like we use for Jawas now), because the Nomex were just a bit large in the fingers and were too tight under the armor. They were kind of painful and putting my hands to sleep. I re-added the Velcro attachment to the palm for the fingers. I was smart this time, and split the seam to better access the palm. The fingertips still want to pop off, so I think I might need to add a bit of Velcro or try a stronger magnet on the outside of the glove. The magnets are still in the inside of the fingers from the first failed attempt. I also fixed a crack in the side of the abs. Third Time’s the Charm Approval Photos: Wish me luck, again! It’s 2020 so we can all use all the luck we can get.2 points
-
I clearly need more sleep... Thank you for your patience! Sent from my Pixel 4 XL using Tapatalk2 points
-
Hi all. Looking to be part out Outpost 42 in NZ so just researching my costume build at the moment. I cant wait to get out and do some charity work. Cheers!2 points
-
Ah, many thanks. I hadn't seen this reference yet. I can easily reduce the size of them all. Sent from my Pixel 4 XL using Tapatalk2 points
-
I would remove a little of they paint as they do look a little large, notice the paint stops just short of the base of the buttons in the reference, may also help the look of your small ab plate.2 points
-
Good luck to these last few troopers. It is quite the milestone!2 points
-
Very happy about the release date for second season of the Mandalorian... ...but I got pinged 10 times by my coworkers within the first hour of work. Including by one of the SVP's and by the head of HR. Share stories of how you know you are THE Star Wars person at work! As for myself.... Colleagues give me SW themed Valentine's Day and Birthday cards. When I showed up to work on Halloween in full armor, my boss looked at me and was like "...I'm 95% sure that's Jessy in there." (My reaction was "who's the other 5%?!") New hires are told to find me from all the Star Wars toys on my cubicle. The day after the season finale of Clone Wars dropped, I got like 5 pings of people asking what my reaction was. When places started closing down due to the pandemic, someone stuck the meme of General Grevious on my desk.1 point
-
This was a long time coming. I have wanted to build my own set of TK armor and join the 501st since not long after its inception. After many conversations with my son about it, we decided to move forward. It has been and continues to be an amazing experience as I am already working on finishing his TK. A cool story is that another couple that we are good friends with were over for a small celebration of their daughter's birthday on the same day that I got my email from my GML about being approved. I had wanted to take a few new pictures for my EIB submission later in the evening when they were gone, but we got to talking about the 501st and the process of building armor around the table ( in the absence of the kids ) and I suggested, off the cuff, that I could put on my armor and present her with a special birthday cupcake from the Empire. When they began to sing Happy Birthday, I emerged from the room, cupcake in hand, and got to watch her eyes light up. She's a big fan of the bad guys...lol. Later on that evening after they had made it home, they messaged my wife and told her that was one of the best birthday suprises she had ever had! It really made me feel good to bring that kind of joy to a youngster and I'm looking forward to many more opportunities ahead.1 point
-
Good call. Thanks!1 point
-
Great work, bit hard to make out some of the details as the images are a little pixelated but looks like a nice job from what I can see, well done1 point
-
You may want to add a little foam or similar just under your shoulder where the bicep will touch, saves touching up the paint I also add foam to the ab and any other section which will rub. Nothing worse than an insect having too close a look at your paintwork1 point
-
Hey Mario - Sebastian changed all pictures regarding the resolution for me as well. Thanks for your feedback!1 point
-
Hey Mario, thanks for the fast feedback. I've changed the resolution of all pictures (i had problems with IMGUR, so it was the first time using postimage, sorry for that!). I will change the resolution for Dani's Pictures as well.1 point
-
David Gdula TK-15028 EIB Letter Joseph Thank you! http://www.whitearmor.net/eib/certificates/15028-eib.png1 point
-
As a HWT that often wears an orange pauldron, I also updated my ear rank bars to reflect the rank of "Captain". No one ever notices, but I think it's a nice detail for those hardcore folks I've always thought of it many elite military units where basically to have that job, you are at least an officer of some degree (like fighter pilots, special forces, etc...)1 point
-
Good luck Silver Sister!! I hope 3rd time really is the charm!1 point
-
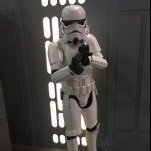
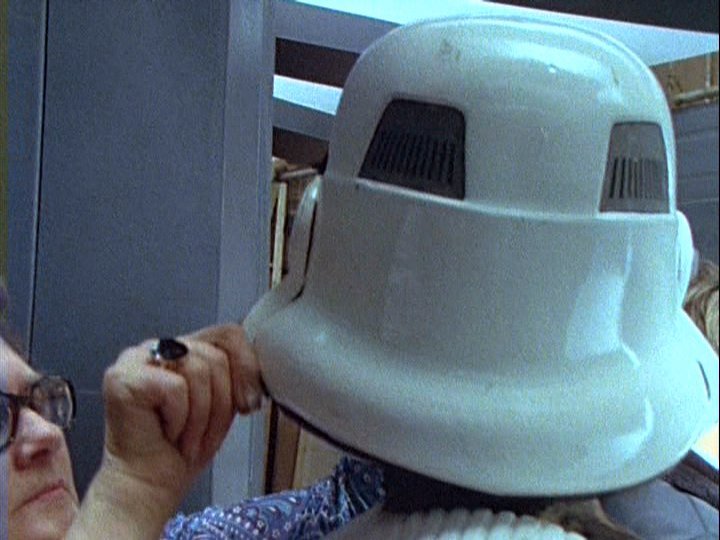
You can trim off more (a little towards the back and a bit more towards the front). Take a little bit at a time - a couple of mm can make the difference. Some of the screen used buckets had quite a bit shaved off the bottom, so you should have no issues.1 point
-
Good morning, Eric! Have you tried searching for the GarageBoss 12.5 oil can? It's actually the exact same one as the Wedco 83150, just under a different name, and it's the one I purchased through Walmart. Below is a link to my HWT build thread, which has a TON of purchase links for components for the backpack. I was a little obsessed with documenting my process. Additionally, here are some direct links I quickly found for the pan you asked about. I'm not sure what shipping would be like to Canada. https://www.zoro.com/garageboss-oil-recycle-drain-pan-125-qt-gb150g/i/G6591299/ ---------- Hope this helps!1 point
-
Welcome! I’m a SA, New Braunfels, Waco, Dallas, ELP guy. Been to Lubbock many times... won’t say why. (wink) 176?!? dang man. I’m undersize then. I’m learning new stuff all the time on these boards!!1 point
-
Phew! Thanks! Sent from my Pixel 4 XL using Tapatalk1 point
-
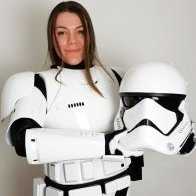
Just wanted to check you are putting it on side ways then rotating straight?
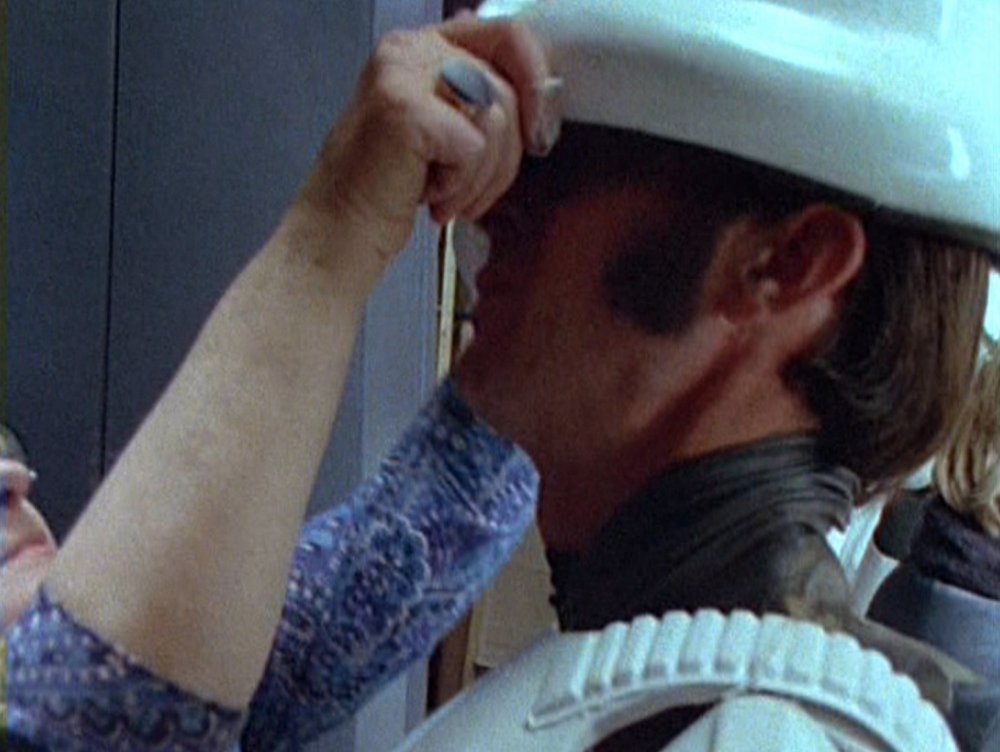
 1 point
 -
This may sound strange, but because of the oval shaped opening many of us have to put our buckets on sideways and then rotate it forward.1 point
-
Welcome trooper, The empire looks forward to your service1 point
-
Yeah, feeling a little embarrassed here! Sent from my Pixel 4 XL using Tapatalk1 point
-
Ok. So I'm guessing that most will look at this update like it's much ado about nothing. However, any progress, regardless of its magnitude kind of gets me excited. Additionally, actually finishing a few more white pieces was just enough to motivate me beyond anything I could have imagined. First, I think I've done a fairly good job at documenting my issues with paint. For future builds, I will definitely employ a makeshift booth setup with HVLP sprayers, rather than using the rattle-can method. Actually, for my clone armor, I'll do rattle-cans, but others will receive different treatment. While the finished products have turned out great, the process, and resulting errors, has left me kind of "head shy" when it comes to painting. I think that by just going out to my garage tonight, and spraying a few small items, I was able to overcome the memories of recent disasters. Let me get you all caught up to speed... First, my printer's putting out more products than I can keep up with. Every time I finish something, I print something else and each requires a lot of post processing work. I just wanted to share this picture because it shows the lineup of current and future projects. Of course, the one in the middle is the priority, but the other two are fun. Unfortunately, Mando has the same deadline as the Stormtrooper, so I've got a lot to work on. But I also wanted to ask anyone who might know... are clone helmets really that big? This thing is enormous. I'm going to post in the Clone Trooper Detachment forum, but my gosh; I feel like I can put the entire TK bucket inside the clone helmet. Kind of like a Turducken. I posted this pic a few days ago when asking questions about the belt (which I've since corrected). But again, it kind of shows the pain of removing 3D print lines. In the previous picture, you can see the horrendous lines left on the bucket after a long two day print. In the center of this pic, you see how I used almost an entire bottle of glazing and spot putty (bottom right corner) to turn the helmet into a "sandable" chunk. After a lot of manual labor, you're left with a much smoother, almost pink helmet that's nearly void of all lines. After a nice layer of filler primer, some sanding, some touch up spot putty, and more sanding, I'm left with this. But that's enough about the helmet. I'll get back to this in a few days. Overall, I'm very excited about how this one will turn out. This pic kind of shows all of the stuff that's piled up during my "fear of painting" period. Please notice that if I would just get over it and paint everything on this bench, that I would only be left with the legs and strapping remaining for the build. I know that nothing is sitting quite right in this picture, which is primarily due to the absence of strapping, but I wanted to check everything regardless, before I start going for "permanent" solutions. As a side note, I have to print the inner forearms again, but that should be a quick fix. Which reminds me. I've started a pile of misprints, reprints, and screw-ups. In the end, I'll weigh this all up to see how much money I wasted. This is just a closeup of the hand armor to show the print lines. This is mostly due to me printing at 180mm/ sec. When I slow things down, it's much cleaner. As I stated previously, I just needed to go out there and spray something. Because of the print lines, I decided to use the gold paint method again. After putty, filler/ sandable primer, sanding, white primer, and gold, this is the hand plate improvement. The difference is remarkable. Other than a little wet-sanding, this is ready to join the white armor club. As is this. And all of these. Yeah, I got some bad runs, but I've seen worse. Also, I didn't even realize that this was more of a brass color than gold. In the end, the results are the same; it's still got flake in it that finds its way into any remaining lines or errors. I love this process. Honestly, I wasn't going to use it on these pieces, but decided to at the last minute and I'm glad I did. Also, the shoulders had a big crack going through them that got obliterated after some alex-flex, primer and gold paint. And finally, the white pieces. Butt, kidney, and ammo boxes. The arms, shoulder straps, hands, and trapezoid pieces should be white tomorrow. Again, this seems like a long post which resulted in very few completed pieces, but when I laid them down with the back and torso I got very excited. Like I said, this was the motivation I needed to start cranking this stuff out. Additionally, since I've now reprinted the shoulder straps and trapezoids, as soon as their white paint dries, I can start assembling and strapping the armor. This should be a good weekend coming up. Until next time.1 point
-
Thanks Sly11, saw a rs prop masters video of them doing that so will go with your recommendation. Sent from my SM-A520F using Tapatalk1 point
-
Hahahahaha - funny but TRUE!!!1 point
-
Well we had one, then he became a DL1 point
-
First Order Battle Groups now houses everything except 3D files for FOTK's check out the Armory section1 point
-
https://www.whitearmor.net/forum/forum/223-weapons-of-the-first-order/1 point
-
Back at it again. Really slowed down while I did some problem solving and had some paint issues (which are extra frustrating at this stage). I'll post some photos and descriptions of my progress and hangups later this week, but as a bit of a teaser...1 point
-
I've done some tidying up to the vocoder and given it a second coat of paint. How does this look to folks?1 point
-
Every morning I wake up wondering if today will be the day. Sent from my iPhone using Tapatalk1 point
-
Every piece of SW news is sent my way, anything with a Stormtooper locally I get asked if that was me.... Someone hadned me an "ooshie*" this morning as she walked in as she knew i'd appreciate R2.... Its established I have May the 4th off every year as well as any dates for premiere events. Someone called me up and asked if I had a cape at work for something they needed.... I did... as well as a cheap Vader costume to go with it. I was asked about lightsabres, I had two under my desk... I've worked a shift on our service desk dressed as a Stormie.... so yeah I am definitely the Star Wars guy at work.... *limited edition collectibles from grocery store1 point
-
Sven Roth TK 21296 EIB A4 Sha Sha Thank YOU so much! My pleasure, Sven! http://www.whitearmor.net/eib/certificates/21296-eib.png1 point
-
No need to worry. There is also distinction in being part of the second wave. Our ultimate goal is 40% of the Legion TK's as EI, which is the same percentage as MEPD. For 5686 TKs, that would be 2274 EI. Apollo 12 was not the first to land on the moon, but they certainly had fun doing so and it was a solid event. Millennium Duo (or Secundus, or II) certainly will have it's own personality and distinction. So while this is a very big victory for FISD and the Legion membership as a whole, it is not the end. There is still much more to come1 point
-
Well guys! Submission photos are in! Hoping I pass and I can go for EIB soon!1 point
-
I'm 52, 6'0" barefoot, and about 185. Most of the extra weight is predictably in my mid-section. There are really only two options: 1) Increase cardio 2) Decrease calories It also depends on your body type too. I'd focus less on weight and more on BMI. Muscle for instance weighs more than fat, so when I was at my physical peak working out like a gym rat I was 175lbs, but I also had a hair under 10% body fat too. That was in my 30s! Unless I really increase my cardio, the only way to lose that 10lbs of belly fat is to change my diet, e.g. I eat less at dinner, drastically cut down on beer, ice cream, cookies, etc. More veggies in my diet. I have weight targets now too, like "no ice cream/sweets" unless I get under 180 and then only once a week. Or, no beer for a month or until I hit my weight goal. The hardest part is my wife is a phenom cook (e.g. better than most restaurants), so cutting back at dinner time has been sooo hard. I realize we are all in COVID, but I think that just means we need to up our game. No reason you can't do some routine in your living room, even if it's just 15 minute/day. It can include pushups, squats, crunches, leg lifts, etc. At lunch time since I'm WFH, I put a pack on and go for a walk, even 20 minutes is better than anything you'll find on the news these days. I am up to 24lbs and that's getting too easy, so will up that weight to my target of 30lbs, which is a good backpacking weight when I go camping.1 point
-
Polishing the lenses didn't work, so ripped it out and ordered another sheet to cut to size. Used 600 grit to get rid of the green stains in the sockets, 1200 grit to finish. It came up good as new. Sent from my SM-A520F using Tapatalk1 point
-
Used some blobs of Apoxie to strengthen around the ear screw holes, which gave me a bit more confidence when counter sinking the screws. Least something turned out ok today Sent from my SM-A520F using Tapatalk1 point
-
2020 bump for new recruits. Haha, jk. I'm actually posting to share my most recent PDF compilation of this thread. Your work continues to amaze me, Dan, and I'm sure many more of your future posts will warrant being added to my All-In-One Resource Compilation thread. Keep up the great work, Sheriff!1 point