Leaderboard


Popular Content
Showing content with the highest reputation on 04/29/2020 in Posts
-
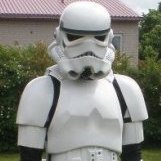
Little update! It's been warmer here in SoCal (actually TOO warm some days haha), so I've been able to lay more paint. Everything (save the helmet) is FULLY WHITE now! All the interiors are resin-ed, decently smoothed, and painted flat white. All the exteriors are fully primed and have had at least 1-2 coats of flat white base, then at least one of gloss white on top. Just need to sand them back to 1500 or so, then let them sit for a week to completely offgas, mask everything, then I'll spray clear, hopefully in the next week or two. Tried to do a front and back shot so you can see a few of the interiors that aren't masked yet. At this point, the helmet is the furthest behind and is sitting in its last coat of primer, sanded and waiting for a coat of flat white - just need to finish filing out the tube vents and teeth. What a pain. I caved and used my dremel to connect holes I drilled at the edges, and nicked a couple spots, so I'll need to fill them back in a bit. I wanted to make sure these were cut out before spraying white though, so that's my project for the next couple of days. Oh, and in other fun news, got my Heavy Weapons Trooper EIB-approved finally, so that's cool! Centurion next once I find more energy to make a couple changes... I'm now halfway done with radiation treatment (10 out of 20 down!), and have been SUPER tired and achy, so it's been hard getting motivated to finish, but I'll get there. Thanks for stopping by!4 points
-
Little Brown Box day!! Big thanks to @jimmiroquai for quick production and shipment, despite the COVID checkpoints!! First step: wash and scrub with scour pads and dish soap. First obstacle: maintenance broke a pipe and there's no water in the whole community. Second step: lay down drop cloths and use Bondo fiberglass resin and cloths to reinforce the interior. Second obstacle: still waiting on those items from Amazon. Third step: once resin has cured, cutout teeth and vents with a Dremel (hopefully without breaking anything since it should be stronger). Off to a great start! Lol!3 points
-
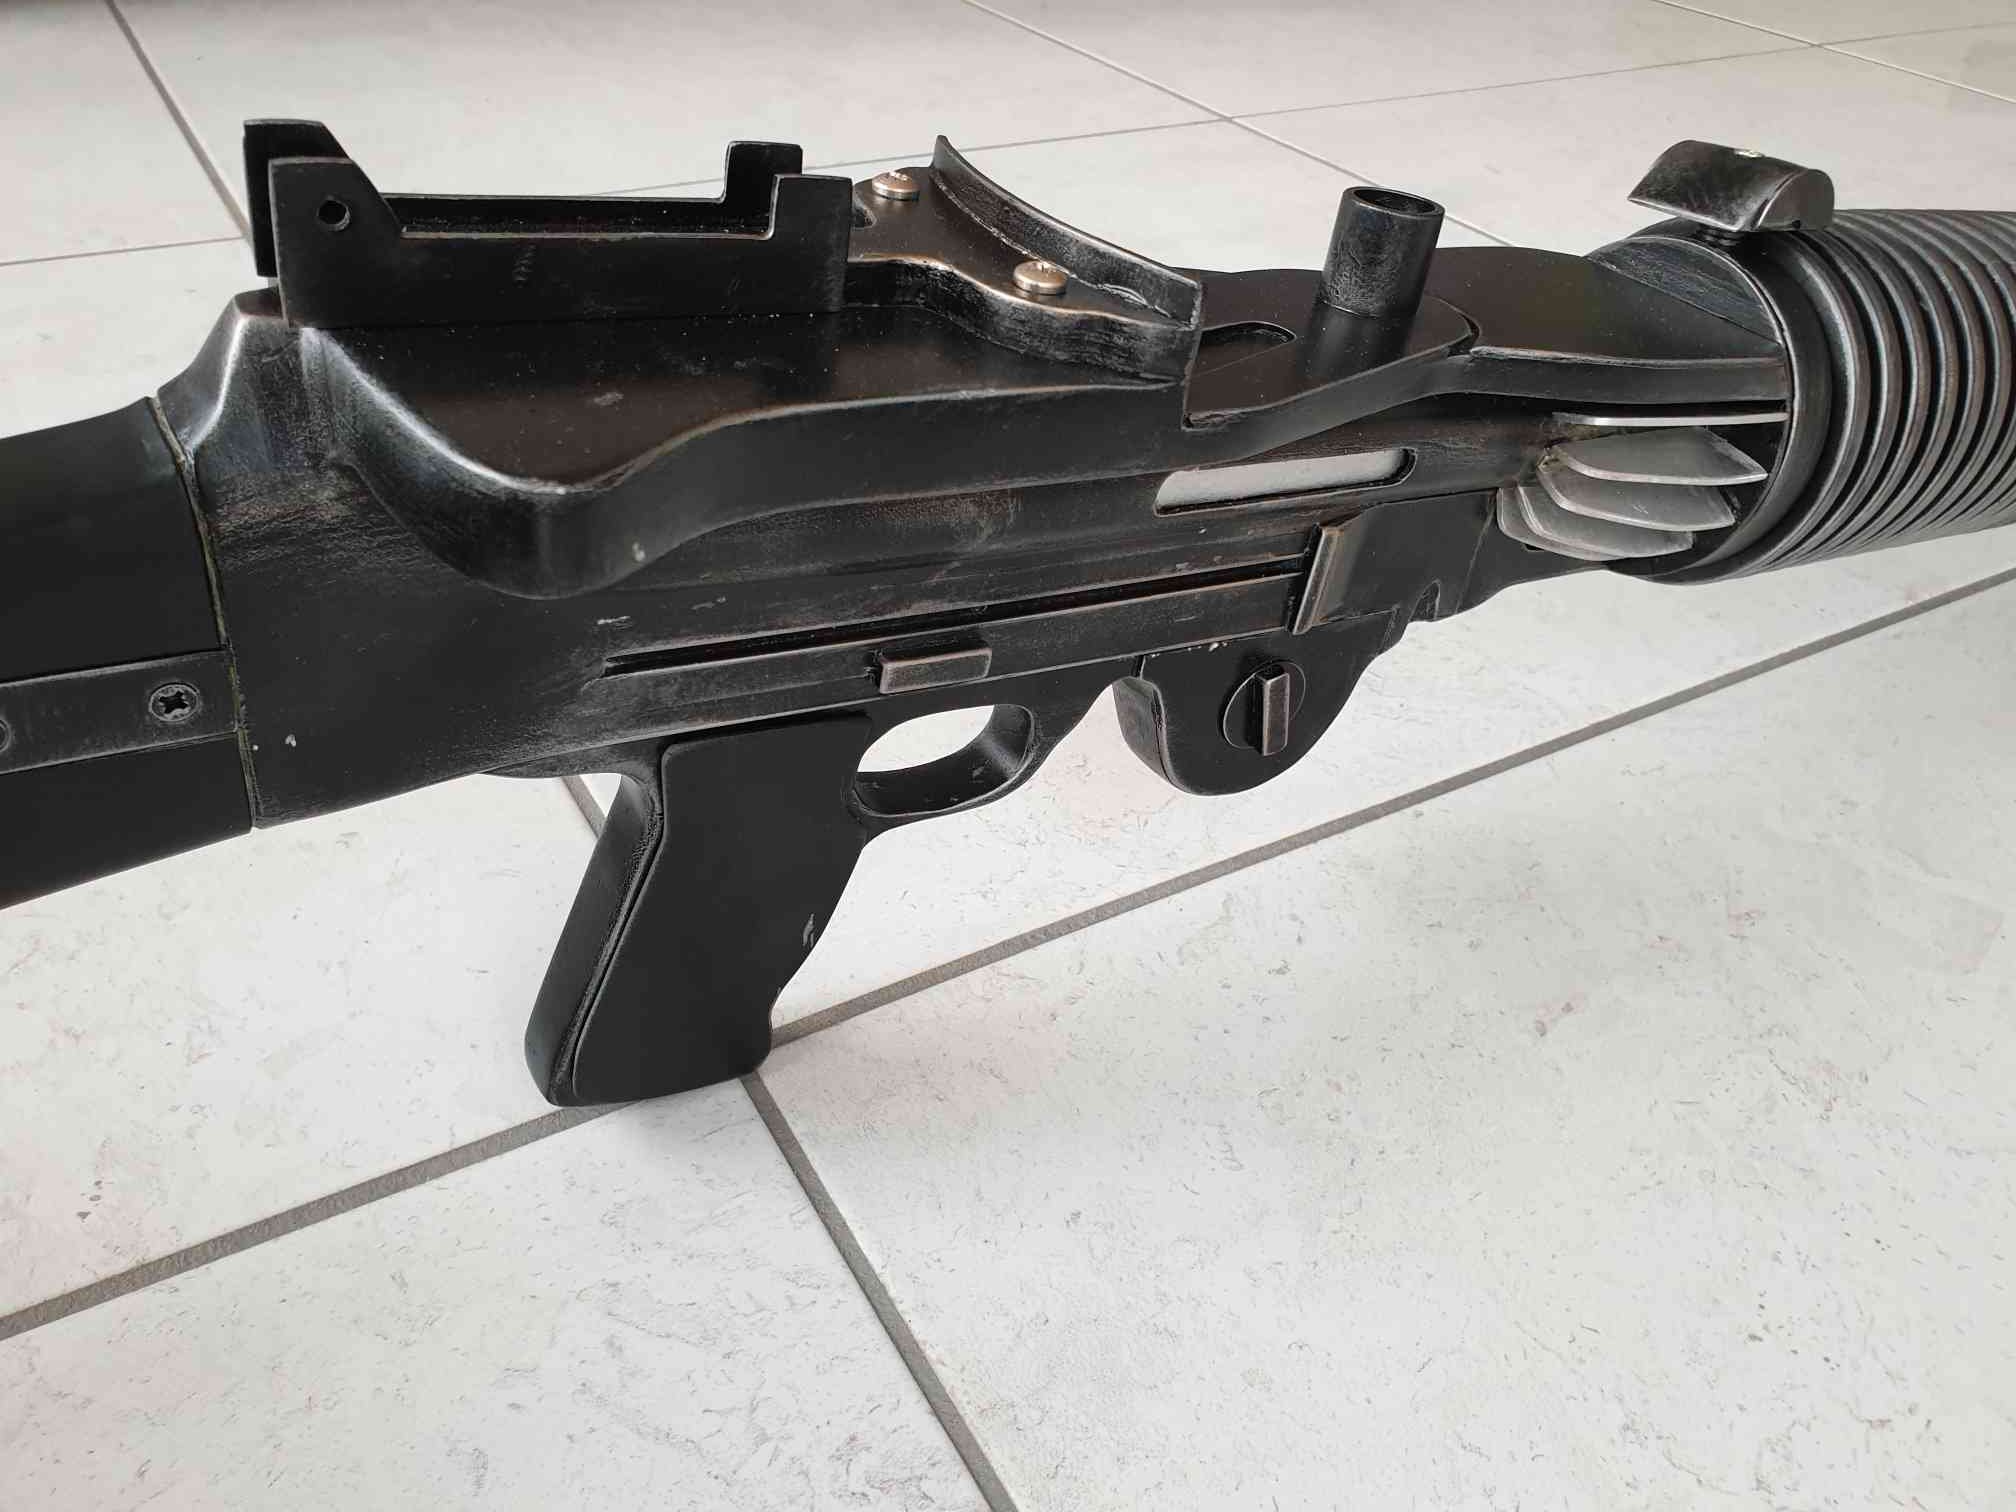
Today I sanded down all the rough edges on my armor in preparation for my initial fit test/ blue tape moc up. I popped open the garage to give myself some fresh air, donned my mask, and threw on some safety glasses. I decided to use a dremel to make the task quicker, so I selected a 120 grit sanding drum and flipped the dremel to around 7k RPM. After practicing a few passes on a scrap piece of ABS, I started on the biceps. An hour later, all edges were relatively smooth and ready to be taped up. But unfortunately fitting the armor got pushed to tomorrow, so more pictures will follow then. In the meantime, I've been starting to get blaster fever. My oh my does Praetorian make a sharp looking E-11. And DLT-19.3 points
-
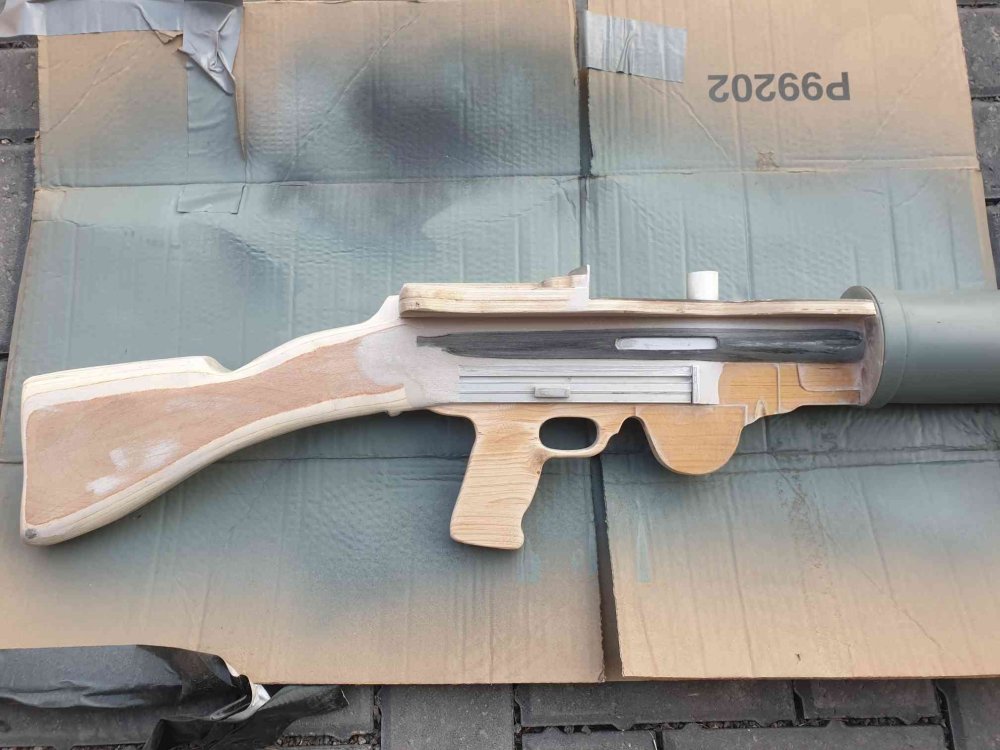
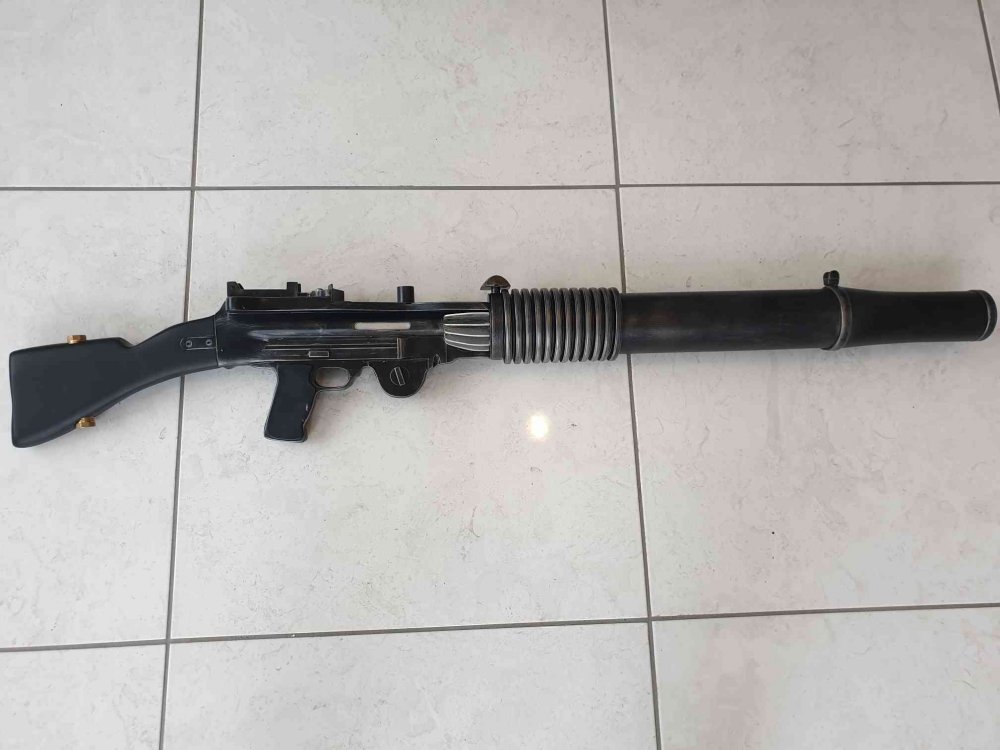
Like a lot of us I have had more time on my hands than usual lately. So after stumbling across Pandatroopers plans for a T-21 light repeating blaster I thought I'd give it a go. The biggest problem I had was purchasing materials as most suppliers around here are currently closed. So I realised I was going to have to make it from anything I had lying around the garage or work. Being in the construction industry this wasnt too difficult. The pine timber and plastic pipe were easy to find but the only plastic sheeting I could find was an old shed window. Using all this and some old aluminium strips I had lying around I got to work. The whole build took 2 weekends and the evenings in between. Unfortunately I didnt take many photos early on but lesson learned for when I build another. After looking at some of the great builds on here, I think I need to up my game next time but I dont think the result is bad for the time it took to build.
 2 points
 -
Hi everyone, First off I am sorry that I am not on here very much. I have been trying to stay at home as much as possible to help stop the spread of COVID-19. When I do go shopping I do not just wear a mask, I wear a helmet! I have been doing this since the state of Pennsylvania has asked for people to wear masks. My main goal was to bring some cheer to everyone else and to not look like a cowboy or surgeon ;p Has anyone else worn their helmet out and about? I would be shocked if I was the only one. Keep safe and hope all of you are doing well.2 points
-
Hey everyone, Been a SW fan since going to see the OT in theaters back in the dark ages(early 90’s). Have been dabbling in lightsaber replica eFX installs for the past few years and have amassed a decent collection and skill set because of it. Spent few years researching armor on and off. At 6’1”(1.85m) and 140lbs(65kg), I’ve been reading lots of build threads to decide on which kit to purchase given my sizing. Thinking I’ve narrowed it down to TM or RWA based on the availability of XL shin lengths and both offering to send the kit with a finished helmet. Look forward to more research and discussions, hopefully with my BBB and build thread soon to follow. -Cam Sent from my iPhone using Tapatalk2 points
-
So, while assembling my supplies in preparation for receiving Jim's helmet, I was back-and-forth on ukswrath's speaker system. I knew I wanted it at some point in the future, so why not now? I ordered it and @ukswrath sent it out right away! Received, assembled, and tested it this morning! So excited to get this installed and use it! Thanks Tony! Everything else is slowly showing up. I should have all supplies, and even my helmet, by May the 4th!2 points
-
Was aiming at having the helmet completed by the end of a week, but now I'm debating electronics. I would like to fully deck out the helmet (hearing amp, speakers, fans, static burst/radio chatter) and that's got me thinking that it may be easier to do with the helmet not completely assembled yet. I'm busy digging into the research on that, could go either way I suppose. Also I'm debating on swapping out the flimsy green-tinted film that was provided with something a little more significant. I believe I read somewhere that welder's visor has been used. - In other words, plenty of research still yet to go. A couple other parts I'm stuck on - The forearms were giving me a hell of a time trying to get them glued together. Even after a 24-hour cure time on the E6000, the cover strips kept pulling apart - too much pressure from the curvature for the E6000 to take... I may need to look into ABS cement to get those to behave correctly. As for the chest plate, I think I may cut the neck line slightly deeper to avoid having to cut the bottom edge and recreate the return there. I know it's canon to Mark Hamill's suit to have no return edge, and I know return edge can be restored (looking at Diana's thread), but it's so close to working as is.. We shall see.2 points
-
Way to go Alex! If you have the time and want to take that armor to the next level.... https://www.whitearmor.net/forum/topic/49177-only-37-spots-left-time-to-step-up/?tab=comments#comment-6876372 points
-
You need to post in the thread that handles the 501st access rights. a admin upgrades your group rights then to the 501st TK group and then you can post there. the member-only sections open up for you, too2 points
-
I've looked at the belt and the left side seemed fine but the right needed to be moved over more than possible. So I cut a piece out so the elastic would stretch further to the end and align the drop box.2 points
-
I printed a full F-11D kit using @The5thHorseman files probably around when TLJ came out. I'm finally beginning to do something with it. I started with a full inventory and assessment of what I have. I have come a fair way in printing and also now have a resin printer which changes things a bit also. I am going to be reprinting most of the smaller parts again on the resin printer to give better detail for less prep work. I did start this 2 days ago but a silly mistake ruined a full plate of parts, so that's currently back on the printer. I'll post pictures once I have some. I also want to add some basic electronics to the weapon. I want to have the red LEDs in the magazine and Hengstler, and also the front torch. I am struggling to source the one listed in the build guide PDF. Instead I have found the smallest one I could on eBay and will see if I can make it work, modifying the parts as needed. The rough plan is to run all of this off a single battery and 2 switches. I have modified the magazine file to add a place for a switch and hollowed out the Hengstler as a possible battery location. I have also added some wire paths to some files, but on others I will drill the prints out and then fill the exposed infill. The modified magazine file. Once I prove these work, and any other modded files, I'll make them available to anyone who wants them. For the front torch I want to be able to choose when it's on or not for photos/effect in darker rooms. I am hoping I'll be able to gut it and run some wires down the barrel to the battery and switches. I have bought some 12mm tactile switches which as luck would have it are almost perfect for the blaster trigger. They are meant to be PCB mount so I have modded one slightly to fit in and still have somewhere for the wires to go. Mine are 6mm height, so a 7mm would probably be even better. I'll solder on some wires and then glue the switch to the trigger, and a thin EVA sheet to the other side as a bit of filler/padding. I will be reprinting the handle for better quality so will run some tests on the old parts to check it works. Biggest issue with this project is fitting it around the armour build so I can get parts sanded and primed for paint once the world reopens.1 point
-
DISCLAIMER While there are some really good threads on this subject here on the FISD, I just wanted to highlight a few areas with some more detailed images. As many of you know, I am not a computer savvy guy, so I designed this for those who are in the same boat I am. Now, on with the show.... Whether you are just starting a build thread or just have a technical question, posting a photo is vital for getting solid advice here on the FISD. A verbal description is one thing, but a picture really is worth a thousand words. You will also need to post photos if you are applying for Expert Infantry/Centurion levels. In order to do this, you will need an image hosting server. For the following I am using imgur (imgur.com). This is a free service, and allows you to crop, re-size, rotate, post and store your photos. It may be a bit confusing at first, but I promise that once you get the hang of it you will be a pro in no time! NOTE For the purposes of this tutorial, we will use as an example that you have a question about the center of your ab-plate section. Instead of posting a photo of the entire costume, you can (and should) crop and re-size it to show a close-up. Assuming you have installed imgur and the photo(s) are downloaded on your PC or laptop in the Pictures section. To add a photo to your imgur Gallery: 1. On your imgur home page, click on your name at the top right (Step 1). This will give you a drop-down menu. Click on Images (Step 2). This will bring you to your Gallery (library/storage area). Go to the task bar at the bottom of the screen and click the New Post button. In the next window you can either just drop image directly to the drop images here box or select Choose Photo to browse your PC and select the images you want to upload. Finally go to Step 1 and 2 to acces your gallery to see the images you uploaded. The photo is now part of your Gallery... time to Edit! 1. Scroll over the image you wish to edit. You will see a pencil symbol and a trashcan. Click on the pencil, which will highlight the image in a green box . Click on the Edit tab on the top right. To crop/re-size: 1. Click on the Crop/Resize button. 2. Using your mouse, create a box around the area to be saved. 3. Hit Apply. To change the size, go to the numbers on the top right of the page. 4. I normally just use the one on the right (399 in this case) but you can use either. Click on the box and back out the number, then add your own to reduce or enlarge the image. 5. Hit Save. VERY IMPORTANT! The edited image is automatically changed and added to your Gallery. To Rotate your image: 1. 1. Scroll over the image you wish to edit. You will see a pencil symbol and a trashcan. Click on the pencil, which will highlight the image in a green box . Click on the Edit tab on the top right. 2. Click the Rotate tab. IMPORTANT: You may have to reduce the size first in order to get the entire image on the screen and successfully save it. 3. It will give you 4 choices like this: 3. Click on the one you want and hit SAVE. NOTE: You cannot Crop/Resize until you have saved it. O.K. time to post it up! In your Gallery, LEFT click on the center area of the pic you wish to post, which will bring you to the area as seen below. 1. LEFT click on Copy next to Direct Link. 2. Paste into your post or thread. DONE DEAL! Posting using a mobile device (phone): *** ***Special shout-outs to Glen (gmrhodes13) and Colin (OddViking327) for the following info. !! From Glen: After adding the imgur app., upload to Imgur then click on the image, then hold thumb on the image, it will open an options page then select copy link, on left, then post into your thread. Doing it this way will give you a link with the image tag, ie: jpg or png and so on. From Colin: Use the phone app to upload to Imgur right from your phone (set it to private and you can post them here, but they won't be searchable in their feed, and you don't have to title them). On each image on the Imgur in your Gallery, click it, and copy the BBCode tab *** and paste it into your post. It won't show while writing your post, but will show after you hit "Submit Reply". Super easy. And if people want to see a bigger version, clicking on it takes them to it. *** IMPORTANT!! Once you have attached a photo into a post or thread, do NOT delete or edit it in your Gallery. If you do so, it will disappear from your post. If you have any questions or issues, please feel free to ask on this thread.1 point
-
Hmm.. I like this. I didn’t see a 3.5 jack on the BlastFX board but I know there is an option for an external source in the menu. Of course I can always add one if need be. Thanks for the tip! I wouldn’t mind rocking some blaster sounds on the super loud speaker I have. Sent from my iPhone using Tapatalk1 point
-
Congratulations mate, now Let's Do it.1 point
-
Very nice, I add a 3.5mm jack to my blasters that are wired along with the speaker, normally fit them underneath the barrel at the back behind the handle then your hand covers the wiring, so they aren't seen, allows you to run a cable from the Aker amp down your arm to the blaster, nice and load for conventions.1 point
-
So I redid my ears. I tried to make the ear screws align with the trapezoid thing as I have seen pointed out on lots of centurion applications but I ended up slightly off. Looks like small movements during positioning and trimming slowly moved the original position. I tried to make it a lot closer to screen accurate helmets. I just need to add the bottom screw and it will help close the small gaps. I just need to verify/research how for in the bottom does it go and does it go in the middle or aligned with the other screws.1 point
-
Excited and wanted to say Hi! I'm about to pull the trigger on a WTF ANH Stunt kit as a 33rd birthday gift to myself ("Halfway to Order 66" is my excuse and I'm sticking to it). I'm a little short for a stormtrooper (5'2" female) but fortunately have some crafty fellas and a super supportive Garrison with a wizard who's already helped a few other local shorties. (I'm already a part of the Midwest Garrison as Governor Arihnda Pryce.) I'm in no rush to finish, but I'm super excited to get my hands into this build and learn some new skills.1 point
-
Thanks for the warm welcome, all!!1 point
-
thank you so much. Yeah specops doesnt have a dedicated thread. If its okay I would love your feed back. Let me get some pics up. Thank you.1 point
-
Congratulations Trooper, Welcome to the Legion. Enjoy being a Bad Guy Staying at Home Doing Good !!1 point
-
I'm pretty sure I'm a rare case ^^ As I said, sometimes life happens and you just gotta put stuff aside for a while1 point
-
Looks MUCH better, sir. We will be with you shortly!1 point
-
thanks for pointing out the gallery, its been helpful. I trimmed the tops of my thighs, I think they look better and will be much more comfortable. I only took off about 1cm on each side. Here are the pics. I also got the biceps and forearms more done, the wrist return edges have been removed, the biceps have been removed, and the smooth parts of the lower forearms are clean. I left a tiny bit on the elbow edge of the forearms because it's the most visible, and I don't want to lose any length there until I know I can give it up. Here are a few pics, sorry, my helper went to bed before getting both arms pics done I did make minimal elbow room on the inner forearm piece so I could bend my arm without issues. Both biceps look like they can be trimmed in a little, I could trim them about an inch on each side, but I taped them like that, flexed, and felt super strong because the tape broke :D. I then realized that I needed to make them large enough to allow full muscle movement. Here's where they are at now. Well that's it for tonight, tune in tomorrow for more white plastic shards flying around my office!1 point
-
What I always do for the thighs adjustment is to place and glue the front cover strip first and after that make another blue tape fit and when sure, cut and place the back cover strip. Remember take a look to the gallery section for reference photos to compare. Cheers.1 point
-
Photo of my rear thigh armor as requested https://i.imgur.com/AP488SC.jpg Removed the silver metallic decals and painted grey to match frown and ear bumbs https://i.imgur.com/yUFqJ0z.jpg https://i.imgur.com/REL9fUG.jpg https://i.imgur.com/BzGIAHa.jpg Sent from my LYA-L29 using Tapatalk1 point
-
Don't forget about the inside of your bin! I have a ton of patches, so I attached my favorites inside the lid. Also pimped out my Tusken Raider bin. (Genuine canyon Krayt skin on top).1 point
-
TK 31168 Requesting 501st access https://www.501st.com/members/displaymemberdetails.php?userID=323581 point
-
Hi again Ted! Before we can move along, can you provide a few additional close-up photos for us? The first would be of the traps/tears on your bucket The reason being is that the color on your traps/tear decals appears to be a very different color than the ear bars and frown, (although this may be the lighting). Having a slightly different color is not a big deal, but yours seems to have a metallic/silver finish as opposed to the gray on the ear bumps/frown. The other photo(s) we need are ones of the rear of your thigh armor as seen below. No need to get suited up, though! Many thanks, and I look forward to seeing the new pics!!1 point
-
I did mine too1 point
-
I don't recall Spec ops have a pre-approval thread. I have a Shadow at the "Specialist" level and would be happy to look your armor over if you'd like. Can you post photos from all 4 sides, including with the arms up.1 point
-
Hello Ashe..."Do it or do not there is no try". Only 33 years old, i`m sure that you`ll do it... All my strength from Spain and if you need anything, here we are... Regards...1 point
-
Hello Ashe. When starting your build, please also check the CRL requirements for the higher levels 2 and 3. Very often these are easy to consider while building, instead of afterwards.1 point
-
Welcome aboard Ashe Sent from my iPhone using Tapatalk1 point
-
Thanks for the heads up! I remembering reading something about that but I thought it was meaning something on the spats themselves! I really appreciate the advice! This is why I am going through and posting all of these pre-trimmming pictures!1 point
-
Hello Ashe, Welcome to FISD. Looking forward to see your build.1 point
-
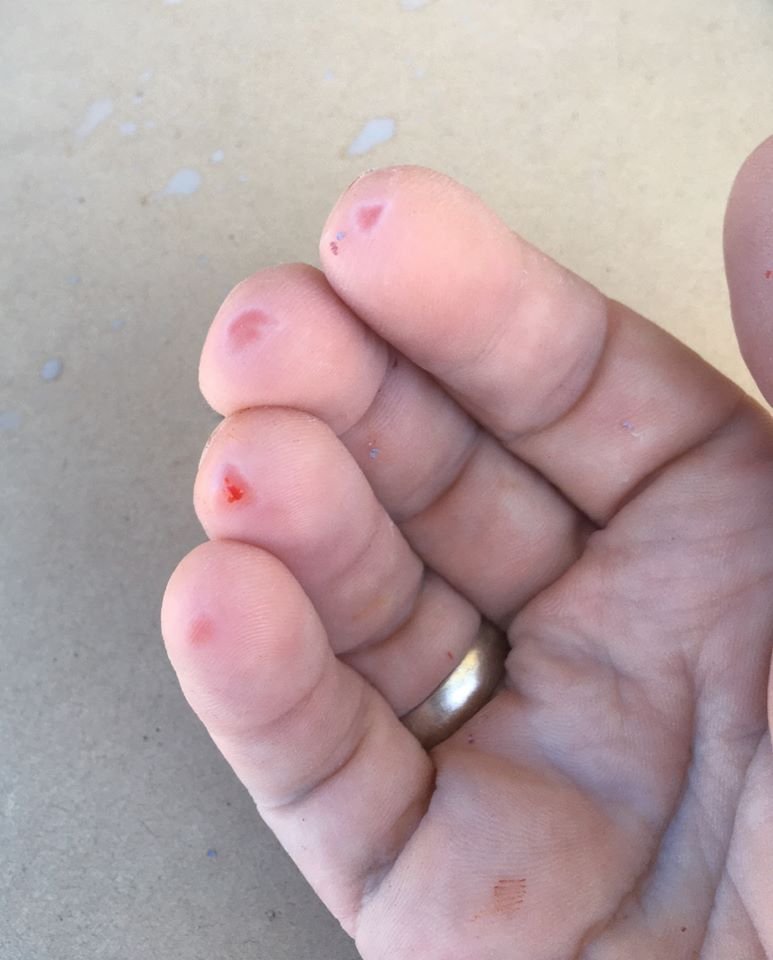
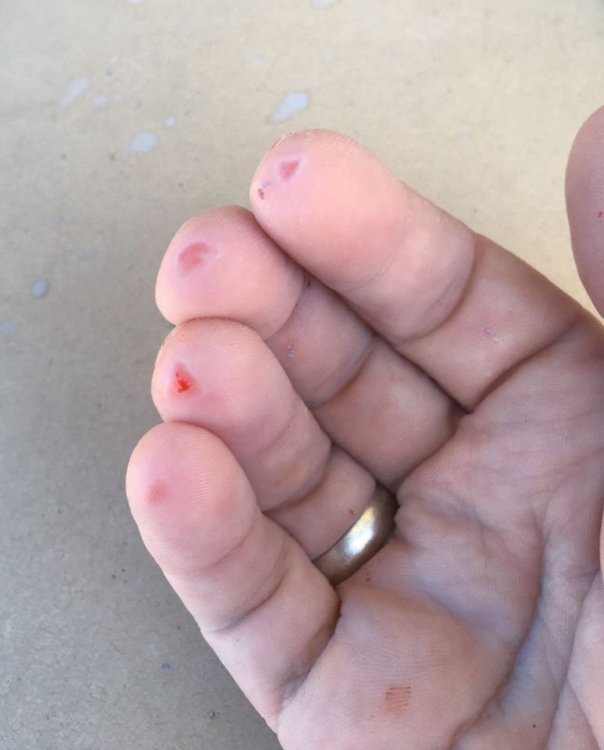
Just allows the sandpaper to glide a little easier and doesn't clog as much as dry sanding, I know what you mean about sanding your fingerprints down, here's my fingers after wet sanding my Sithtrooper armor, you don't realise the skin is going until it's too late
 1 point
 -
Hello and welcome aboard, good luck with the build1 point
-
Hi Ashe, Welcome aboard. Wishing yo good Luck with your build !!1 point
-
Welcome aboard. :-)1 point
-
Hi, welcome to FISD, looking forward to see your building process photos. Good luck.1 point
-
Hi, welcome to the FISD! Excellent, we hope to see you soon at work. For anything, you are in the right place1 point
-
I would love to be in the first 1000, unfortunately I’m only 16, and the 501st age restriction is 18 Oh well, I consider myself the luckiest guy in the world to even have stormtrooper armor1 point
-
One of my goals has been to be one of the first 1,000 EIB and 500 Centurion, so I really need to get working. Baby care has occupied more time than binge-watching during this pandemic. Perhaps I need to start pulling some overnight armor working sessions. Haha. Sent from my iPhone using Tapatalk1 point
-
Thank you very much everyone for your help! I've already started work to keep going.1 point
-
Just like Boba Fett crawls out of the Sarlacc pit, I am back from the dead! Life happened and everything has stood still for years. I have finally found the lost motivation, and the time to say the least to finally get back on track, and hopefully after 10 bloody years finish my TK! As I dug out my armor from the box it's been sitting in, dusted off my bucket and managed to find my boots, I have noted the few things I have left to do to finish my armor. I aimed way to high when I started building my armor, aiming for the higher quality rankings to make sure the armor was as good as I could get it. Now, to begin with, I'm mainly aiming to get it approved! To list the things that has to be done: Assemble Doopydoos E-11 Blaster Kit Get a holster (holster kit) Make/purchase a neck seal Attach the small ammo belt on right thigh Attach strip of plastic on the back of my right shin (Because for some reason it's gone?? I have no idea where) Build the thermal detonator (Need to purchase/make metal clips for it) Attach a new button plate because the old one is real messed up due to mistakes and bad paint Repaint painted details due to the color aging and turning yellow-ish Fix yellowing on some parts of the armor due to it being stored away for a long time and plastic tends to yellow Refit strapping and padding to make it a bit comfortable Now, I assume a lot has happened since I last worked on this in 2014, so if anyone would like to bring me up to speed that would be really helpful! Time to finish this!1 point
-
Slowly but surely getting there, and thank you so much for your words of wisdom too!1 point
-
My parcel arrived today, everything accounted for, along with other bits I have been stockpiling for this build: Hope to start on the helmet soon!1 point
-
Blaster reference thread Pulling in some info and pics from some other threads, I haven't gone through them yet to remove anything not directly needed but didn't want to loose the info after I've been searching for an hour Author JAFO The current CRL doesn’t address two other known differences between TFA and TLJ troopers ... the forearm shape is different and so too are the helmet clips. They are flat rather than indented. The real forearm difference is the shape at the elbow. A different cut altogether. The area you’ve highlighted as ‘grey ‘ is actually a dome head Allen key bolt. This was one of two bolts used to affix the Picatinny rail on the TLJ kits. There are three different cod shapes seen in TLJ and I trust the CRL will address this in time. It’s hard to enforce the all black end cap as standard when the TFA TD is seen several times in TLJ. Admittedly the TLJ TD was a complete redesign from TFA but it’s hard to ignore the facts seen above. Spats F-11D HEAVY BLASTERApproximately 20% larger than the standard F-11D blaster and equipped with a tactical shoulder stock.Only question is whether carrying the Heavy Blaster is restricted to troopers wearing ammo vests. Great mod on the TD. Like you, I used a can lid to add the extra length. I took things even further by cutting out the strip on the back of the TD to make it more accurate to TLJ.The TFA TDS were solid resin and weighed 1.5kgs. For TLJ they completely redesigned the TD, cut-out the apertures and created a lightweight insert. This promotional image appears to show the F-11D has some traits of both the previous versions. In these images you can also see the cocking lever through the rail. Looks like TFA reuse likely. It seems inconclusive based on different reference. Here’s a whole bunch more for reference. Official First Order character standees for TROS Electroprod Glad to see we will be able to include the upgraded TD in the CRL for both TLJ and TROS. Just returned from a third viewing and there's lots of fun stuff to be caught when watching the FOTK scenes very closely.There's a scene on Kijimi that is reversed, so the calf greeblies appear on the right leg. There are bendy cod pieces all over the place, a cracking thigh split as Poe et al escape the Star Destroyer, and then there is the case of the shortening TD end cap.As you can seen from the pic below the trooper on screen right has the standard width black end cap (approx. 1in/25mm), whereas trooper left as a much shorter end cap. It's all black so isn't a TFA TD. Given the TD cylinder is an insert it looks like they were prone to getting pushed further in to the holder.I spotted this issue a few times and it can also be seen in the 'Jedi Mind Trick' scene. Author The5thHorseman One really funny thing is that the white cap on the magazine is glued on backwards! Haha, I wonder if all the blasters in the film will have that same issue. There's also two visible vent holes in the barrel at each end of the top t-track. However, the heavy F-11D linked in the first post of this thread doesn't have them, so it might just be an error from the propmakers specific to this blaster. Ooh, the cocking channel has been swaped from the left/hand side of the blaster to the right/hand side. That's kind of an important design modification actually. (Mind the End Caps while at it.) (Mind the End Cap Latch, while at it). Author gmrhodes13 Clip recesses section also a little bigger on TLJ on helmet, different recess in main part of the clip and no recess in the end section of the clip Forearm differences Cod Baton handle lights Forearm overlap and split in top plate Blaster detail Binders Overlap Sling, D ring (also note need an update for TFA to add sling as an option) TFA Sling D ring TLJ (rectangle) Rear sights different color, black std blaster, white heavy blaster (update TFA also) TLJ Not all have a D ring (rectangle) Lights run up handles when charging laser ax's TLJ-E Weathering More wreathing and blaster torch rail. Also forearm box lifted at front. (deleted scene) Nice side shot of teeth, also right forearm box barely attached, aluminum rail on blaster mount. Blaster I think you would need to show examples of the blaster size difference, would be easier for those looking at the CRL's to see a noticeable difference. Could be confusing for those who reference the TFA Visual Dictionary which shows a F-11D blaster with "removable stock" it would make no sense for the blaster to have a removable stock if the blaster was only going to be upsized for heavy/vest troopers, after all standard troopers are not seen (that I'm aware off) with the addition of the removable stock only on heavy/vest troopers so there should be mention of two different versions (sizes) of the F-11D blaster. I used this as a reference but it is still open to interpretation as the heavy/vest trooper is slightly more in the foreground and the rotation of the blaster showing less black so appears thinner. This is the issue, really need definitive references not just approximate open to interpretation sizing Neck seal closes at front Cod1 point
-
Imperial Valour, based on the HSP helmet, it looks to me like there is a recessed area in the center of tear traps, temples, and rear vent boxes? If this is the case, I would suggest you make the (grey area) out of styrene. Make a stencil for the lines and cut them out if the styrene then shape (hot water bath or heat gun) the styrene to fit the curvature if needed. Paint the area on the helmet black then paint the styrene admiral grey and glue it in place. I think this is how the actual screen used helmets were made and why we have in the CRLs that there must be a recess black outline of each of the boxed area. Most of us have this already molded in our helmets so we can not make the tear traps like this but it looks like you have the ability to do so.1 point