Leaderboard


Popular Content
Showing content with the highest reputation on 09/24/2019 in all areas
-
Halloween rush it that time of year were I get pretty busy! Lately most of my customers opt for the fully built ready to wear out of box, never built so many in a small time frame! I prefer to build 3-4 at same time which speeds up process. Mark (AP)3 points
-
I just got my 2 BBB today! Problem: I got it this morning at work, and now they're sitting on an empty desk next to me (colleague is out on PTO). It's taunting me. I'm not going to get any work done today.........2 points
-
A few finds from Google https://www.ehow.com/how_5686029_remove-nicotine-smell-plastic.html https://grandfolk.com/guide/how-to-remove-cigarette-smell-from-toys/ http://www.howtocleanstuff.net/how-to-remove-smoke-smell-from-non-washable-items/2 points
-
Additional work last week, then on the long weekend Bulldog44 came into Tokyo to help with some additional building and take some photos. First placement of sniper knee, like every AP armor kit the sniper knee needs to be off center to be level and still I am not happy with the alignment on the sides. Finished up the ab plates and buttons. Attached the thigh ammo belt with rivets, forgot to paint them so will get to that. While in Canada I purchased the suggested super glue and it worked like a charm. There is still some strapping to be done on the arms to keep them in position. See below for painting those rivets. This is the telling photo, the right shin did not hold and will need a redo or new approach. Also noticed for the first time the TS clips were too long. Next day cut the AP provided TD clips down to screen accurate length, will need to add some bends into it as well. Painted the side rivets and helmet screws, forgot the thigh ammo belt rivets so paint will come out again. So the work continues but that mountain top is in sight.2 points
-
Here are some additonal photos showing the white inside of the hovi mic tips. Let me know if you need anything else.1 point
-
You need to check the c.r.l. Ive not looked in a while, but I'm sure it specifies one ear black stripe to the rear of the ear , not front. But I may be wrong .1 point
-
there has to be a market for a FOTK themed banana hammock. I don't know that I want to see that market... but its got to exist.1 point
-
Whilst images like this exist the TLJ cod will always be a a fun one to pick. One, scene, three varying looks! Sent from my iPhone using Tapatalk Pro1 point
-
I do I have to see when i can do it. Sorry What do you want to see exactly from the right and left side?1 point
-
Well Crap MMcFett, If I had seen that RO E-11 back when I was doing my build I would have grabbed it. I purchased an ANH E-11 3D print from Blaster Master before he shut down his store. Lots of awesome reviews of his E-11s and he was a great guy to talk with. I planned on building the ANH E-11 and converting it to RO standards but I have never gotten around to doing it. GandalfTheImperial, that bucket looks nice. I have a Prusa I3Mk3 so I would need to print it in parts and then glue it together. I like the size options as well and 30.00 bucks for the model seems like a steel. I have a black series bucket that I am planning on modifying for my RO 850 AW build but I am not sure which would be easier, 3D print this one or mod the BS. The only thing I would do differently if I had modeled this would be to have the tears and rear boxes be separate parts. This would make painting and detailing easier. I know there are some 3D models of the armor out there but I have no idea where and obviously no clue about price and quality. Thank you everyone for the updates.1 point
-
If its in the plastic, its harder to remove. If I were you, I would try an odor absorber. After hurricane Katrina, everyone's refrigerators were foul smelling because food had been rotting inside for weeks or even months. The smells were thought impossible to remove. I had already replaced my old refrigerator, but I was determined to remove the smells so I could use it as a back up fridge in my garage. I bought these canisters of odor absorbers from Home Depot in the cleaner aisles. It took me a a couple of weeks of leaving an absorber in the unit and replacing it each week, but it really did the trick. I do not know if it will work with your ABS helmet, but I assure you, it took a most horrible smell imaginable and sucked it out of that full sized refrigerator. It was called OdoBan and they are about $3 a canister. Just something that might help you. Good luck trooper!1 point
-
Looking great so far! May I suggest updating the title or we can tag it with the type of trooper you are building? I almost thought this was an electronics build ;-)1 point
-
sorry for the hijack Mark1 point
-
We had a 3 month grace period on the OT TK CRL amendments after they were published, so there is no reason why the FO CRL's will be any different. We are not about making things impossible for members who have started construction without plenty of notice,so you should be fine1 point
-
Nice work, keep it up1 point
-
Can't believe it's been just over a month since my last update! I have been working it, but not a lot, and progress has been somewhat slow. All because I wanted to try an expanding foam insert for my head. It took a lot of tweaking, but I'd consider it successful. I carved out a place for some hearing augmentation electronics (which I've abandoned for the moment), and interestingly, there's a LOT more room on the left side of the helmet. It also has some channels for a blower system. I have some ideas that involve a largeish blower fan, though I'm not sure where I'll mount it. Probably under the chest plate, but I haven't started that project yet. I lined the helmet with a trash bag (taped it in) and did the insert in two pieces. I wanted to make sure it would come out: I have mics fitted in the ears, and got the ears fitted to the helmet. The green lens is kind of disappointing, and will probably be replaced. There are some annoying scratches, but since visibility is poor, it might be something I can live with. I also wired up a mic to a speaker, and it works, but isn't very loud (yet). Feedback will probably be an issue but as long as it's louder than my muffled voice, it's an improvement. So the helmet is "done", finally! Minus cleaning all the smudges, painting the screws, and all those types of details. But I'm well into the last 10%. Now I'm down to just two more things: Neck seal and holster. I'll probably wait for approval before I start the blaster.1 point
-
Thanks to previous direction, went and got 1" nylon webbing - 2 yards. I intend to use this in pieces that are supposed to stay put. 3" elastic - half yard. I intend to use this on holding the corset closed. Most likely will have a lot left over, the fabric only sells by half a yard 1" elastic - 2 yards. This is super soft, which is good, since I intend to use for knees and elbows. USPS didn't make the delivery today so apparently it'll arrive tomorrow. So far only one coworker knows about it, since he's a SW fan (runner up at our company's SW costume contest last year). We've been joking about possibly having him come to work in his rebel costume and running around the office with me trying to arrest him. Tomorrow's gonna be real fun when I get the boxes and have to dodge inquiring ppl, and me wanting to sneak a peak. Yeah we're a little crazy at my workplace.1 point
-
Hi @mlarsen! Sorry for the delay. Could you please post a well-lit photo of the hovi tips? We're trying to tell if the insides are white, per the L2 requirement: Correct 'Hovi mic' aerator tips are present. Screens used shall be of a wide type mesh, with the rim of the mic and the inside white or painted white Thank you! You're almost there.1 point
-
Sorry for the late, my pleasure1 point
-
The CRLs are fluid and currently under review. That said, if your build thread is in progress while the CRL is you shouldn't be denied approval at higher levels, so long as it's not well into next year when you finish, then it may be up for debate1 point
-
Satchets. Justjoseph63 has a tutorial in his magnets thread.1 point
-
I thought you'd gone a while ago. No drama I'll get there one day.1 point
-
Keeping it in mind. There shouldn’t be much gap if any. I need to boil the bridges tonight, so I’ll know what, if any, adjustment I need to make after that. Thanks as always!1 point
-
Thanks! I used some thin, non stretchy fabric. Kind of like cotton duck cloth, but thinner? And small zip ties. Use one color for one polarity, another color for the mate to keep pairs easy to match.1 point
-
lol . How many time did I announce that I was going there Glen?1 point
-
Hi Adam, I'm glad you feel it will be helpful to you. I read through several build threads to make sure I was doing things correctly. Here are some of them:1 point
-
Yeah, if it's going to break anyway, might as well do some experimenting! Sucks that it's already breaking, but it might lead to something better!1 point
-
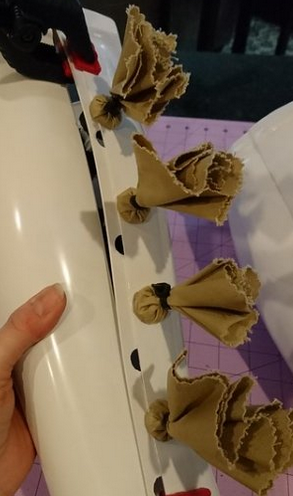
Inspiring tutorial! Came for the magnetic shin guide, stayed for the. . . whatever these are . . . Looks like a great idea to protect/manipulate the magnets. Is there a tutorial on these somewhere? I think I can figure it out, but is there a recommended kind of material or thickness?
 1 point
 -
Great Job Trooper !! welcome to the ranks ..1 point
-
Thanks Fabio, I'm totally proud of you! You're armor is great, as I saw during the last Sunday! Davide1 point
-
Whaaaaat!? hardly see anything wrong with them1 point
-
Thought I'd post this up just for fun. I was rummaging around hoping to find the blaster in my profile pic to see if it was the correct type to modify into something for my costume when I found the TD's I made for my kids. It struck me how adorably small they are. Ah- hem, so I thought I'd do a comparison shot with the helmets I built them. Then It became apparent that I didn't get the brackets right on them. [emoji2] Sent from my sorrosuub C1 comm link device using Tapatalk1 point
-
Damit I should have given you a shopping list1 point
-
Nice work on the fixes FYI the ab plates don't have rounded corners but I doubt would hold up EIB1 point
-
Ukswrath, thanks brother. I also found another RO E-11 maker. I will add them to the list.1 point
-
I mentioned having a new helmet and haven’t shown it off! Time to correct that mistake. The padded interior lining was a nice surprise. Sent from my iPhone using Tapatalk1 point
-
Looking good Denis, just a couple updates and you're ready.1 point
-
Good luck Denis!1 point
-
Nice work trooper, a couple of additional things. Your ab/belt/cod area appears on an angle you may want to straighten Ab plate snap shouldn't be painted white Helmet brow is normally higher for Stunt versions, the Hero has lower brow. Shoulder straps not sitting central on back plate strap areas Forearms need to rotate so cover strips match biceps Large gap on strapping to drop boxes, only need a few mm's, also drop boxes need to align with end of the plastic belt section. Ideally the tube strips should fall from the top at the front Thigh ammo strip should use cap rivets and also positioned @ 10mm in from end (top/side) Large ab plate has been over trimmed, small plate could have some more trimming, button paint is also a little large Good luck with approval1 point
-
Hi Denis, Glad to see another Trooper going for EIB level. Great job with your armor. I would like to suggest a couple of corrections and photos to add to your application that I'm sure the D.O. team will ask you to provide: 1- You would like to remove a little more gray paint from your helmet frown as per the Crl states: Frown is painted gray and does not leave the teeth area. 2- Your hovi tips need to be painted white inside and same for the ring. Correct 'Hovi mic' aerator tips are present. Screens used shall be of a wide type mesh, with the rim of the mic and the inside white or painted white. Here are some reference photos. 3- A close photo of your Thigh Ammo belt rivets, both sides Internal and external to see the rivets type. Thigh ammo belt is attached to thigh with a solid head rivet, painted white, in the upper corner and fastened to the lower thigh ridge. The rivets used shall be single cap, double cap or split rivets. No pop rivets allowed. Rivet should be approximately 5/16" (8mm) in diameter (exterior). 4- Photo of your ammo belt complete of the front to see the CRL required square buttons There shall be three square buttons, one centered in the middle and one on each end of the plastic ammo belt.. Good luck with your application Trooper1 point
-
From those and so many other photos and other forum posts I can see this is not an area that is absolute. Some members and screen used helmets have grey extended past uncut tooth, with that uncut tooth either cleared or painted over. Others just taper off after the last cut tooth and don't extend that far. The CRL is not specific so it seems to be owners choice and fine as long as some screen used reference can be cited.1 point
-
Could I add a suggestion to your great info piece? When making magnet sachets, it's a really good idea to make sure that you've got polarity-correct pairs. An easy way to help identify magnet pairs is to assemble them using fabric with high-contrast colors. Kind of like this:1 point