Leaderboard


Popular Content
Showing content with the highest reputation on 10/10/2017 in all areas
-
General Information Name: Taylor A. Goodson FISD Name: Ruthar Legion ID#: 12110 (Legion profile page) Garrison: Northeast Remnant EIB Application: #760 - Mandatory Information Armor Maker: ATA (Affordable Trooper Armor) Helmet Maker: ATA (Affordable Trooper Armor) Blaster Type: Custom 3D print (E-11), Hyperfirm (DLT-19), Petesprops (SE-14r) Additional Information Height: 5' 07" Weight: 178 lbs. Boots: TK Boots Canvas Belt: Rob Kittell Hand Plates: justjoseph63 Electronics: iComm with Aker amp, Henry's modular helmet fans Neck Seal: Darman's Props Holster: Darman's Props Centurion Level Rivets and Screws: justjoseph63: Side and thigh rivets | TD screws Photos Full Ensemble: Front: (updated from EIB application to show improved biceps and belt) Back: (updated from EIB application to show adjusted back/kidney overlap) Left: Right: Helmet Details: Front: Left: Back: Right: Green lenses: S-trim: 3 ear screws - left: 3 ear screws - right: Hovi-tip mics and vocoder: Helmet interior: Armour Details: Ab/kidney rivets (provided by justjoseph63 Side and thigh rivets) Upper right abdomen male snap: Free-floating shoulders with elastic: Abdomen detail: (updated plate sizes (slightly smaller edges) from EIB application) Center plate edge shortened: Button plate edges shortened: Forearm front return edge removed: (fully removed - updated from EIB application) Posterior/cod connection details: Right Thigh Ammo Pack: Cap rivets from justjoseph63 (Side and thigh rivets) Interior cap rivet: Inside: Outside: Sniper Knee Plate: Front: Inside: Outside: Main belt: Drop box 1/2" thickness: Drop box attachment and inner box: Belt boxes now glued in correct position (update from EIB application): Belt construction detail rear: Belt construction detail front: Interior strapping and electronics: Hand plates and gloves: Flexible hand plates: Rubber gloves: Full view of gloves with installed hand plates: Neck Seal: Boots: Slightly scuffed: Thermal Detonator: Screws from justjoseph63 (TD screws) 4 screws and aluminum clips: Slotted pan-headed screws: Full canister dimension - 7.25": 3/4" end caps: Clips and panel placement: Further Updates from EIB Application: Bicep lower edges: Ugly lower edge removed on right bicep: Belt placement adjusted higher to match screen reference more closely: Weaponry: E-11 DLT-19: SE-14r: Action shots: Bucket off: Thank you so much for your time and consideration! The feedback on the EIB application was amazingly clear and very helpful - it certainly made the updates required for Centurion that much easier to make, so thank you for such clear guidance!3 points
-
Hi All, I've made some more progress on the folding stock. I've spent sometime on figuring out how to represent the details of that perplexing piece of the folding stock - that vertical piece of the front pivot bushi. In studying pictures of the piece from a real SMG and looking at how the piece looks like installed; I've created a piece that mostly functions the same but only slightly resembles the real piece. I made it out of polymer clay reinforced by green stuff. The clay is baked at 425F for 14 minutes to get it hard, then applied green stuff to reinforce before shaping and test fit. I noticed later the angle on the vertical piece is too steep; I will need to file down slightly to get it more flush with other details. Here's how that vertical piece looks like installed. I also put in the washers on either side of the front support pin on the folding stock. Pins also detailed as such to resemble installed rivets I believe. Thanks for dropping by, have a great day!2 points
-
My Rogue One E-11 blaster2 points
-
For basic approval you don't need a blaster ;). I would check with your GML (garrison membership liaison) but in the CRL it doesn't state the use of a correct torch until L3 requirement: E-11 Blaster For 501st approval: Manufactured by BlasTech Industries, the E-11 is standard-issue for many Imperial troops. Light, compact yet powerful, the E-11 blaster is always in high demand throughout the galaxy. Based on a real or replica Sterling sub-machine gun, scratch-built, or a modified commercial toy Stormtrooper blaster. For level two certification (if applicable): Folding stock (does not need to function). A real or replica ammo counter - based off of a Hengstler counter - shall be present. D-ring mounted on the rear. Sterling based blasters have the correct M-38 or M-19 style scope. Two power cylinders on the magazine housing. Scratch-built, resin cast, Hyperfirm rubber cast blasters shall have a total of 6 T-tracks on blaster (leaving the lowest row on the magazine housing side uncovered). If using the Hasbro E11 toy blaster, it is modified to have the correct number of T-tracks (6 total), with a lower row of open vent holes on the magazine housing side. This is accomplished by covering the pre-existing rows of holes with T-tracks, then grinding off the lower integrated T-track on the magazine housing side, and drilling a new row of holes in its place. No ESB/ROTJ greeblies are allowed on the blaster. For level three certification (if applicable): Hasbro blasters are not allowed, even conversions. A correct flashglight attachment shall be present.2 points
-
Hi all, The AM armor is really awesome! I have assembled the biceps, and forearm supports as well as lashed the top chest and back piece. My next question is the belt. Do I glue the white ammo packs to it? Also where is the best placement for the thermal detonator in the back? It velcro's together. Thanks! Mike1 point
-
Personal Information Name: Kai TKID: TK-71715 User: TK-71715 501st Pofile: http://www.501st.com/members/displaymember.php?userID=19364&costumeID=124 Garrison: German Garrison Mandatory Information Armor = Anovos Helmet= Dan Laws Blaster= DoopyDoo Optional Height = 166cm / 5'5" Weight = 68 kg / 150 lbs Boots = TK Boots Canvas belt = Felice (GG) Hand Plates = Sonnenschein TD = Anovos Hovi Mic Tips = CFO Electronics= Aker plus WTS (Wireless Trooper System) Neck Seal = Handmade (GG) Holster = Friedel (GG) Undersuit = functional sports underwear Application Photos Armor Photos Full Body Front: Full Body Right Arms down: Full Body Right Arms up: Full Body Left Arms down: Full Body Left Arms up: Full Body Back: Action Shot: Armor Details Ab Buttons: Ab Split Rivets Interior (I hope they are visible): Kidney Split Rivets Interior (I hope they are visible): Ab Kidney Left with Notch: Ab Kidney Right with Notch: Ab Top Right Snap: Butt Kidney not Fixed: Hand Plates: Shoulder Bridge (Front): Shoulder Bridge (Back): Shoulder connection: Thigh Ammo Pack Left: Thigh Ammo Pack Right: Thighs Front: Thighs Back: Thigh strapping: Knee Plate Left: Knee Plate Right: Greaves Front: Greaves Back: Belt Front: Belt Back with closed Back on Drop Boxes: Cod Butt Connection Outside: Cod Butt Connection Inside and Kidney Ab Strapping: Posterior Inside: Posterior Outside: Interior "lower" Strapping: Forearm strapping: Forearm Left Front: Forearm Left Back: Forearm Right Front: Forearm Right Back: Forearms: Forearms Wrist: Accessories Details: Thermal Detonator Front: Thermal Detonator Back: Neckseal: Helmet Details: Helmet Front: Helmet Back: Helmet Left: Helmet Right: Helmet Lens: Helmet S-Trim: Boots: Blaster Details Blaster Left: Blaster Right: Blaster Back (D-Ring): Thank you for your time and consideration! kai1 point
-
Evening everyone. So, I was thinking about my blaster and realised that I wasn’t going to be happy with the inner front end of the folding stock - specifically, the inner tube mod only running part way. Primarily because I knew it could be seen from the side. As I knew I wanted to keep a decent amount of resin for the front locking screw to attach, I decided to run the aluminium pipe the whole way - with a mod, of course. After lots of resin shaving, I achieved a suitable shape. I cut the aluminium tube in half, just big enough to cover the screw stump. Quite pleased with the result. With hindsight, I could have left a few more millimetres on either side to cover a little more ‘stump’. Aside from that, I replaced the fake screws on the Hengslter counter and the mag housing. Also added the tiny grub screw to the front sight block. Getting there. :-) Sent from my iPhone using Tapatalk1 point
-
Well, I don't think it's the influx of crappy boots either, it's all about economics and as you guys note, shipping.1 point
-
It helps if you can dislocate your shoulder [emoji23] I use magnets! Sent from my iPhone using Tapatalk Pro1 point
-
PM inbound1 point
-
I've purchased 3 of these so far and one canon versions sold in the UK. The knockoffs took 3 weeks to arrive the canon version 4 weeks, so obviously these's are out of the question for Halloween. $20-30 in two weeks, sorry I can't help you there.1 point
-
Looking great, buddy. [emoji1303] Sent from my iPhone using Tapatalk1 point
-
Hey Taylor would you be so kind as to post a link to your EIB application at the top of this page please. Thank you1 point
-
Today I’ve been strapping the torso together..... I have hand stitched the elastic.... and used bolts to hold the an and kidney together..... the idea is that I can dismantle the torso if I need to trim it down.... which I think I will .... well I’m not known for being tall lol Anyway hopefully first fitting tomorrow and we will take it from there Position of the rivets Various pics of my rather unusual strapping Actually the butt and kidney go well together Pity the same can’t be said fir the back piece All strapped together As I said... this is all temporary ... so I can easily dismantle it if need be .... the bolts will be replaced with the split rivets once everything is sorted.... I do think I’m going to have to reduce the torso...... didn’t realise I’m not as tall as I thought/ think .... doh Sent from my iPhone using Tapatalk1 point
-
also, I have a problem with the CRL calling out a specific Vendor by name. Can we omit "Hyperfirm" from the CRL? They aren't the only ones making rubber blasters. That'd be like saying "DoopyDoos resin cast"1 point
-
I have a question about the blaster itself... The CRL above states "Based on a real or replica Sterling sub-machine gun" but, the Rogue One E-11 isn't based off of a Real Sterling. I know it's being nitpicky,but I was curious.1 point
-
This is by far one of the most detailed WIP E-11 Threads I have seen here on FISD. Now granted, I don't get to look through all TOPICS, but.. nonetheless.. Mighty Impressive work Jesse.1 point
-
Actually that's not the correct flashlight, the screen used flashlight is the Element model M300A, not the M300B. It's all written in my Rogue One E-11 Blaster Reference thread here;http://www.whitearmor.net/forum/topic/41271-rogue-one-e-11-blaster-reference/ Sent from my iPhone using Tapatalk1 point
-
You guys are too kind. [emoji847] In all honesty, I’m just taking inspiration from the many superb builds on here. Although I’m really pleased to hear that the t-tracks might be something a little bit different. :-) Sent from my iPhone using Tapatalk1 point
-
Looking forward to seeing your app1 point
-
You prob dont need it but ive added and will test but yeah its to snap to the cod so they wont wobble or flap apart while walking. So far im ok suiting up solo with what ive done. I leave the shoulders snapped to the yoke and slide that over my head. The Cod and Butt plate will also remain snapped so will go on in one piece. I am curious on how ill get the TD on solo as havnt tried that yet1 point
-
http://www.ebay.com/itm/M300B-Scout-Light-Tactical-Torch-Airsoft-Weapon-LED-Light-Remote-Tail-Switch/162352971127?ssPageName=STRK%3AMEBIDX%3AIT&_trksid=p2057872.m2749.l26491 point
-
So just an update: I'm pleased to announce that I've been accepted! TK 28222!!!!!! Now time to move on up!!! I will definitely be hitting you up with this soon!1 point
-
And on the night of the new TLJ trailer. I’m stoked!!!! Sent from my iPhone using Tapatalk1 point
-
3 rivets for the belt, 2 rivets for the drop boxes and 2 for the thigh ammo pack1 point
-
Right thigh with ammo pack just held in place by magnets http://20171001-180106-2 by -matthewwormleaton- http://20171001-180126-3 by -matthewwormleaton-1 point
-
Much more enjoyable than the first trailer, 66 days and counting1 point
-
Got several much needed packages today, including the E6000 and my order from trooperbay with armor white, novus 2, and a new lens. While waiting for the glue to set for the inner strips on the thighs, I started working on the helmet. I've put a lot of work into cleaning out the old gunk of residual glue and foam that was still stuck to the plastic, as well as random dirt and general filth. Pretty straightforward install and now sits tighter than the old lens, removing the gap it use to have.1 point
-
Looking good, Dan1 point
-
Great job so far, My shoulder straps are purposely made longer than the originals to fit a wider range of sizes, to be movie accurate you need to trim off the rear big bump including a small one, basically you should be left with 12 small tabs and the front big one, also from your photo the shoulder strap should sit much lower on the chest, the way I measure is that the 5th small bump is aligned with the chest top end parts (end section that is under the shoulder starps) hard to exlpain just shoot me a email and i will send you photos somehow im having problems posting photos. Mark (AP)1 point
-
My quality control officer (aka my four year old son) stands on duty. Time to go watch the trailer about 30 times.1 point
-
Update 3: Fixed the 2 middle boxes to be thinner and less fat. Did so by cutting off the middle sides, and replacing with extra plastic so there's more of an opening. Also got the thigh ammo belt trimmed up (unlike in the above photo) and e6000'd to the thigh. Hopefully this should all come together as I have planned. Not only that, but I revised the overall shape of the thigh at the top and the bottom, so it's less angular and more curved and smooth like the screen used. And here's a quick mock up. And here's my thighs. I made them close in the back with velcro for 2 reasons; For accuracy (they close in the back in the film), and so that as I get fitter, I can adjust it.1 point
-
Ok sweet. Now to find a cheap tactical flashlight at Scheels....1 point
-
Congratulations! Good Luck with your build!1 point
-
Cheers Glen1 point
-
Fingers are crossed for you, good luck, hope you get a speedy reply1 point
-
Great news, nothing better than a BBB (Star Wars trailer maybe ) Looking forward to seeing your build thread soon, good luck1 point
-
Yes. Due to rough cutting, the aluminum channels are always a little bit longer and do need some fine trimming. I would say, go for the aluminum trigger guard because it looks much more accurate.1 point
-
Ah yes - ironic that I failed to read the part about ‘lenses’. Lol Thanks you. I’ve gone back through my kit and found the reticle lens. Based on what you’ve said, I’ll re-attach the lens housing that I cut apart. I’ll drill out the inside further to fit the larger housing in. Should be a relatively easy fix. Whilst I’ve got you, I’ve been trialing my end cap clip. The Doopy’s part is smaller than the aluminium channel. Would you suggest cutting down the channel to match? I’m also still not sure whether to use the Doopy’s trigger guard or keep working this aluminium one? Thanks in advance. Sent from my iPhone using Tapatalk1 point
-
Here's a photo of an actual Sterling SMG, so it looks like Ducati and T-jay got it spot on. *Update: mine is definitely wrong so I'm going to correct it. Kudos to you for highlighting this bit of detail Jesse.
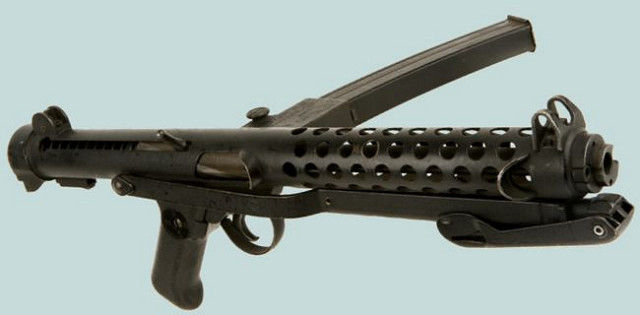 1 point
 -
Yummy gummy bears. ;-) (No worries - credit where credit’s due) :-) Sent from my iPhone using Tapatalk1 point
-
Thank you Dan for pointing Paul in my direction. He already contacted me and I will ship his completion set tomorrow...1 point
-
Morning troopers, Carried on with the front sight block yesterday. I’m planning to use these original DD parts with the addition of a custom sight pin. Any thoughts? :-) Sent from my iPhone using Tapatalk1 point
-
I made this schematic drawing of an E11 blaster to show what type of components I used for the blasters I've built. I think a picture tells more than a thousand words, therefore instead of a list I decided to go with this: If you have any enquiry about any of these parts, I can gladly link in where I got them. Mostly on ebay, and directly from Adafruits, they have amazing neopixel stuff.1 point
-
Hi all, i have completed my shins and I decided to go with the bra hook closure. Left shin. / / / The rear cover strip looks off centre but when it’s on my leg it aligns vertically and before setting the sniper knee in place with e6000 I adjusted it to align with the shin front edge.1 point
-
Great news, looking forward to the progress1 point
-
There is. It's call the Bounty Hunters Guild. There's more than just The dented helmet. http://thebhg.net/forum/1 point
-
And now we come to the evening's hijinks. After dinner and a visit to my favorite brewpub, it was time to take care of a few more things. The E6000 has cured, so let's hack apart a visor, shall we? Essentially, I placed the lens in place, centered over the eye holes, and used a silver sharpie to mark (VERY conservatively!) the places I could hack away, starting at the ends, and worked my way in, slice by slice, until I was confident enough of placement that I could slice it in two in the center. Gulp! The thin cutting disk of my Dremel made short work of all this. There was one close call when I slipped a bit and the spinning disk bounced off the lens, but fortunately the scratch didn't end up in a visible place (you can see it in the shot just below). Yikes! I continued working it down, and once it was small enough to be sure of the correct center screw mounting placement, I put a dot over the T-nut to mark the drilling point: I did end up using different #6 screws than I originally purchased. Home Depot only had 1/2" #6 screws (at the shortest), and the right length is more like 1/4". Fortunately I found some good ones in my random screw collection. (I think they're technically computer case screws, since I found them in a bag with a bunch of other computer-related screws for hard drives and such.) So I screwed in that middle mounting screw for the one lens, and started marking more aggressively the pieces to cut away. I wanted to do this shaping before I drilled the second hole, so the entire lens could still be re-positioned, if needed. Again, silver sharpie gave me my trim lines, and I continued cutting. Finally, after all the rough cuts were done, I used the bench sander to smooth up the curves, and only when I was reasonably satisfied did I add the second mounting screw hole. With the first lens fixed in place, I repeated the process for the other lens. Success! (sorry about the focus!) And there we are: At some point I may do some more shaping of the two lenses, just to smooth the edges further with a finer sandpaper, and to make the lens shapes more symmetrical (not that you can tell from outside), but this definitely works for now. The lens are much closer to flush than Anovos had them, but they're definitely not sealed against it, so I should still have some airflow. Finally, I decided it was time to put in at least one helmet pad, so that test fittings don't put my bald head on the surface of the dome. I'll wait until the fans are closer to finished before attaching the rest of the pads, but putting the circle pad in the top of the bucket sets the helmet at just the right height, and is a lot nicer to wear now for test fittings. Extremely easy to work with these pads, I'm very glad I got them!1 point
-
Just don;t go willy nilly, James. You don;t want to pick any material. One of the main issues that comes with the belt is its ability to support the holster AND E-11 without severe droopage. Many of the belts nowadays have a plastic insert that serves as support. You can build internal support by using certain materials that not only give structure, but make it easier to sew. The originals were made from 5 layers; 3 internal layers, denim twill on the outside and satin on the inside. You don;t necessarily HAVE to use those materials, though. "Canvas" is also known as duck cloth at most fabric stores. You will also want to pick up some interfacing. This is essentially fabric glue in sheet form. It comes in many forms by you want the iron and peel kind. First you need to measure how long this needs to be. Measure around your armor and take into consideration about 4 inches of overlap in the back. Cut your 5 layers of fabric. These need to be kind of exact. Your final belt should measure no wider top to bottom than 3 inches. Cut 4 strips of the interfacing to match. Start with the inner 3 layers. Grab your iron and iron one of the interfacing strips to a layer. The adhesive melts fairly quickly so you don;t need a ton of time or a SUPER hot iron. Peel away the paper backing and lay the next layer of fabric on top and iron that. Take the third layer and iron the interfacing on that FIRST. Peel the paper off and lay this, adhesive side down, onto your other two layers and iron all three until they are attached. Stitch these three layers together on the sewing machine. NOTE: This adhesive is just made to help you hold the material from slipping and gives a little body to the material. It's NOT a super stick adhesive like a liquid glue. Iron a strip of interfacing to each of the last two layers. Iron those to each side of the 3 inner layers and stitch together. Add 4 inches of velcro and you're done. You don;t need any fancy binding stitching. The duck cloth WILL fray slightly. That's OK. It was like that in the film. But you can mix some White glue with a bit of water and paint it on the edge to minimize this.1 point