Leaderboard


Popular Content
Showing content with the highest reputation on 09/18/2020 in Posts
-
Gone with a 25mm cover strip, about 15-20mm opening at the top narrowed the knee opening by about 20-30mm. Cover strip has about 2mm of contact each side at very top Gluing one side first on each thigh before joining, will fill gap with some epoxy and do larger reinforcing strip on inside. Sent from my SM-A520F using Tapatalk3 points
-
Hey guys, been a while, I do apologize! Work and life have been crazy and I've been stuck in that last 10% or so of my build for a little while. I'm constantly trying to figure out not just how to make things work, but how to get them to work WELL! So let's break down my list of excuses as to what's been holding me back. It's pretty much 4 categories: the helmet, the belt, the shoulder bridges, and final strapping/adjustment. The Helmet: Not much to say here. It's still sitting in primer (well, sanded back clear), waiting for it's final coat of white and clear, then the grey/black details. I'm waiting to finish the belt so I can respray both at the same time, since cracking open a can of 2K clear is a commitment. I have the satin grey, flat black, and a black fine detail paint pen ready to go, it just makes me nervous with the masking to ensure I get the details sharp. The Belt: Had a pretty bad issue with the belt that has been extremely irritating and time consuming to fix and has led me to question my paint method as a whole. I didn't document much of this (sorry) admittedly because of how frustrated it made me. I was using a piece of 2" blue masking tape horizontally across the middle of the belt to help me mark the holes for my belt box attachments, and when I went to remove it, I ripped about 2"x10" of the clear coat off the center of the belt. It must not have fully bonded to the 2X paint underneath and peeled off like a film. It was thick enough that it left a jagged, noticeable edge where it was removed, and obviously a difference in sheen. I was pissed. The belt is a pretty noticeable part of the suit, so I knew it needed to be fixed correctly, which meant more sanding and a respray. I tried to spray a couple coats of white to bring the level in the exposed area back UP, while also spending several sessions sanding the clear on the rest of the belt DOWN to try to level it out. I thought I had it good to go and sprayed the whole thing again... only to have the clear continue to peel up. At this point, I used a piece of tape and intentionally ripped off any remaining clear that was loose, then sanded almost all the way down to the fiberglass, before spraying with white again, which is where the belt is at now. Ready for clear. Again. Unsure if this was an isolated incident with the 2K or what, but between this and the cost, I think I would just use Rustoleum's gloss clear if I did this again. Not sure the 2K is worth it. Which brings me to my next difficulty - attaching the belt. I had the realization the other day that this suit would potentially be very difficult to put on by myself, should I need to without a competent wrangler, which got me rethinking some of my assembly methods. Hence where the magnets come in! I started with the idea of making the trauma plate easier to install on my own and added 4 big neodymium magnets to it in the center and top corners. I may dial the gap in more in the future but I wanted to keep the flare at the bottom to account for the back belt. I cut some craft foam and covered the bottom side of the panel, hopefully keeping the scratching/rubbing to a minimum (which I'll address in a couple other places as well, and will be watching for as I wear the suit... some day haha). And installed! It goes on easily by itself and aligns nicely. Next I wanted to find a convenient and secure way to mount the belt to the barrel, and figured I would give the same big neodymium magnets a shot. I sprayed some with flat white so they blend in a little better and epoxied them to the back side of the belt, and corresponding ones to the inside of the barrel. I also put magnets on the ends of the belt, where they overlap, and I'll add a little of my ultra-thin velcro to the very edge to hold it all together. I did need to end up trimming about 2" off both sides of the rear belt assembly, as it was too long and the overlap was hitting somewhere up by the belt boxes. I'll need to repaint the ends, and I wish I had noticed and fixed this before final paint... But it's okay because I had ANOTHER paint issue on the belt! When I was testing out the magnets, I left one on the front overnight by accident and it bonded to the paint or something, because when I removed it, I got this: So that was fun to repair. Again. I have all the holes drilled, screws ready, and the elastic prepped for the drop boxes - just waiting to assemble until after final paint on the front belt. And finally, the last belt component is the thermal detonator. Started masking it so it will be ready for gray when I do the helmet details, then I will mount it to the rear belt. Planning to use screws for everything, along with a little E6000 to hedge my bets. Hopefully if I ever need to remove anything, it won't take the clear with it again... The Shoulder Bridges: Next on my list of sorrows were the should bridges and their attachment. I had originally ordered and intended to use rubber/latex shoulder straps from Jeff/11b30b4, but was having a heck of a time deciding how to mount them and was way overthinking everything. Between this, the fact that they had yellowed pretty significantly, and that I eventually ended up snapping one while trying to bend it to the proper curved shape (they are cast flat), I ended up giving up on them and went back to the hard ones from Jim. The ridges are larger and look more accurate, but I was (and still am) concerned about them cracking. I think I've decided that I'm going to glue them in the front with epoxy, then use neodymium magnets embedded in the bridges to keep them in the pockets at the rear, essentially "hard-mounting" everything, more like many clones do. I also ordered a set of Mr. Paul's (of TotalGrunt/Shoretrooper build fame) metal shoulder bell/bridge supports. These are apparently the most accurate way to ensure your shoulder bells are supported and sit correctly, and include the elastic/snaps to attach the bells, so I'll post up how that process goes when they arrive from the UK. Final Strapping/Adjustment: Obviously this is the very last step, but I'm curious what new and exciting problems I'll run into as I figure the last of this out. I haven't actually put on the full suit in MONTHS so I'm curious how it'll go. I don't think I've post since I started applying the ultra-thin Velcro, but I'm pretty stoked on it. The only concerns I have had are that it's actually a little stronger than I anticipated, so I don't need to use as much as I did on most of the pieces (I may trim it back later) - I don't want to put TOO much strain on the pieces when I WANT to take them back apart. I also ran into the issue of the adhesive pulling the clear coat off again, so I started scuffing up the spots where I applied Velcro to help mitigate this. Otherwise, it works and looks great and allows for a much more flush look. Magnets probably would work well for areas like the shins and forearms as well, but I'm over it and just want to finish at this point. I also need to create the belt drops to hang my thighs with... it's on my list. I'd like to improve over my current OT-style design and incorporate the correct-style clips, but need to do some more research. If anyone has any good solutions, I'd love to hear/see them! From the top down, a checklist (mostly for me, but might as well post it here): Helmet - final white and clear, helmet detail paint, install visor and vocoder, install interior padding, install fans/mic Chest/back - epoxy in shoulder bridges and shoulder bell supports, finalize chest-to-side panel connections, install craft foam lining Ab/belt - epoxy in magnets for belt attachment, final white/clear on belt, install belt boxes, paint thermal detonator, install thermal detonator Arms - install shoulder bell snaps Legs - glue sniper knee, create garter system for thighs, install garter system I'll keep grinding away and maybe add some pictures later this weekend, but there's a pretty big update down for ya!2 points
-
A few people have asked how I mounted my TD and ammo boxes. Originally, I mounted the ammo boxes with pop rivets but they later came loose or pulled through the boxes. I mounted my Td with machine screws and T-nuts so I went back and did this with the ammo boxes as well. This method take a little longer but gives you the ability to remove the items if you need to. So here is my TD mounted to the hard back belt. Notice the 4 screws, this is how they are mounted. You will need the following: 4ea #8-32 x ¼” T-nuts 4ea #8-32 x ½” Combo Truss Head Zinc Machine Screws PC-7 Two-Part Epoxy Resin Dike pliers (Cutting) Drill with ¼” drill bit Dremel with cutting arbor 220 grit sandpaper First, I placed the TD on the hard belt properly centered and aligned and traced the outline of the mount on the belt with a pencil. Next, I drilled 4 corner holes on the mounting face of the TD to create a box large enough to get my fingers or tools inside the TD but also leaving enough material on the mounting surface for the T-nuts to bond with. Next, I used the Dremel to connect the 4 drilled holes thereby creating the square hole. Using 220 grit sandpaper I rounded the edges of the new hole and I rouged up the inside of the TD where the T-nuts will mount. Next, I marked on the back hard belt where the machine screw holes will be in relation to the traced outline of the mount and where the square hole was made. Be sure you leave enough space around the edges for the T-nut to fit inside the TD and not hit the walls of the TD mount. Next, using the ¼” drill bit, drill the 4 screw holes in the hard belt. Next, hold, tape in place, clamp, or brace the TD properly aligned to the hard belt and drill through the hard belt to drill the screw holes in the TD. Next, using a dike pliers (cutting), cut the 4 prongs off the T-nuts as close to the surface as you can. Next, mix up 2 tablespoons of PC-7 (1 tablespoon of each component A & B). Next, using a finger smooth some of the PC-7 inside the TD where each T-nut will mount. Insert each T-nut from the inside of the TD to protrude through each ¼” hole, then smooth the remainder of the PC-7 on top of the T-nuts blending the PC-with the inside of the TD to completely bond the T-nuts with the TD and let it cure overnight. Lastly mount the TD to the hard belt with the machine screws. This allows for you to remove the TD if you need to. I used this same method for the ammunition boxes on the front hard belt. I hope this helps for anyone looking to mount stuff with screws.2 points
-
I will add these on my build thread as well. So here is my TD mounted to the hard back belt. Notice the 4 screws, this is how they are mounted. You will need the following: 4ea #8-32 x ¼” T-nuts 4ea #8-32 x ½” Combo Truss Head Zinc Machine Screws PC-7 Two-Part Epoxy Resin Dike pliers (Cutting) Drill with ¼” drill bit Dremel with cutting arbor 220 grit sandpaper First, I placed the TD on the hard belt properly centered and aligned and traced the outline of the mount on the belt with a pencil. Next, I drilled 4 corner holes on the mounting face of the TD to create a box large enough to get my fingers or tools inside the TD but also leaving enough material on the mounting surface for the T-nuts to bond with. Next, I used the Dremel to connect the 4 drilled holes thereby creating the square hole. Using 220 grit sandpaper I rounded the edges of the new hole and I rouged up the inside of the TD where the T-nuts will mount. Next, I marked on the back hard belt where the machine screw holes will be in relation to the traced outline of the mount and where the square hole was made. Be sure you leave enough space around the edges for the T-nut to fit inside the TD and not hit the walls of the TD mount. Next, using the ¼” drill bit, drill the 4 screw holes in the hard belt. Next, hold, tape in place, clamp, or brace the TD properly aligned to the hard belt and drill through the hard belt to drill the screw holes in the TD. Next, using a dike pliers (cutting), cut the 4 prongs off the T-nuts as close to the surface as you can. Next, mix up 2 tablespoons of PC-7 (1 tablespoon of each component A & B). Next, using a finger smooth some of the PC-7 inside the TD where each T-nut will mount. Insert each T-nut from the inside of the TD to protrude through each ¼” hole, then smooth the remainder of the PC-7 on top of the T-nuts blending the PC-with the inside of the TD to completely bond the T-nuts with the TD and let it cure overnight. Lastly mount the TD to the hard belt with the machine screws. This allows for you to remove the TD if you need to. I used this same method for the ammunition boxes on the front hard belt. I hope this helps for anyone looking to mount stuff with screws.2 points
-
You may find when you are wearing the ab and kidney the sides may pull in so it may conform better. I would suggest having a look at other AP builds to see if this is common2 points
-
I may be biased, but I think it was amazing. The EI history research and presentation was over the top 3000 cool. Can't cupcake enough on it.2 points
-
Congratulations, all! Thank you, to each and every Trooper who has come before #1000 for being a part of it, via hands-on help, online guidance, posting a build thread, mentoring another Trooper, or earning EIB themselves. They say it takes a village to raise a child. It certainly takes a Detachment to earn EIB. Spread the word, encourage others, spread some smiles. TROOPERS HELPING TROOPERS!2 points
-
I’ve been doing my research and thought of something. Might this forum Support any way to host a Live Chat session from time to time with some of your more experienced members? I don’t know what you all may think about such and idea. Thanks to everyone who has been so nice, supportive and friendly, BTW!1 point
-
This is exactly what I did to achieve the appropriate angle. Eric Dyke has a great AM helmet tutorial.1 point
-
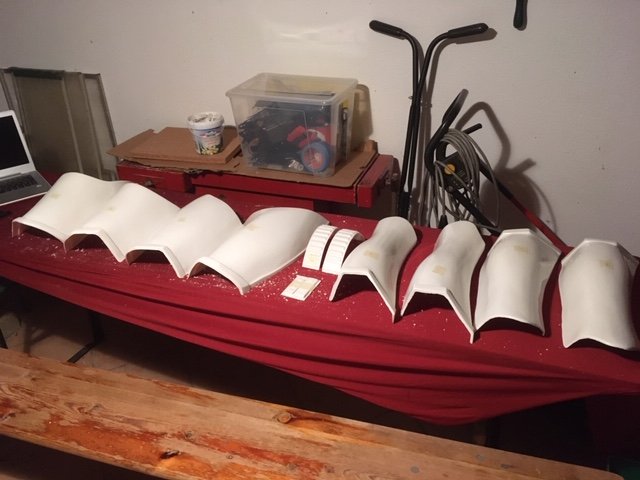
I've been busy moving out of my old appartement this week, and the new one is still a complete mess, but I got back to working on the trooper today. The legs are now fully trimmed, and I started with some of the smaller parts. For tomorrow, Instead of continuing with trimming I think I'll start with gluing the legs, since I know that there will be lots of time left for trimming, when i'm waiting for glue to dry.
 1 point
 -
Also, got a bit of work done on my helmet. Got the brow at the height I like tried fitting the ears and I believe in order to align the ear screws with the traps, I’ll be needing to trim off the back half of the bucket a little bit. I’ll also be probably trimming a but of the right side’s brow gasket to make it line up more with the trap. When I get back to my armor, I’ll be sure to snag some better pictures with the ears in place to give you guys a better idea before I cut.1 point
-
Will do for future snaps! I’ll admit I am not the most experienced with setting snaps.1 point
-
Hi all Darren and I have been looking at this issue today. The GML is aware and looking into it. :-)1 point
-
Congrats brother and welcome to the troops.1 point
-
Actually, the black strip is more like 5/8"1 point
-
Ok, good to know. I think I'll do a fitting and see how it goes, and post some photos. Sent from my Imperial Communicator1 point
-
I had to put a similar V opening in my thighs to make them fit high enough. Larger strip in the back is usually ok. Sent from my iPhone using Tapatalk1 point
-
My ab and chest was the same shape but I am big enough to fill it out. I reduces the ridges fir space and comfort. The chest piece doesn’t need to lay flat over the ab so only you will know the difference. Sent from my iPhone using Tapatalk1 point
-
So if we get enough interest for this type of thing, I'm all for it but would like to do a 1 off trial. initially. We need a benchmark to gauge ongoing viability. As has been mentioned, time zones are the real issue to overcome, but with some planning, I'm sure we can do it. I'll formulate a basic plan, choose a platform like Zoom so we can have video chat and work out a time frame. I will keep you guys posted.1 point
-
Hi, yes,I filled in all the relevant 501st information & I'm registered on the UKG forum as I'm from the UK, I have since been in touch with my armourer on the UKG ,he is looking into it so hopefully it should now get sorted. thanks again regards Darren1 point
-
Yes there should be no issues with a slightly larger cover strip1 point
-
Ears have to be the worst but they get easier the more you do. I prefer snaps as you then align everything the same time you put on the suit, Velcro isn't so precise but allows you some adjustment, really it's up too you what you use1 point
-
Yes, definitely come over to the clone trooper detachment, and check out the animated clone section [emoji1687]1 point
-
Head over to Clone trooper detachment https://501stclonetroopers.com/ Also list of CRLs is here https://databank.501st.com/databank/Costuming:CTN_CRL1 point
-
And so it begins! Good luck on your build, Paul!1 point
-
It is with great pleasure that I extend to you the distinction of being the 1000 Expert Infantry award recipient. The first was Scott M. back in 2007, so this has been 13 years in the making. What an excellent way to complete the first M peritus pedes quinos, so to speak. Yes, we'll work on a better way to describe you and your cohort in due time. Congratulations on a job well done, and may you inspire others to follow.1 point
-
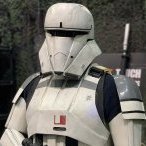
Well I hear the LMO's are happy using the Black Series Cardinal for that CRL. But in saying that we do have screen images of the incinerator trooper so definitely follow those more closely, I have added some images here1 point
-
Definitely check with your GML shouldn't take this long, I'm getting replies within a few days.1 point
-
@11b30b4 850Armorworks has upgraded their ENTIRE shop (multiple 3D printers, new paint booth) and has just begun production of a rotocast ROTK helmet, and it comes with your choice of printed hovi mics. They are also working on upgrading ROTK armor parts slowly but surely. Because of Hurricane Sally, they are shutdown, but they will be back up and running as soon as possible. Their IG has been documenting everything, and it's impressive.1 point
-
Oops, my bad. Well, thanks to Parquette for creating an awesome thread on the asymmetrical Rogue One helmet.1 point
-
Black strip on the Jim kits is about 3/4" wide if I recall correctly. I will measure it and get some pics for you this week.1 point
-
Hells yesssss, looking awesome. The spacing on the ammo boxes looks fine to me. I also attached my ammo boxes with rivets but late had to switch to screws because the rivets came loos on some of the boxes from bending over. I attached my TD with screws so I could remove it. I don't think I ever added the pics to my build thread so I will do so over the next few days. If you decide to go this route, you can always drill out the rivets and replace them with the screws but if the rivets work for you then roll with it. Great job, looking forward to your EIB.1 point
-
I bought this just before I started to pursue my Expert Infantry badge. I ended up getting #891. Congratulations again, to all who were part of this glorious March to 1000. Sent from my iPhone using Tapatalk1 point
-
I added foam in areas I knew would rub, under shoulder to bicep, backplate to TD, under chest to yoke. I would stick with red on the back plate for the moment, you could always have a black sticker on hand for approval purposes of it's needed I use clear on armor but I use automotive acrylic paint, it's saved me some paint scuffing over tiime1 point
-
Been a productive few days. - Velcro closures and cover strips on calves. - Sniper knee in place just needs a small bit of heating and glue to attach the sides. Front glue has had 48hrs to cure. Happy with it's position. - Front of thighs done, and reinforced on inside, return edges trimmed, - thigh ammo pack trimmed. - Split rivets purchased from Bunnings, no sausage though . Plan to finish legs by end of week. Cover strips on backs of thigh should be vertical and exacly in middle or off set slightly ok?? Sent from my SM-A520F using Tapatalk1 point
-
The tube stripes and vents worked well; much less cleaning up required than I expected. I may even leave the tube stripes a little haggard to give them a more authentic look. There was a little paint bleed here and there, so I'll clean them a little once all the paint has cured fully. Very happy with the results!1 point
-
Hello and Welcome to FISD Bryan.1 point
-
Just watch the crimping the posts of the snaps, looks like the one in the image above isn't quite central. A good tip is to first hit the post with a philips head screwdriver, it will splay open the post a little so when you use the snap tool it will crush better.1 point
-
I'm 5 ft 9 1/2 and have, over the years met most of the surviving actors who were stormtrooper s in the original movie . Non were shorter than me , but again non were much taller .1 point
-
I modified mine, a strip of elastic with velcro on the ends1 point
-
Welcome to the FISD.1 point
-
Great to have you here on the FISD, Bryan! Although I was 14 when ANH came out I felt the same way... to this day I still think the original TKs are the most iconic "bad guys" ever! It's never too late to fulfill your dream of becoming a shiny white spaceman, though. I was 51 when I purchased my first set of armor and haven't looked back. Is it an inexpensive hobby to start? Nope. But, after you get your 501st approval, go on your first troop in your armor and see the smiles on so many faces it makes it all worth it. Trust me. Know in advance that we at the FISD are here to help every step of the way, from providing the best resources to finding the right armorer to assisting in the entire build process. We encourage a lot of research on your part, but are always here to guide you if you have any questions. It's kinda' what we do best! As a fellow vet, thank you for your service, and if you have any other questions please feel free to PM me.1 point
-
Welcome to FISD Bryan! You are with good company here. I admire your efforts on combining your health goals with the goal of being a Storm Trooper! It's never too late to join the ranks. Have you decided on which version of Storm trooper you would like to build? Sent from my sorrosuub C1 comm link device using Tapatalk1 point
-
Hello Bryan!!!... A lot of strength in your fight with the scale!!!! We share the hobby of RC, although I build cars, no jets(I don't have enough skill)... Greetings from Spain!!!!1 point
-
Hello Bryan! Welcome to the FISD!1 point
-
Welcome Bryan.1 point
-
Welcome to FISD Bryan!1 point
-
I had to wait a week if I remember correctly. In the end I was added 1 day before my birthday. Best gift ever ;D1 point