Leaderboard


Popular Content
Showing content with the highest reputation on 07/31/2020 in all areas
-
LOVE IT, but I am SO going to steal that idea, Chris.... OTKD. You heard it here first, folks LOL.3 points
-
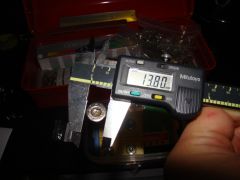
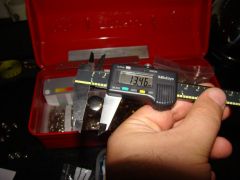
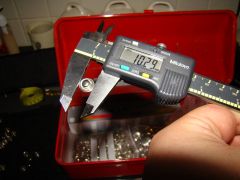
Alright fellas. Here's my very,very first progress post. After reading through everyone's helpful suggestions I'm left with a much clearer direction and inspiration! Caleb and Josheph, I intend to do some more research regarding achieving Centurion level certification. I'm sure I'll have more questions the further down the rabbit hole I get. For now I'm going to see about procuring correct bubble lenses and 3 column ear pieces. Also Caleb, the link to your build has so far served as a real useful guide in preparing my leg pieces. Mario, "Measure twice, cut once." is now my motto haha. I am taking it super sloooooow so as to ensure success. Glenn, anytime I begin a new process I'm making it a point to cross-reference other ATA build threads to ensure best practices. Andrew, Randy and everyone, I truly appreciate the sincere welcome and all of your time and advice. In time I hope my build can be just as useful. Thanks everyone! Joseph, I would certainly welcome you to relocate my build thread with the ATA suffix if it can get more eyes over here. Thanks for that! So now to the creamy center... All progress examples are from the right leg shins So far I'm merely cutting all the excess flash off each part. If you guys think everything looks ok my intention is to make the final cuts at 1/8" thickness at the top, and cutting to show some curvature at the bottom ankle area. Since the front cover strips are 7/8" wide I'm assuming to half those dims for both the inner and outer pieces? I intend to measure/cut the rear halves until they fit snug n proper. The sanding will then commence! I've got 60 grit sandpaper for rough sanding and 120 grit to even things out. What do you recommend for a baby smooth finish? I'm making sure that all corners are rounded off to mitigate snap, cracks n pops For gluing pieces do you recommend glue with ethyl cyanoacrylate or good ol' E6000? I think that's it for now. I can't thank you enough for all of your encouragement and advice but THANK YOU! Until next time...3 points
-
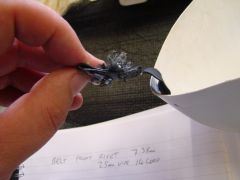
Exposed bolt I split the bolt so I could cycle it but also cover the electronics behind it. I was also removing a lot of resin material weakening it.3 points
-
Embrace the sound. You're Movie Accurate3 points
-
Being a Star Wars Fan from the beginning on, as child there were no costumes or anything like that. Like all the other kids, I played with the figures we had these days. As I grew older, toys were sold, so my collection of figures and vehicels. Just my snowspeeder stayed. At the Begin of 2020 I finally bought my first Helmet. A Black Series Rogue One, as I was stunned by the Film. It didn´take long that I decided to become a Stormtrooper. A dream since I was a kid. So I ordered a R1 Kit from 850 Armor Works. In the meantime I registered to this forum, where I found plenty of Infos in the WIPs. I made contact to T-Jay, who provided me his completion Kit for the E11 Blaster, which I wanted to build as I waited for BBB. Time went by, I finished the Blaster and the armor arrived right on time. BBB had come Now the adventure could begin. I costumized the helmet to be screen accurate and began working on the armor. Always following the CRLs and Level 3 Requirements. I never worked with ABS before, but found it very easy. My deadline was set to the 4th of May. You know why After some setbacks with painting the bucket, this goal was reached. Yeah, and it was Corona who ruined everything. But I think, I´m not alone with that. Knowing there would´nt be official events taking place, on Fathersday here in germany, I made my own. I patroled the whole day in my driveway. People driving by were excited to see a real Stormtrooper. Many stpped and took pictures. Even the local Police asked for a foto. A so called " Cocktail Taxi" also stopped and offered me a free cocktail of my choice in exchange with a selfie. That was a fun day, which made me even more wanting to become a member of the 501st. And here I am.2 points
-
Images updated2 points
-
Thanks Mario! It is difficult to tell from the photo I provided, but indeed the return edge on the cuff had been removed. Here's an update on my progress over the last couple of days. I next moved on to trimming the calves after glueing inner strips to one side of the forearms and biceps. The AM pieces are quite large, and while I am 6'3" and sit around 200lbs, there is still plenty of room to trim, so I proceeded to cut the front reveals to 11mm, allowing for some sanding to get to the 10mm on each side. I glued inner strips on the front of the calves from the waste I trimmed. After sitting almost 24 hrs, I then cut 20mm cover strips from the extra ABS provided in the AM kit. I cut them to length and chamfered the corners. I lightly sanded the back of the strips and the surface of the calf where they are to be glued. There was only one thing left to do, stick em on. This part made me a little nervous as it was the first part I've glued that would be visible. I know ES6000 is easy to clean up, but still...lol. And just when you think Diet DrPepper can't get any better....They give us Diet DrPepper with Cream Soda. I have to quit drinking these things, but dang they are so good! Next stop...thigh work. Again, these pieces are HUGE! I had no qualms about doing what I did with the calves and cutting the reveals down to 11mm on each side. I started out using an aluminum yard stick for my straight edge, but quickly realized that it wasn't as flexible as I wanted it to be for the contour of the thigh. I decided to use a slab of the extra ABS to use as a straight edge. By this time, I had seen another technique (I apologize for not giving credit as I can't recall where I saw it.) where blue painter's tape is placed on the line and the trimming is made just outside, allowing for final sanding up to the tape line. This worked really well and gave me great alignment when I put the pieces together. And that's where it got a little late and I had to turn in. I'll likely get some interior strips on the thighs tonight and work on sizing and trimming the backs of the calves. I'll also work on applying cover strips to the other pieces as long as I have enough magnets. I bought 24 of those babies thinking that surely it would be enough, but dang there are a lot of cover strips!2 points
-
Bought a pair of compression pants and ordered my undersuit shirt and knee gaskets form darkside closet yesterday!2 points
-
Well, some of us do...2 points
-
I use the Vallejo liquid mask.2 points
-
I've just added some chips and weathering to a droid build using toothpaste, worked great and is cheap. I see a few others using liquid latex or vaseline. Some great tutorials can be found on YouTube.2 points
-
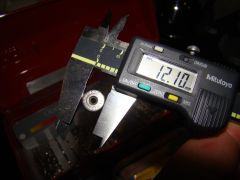
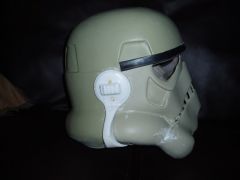
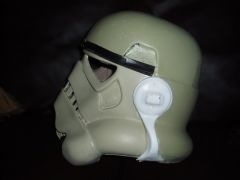
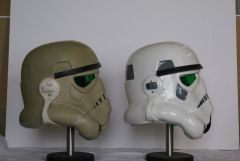
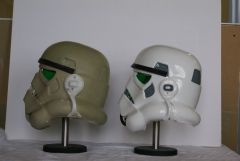
GREAT job on the trimming so far, Rob! You mentioned you were looking for bubble lenses and 3 bump ear bars, but if you are aiming for a Hero build the frown can only have 6 openings (3 on each side). The helmet you have has 8 (Stunt style). Note the extra opening on the ends on yours Hero Can this be fixed? Yep. I changed an Anovos Stunt Helmet to a Hero using ABS paste to fill those holes (not an easy task, though). I would steer well clear of CA (super) glue. Seriously. Although E-6000 takes 24 hours to dry, it is much more forgiving and can be removed easily if it drips on your armor. If you make a mistake, the bond can be broken with no damage, but with CA glue, once it's set it's set. Drips must be sanded off and the finish polished. Not easy. Trust me. Thread moved, title updated!2 points
-
Muchas gracias por tu aplicación a EIB Nora, uno de nosotros estará cargo de tu revisión pronto. Mientras tanto es necesario que pintes los tornillos de tu detonador térmico en color negro y de acuerdo al CRL para nivel 2: CRL: Los clips deben estar sujetos con tornillos de tipo ranurado, planos o de tipo domo, y deben ser de color negro (dos por clip). Saludos Hi Nora, Thank you for your EIB application, one of us will be with you shortly. Meanwhile we need you to paint your TD screws in Black color please. As per the CRl States for level 2: CRL: Clips shall be attached with slotted type, flat or dome top style screws, and be black Cheers2 points
-
I love the sound of armour clanking in the morning lol. It's an endearing fact of life, embrace it, we all have the same issue and its sounds great when you are marching along in a group of other TK's. If it is giving you troubles with walking it may needs some minor tweaks and trimming, so my suggestion is to suit up and have some photos taken so we can check your alignment, spacing and offer some advice that might make a difference to your overall comfort.2 points
-
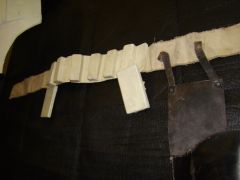
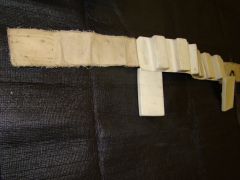
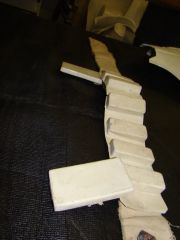
As I've mentioned previously in a couple of other threads, my son and I are beginning our journey to 501st approval. I think we're going to be following the 80/20 rule. I'll end up doing 80% of the work, or more...lol. We ordered the AM kits from Dave at Dave's Darkside Depot and should be receiving them very soon, along with our boots from IB. I would like to give Dave a shout out. He's very responsive to questions and seems like a super great guy. I've also ordered my E11 from Quest Design. Only thing left for me to purchase will be neck seals, holsters, belts, and my son's E11. I may take on the belt project myself, although its been a while since I've had my hands on a sewing machine. The holster project looks doable as well, but I have to weigh the cost of material and time versus purchasing them completed. Another thing that I am torn between is building these simultaneously or focusing on mine first as an attempt to get into the first 1k EIB and then using that expertise to build his. I'm not sure what I'm going to do yet, but I imagine I will start with both and let my rate of progress be the deciding factor. That being said, in preparation for BBB, I got a start on some snap plates. I put together 20 for each kit per UKWrath's AM 1.0 TK build. I started out using a punch for the holes in the 1" nylon, but quickly learned that using the soldering iron was not only faster, but also gave me a nice cauterization around the hole. This is also the E11 I ordered from Quest. I have read that they make a good product. Does anyone know what, if any modifications I will need to do to it to be lvl3 compliant? E-11 Product Listing1 point
-
Greetings all. I am almost finished building an ROTJ Vader (build thread on the SLD) and poking at the idea of an OTTK standing alongside him since I do not expect there to be much if any trooping for some time. Not sure I will take it anywhere yet but thinking about it and wanted to say hello. In the meantime, here is a quick pic of my first suit up of my WIP Vader (12SEP2020). I have a litany of small things to address but very pleased so far. I custom built the chest box and belt boxes.1 point
-
[EDIT] Switching to TFA FOTK since KB Props armor is TFA and finding the TLJ parts is a little difficult. I will return to TLJ later! Hey everybody, Momo here! I'm pretty new to this community, got cadet status for the Georgia Garrison not too long ago. I have aspirations to become an FOTK someday and a few days ago I got my big start with the Big Brown Box! Ive already ordered my lexan scissors off Amazon so im waiting for them to come so I can get started on trimming these pieces but I got a lot more tools and soft goods to gather. I need to keep my eyes open for Imperial Boots to start taking orders again so I can get my boots and gloves. Everything else will come with time. This is my first stormtrooper and I'm still learning the terminology of stuff and exploring this side of costuming...but hopefully one day I can join the ranks! This is the look im going for when its all said and done. I'm still deciding on pauldron color, but red is probably what I'm going to end up with. This is the aftermath of taking everything out of the BBB. Its a lot of stuff! I'm kinda worried about stuff not fitting right but some of these pieces are enormous xD I'm only 5ft but I'm not the skinny variety so fitment will be interesting. List of stuff for my stormtrooper thus far. Most of it is not ordered yet, but its good to have an idea of where I'm going for things. Research is still ongoing! Will edit post to reflect updates on Parts List Parts List: -Hard Bits- TLJ Helmet: KB Props (Received) Armor: KB Props [Only comes in TFA] (Received) TLJ Cod: TBA TLJ Forearms: TBA TLJ Thermal Detonator: TBA TLJ Thighs: TBA Pauldron: KB Props (Received) TFA FOTK: In progress Eventually I want a voice amp and stuff but I'll worry about that after I finish the suit. Fans may be a must though. I usually just rig a CPU fan in there but I might want something a little more professional this time around. I'll probably be adding more to this list later. For now this is all, updates will be slow as I'm not trying to rush this. Dont wanna make any mistakes, I am new after all Gonna take it slow and carefully for the best result! This be exciting times!1 point
-
Here's a pic wearing my gloves! I applied putty to the chest, since I ran out of time Wednesday. I set it in the sun and moved on, giving it 30+ to dry. I sanded and washed each piece. I applied a bit more on the oval and to a few spots I missed on the shoulder straps. Let them dry while working other pieces, then sanded and washed again. The scratches on the chest and the oval seem flush now! I hope to prime these pieces tomorrow, since I shouldn't have to trim anything...1 point
-
I am 6'1" and 195, the suit is made for your size. You will find a lot of AM owners love their armor. Try Dave at Dave’s Darkside Depot Heres the thread on Dave:1 point
-
Greeting Troopers! In my next offering of "Compile every helpful thread into PDF form" I present to you gazmosis' helmet ear tutorial. Here is the direct link to the PDF, for any Troopers that still have print reference folders or want to archive threads in iBooks on their iPads. As always, all compiled PDFs will also be included on my All-In-One TK Resource thread. Thanks, Steve, for the work you put into this tutorial!1 point
-
Hi!, Change is already done, Cheers1 point
-
He's an awesome Hux! I recently signed my boy up as well. He is Starkiller. I think I was more excited about it than he was. lol.1 point
-
Toothpaste...Genius idea! Thanks Glen.1 point
-
Thanks for the info. Might give toothpaste a go....genius idea!1 point
-
LOL, yeah, OCD has its own name on the SLD... OVD. Obsessive Vader Disorder. I have been suffering that big time as I have done a plethora of iterations in my chestbox modeling and still have more to do... it is a slippery slope indeed. I really appreciate the insight and be assured if I do go down this path, I will be every bit as focused on building a proper TK no matter which version I choose. Wait, did I just read a jedi teaching?? Say it ain't so!! So is there a correlation on fewer ROTJ TKs and difficulty of acquiring parts to ROTJ TK? And for curiosity, what is the most popular TK around?1 point
-
I love that sound the dropboxes make while walking. For me it belongs to every kind of armor.1 point
-
Hey Andreas, great to see your journey reaching this epic milestone. Even under these special circumstances, you managed to get everything done in time - including the issue with the helmet paint. Times will get better again and I am sure we can meet in person some day at a 501st event.1 point
-
Trooper, the emperor is proud of your efforts no need to double them!1 point
-
Welcome trooper, serve the empire with pride!1 point
-
Scott Woodworth 41469 EIB Letter Mario / TKSpartan http://www.whitearmor.net/eib/certificates/41469-eib.png 2961 point
-
Happy to be here among the Elite! Who's next?1 point
-
Follow the existing TLJ CRL and make notes as you go for any changes required t suit Cardinal. Then we need to sell it to the LMO's for a green light. Occasionally they are hesitant to allow CRL's off action figures but it has happened in the past.1 point
-
For those interested appears we made 500 in September 2015 And number 500 was1 point
-
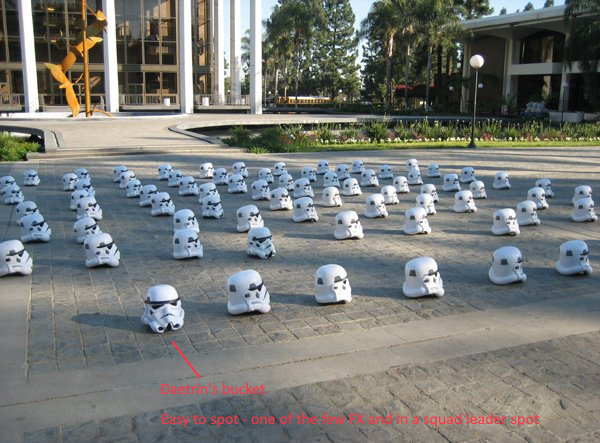
Last ones, I promise I'll stop Football practice Some awesome bucket images Position No81 point
-
FOR THE WIN1 point
-
Ooh - good one.
 1 point
 -
http://i767.photobucket.com/albums/xx316/flyinghome/8020sandysweat.jpg
 1 point
 -
Herzlichen glückwunsch zu deinem Abschluss Andreas! Congratulations on graduating.1 point
-
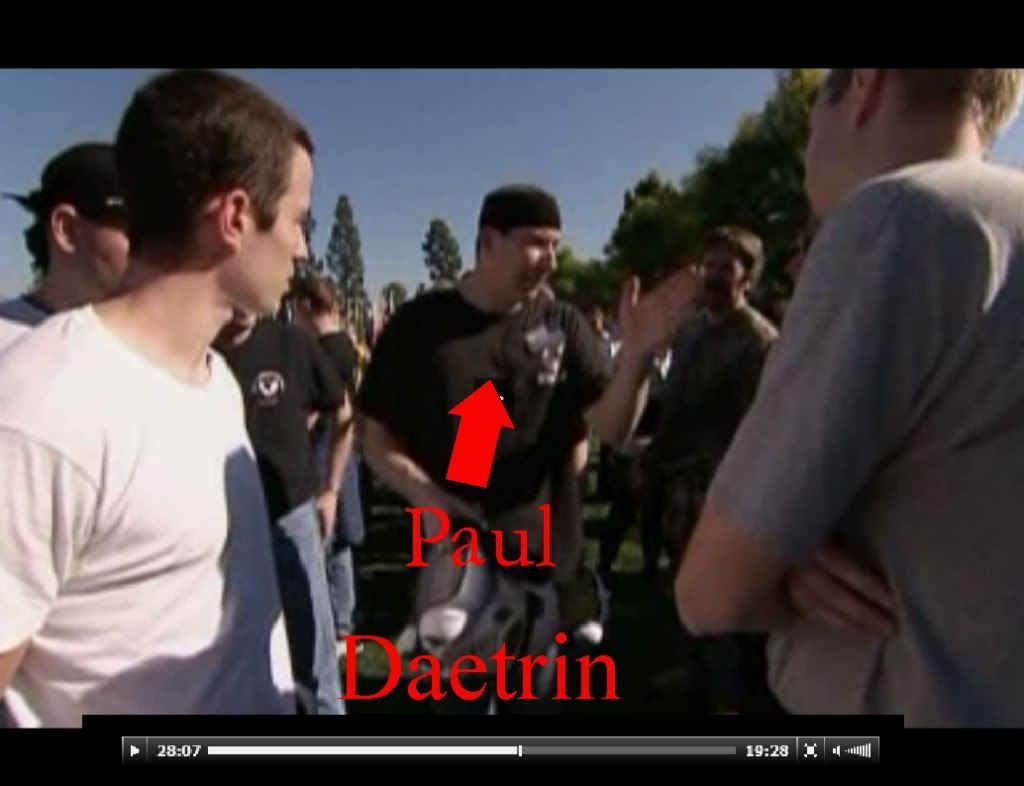
Ok I'm a little obsessed Shame a lot of the older links are no longer working Love this shot http://www.70thexplorers.com/event_pics/RoseParade/images/Img_2032.jpg Some great practice images on an old legion thread https://www.501st.com/forum/viewtopic.php?f=42&t=7938&p=169817&hilit=rose+parade+photos#p169817 Another nice folder http://www.70thexplorers.com/event_pics/RoseParade/FrameSet.htm Some videos Mary Franklin Serenade Some audition videos Stormtrooper training And just because this is an awesome image Photos of the parade, "recognize someone" https://www.flickriver.com/photos/calibre68/sets/72157594452805952/ And here we have a couple of workers mopping up all the sweat after the Stormtroopers had walked past1 point
-
Congratulations trooper and welcome to the ranks1 point
-
Congratulations trooper, Now you are an Action Figure !!1 point
-
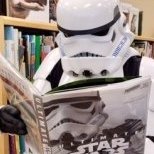
Book received today! I only ordered it a few days ago. Amazing! Now time for a chilled afternoon reading! [emoji1591][emoji41][emoji1591] Sent from my SM-G920F using Tapatalk1 point
-
Pretty much that is normal for most of us, I guess you could add some foam in places but the sound is pretty impressive to the waiting crowds at some events1 point
-
Just waiting for my 501st access to be granted on here, then I will be aiming for my EIB. [emoji1303][emoji16] Sent from my SM-G920F using Tapatalk1 point
-
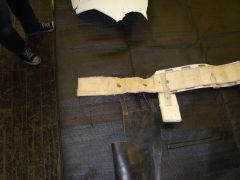
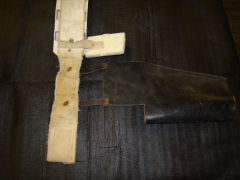
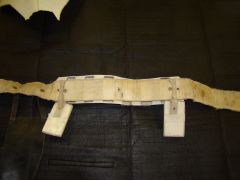
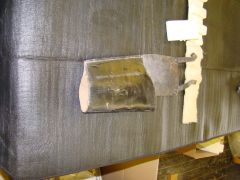
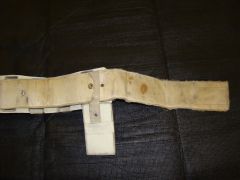
Ok, hows this for the abdominal section overlap? I had to scrap the bracket system, it wasn't working. I'm using Velcro for now1 point
-
I’m shooting for EIB number 1138, which will likely be in two or three years. [emoji6] Sent from my iPhone using Tapatalk1 point
-
Proud to announce, that my son is officially a member of the Galactic Academy. Cadet CID 5131 reporting for duty.1 point
-
1 point
-
One of my goals has been to be one of the first 1,000 EIB and 500 Centurion, so I really need to get working. Baby care has occupied more time than binge-watching during this pandemic. Perhaps I need to start pulling some overnight armor working sessions. Haha. Sent from my iPhone using Tapatalk1 point
-
A treasure trove of images of the original suit that RS Props are in possession of. Full credits go to Voice In The Crowd for allowing us to share his pictures, and to RS Props for allowing him to take the pictures.1 point
-