
Leaderboard


Popular Content
Showing content with the highest reputation on 07/04/2020 in all areas
-
Just an update... I received an email from Victor this morning and the requested change has been made. Great customer service!3 points
-
For Centurion level, the requirements for the E-11 are listed towards the bottom of the CRL page here, Luke. When deciding on which type you prefer, it comes down to a few things: 1. Rubber- Good points: Basically indestructible, and many (but not all) are approvable at Centurion level. A nice choice when you want to let someone hold it for a photo. Bad points: Not as screen accurate/realistic. (But then again, 99% of the public won't notice) . Can cost several hundred dollars for a quality one. 2. Doopydoos- Good points: Fairly inexpensive and can be modified to look incredibly realistic with some attention to detail and replacement parts. Great for those with mild OCD (like myself) and a lot of time on their hands to do this. Bad points: Being made of resin, they need to be handled a little more carefully. I personally never let anyone hold my weapons, saying something along the lines of "The Emperor/Lord Vader forbids it" or "It's against Imperial regulations" when they ask. I have built and trooped with several DD resin E-11's through the years and never had a breakage issue. Long wait times for delivery (often out of stock). 3. 3D print- Good points: Relatively inexpensive. Can be very accurate depending on the designer and can be modified in certain cases for a more realistic appearance. Bad points: Can be somewhat fragile (like the resin type). Also, depending on the printing method there can/will be a LOT (think hours and hours) of sanding/filling involved to smooth out all the print lines, a requirement for Centurion level. A lot of it also depends on your budget. Being a little lot on the OCD side,I modified the heck out of my last DD build using a real Sterling magazine (modified) link here. I also used this same seller to replace the resin folding stock, rear cap, cocking handle, magazine well, front sight assembly and a bunch of other items with metal ones. This may seem a little extreme, but being an accuracy nut it was worth it. And, of course, I personally would never do a DD build without one of Tino's crazy-accurate E-11 finishing kits.3 points
-
General Hux! What are your orders3 points
-
without wrinkles and crinkles3 points
-
1. Caleb Powell 2. Florida Garrison/Tampa Bay squad/Already approved SL-84095 ANH Vader 3. Armor maker RS Props 4. Helmet maker RS Props 5. Cloth belt maker RS Props 6. Neck seal maker Darmans props 7. Boot maker Imperial Boots 8. Idk... it was skipped in the overview thread 9. Blaster maker RS Props 10. Gasket maker N/A 11. Height 6', 72", 182 cm 12. Weight 205lb ish... 13. ANH Stunt/Hero 14. @TKSpartan was the most help, @justjoseph63, @CableGuy, @gmrhodes13, @Chemi, and @TheSwede provided key insights and I wouldn't have finished with out their help. I also wouldn't be done yet had I not bought a great set of hovi mic tips from @ukswrath. Thanks everyone for the help! The build thread link is in my signature. Hopefully I can submit for EIB the day I'm approved2 points
-
Perfect! Thanks @justjoseph63 Just before I start going back to my tools for coloring/weathering/attach it to the blaster, will this D-ring shape do?2 points
-
Inner cover strips are dry and the forearms and biceps are assembled! I will continue to make 20mm outer cover strips. Forearms need a little reshaping but I am finally making progress. Two month old babies definitely cut into hobby time.2 points
-
Attention all members and loyal citizens, Ask not what your detachment can do for you but what you can do for your detachment! Right, now I hopefully have your attention, we got a real easy way that any member can be part of the forum clean up crew, and help out making this place a tiny bit better by doing what many of you already do and that's simply peruse the forums. The task we have is monumental for any one person, but together, many hands make light work and you can feel confident that you played a part in the 2020 FISD term. Here's all you need to do. Find a post while surfing the forums with any of the following, please post a link to it in this thread. and that's it. Job done. What am I looking for? Photobuket water marks across images in a post. Watermarks in general that cover an Image that is advertising in nature. (Members are allowed to watermark photos and images they themselves have taken as long as they don't obstruct the image) Post where the images no longer work or just have info like 12034056.jpeg and nothing else. Broken links in a post that go no where, usually found in older post from years gone by. These generally don't help anyone so may be considered no use or obsolete. Please note we do not require links from anything already residing in the Archive or Trash compactor sections at the bottom of the forum. What happens once you have posted a link here to the thread with the issues. A member of the clean up crew ie. a staff member, will take a look at your link and see if we can rectify the situation by correcting the image, re-instate the broken link, or consider archive the post or thread. We are not in the practice of deleting but rather preserving our history. Once a staff member has attended to the links in question that hopefully will start populating this thread, they will respond to make all aware your post has been attended to. If you have any questions regarding the process, you can also ask those in this new thread. Happy forum surfing1 point
-
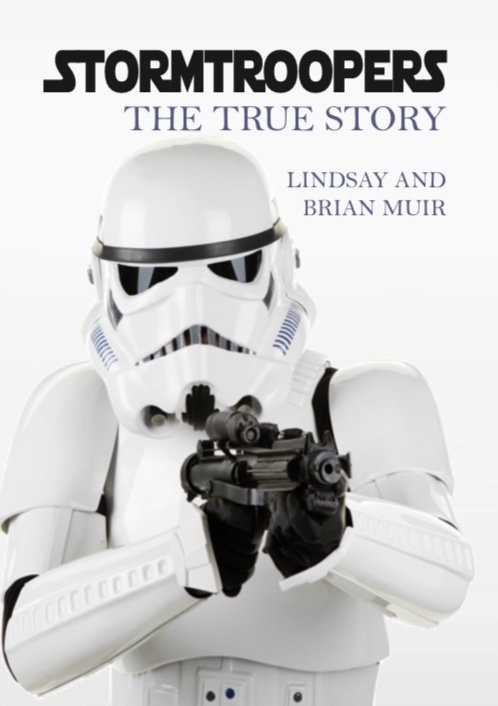
Hot off the press this week! The true story of how the iconic Stormtroopers were created , which subsequently led to a high profile multimillion pound court case. With the endless controversy and conflicting stories reported in the media and on the internet, this book reveals the facts from the crew on the production in 1976 Hit the link for your signed preorder https://www.brianmuirvadersculptor.com/store/c1/Featured_Products.html
 1 point
 -
Hello all, so happy to be here after about 5 months of waiting for my BBB day! Yesterday I finally received my kit from Walt's Trooper Factory and I'm ready to go. I have had all the tools necessary from https://www.whitearmor.net/forum/topic/31404-supply-list-for-your-ot-tk-build/ and I am ready to go! I am using other build threads and am watching https://www.youtube.com/channel/UCeDunMes3e0wQn8_ns-ma4g to help with the building process. I have never done anything that has required such creativity before, so this may take awhile but I am excited. Going for centurion out of the gate! Wish me luck :).1 point
-
After my R1 was ready, my son also wanted to be a part of the Empire. Due to his hair colour he wanted to become Armitage Hux. I ordered a cosplay uniform for him, as he is just 16 years old. Later, when he is old enough, we either go futher with this costume or he will get a TK armor. It needs some ironing and little tweaking. But he wanted to wear it right away.1 point
-
Hi from the UK, Just about to spend many hours reading, researching and asking questions to try to get a stormy suit assembled to a reasonable standard. Not touched the white stuff before but I do have a little crafty experience from a couple of bits in the past I had a Fb page called Pepakura Heroes a few years back that was a diary of some things I made...including an E-11. I'm in my late 40s so probably a mid-life thing but of course it's been a dream for decades so I figure I'd come here and hopefully you guys can help me out - you're my only hope.
 1 point
 -
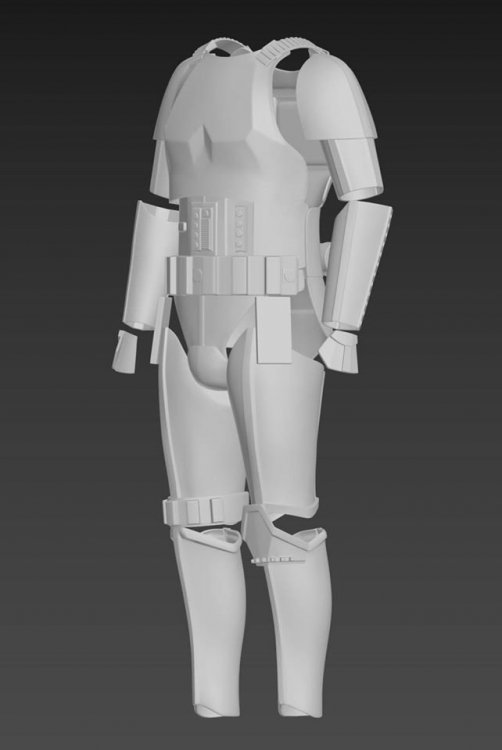
Hello all ! I am from Poland , I decided to create my own armor using a 3d printer. I have the option of professional painting, so there will be no problem with the finish. I'm starting now. I think reading the topics will be very interesting. Best regards ! Ps. Sorry for my English

 1 point
 -
Absolutely! Definitely will keep that in mind1 point
-
APPROVED! I need to hike the biceps up a little and they're happy Edit, I meant biceps, not shoulders1 point
-
Yes Laura, It's just right !1 point
-
Pura Vida Caleb!!! You got this Mate, see you in EIB and Centurion soon!!!!1 point
-
I bought them about 2 years ago, so I honestly don’t remember their size. They seem to be about 5/8”, but I can’t guarantee it. Sorry. After reading through some other threads, I’ve become really dissatisfied with my helmet’s (incomplete) paint job and decided to sand it down to try putting another, better layer of white before working on the details. While sanding, I discovered some pinholes and divots that needed filling, so I plugged them up with some years-old spot putty. It feels like I’m making progress, even though all that work actually put me further behind where I was when I started. I’m not shooting for anything beyond Level 1 approval with this build (I don’t have the bandwidth to maintain more than 1 costume at that level, tbh), but I *do* want the helmet to look as good as possible, since that’s what most people focus on when they see a TK.1 point
-
Thanks for your response. I'm so sorry i didn't have all the correct information .i will get it together asap. I was tackling the technology but I'm on my way! Thanks again for your help and advice.1 point
-
Hi Laura, and GREAT to see the new photos! One last thing before we can get started, trooper... unfortunately the D-ring on your E-11 is a rectangle and needs to be more of an oval shape (rounded on the sides) as seen in the reference images below. One small fix and we can get going on your submission. THANKS!!1 point
-
Amazing Hux, great to see you can share your passion with your son.1 point
-
Lookin' sharp, Caleb! I see nothing that should hold you back from Basic approval, sir.1 point
-
Hiya, Just to show the other side of the coin, I’ve trooped my resin DD E-11 for two years and haven’t once dropped it. If you want the more detailed blaster, just being careful with it can keep it in mint condition. :-)1 point
-
Cool cool thanks for the info! I spoke with @TheRascalKing as well and he also recommended the rubber blaster. I'm planning on trooping a bunch when I get approved down the line so this seems like the best choice. Mostly I was trying to weigh the cost of the rubber (Centurion approved out of the box) vs the cost of the parts to mod the Doopydoos + build time to make it Centurion approvable. I'm very back and forth about it lol. Appreciate it!1 point
-
Hello everyone I have not had much chance to work on my kit, but I did manage to make some progress. I cut out and sanded the cover stips for my biceps and forearms. In my last post I was asking about the corner measurments for the cover stripes. I decided to measure and cut 3mm each side, line up and trim. Thanks for the reference pictures Daniel. Thanks for that usefull tip Mario, I did not have a block of wood to hand, so instead I used this metal rectangle to even out the clamping force. This worked a treat, highly recommend this method to other builders when doing their cover strips. Here is the finished result for the biceps. I even made some Han hooks by using Ukswrath's measurments. I will attach these with some velco, that way I have the option of attaching or removing them whenever I wish. If anyone else reading this build thread is going to do the same trick, here is a tip I have for you. Make sure you stick the soft part of the velco onto the bicep and the course part onto the Han hooks. Just in case you might decide to have the hooks on some troops but not on others, the soft velco side on the bicep will not scratch you or damage your undersuit. I didn't have so much luck with the forearms. After gluing the edges to together, I waited 48 hours to dry then gave them a hot water bath. Unfortunately I did not leave them long enough, because the E6000 deteriorated from the forearms. However, not only have I reglued the forearms back together, but I've also glued the cover stripes on as well. Now, this time I will leave them for at least a week before giving them another hot water bath. While I wait, I think I'll commence on the torso.1 point
-
Superb job, Caleb! That’s a build to be proud of. Suit looks great on you. I’m confident that you’ll have no problems with clearance. Well done, again - you’re now an awesome Stormtrooper! :-)1 point
-
All your hard work is finally going to pay off Caleb, well done and looking forward to congratulating you on your pending approval.1 point
-
Amazing Trooper, Great to read you're going for high levels. Good luck and you can open a building thread for your son's build and your EIB advances. Cheers.1 point
-
Hi Luke, For E11 Blaster reference you may want to look this Thread I use a Praetorian Blasters Rubber E11 , and have moded a Hasbro E11 with the Doopy Doos conversion resina Kit and have seen some videos in You Tube about Doopy Doos E11 kit. In my opinion: Rubber Blaster is better for Trooping , it resist falls and shocks, while the resin, although it looks strong, can suffer fractures when falling or hitting. Obviously the cost is a big difference between both. I have read some trooper to have both, but it's your choice. Hope this can help.1 point
-
Hi Emma, don't feel that bad, usually armor building is full of challenges , bad measures, wrong cut, battle wounds , but I can asure you. your're learning a lot, and all this knowledge will let you help others in their builds and you'll encourage new troopers around you. And there's always ABS pieces to reinforce and ABS paste to fill the gaps. Keep on advancing, there's no way back Trooper!! "Retreat, hell! We just got here."1 point
-
I think it’s important to share the successes AND the failures: I thought I’d try using my heat sealing iron to make the new return edges on the butt and kidney. I had measured about 1 inch of overlap during my fitting, so I measured 0.5 inches up from the bottom of the kidney and 0.5 inches down from the top of the butt several times across the curve and used a tape measure to connect the line. Then, I used my heat sealing iron to fold over the edge up until the line I drew. Alas, it was a failed attempt. It took me 3 hours to barely get through the first pass 1/3 of the way across the kidney alone. The iron was too small and not hot enough. It was a waste of time. Before proceeding with this step, I will need to get a better tool or else it will never get done. The photo shows the best part of the process today, but the rest of it hardly folded over to a right angle at all. It took so long. The tool was just too weak, that’s what I get for investing in something cheap. Today felt discouraging but I will continue onward!1 point
-
That’s awesome! His look fits that role awesomely! I’m about to begin a duel TK build with my son. I know you have to be a proud dad.1 point
-
I can imagine so. From what I hear, they provide a high quality product. I’m excited to get my hands on them and feet in them.1 point
-
Yo te ayudo Fernando... Este es el link a tu perfil. https://501st.com/members/displaymemberdetails.php?userID=325931 point
-
I have hot water bathed after gluing with no issues. If you do have an issue, it is not a big deal to remove the coverstrip and re-glue.1 point
-
Great work, one thing you could work on while you are waiting to take it to the next level is the ab plates, the bottom (large plate) button paint is a little large, also the plates shouldn't have rounded corners, smaller plate could be trimmed a little more also.1 point
-
BBB photos there is nothing better. Some great helmet tutorials which may help, also don't forget to check references in the Gallery Sections1 point
-
Cool !!1 point
-
Great work so far, what an awesome build!1 point
-
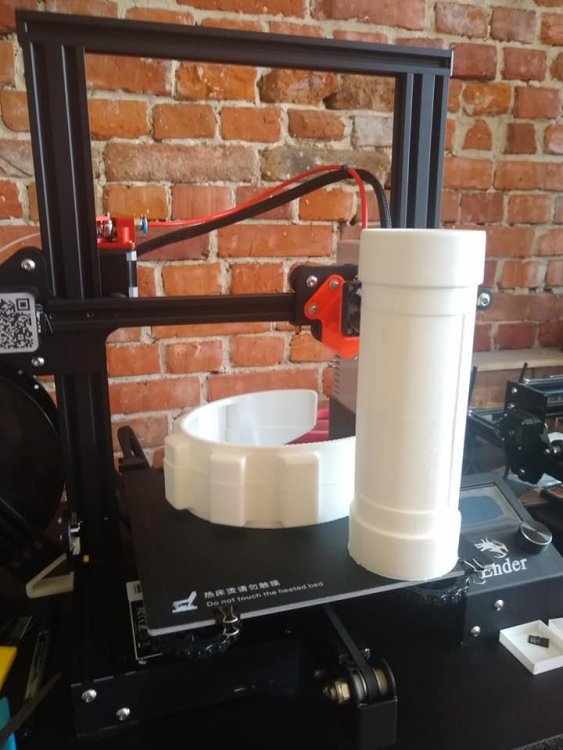
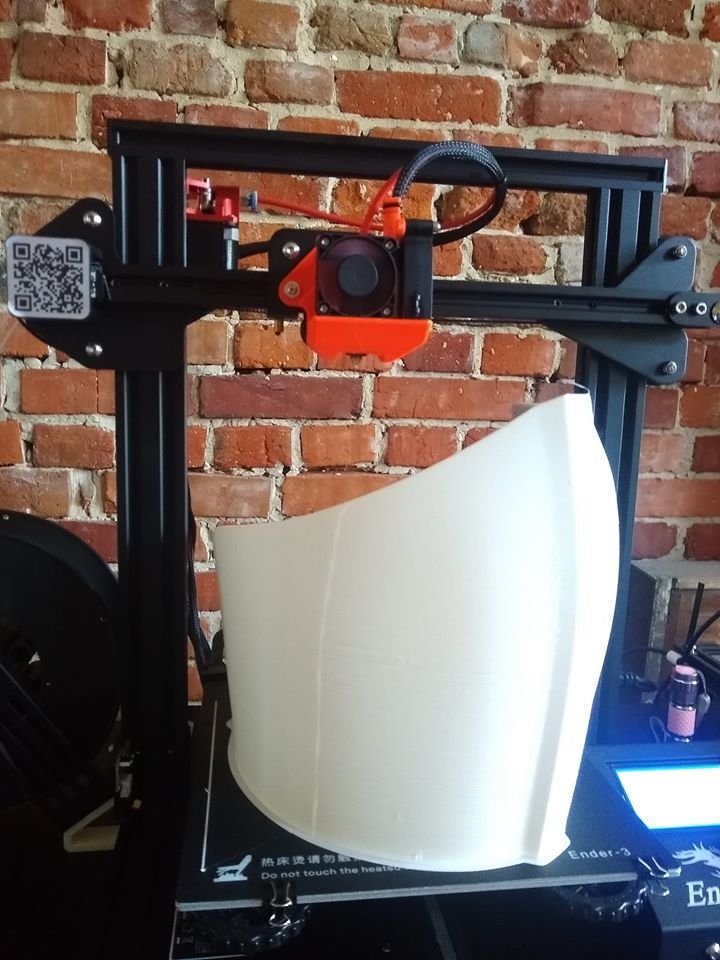
Why print something twice when you can print it three times! The change to the helmet part reminded me of the TD issue I had. So I've done the same thing, and also worked out how to get a bit of a better result at the expense a really slow progress bar. The results is still not perfect, you can see where there's some artefacts caused by Meshmixer reducing the mesh after the cut, you get to watch the progress bar of it ruining your part . I wish it wouldn't but I don't know how to turn it off. Also it would seem luck is on my side, maybe, need to print the part and check first. This is some standard UK guttering down pipe. You might remember it from such uses as the Shoretrooper Pringle cans, and OTTK TDs. And its about 1mm smaller than the hole *should* be, aka perfect. Obviously I need to actually hold parts and try it first. Yesterday I printed the tube stripe sections of the helmet. I was a bit nervous of these but due to cutting the helmet up to account for them I was able to orient it so they came out super clean. I also got all premature and got out the airbrush. The fit test got me all excited so I've started prepping them for a metal paint look. First job some gloss black primer. You can still see some of the tiny DLP layer lines in a few places and some grit that only appeared when painted, after they were air dusted and brushed down before painting However no ones going to be sticking the face as close as I do to them so I doubt you'll see them. Next stage will be some Alclad High gloss black then some Alcad Chrome. I am also considering moulding and casting one of them after the high gloss stage and trying an aluminium cold cast. And by considering, I know I will I just need to buy some silicone that's not about 18 months old. Maybe the stuff I have will work, I might get lucky but twice in a week seems like pushing it.1 point
-
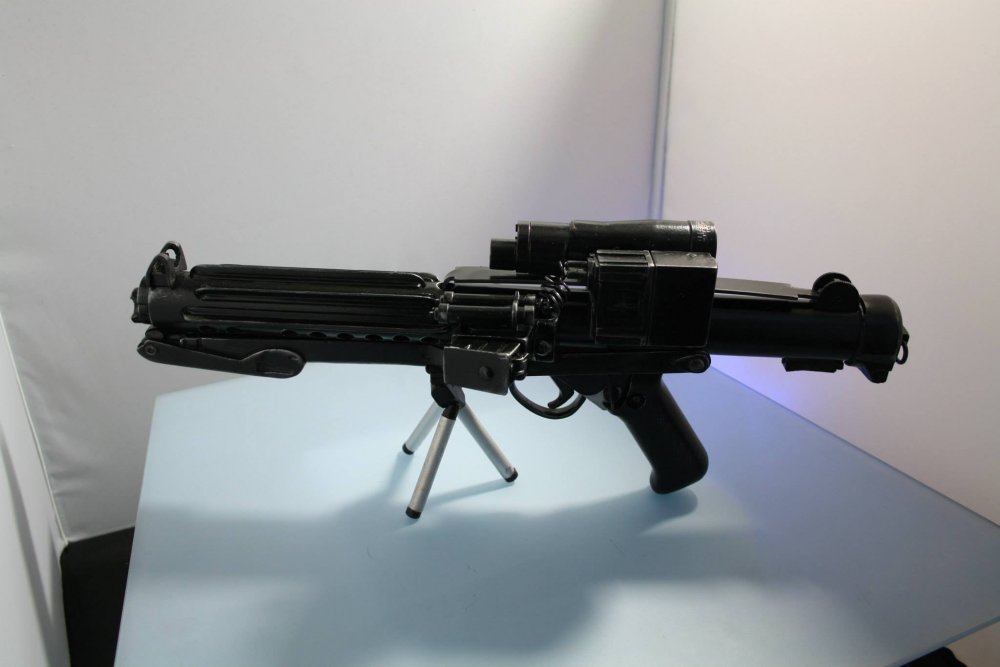
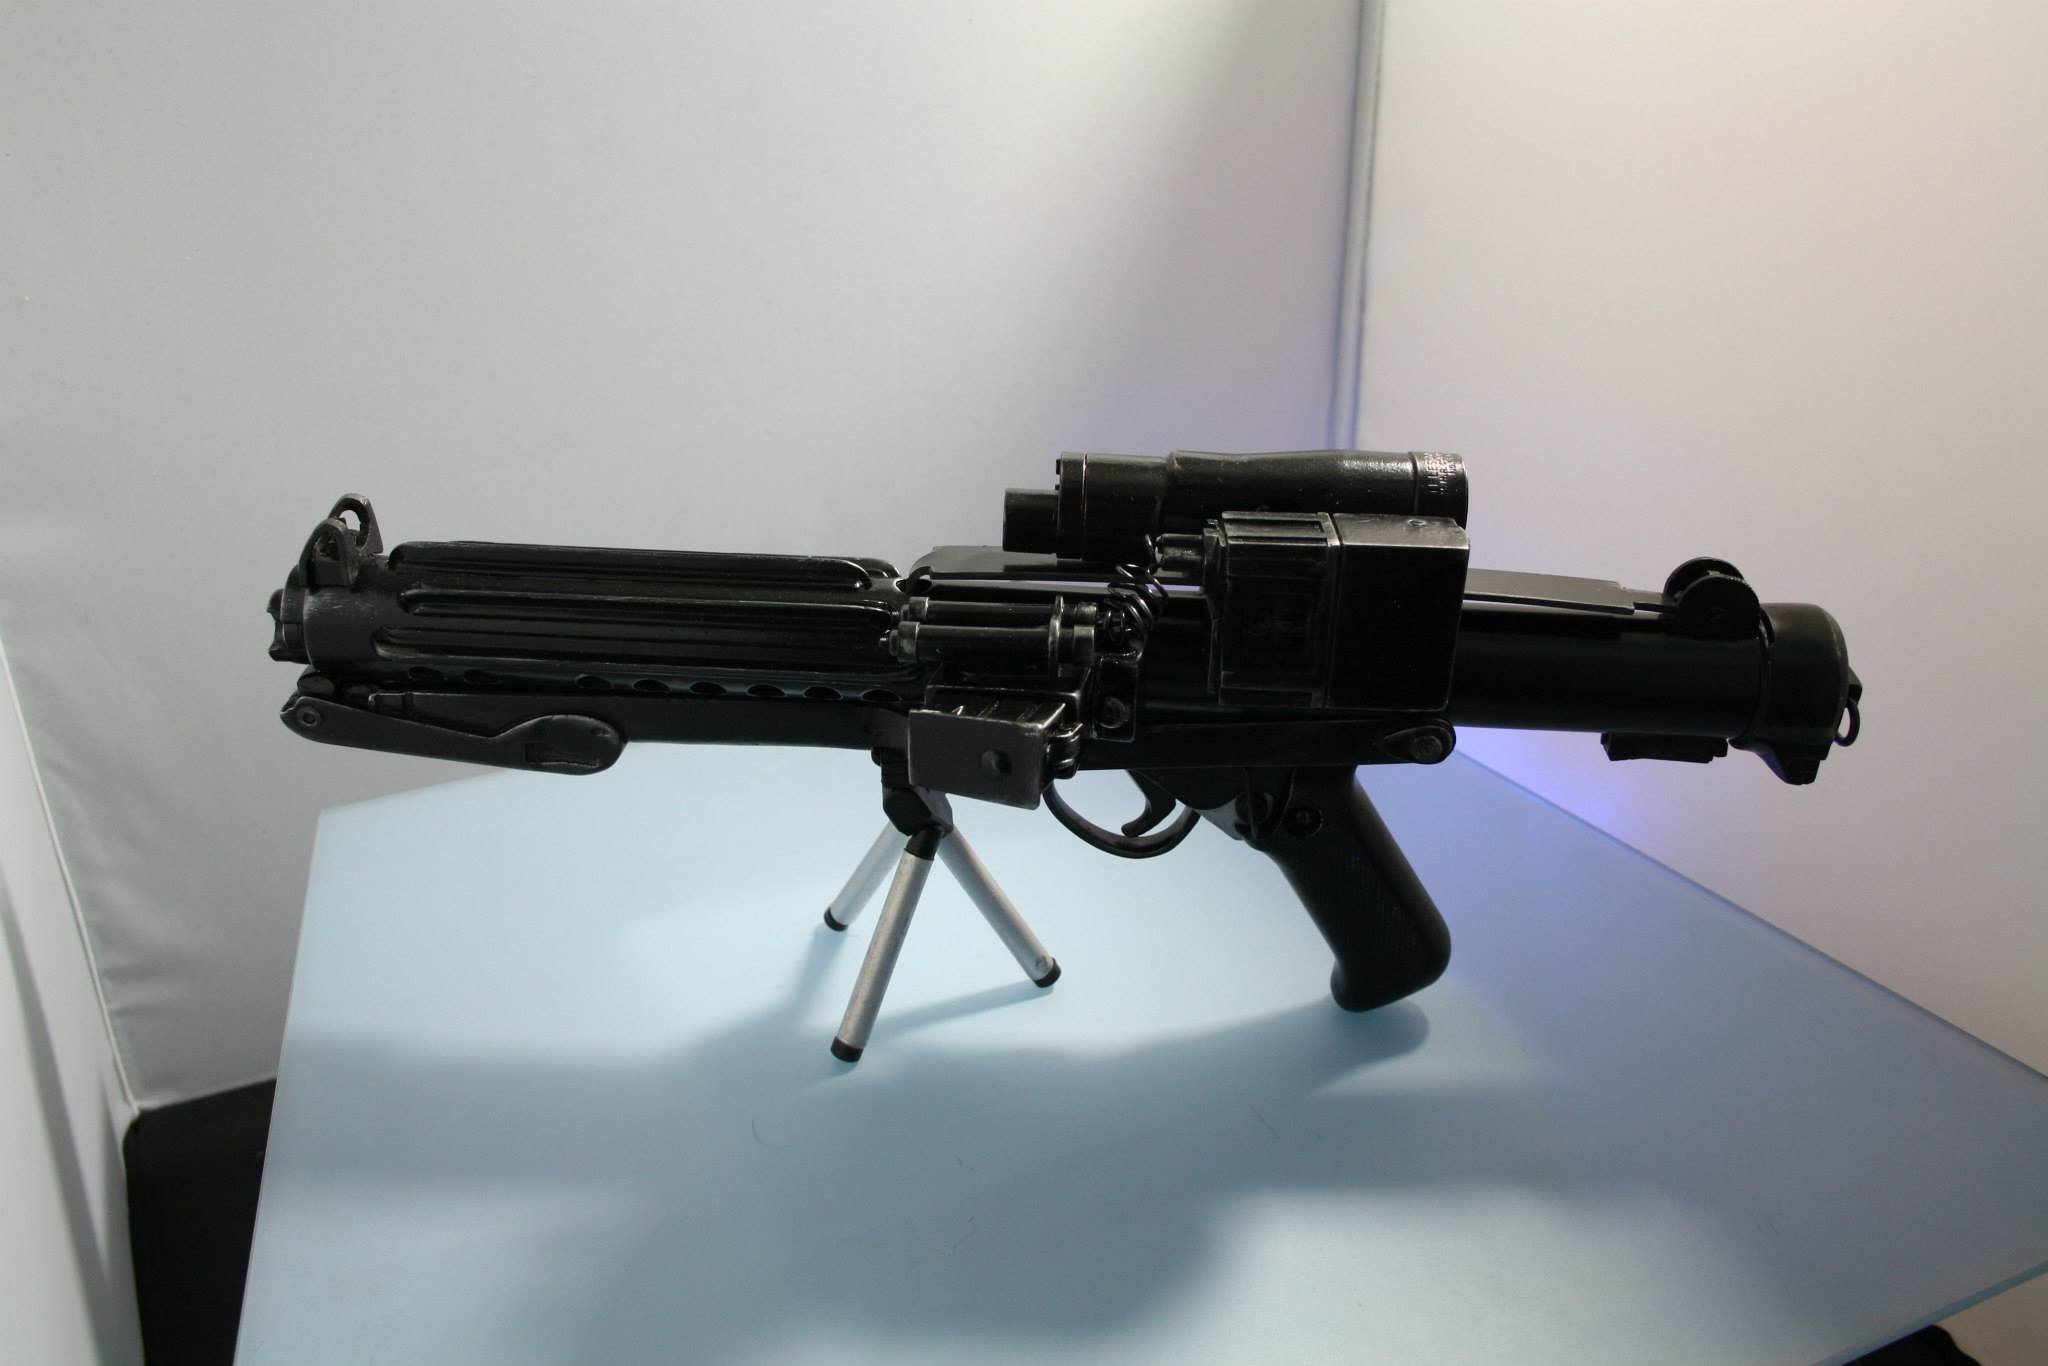
If a picture paints 1,000 words then this photo review of @Hellhounds' rubber E-11 blaster will be an EU-expanse worth of information for any Trooper seeking a product comparable to the old Hyperfirms and the newer Praetorian blasters. The inspiration for this thread came from the fantastic comparison (thread) of a Hyperfirm (HFx) B-Grade rubber blaster verses that from Praetorian Blasters (PB), by @kman. In fact, the angles of my photographs are intended to replicate those used by kman, to provide the opportunity for close comparison of the three models. Essentially, these two threads should compliment each other. The Hellhounds Props (HHP) E-11s (among other blasters) are new as of October, 2019, and are currently available from Daniel directly, as well as from @TK-4510 on Trooperbay. As I understand it, this purchase is from the first run of a dozen blasters, and thus far there appear to be no user photos of these Hellhounds rubber E-11s on FISD. Daniel from HHP currently has threads mentioning his E-11 product here and here. Regarding Rubber Blasters For those of you unaware, these "rubber" blasters are actually constructed of a combination of foam and rubber, and may have some form of armature (solid framework) serving as the skeleton. The benefits of rubber blasters are primarily weight, durability, and safety. These rubbers are heavier than standard Hasbro and Rubies conversions, as well as most resin builds—providing a slightly more realistic helf—while still remaining light enough for hours of trooping. Fully metal E-11s can start to feel really heavy really quickly. As you'll see below, the HHP weighed in at 35.03 oz, or 2.19 lbs. Rubber blasters are also less likely to break if dropped, and if a component does come off, it will likely just need to be re-adhered, rather than reconstructed (resin or plastic may have cracked or shattered). Finally, rubbers are safer when trooping in close proximity to children who may wander outside the line-of-sight of a Trooper with a bucket on. A swing and impact of a rubber E-11 is less likely to injure innocent bystanders. The most obvious disadvantage of rubber props is that they are generally not as detailed and refined as their resin counterparts, but advancements in molding techniques are changing that. Now, to be clear, I am in no way associated with or being compensated by Hellhounds or any other blaster maker for this review; I am simply seeking to provide Troopers with data on a new product. Note, too, that throughout this post I will link to parts of the official FISD E-11 Blaster Reference thread (here is the Rogue One Reference), to provide additional insight and imagery. So, without further ado, open kman's thread below, split-screen your device, and feast your eyes on three types of rubber E-11s from this (US) side of the pond! NOTE: The images below may not appear as clear/crisp as they do at full resolution since the FISD/browser display compression isn't great. Clicking each photo will open a full-scale version which should present better clarity, at least in a web browser. HHP TOP DETAIL VIEW The Hellhounds Props (HHP) magazine appears to be closer in length to a Praetorian Blaster (PB), rather than the notoriously-shortened Hyperfirm (HFx). HHP appears to be just a hair shorter than PB, but I've also seen longer magazines on some images posted by Daniel on social media. Perhaps HHP magazine length is still being fine-tuned, but I may try to see if I can acquire a longer one. Additional, note that the HHP Hengstler counter includes the two soldering pins, while the PB and HFx do not. Finally, there is a HFx-quality seam on the HHP between the rail and top T-track, but the HHP T-tracks' quality and installation into the venting holes matches those of PB. HHP TOP VIEW Immediately obvious from this view is that the HHP has a static (non-movable) aluminum D-ring installed, similar to that from PB, but the PB version is rubber cast directly to the end cap. This HHP is similar to HFx in that it does not have a faux recoil spring behind the charging handle and bolt, like that provided by PB. Notice a slight tinge of brass on the scope, and a pretty minimal and clean seam line on top (much like PB). HHP FRONT VIEW This is where further distinctions are easily identifiable between the three blasters. In general, the HHP has cleaner lines than a B-Grade HFx, but PB comes out on top with the crispest lines and no visible seams. One of the HHP front scews is excellently made (PB quality level), and the other is adequate. The front sight is also correctly thin, matching that of PB and differing from HFx's thick block, and the HHP barrel bore dept on the HHP is 0.5" (1.27 cm). Note that, with blaster in-hand, the tip of the HHP appears cleaner than this close-up photo presents. Macro photography tends to reveal blemishes which would otherwise be indistinguishable to the naked eye from normal real-life use distances. HHP BACK VIEW As previously mentioned, the HHP includes an aluminum D-ring (woohoo level 3), while the PB included a molded rubber one, and HFx none at all. Once again, PB came out ahead with the most detailed knurling on the rear sight, followed by HHP, with HFx at the bottom of the pile. The rear end of the scope appears to be of similar quality on all three E-11s, and notice the more visible brass color on the rim of the scope (also present on the front, seen later). HHP RIGHT SIDE Stormtroopers and Femtroopers, I present to you, a METAL SCOPE RAIL, with open space underneath! You read that right. HHP finally provides us with an OT E-11 without a solid rubber rail, which was and still is the standard with HFx and PB. This was actually one of the two major factors in my decision to go with HHP (price was the other). Of course, doing so sacrifices the recoil spring and the clearing strip and extractor detail on the ejection port. Make note, too, that this HHP scope does not have the round knob on the right side. HHP LEFT SIDE An iconic angle of the E-11. The trigger guard appears to be of similar thickness to than on an HFx, which may be just a hair thicker than a PB. The guard feels very sturdy and I'd have no concerns holding my index finger on it during a long troop. The trigger itself is cut out in the same fashion as an HFx, with more open space below and behind it than that provided on a PB, and the HHP trigger feels a bit flexible, which leads me to believe it is cast in solid rubber. Additionally, aluminum appearance is present beneath the selector switch on the HHP, a detail left out by HFx but included by PB. HHP BACK QUARTER VIEW This perspective highlights the metal scope rail, though take note that the rail is thicker than it appears in this image (due to camera lighting). I spoke with HHP about the strength of the rail prior to purchasing, and Daniel assured me that it is solid—which I agree with. That scope isn't going anywhere, and I do not foresee any sag in the long-term. Notice the screw head on the underside of the rail, which secures the scope (a second is obscured from view by the counter). Additionally, this angle, once again, shows the magazine length, which is significantly longer than the HFx but perhaps just a hair shorter than the PB. And finally, two notes regarding the rear sight area. First, the horizontal retaining pin area has been molded as a recessed space on the HHP, as opposed to raised and textured (faux) pin on both the HFx and PB. Second, though not easily discernible in any of these images, there is a locking notch band at the end of the receiver tube on the HHP. HHP BOTTOM VIEW Another major differing point of this HHP blaster with PB (unsure of HFx), is that Hellhounds hollowed-out and split the arms (wishbone) of the folding stock. On the Praetorian the two arms are actually a solid piece molded with and surrounding the trigger guard. The second photo below shows this up-close. AWESOME! The only other distinguishing feature from this angle is the length of the magazine, and the already-discussed aluminum appearance beneath the selector switch. HHP EXTRA VIEW This angle shows several features which are missing from the HHP blaster but were included by PB and HFx. The ejector knob is missing on the HHP, as are some greeblies on the magazine which are present on the PB (but also not included on the shortened HFx mag). These omissions, and perhaps also some missing details on the front and rear of the power cylinders are perhaps the greatest shortcomings of this Hellhounds blaster. It's possible that the ejector knob fell off in-transit, so I will be reaching out to Daniel to inquire about a replacement/addition. On the plus side, the casting of the Hengstler counter appears very nice. EDIT: I reached out to Daniel at @Hellhounds and he said that future versions of his E-11 may include the ejector knob and magazine catch. In the meantime, he is planning on sending me those individual pieces to add on to my baster. HHP ADDITIONAL ANGLES The images from this point on are all from new angles not included on kman's Hyperfirm vs. Praetorian thread. They are intended to highlight the fine detailing present on these Hellhounds blasters, and will so provide a better view of the of the differences in the three rubber E-11 blasters. These first two images provide alternate angles of the mag well area, showing the lack of the ejector knob. The two soldering pins on the Hengstler counter are also visible. EDIT: I reached out to Daniel at HHP and he said that future versions of his E-11 may include the ejector knob and magazine catch. Notice the detailed inscriptions and oval inlay on the bottom of the magazine well, shown below. Very nice, as is the texture on the magazine itself. The two images below highlight the T-tracks, venting holes and folding stock. As previously mentioned, the T-tracks are smooth and straight. While I am not certain that the original Sterlings had such a texture on the stock metal, I definitely like the presence of the it as it adds to the weathering and could even be considered to be carbon scoring. "You boys have seen a lot of action..." The image below shows a close-up profile view of the muzzle screw, front sight, flash guard, and folding stock butt. Notice that, in the same fashion implemented by HFx and PB, and clearly for the purpose of providing structural support, the front sight is not hollowed out on the HHP. The two images below are intended to highlight the charging handle, ejection port and guard, and texture on the folding stock and grip. Note that, as already established, there is no recoil spring, clearing strip, and extractor on the HHP. However, the grip detail is fantastic. Additionally, other than the rubber trigger, the grip is the only other place on the blaster where flex can be found—on the smooth front and back. I suspect this may be intentional to provide comfort in-hand, and I like it. Below: End cap and D-ring from both sides. Also shows the end cap clip, scope rail, and rear sight again. The textured and inscription details on the back of the scope can be seen on the photos below. While there is some brass weathering, a little more would be nice. These two photos below highlight area around the front of the scope, showing the molded screws, metal rail, power cylinders, and the soldering pins on the Hengstler counter. Notice more brass color on the scope rim. The HHP weighed in at 35.03 oz (2.19 lbs or 0.99 kilos), comfortable for long troops. FINAL THOUGHTS By my assessment, the Hellhounds Props blaster situates itself right between the HFx Hyperfirm line and the Praetorian blaster. Overall the mold/seam lines are of better quality and more minimal than those on Hyperfirms, and approach or in some cases match those of Praetorian. A few details are missing on the Hellhounds, such as the recoil spring, magazine ejection knob, and greeblies on the magazine (EDIT: I reached out to Daniel at HHP and he said that future versions of his E-11 may include the ejector knob and magazine catch) and power cylinders, but conversely, HHP has included details not currently seen on OT blasters from Praetorian or Hyperfirm—a real metal scope rail and split arms on the folding stock! While this may not be the case forever, it is also worth noting that the Hellhounds E-11 is currently less costly than one from Praetorian. For me, this blaster was an EXCELLENT choice, and I would not hesitate purchasing from Hellhounds again. And there we have it. Hopefully this photo review can serve, in conjunction with kman's thread, as a valuable guide for any Trooper in the US considering purchasing a rubber E-11. Perhaps in the future I'll have the pleasure of owning more rubber blasters (DLT-19!) and be able to create additional comparison guides. I'd be happy to serve as a weaponry photographer/reviewer Amazon Vine Program style here on FISD. In case any of you missed the link near the top of this post, here is the FISD's official E-11 Reference Guide, followed by a Rogue One variant: Move along, move along... MV1 point


.thumb.jpg.77bd551337f7adc46a4b151e703df6be.jpg)


