Leaderboard


Popular Content
Showing content with the highest reputation on 05/27/2020 in Posts
-
Hello friends, I am interested in working or fixing my armor to level up, I ask for your support to guide me to start and work on it. Thank you so much. over&out.4 points
-
[EDIT 6-17-20: Please do read this entire thread but the packs are done and the files are HERE: https://www.thingiverse.com/thing:4462006 ] Hey all! I'm an approved ANH Stunt TK with aspirations to become a HWT. I started my pack project about two years ago but got derailed by life. I'm building two packs, one for me and one for a friend currently building a TK. The first pack is almost done and has used my initial 3d printed parts to test it, and after building that I have gone back and modified my files. I'm going to post screen captures first to see if there are any issues or CRL conflicts before I start printing them to make the second pack. After everything is approved and assembled, I will be releasing the files to my Thingiverse for any future HWT that want to use my parts to build their pack vs. scratch building everything. I used ukswrath's build, the published approximate dimensions needed for each component, and screen grabs from the game to base my parts on. The base of the pack is still an oil can, the radio base is still a "memories" box, the upper center tube is a wipes container, and the side tube is PVC. CRL: https://databank.501st.com/databank/Costuming:TK_hwt UK's Build: Game Screen Grabs: Pack Specs: First, here is my "rough draft" pack. It is currently only lacking 1" webbing straps, weathering, and the chest MP40 pack before I consider it complete. Bear in mind the rendered parts are the current revision, mostly just added some radii and screw holes for the corner screws. Upper Left Button Box. I've made each sub component that is painted a different color a separate part for ease of assembly. The frame the buttons fit into actually sits in a pocket in the button base so that everything will easily line up straight. The parts will just be glued together unless there is any reason to add holes for screws? The buttons are based on the same dimensions as the rubber bumpers used in UKWrath's build as they seem popular. The bumpers could be used in lieu of the printed buttons, but its way cheaper to just print them IMO. Top Middle Wipe Tube cover. I'm still using the standard plastic dollar store wipe tube. I could just print a tube with a flat back but honestly for $1 its not worth it, although with the covid pandemic wipes have all but vanished. I may go ahead and make a file just to have it available though. I've seen some people just use black electrical tape to make the cover, others use cardboard, others use sheet plastic. This 3d printed part just makes it look more "real" IMO. Upper right flap vent box. I really thought this would be tough to draw but it turned out to be simple. The vent section prints as a separate part that fits into a pocket in the base. No more cutting of strips and trying to glue them together perfectly as this prints and looks great. The look is more akin to the UKWrath build than the game as the vents go all the way to the bottom of the part. The CRL also shows the vent flaps going lower. I can mimic this if people think matching the game is better than matching what most people seem to build? Lower left radio. I have made two files for the faceplate as it is larger than what my printer can fit. The top section is the "screen" and the lower section is for the knobs. I am still attaching this to the cut-down heavy cardboard "Memories" box as my printer can't make something that large for less than what the box costs. I have also made a file for the knobs with holes to screw into the plastic faceplate. They're roughly the same size as the plastic caps from the oil can base so either could be used but with holes perfectly centered on the printed part I'll just let the machine make them. Center right is the angled box with tombstone shaped vents. Per the game, this box is angled although most builds have it as a flat box due to limitations of scratch-building nice parts. Again, the faceplate is a separate part for painting and assembles with glue. There is a neat trick that if I print the box upside down, the face that points outwards will have some drooping plastic bridges that look like vent media underneath the faceplate (see the pic of my test pack). I've removed the corner screws from the original part and added those screws to the outside of the base instead. Lower right Drop Siphon. Again, the upper black section and the lower tapered grey section are printed in two parts. I have left a lug on the tapered section and a hole on the upper section so that they will easily line up for assembly after painting. Also, I needed this to print in two parts so that they would fit onto my printer. The upper section has the cap integrated into the design with the same rough size and shape as a juice lid used on many builds. The upper black section also has a flat base on the back to allow for simpler mounting to the oil can base. The grey tapered section has 8 1/8" holes evenly spaced around it for placement of real rivets. I could just integrate 3d printed rivet look-alikes but honestly I like the look of real hardware on the 3d prints to give it a bit more realism. And lastly are parts for the 24" PVC tube mounted on the right side of the pack. Instead of buying a vacuum formed TK shoulder strap or PVC caps I have just made files to print look-alikes. The tube stripe prints with the same diameter bend as the OD of the pipe so no need to heat it up with a heat gun and crinkle it to death. The caps could be sourced and cut down from a hardware store, but if I can print perfect parts that are ready to go right off the printer I'd rather just make the file. The biggest concern I have for making it approvable are my "clamps" that attach the pipe to the side of the pack. They make the tube stick out from the body of the pack a hair, but I don't think its enough to hurt. I know some people just screw them on or use toggle screws but I wanted something that looked a little more military and polished. The clamp first attaches to the side of the oil can with 1/4"-20 screws and then the PVC pipe is attached to the clamp via screws. I think it looks super neat and it is very, very solidly mounted so its worth the slight deviation from the norm. So.... please give me any input or criticism to make these parts more accurate, buildable, etc. I'd like to make any modifications to my files before I print up a second batch for another pack and before I release them to the wild on Thingiverse. I can also drop the files on FISD just have a backup source if I can upload STLs.3 points
-
Hey all, for transparency we've made a couple minor CRL wording corrections, these will not effect any approvals. All OTTK armor related CRLs for Basic and L2 were updated. What used to state "Aerators/Hovi mic tips" now state "Aerators/Hovi-MIX tips" All FOTK armor related CRLs excluding Phasma for Basic and L2 were updated. What used to state "The right outside thigh (to the wearer) includes a base for a holster", now states "The right outside thigh to the wearer includes a base for a holster (holster must be present)". Level 2 "Holster must functional"3 points
-
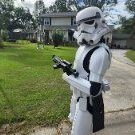
From a galaxy far, far away, coming to a neighborhood near you. I can't wait to see this at DragonCon3 points
-
Hola Ulises Bienvenido al FISD, ya echaste un vistazo a los requerimientos para EIB y Centurion? https://www.whitearmor.net/forum/forum/18-fisd-expert-infantryman-badge-eib-requirements/ Puedes abrir un thread en esta area y postear fotos de tu armadura para recibir tips y sugerencias o chequear otras solicitudes en esta sección para que veas otras armaduras como al tuya. https://www.whitearmor.net/forum/forum/19-request-expert-infantryman-status/ Estamos para ayudarte, no dudes en hacer cualquier consulta. saludos Hi Ulises Welcome to FISD. Have you taken a look to the following sections yet? https://www.whitearmor.net/forum/forum/18-fisd-expert-infantryman-badge-eib-requirements/ https://www.whitearmor.net/forum/forum/19-request-expert-infantryman-status/ Take a look, open a thread and post photos, receive suggestions, tips from our very experienced troopers. We are here to help. Cheers3 points
-
All photos have been uploaded and thanks!3 points
-
Hi! So.... It's been a solid 4 years since I've been to this thread...I figured COVID-19 would be a great time to finally work on this armor some more! I will post more updates here. Wish me luck!3 points
-
Just a small update here, my gloves from Joseph and my hand plates from Dan Laws arrived today! A small beginning to this build.3 points
-
This is your last chance to be part of the first millennium, and it will never come again. Time to really just pull out the stops and get it the rest of the way there. EI was designed to be done for a modest sum of $$ (say $50 or so) and a half-day of work. It's really not a huge jump like going Centurion. Just think about it. You can say that yes, you were part of the original 1000. Any commemorative items we make - even if it's just a banner decal that goes on your armor bin, will be something to say you were part of. Really can't under play how historic this is going to be.3 points
-
I will once the glue dries again, I think there was 1/2" to 3/4" gap. Ive been studying the build portion of both those threads, haven't read much of the commentary yet but that seems to help Thanks! I've read that one probably 5 times, I'm going through the comments now to see what other information I can find. Thanks again guys!3 points
-
Another practical tip to remove the E6000 glue in excess is just rub it with a soft cloth. the heat makes it peel off easily. try it.2 points
-
It reads on the CRL (Holster must be functional). It's just a Typo in Tony's post Only reason we changed the basic was due to the oversight in the past, plus brings it into alignment with our OT CRL's as most of them have holsters as part of basic.2 points
-
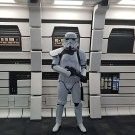
Good Afternoon! I hope you all are safe and healthy! Armor = TM Props Helmet= TM Props Blaster= 3D printed Height = 5'9 Weight = 200lbs. Boots = Imperial Boots Canvas belt = TM Props Hand Plates = TM Props Neck Seal = RS Props Holster = TM Props Thank you for looking!1 point
-
Hello everyone, I'm Adam from the UK. I've been reading as much as possible on this excellent forum and took the plunge recently, purchasing an ESB TK kit from RS Propmasters. Well it has now arrived and if I said I was excited and terrified in equal measure, that wouldn't be quite true - this will be my first build and I'm definitely more terrified! I will start a build thread soon and then promise to bombard you all with lots of questions!1 point
-
My paint finally came in last night! Applied the first coat. My paintbrush BARELY held together...it was the widest one in the house. I think I have a foam brush I can use for the 2nd coat tomorrow. I am VERY HAPPY with a black interior and glad I postponed my last coat of primer so I didn't have to worry about overpaint!1 point
-
Si puedes postea fotos de tus avances. Once you're ready , post photos. Troopers Helping Troopers1 point
-
Muchas gracias Mario, Reviso las ligas que me has enviado y empiezo a trabajar...cualquier duda los contacto para su apoyo vale? Un abrazo!!!1 point
-
Good luck Trooper !!1 point
-
Hi Jasper, and thank you for your EI submission! In the following review I will be going over items pertaining to your current submission, as well as those that will be required for Centurion level should you choose to apply... (and with this armor, I expect it)! CRL and EIB Application Requirements: All required submission photos have been posted and I am very pleased to announce your armor displays all the necessary elements to qualify for TFA Expert Infantry. On behalf of Sha Sha and myself, Congratulations! Other-Armor Fit/Assembly: In this section we review observations made by your fellow troopers and ourselves. Some observations may lead to suggestions to improve the overall look of your armor. Note that we consider both text (CRL) and pictures (screen caps/reference images) when reviewing submissions. WOW.. Nothing to mention here! This is a first for me, brother. I have reviewed countless submissions for Expert Infantry and there's always at least a few suggestions to go over in this area, but in this case you nailed it on the first round! Your attention to detail is phenomenal, and I can tell that your heart and soul have gone into this build. Centurion Requirements In this section we prepare you for Centurion. More photos may be requested in the future that allow us to make better decisions on possible adjustments. If there are any areas of concern they will be discussed here. Because Centurion photos show much more detail than those for Expert Infantry, items to pertaining to Centurion might be seen there and not here. We try to point out all that we can from what is seen, but the final accuracy is the responsibility of the trooper. There is absolutely nothing holding you back from reaching Centurion level, Jasper, so I expect to see that submission as soon as you get the chance to post it so that we can get that badge under your name. Well done, sir. Well done indeed, so buckets off to you!1 point
-
Welcome back, Emma!1 point
-
Do not overfill, use less than you think you will need. I personally like to wet sand, but as you are going to need to paint the kit you can use 120 and work up from there. Add more paste as needed, and sand some more.1 point
-
Hi Eric, Thanks for your application and for the quick fix with the frown paint. You've clearly done your research - this is a phenomenal build! CRL and EIB Application Requirements All required photos are now in and, after review, we are pleased to welcome you to Expert Infantry rank. On behalf of Joseph and myself, many congratulations! Other-Armor Fit/Assembly In this area we review observations made by your fellow troopers and the DO team. Some observations may lead to suggestions to improve the overall look of your armor. Note that we consider both text (CRL) and pictures (screen caps/reference images) when reviewing submissions Starting from the top, although Anovos helmets come pre-painted and pre-built, looks like the trap decal is overlapping the upper ridge a bit. If you find yourself motivated enough, you could either replace the decal, or go totally screen accurate and paint the details. Reference Image: Continuing on with the helmet, we're suggesting that you sharpen up the paint on the vocoder to define the shape a bit more: The shape I've drawn in green is just an approximation; it doesn't have to follow it exactly. But if you compare to screen-used helmets, you'll see that the shape is a lot more defined. Reference Images: Next, just a dressing issue. It really cleans up the look of your armor to have the gaps equally sized and the armor pieces lined up. Especially viewed from the back, you can see the bicep/forearm gap on your left arm is larger than the right arm, so we're suggesting you double check the strapping and see if it can be adjusted to be more even. I might suggest bringing the left forearm up, as it looks like it may be running into the left handguard a bit. All in all very small details, but ones that really bring your armor to the next level. Reference Image: Next, just worth noting that on the screen-used TDs, the screws were a bit closer to the ends of the clips, and the ends were squared off, not rounded. I understand that Anovos armors also come with the TD fully assembled, so I'm simply mentioning it for your information. Reference Image: Finally, just a small detail that on the screen-used suits the shape of the sniper knee was a bit more angular than yours. Reference Images: Centurion Requirements In this section we prepare you for Centurion. More photos may be requested in the future that allow us to make better decisions on possible adjustments. If there are any areas of concern they will be discussed here. Because Centurion photos show much more detail than EIB, items to pertaining to Centurion might be seen there and not here. We try to point out all that we can from what is seen, but the final accuracy is the responsibility of the trooper. Starting from the top again, as Joseph already pointed out, the lower ear screws on your helmet will need to be replaced and countersunk per the L3 CRL: Ear screws shall be slotted, flat topped, countersunk and painted white. Reference Image: Next, the L3 CRL states: There should be a minimal gap between the shoulder armor and the chest/back plates. I believe it's largely due to the way you're holding your arms in the front photo as your rear gaps look pretty good, but we'd like to see if you can close the shoulder bell gap any more. This is not an area we're extremely picky about due to differences in troopers' body types as well as differing sizes of the bells from different makers, but one thing to double check is that you've removed all the lower return edge from the bottom of the bells, and when you take your Centurion photos, please take the front ones with your arms relaxed at your sides. Reference Images: Moving down, the L3 CRL states: The top of the ABS ammo belt should sit at or just above the bottom of the central and vertical abdomen button panels. Your belt is just a hair too low, so you'll need to raise it a bit. If you look at the reference photos, you'll see that many TKs actually had the belts overlapping the lower ab buttons. On my own kit, I added two small strips of velcro to my belt to keep the front from sagging. Reference Photos: Next, the L3 CRL states: A single male snap on the top right corner of the ab plate is present. This is also known as the 'Han snap', and I suspect it's present on your armor, but none of the photos you submitted showed it, so I'm mentioning it here. Reference Photos: And that's it! Once again, this is a superb build, and it's just a few small fixes to get you to Centurion. We hope to see your application, soon! Congratulations again.1 point
-
Hello Adam and welcome to FISD. Congratulations on your choice and BBB day. RS makes a very good kit. You have done your homework. Can't wait for your build thread and photos. Before you start building, please also check the requirements for levels 2 and 3. Just little tweaks here and there - but so much easier to make during the actual build, instead of later corrections.1 point
-
Completed the ab boxes last night, still need to trim the belt boxes though. I'll be using ABS paste for the first time soon on those bicep seams and the forearms. Hoping to not screw things up. What grits do people use to smooth out the abs paste after it hardens?1 point
-
Amazing job - very well done!1 point
-
Thanks guys! Riding on the shoulders of giants!1 point
-
Wow! Fantastic build.1 point
-
Amazing work Martyn keep it up !!!1 point
-
Great build and great looking application, very excited for you mate good luck1 point
-
AWESOME job on this armor, Jasper! Hang on sir... we will be with you shortly!1 point
-
Awesome, thanks!1 point
-
I’m starting to wonder, “How many TK builds will Justin start and complete before I even finish my own first build?” Haha. Looking forward to following your progress! Someday I’d love to grab an Anovos helmet myself and paint it ESB style. I love the crisp lines they have! Sent from my iPhone using Tapatalk1 point
-
The problem is that the print lines are visible. You can use a black "Filler Primer Spray" to hide them...1 point
-
I do have plenty of sharpies handy. Thanks for the tip.1 point
-
1 point
-
Honestly, I would try to find a better option...The manufacturer's name is in a very visible place. If you try to remove it and it looks bad?It will be money thrown in the trash ... Regards.1 point
-
I have seen some very impressive 3D printed E11 blasters out there David, you can always post some photos up to get feedback and may find there are no problems at all. If your finish is good you may be very surprised1 point
-
Here is another nice helmet build1 point
-
Mineral spirits would definitely be a lot more gentle than acetone, usually acetone doesn't work with plastic very well and can melt. I do love the black teeth and do get asked sometimes "why does that one look different", but only a few ask1 point
-
Hooks in on the shins.1 point
-
Hi Caleb, take a look to this thread, it's excellent for helmet build. for Shins closure I think this thread could be useful. ending page 4 for the Shoulder , could you please, post some pictures? cheers1 point
-
Ask over at the special ops detachment. They are the shadow trooper experts.1 point
-
Hi FISD staff, members and friends. I’d like to thank all the FISD staff for working tirelessly over the last week on this nightmare. I know it’s not a decision you and the other staff members have taken lightly. Believe me the last thing I wanted was to bring down a trusted vendor who I respected and trusted. But in his own admission of guilt has done this to himself. I’d also like to thank all members I have known on this forum for many happy years and members I hope to get to know, a heartfelt thanks for the overwhelming support I’ve had through this whole debacle. It really has been a humbling experience in more ways than one. THANK YOU ALL. Sent from my iPhone using Tapatalk1 point
-
Official Statement TM recast CFO JoeR helmet. Fellow troopers, Thankfully it is not often we need to deal with situations such as what has unfolded over the last week, with the subject of recasting one the Detachment has always taking a strong stance against. Our members are our priority, having you all feel comfortable with buying various products from reputable vendors and honest vendors falls into that mandate. We supply a trusted vendors list that brings that confidence to purchase and is governed by several factors some of which are, quality, reliability, accessibility, integrity, honesty and trust. This recast thread, the above factors and content within have all formed part of the tough decision making the staff has had to make. We feel the integrity and trust has been broken between members, FISD command staff and other vendors with one of our long serving armour suppliers. This is not a subject that the staff or I have taken lightly as we have poured over this since the initial post was made. We have looked at the very compelling evidence and we have seen the response from the accused sent only to the accuser. TM (Paul) has been given equal opportunity to respond directly and state his case here in this thread but he has chosen not to do so. The evidence has been viewed as irrefutable, and Paul's response to CFO (Mark) a full admission that this was done with ill intent. This has led the command staff no choice but to make some decisions and take actions in the best interests of our FISD membership. First decision was to have TM removed from our vetted sellers list. This does not prevent anyone from making purchases from him, we simply wont feature TM any longer. The second discussion was in regards to a possible forum ban. A poll was set up for staff to vote anonymously with four options: No ban, 6 month ban, 12 month ban and Indefinite ban. The top poll placed was the indefinite ban, so from this point forward an indefinite forum ban period will be put in place against Paul. Paul is not a 501st member so there is no maximum period a ban can be in place. An indefinite ban period also gives flexibility that if this or future command teams decide to lift the ban, that option exist. We are not sorry for taking this hard stance as I have stated our membership is our first priority and we believe they should be able to procure their costuming needs from vendors that uphold honesty and integrity. Thank you for your time1 point
-
IDK who Chad is, or really anyone else on here (but thanks for all the good threads and help I've received), but I see his point but I think it is an incomplete thought. If we are just talking about staff showing preference to a specific vendor it can set a bad precedent. I know some staff members are vendors and will obviously support and promote themselves, but if a staff member heavily promotes/supports a single vendor (as in they only promote that vendor no matter the quality, and ignores the existence of others) then that would not be acceptable in my mind. In that case I would be suspicious of some type of foul play, under the table deals, bribes, or other shenanigans. I am not accusing anyone of this nor do I expect to, but if it happens I would expect that member to step down from their position or to change their ways and to support all approved vendors equally. On the other hand, if a staff member guides newcomers like myself toward vendors who have a good reputation and deliver accurate and timely products, while not showing undue preference, that would be acceptable by my interpretation of the charter. Hence the approved vendor list. Once a vendor, 501st member or not, shows bad intent, is unable to deliver quality parts, or is shown to marginalize and degrade others work then they should be publicly removed from the vendor list. Their accusations should be laid out, and then forum members should easily be able to find why they aren't a good person to buy from. Nobody has control over what armor anyone buys, or what they do with it on the own time, except the person who bought it. If they want to paint it pink, or rainbow, or blue, or turn it inside out and wear it to walmart then that's impressive, but just fine. The legion, and the detachments, should make the accusations known, and if they are valid they should remove said vendor, and that's it. I have watched a recaster in the SLD get called out, get help, and is now back on the "approved list" for vendors (I think there is a list somewhere there, but it's a smaller detachments so they may not have an actual list, just recommendations). So it is possible, but in this case I don't see that happening. Now, back to the subject at hand. I really hope my comments aren't controversial, I just followed 40+ comments and figured I would summarize a little of what a lot of people are feeling, and also help get the thread back on subject. To sskunky, That totally sucks. I can only see a few minor differences (not been looking at white armor long, but I can spot a vader version from 100 feet away haha), but the ears and a few other tells makes me believe your accusations. Ive seen your work over the past few years since I started this hobby and I really wish this hadn't happened to you. I wish the best for you and your family. If able, I would find it easier to spot the similarities if you compared both of the helmets in the pictures to another vendor's helmet. The shadows and other small details you mention are just not visible to me yet. But I understand if you don't have the time/patience/desire/ability to do that. To TM (assuming you read this), I would be interested in what you have to say about the accusations, and I would like to see if you have any proof that sskunky's accusations are incorrect. If you can prove that you didn't recast this or any other items that you sell then I will happily refer people to your quality products and I hope others will follow. If there is no proof, or no response then me and (most of) the rest of the legion will assume you are a recaster and will try to keep current and future members from purchasing from you. The ball is in your court, I hope you don't drop it. To everyone else, HI! Thanks for all the help, I'm getting close to finished on my TK and the forum has been invaluable, as expected. Sorry if I sound uneducated in TK stuff, it's because I am , if you have any questions about Vader, R2D2 building, or MSE building there is a good chance I can answer them (or at least direct you to a good source) so please don't hesitate to ask. Keep up the good work, don't get the Rona, and I hope to see you trooping soon! LLAP (oh wait, wrong forum) MTFBWY (uhhh... nevermind, how about) Long Live the Emperor!1 point
-
The Galactic Academy is for ages up to 17, as 18 year olds can join the 501st. I myself am a member of the Galactic Academy, and I am 16 years old. It is a great starting point in getting involved in costuming and being in a group. Hope this helps!1 point
-
That what Zoom and Microsoft Teams apps can be used for to help out. You can see live video where people can help you with how everything sits and fits. We are here to assist in every way possible be it PM or Skype style video hook up. Sent from my iPhone using Tapatalk1 point
-
@T-Jay is 100% correct, John. They make a fantastic product, but they are horrible at communication. Even after you buy one, be prepared to wait a month (or more) for delivery, sad to say. I suggest going to their page that lists the item here and then adding your email address in the box on the top right of the page (example below). They will (eventually) send you a notification, but it's VERY important that you order it immediately. I waited one day for my second one and they were sold out again... it's just that fast.1 point
-
A lot of my garrison mates really like Brett Fullord's E-11. You can see a listing on etsy here: ------------1 point
-
Here's my finished pimped out armour transport:1 point


.thumb.jpg.77bd551337f7adc46a4b151e703df6be.jpg)