Leaderboard


Popular Content
Showing content with the highest reputation on 05/02/2020 in all areas
-
Yep. Pretty close now! IB Boots arrived today.3 points
-
It's always a relief feeling when the cavalry arrives @justjoseph63 @CableGuy3 points
-
The thigh ammo pack also only has a small amount of excess plastic above and below the raised ammo boxes; Hope these photos help. :-) Dan2 points
-
Here are yesterday's batch of resin parts, less the scope mount which was a complete disaster. I reprinted the scope mount and a number of other parts and they came out well for the most part. Slowly getting the hang of the resin printing. Requires a fair amount of thought at the slicing stage. You can also get unlucky and stuff will warp: I also got a few deliveries. I now have a full set of hardware (should be enough for 2 blasters, more for most screws) and what I hope will work for the torch. They are a fair bit bigger than the spec item but they are pretty bright and I think I can make something work. I've cored out the middle of the mount to accommodate it but the biggest issue is length. It's too long, but as I plan on making it work using the trigger I'll be gutting it anyway and possibly sawing it down. If I can saw one down I'll be able to solder on some wires and run it off the core battery. Also these have a focus zoom, I can choose from a spot to reasonably wide. I'm tempted to go for the spot option so if I am ever in the dark I can really use it to nice effect. I'll probably run off a new mount and ring and see how they fit tomorrow evening after the days armour print run.2 points
-
It looks like you shouldn't have a big issue with these, Caleb. The small one needs to be trimmed a bit to straighten the sides out but excellent job on the large one! It's probably the angle of the photo, but the top right looks to be extending past the raised ridge just a hair. SO glad to see that you have the corners squared and not rounded off. NICE WORK! Now that you have your magnets, you may be able to get these to lie flat and use E-6000 (generously) to hold them down. Any excess (seepage) can be easily removed.2 points
-
ONLY 5, 4, 3 2 1 SPOT LEFT, TROOPERS, SO TIME TO STEP-UP! 1000 Expert Infantry reached! Now that many of us are unfortunately stuck at home and boredom is beginning to take it's toll, it's time to wipe the dust off of that armor bin and become a part of FISD history! Instead of binge-watching re-runs, we are suggesting that you put the D.O. Staff to the test and spend some time on that white armor you miss wearing so much by applying for your Expert Infantry badge! As you may be aware, we are aiming to have #1000 approved by the end of the year. We only have 2 to go, so in order to reach that goal we are asking that you read over the CRLs for your particular armor, (this thread will help) make any necessary adjustments and post up your submission! Photo Checklist- Link here Apply Here Questions: 1. Not sure if I have what it takes to get my EI badge- You don't know until you try, and you have not only the D.O. staff but an entire Detachment to help! 2. I need some repairs/fixes first- This is why we are here! We honestly want you to succeed and are here to help in any way we can. 3. I am happy with the way my armor looks, so why bother?- It not only makes you look more screen accurate, it instills a sense of pride and "esprit de corps"! 4. What if I don't make it? No worries, we will provide detailed suggestions on how to reach your goal! Benefits: 1 Bragging rights for being one of the "Original 1000" 2. You get a cool badge under your name here on the FISD. (Street cred). 3. Access to EI rocker badges (coming soon) to go above your FISD patch (also coming soon)! 4. Access to coin runs for EI awardees only. 5. Certificate for your accomplishment. 6. You will have a more screen accurate looking set of armor, and be one step closer to Centurion!! 7. We are planning a VERY special piece of one-time-only FISD Exclusive merch to honor hitting this milestone! Know that the entire Staff and those who have reached Levels 2 (and 3) are here to help in any way we can, and that you are more than welcome (and encouraged) to ask any and all questions you may have here on this thread, or contact myself or Sha Sha. You can do it, Troopers. Let's turn this "anno horribilis" into a banner year for the FISD!1 point
-
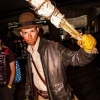
Hey everyone, name's Dave and just dropping in to say hi and introduce myself! Been a lifelong Star Wars fan, and growing up, the characters from the movies were my idols and heroes. Cons and cosplay weren't happening, and the big screen was where all my fantasies played out. Then a few years back I heard about a group called the 501st and what they did, and I wanted to do nothing more than to join. Sadly, being in the military in a time of war kept me from doing that. Well, just this past February I was lucky enough to be able to join the Parjai Squad of the 501st at Pensacon and trooped for 2 out of the 3 days as a Tank Trooper. I was hooked! Unfortunately for me, this all happened right before COVID-19 began sweeping the nation, and my build plans got put on hold. But I'm still researching and gathering the pieces slowly, and hope to be approved by this fall. First build is going to be a clean R1TK, then a Tank Trooper once the TK is approved. Got my Black Series helmet in Thursday, and can't wait to start the process! I've attached a pic from Pensacon this year, with me in Tank Trooper armor. Seriously the best time of my life. FOR THE EMPIRE!
 1 point
 -
1 point
-
More filling and sanding happened this week, and the weather is good today, so that means... Priming!!!! Priming!!! Priming!!! So glad to be at this stage of the build. I like this part very much; all the hard work starts to look like a thing now! I thought I'd share a little shortcut for painting parts. I'm sure some of you already know this tip, but for those who don't, this can help you with spray painting your parts! We all know that some parts are kind of difficult to spray paint. They don't have flat surfaces, or are just oddly shaped. This is a way to get even coverage and eliminate any drips. You'll need some craft foam, hot glue, and coat hanger wires. If you don't have craft foam, styrofoam works nicely, as well as cardboard. You'll want your pieces large/thick enough to put your hanger into. Make sure your coat hanger wire is kind of straightened out. Stress on "kind of" for me because I don't have the patience to straighten out coat hanger wires. Keep the large hook in one end, and put a smaller hook in the other end. Length doesn't matter. Hot glue your foam block right onto the armor. Make sure it's fully cooled before proceeding. Once the hot glue has cooled and your block is secure, put your small hook end firmly into the block. Fishin' for armor! It should look like this when you're ready to move outside to paint. Now hang the larger hook end from a branch, pole, or whatever location where you can spray from all sides. Lucky me, we have a nice tree right outside of our garage with some relatively low branches. The length of the coat hanger puts the part exactly at eye level for me to paint. Before and just a few minutes after, I've got the first coat of primer done. And I love seeing the chest plate finally look like one part instead of a bunch of smaller assembled bits. I have a bunch of these coat wires, but not enough to paint all the armor at once. While these dry, I can easily hang them in my garage. I will leave the foam glued to the armor until I've completely finished the filling/sanding/painting process, so I can quickly hook up my parts again when necessary for paint. Using the foam and coat hanger method to paint parts allows for quick, even, drip-free coats. It also makes for keeping the parts off the ground and clean while they dry. The foam easily can be removed from the armor once everything is all painted. At this stage, I'm also out of filler primer. Boo!!! More will be arriving next Saturday, so the rest of the armor bits will just have to wait for their primer coats. In the meantime, once the primer has cured, I'll be applying spot putty, wet sanding, then applying gloss white. Can't wait!1 point
-
I’m going to be getting some made and then added/filled on top Fear not1 point
-
I have learned so much a second build would be smoother. On the other hand, I’ve learned enough that I don’t think I’d ever want to do a second build. Andrew has been so helpful with this build. I look forward to showing you guys the finished product. Sent from my iPhone using Tapatalk1 point
-
Wow this is fantastic work Chris1 point
-
Nice job Scott. I like the spacer idea for the rail scope. Build is coming along nicely. The stamping is a nice touch to the bolt.1 point
-
Looking great, Shane! Speaking of snags, you may want to round off the tops of the biceps.1 point
-
You NAILED those thigh tops, Caleb. EXCELLENT!1 point
-
Well done for asking before cutting. You’ll need to leave some space either end for the belt attachment and button covers. See references below; ***Approximation only*** Whilst those type of diagrams are quite handy, I’d highly recommend checking out photos of the source material from the gallery; https://www.whitearmor.net/forum/gallery/ You’ll find all sorts of high quality photos in there, some of which I’ve posted below for reference. :-) Outer ends of ammo belt (in this case, the button cover is missing) Note that there is only a couple of millimetres above and below the 6 raised ammo boxes.1 point
-
Welcome to the legion trooper! Congrats! Sent from my iPhone using Tapatalk1 point
-
Also, Here is a better pic of the button plate.1 point
-
I can't say I did a lot of work the past 2 days, been busy with life and family, including replacing a garbage disposal... that was fun. I did get a few TK things done though. Both thigh front cover strips are in place, one of them I did yesterday, the other I did today so it's drying. The first thigh I did both the cover strip, and the backing strip at the same time, but the second I did just the front cover strip, ill add the backing strip tomorrow when it's dried. I also got one shin done. I'm glad I bought 30 magnets! and I just did the outer cover strip, ill do the backing one tomorrow I got some paint picked up as well I based the colors off of this post. Luckily the nearby hobby town had it, and they were open and taking phone orders I'm going to cut a few more cover strips once both shins are done and get started on the arms. When doing the biceps and forearms do you do one cover strip at a time, let it set, then do the other one? Or do you do the whole forearm/bicep at once and thereby making sure things are fully aligned? Both are doable, but why not figure out what's best right? I'm planning on doing just one at a time.1 point
-
Thanks Justin. I don't think I'm going to spray the interior with Plasti Dip since it prevents velcro adhesion, and I haven't planned far enough ahead to where/how I'm sticking everything.1 point
-
Looks like you're getting a handle on the resin printer, they look nice and clean.1 point
-
Congrats and welcome from Canada!1 point
-
I just used lexan sheers and my sanding drum to smooth things out on the lens. Oh and if you're gonna spray the interior, do that before cutting the vents - less masking. Otherwise sounds good and have fun!1 point
-
My commission build will take about 2 months. So pace yourselves people. I’m trying to make this TK1K EIB group!1 point
-
Sounds like your having a breakthrough David. Your doing great, Andrew won’t steer you wrong as will anyone here. Keep up the good work! Sent from my iPhone using Tapatalk1 point
-
I used to go crazy at the inconsistent armor from the film but I’ve come to embrace it, realizing guys like us were building the suits and we’d all have differences. I have heard two stories on higher level approval with the tab indicating that perhaps the rules have changed. I see no harm in submitting with the tab and removing it if I have to. I’ve learned so much with this build I’m good with anything. Sent from my iPhone using Tapatalk1 point
-
I'm doing my part!1 point
-
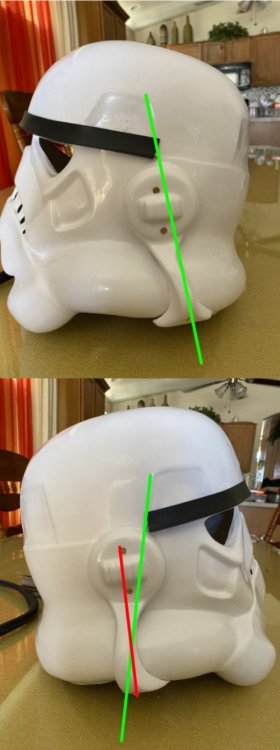
Hiya, Yes, the main discs of the ears still look a little thick. Personally, I’d consider trimming them down. Just from the pictures, and purely as an estimation, I’d be tempted to consider reducing the thickness of the discs by at least a third. (Only an estimate by eye-balling it). As another trooper also mentioned, the right ear alignment could be adjusted to better match the rear line of the trap. [emoji1303]1 point
-
Rowan is 100% correct on the ear screws aligning with the back angle of the trap. It doesn't have to be perfect, but as he mentioned the right one needs some tweaking. The gaps you have are fine, so don't worry about those. Alignment reference Gap reference1 point
-
For the sizing of your ears, I'm not so sure. That's more up to you, but I'll leave it to others to advise you in any way there. As for the placement, there are some things you can do for it to be more screen accurate. Those helmets had the ear screws aligned with the front traps, and your left ear is fairly spot on, the right one should be aligned to match though.
 1 point
 -
Working on it as we speak. Waiting on some deliveries to complete and then send pics for approval!!1 point
-
Looks great Scott. The additional clearance below the rail will help saving your receiver tube from scratches of the scope screws.1 point
-
Made some Scope rail progress tonight! When I was making the pin for the rear sight I had the brilliant idea to make it one piece so it goes all the way through. So it kinda goes all the way and seemed to be a slight hinderance for the scope rail. I decided to add a little spacer from the scrap aluminium to raise my rail to a more level appearance and compensate for that odd bump in the back.1 point
-
This is a great thread Chris, I'm pretty excited to see this all come together.1 point
-
Outstanding job on that, Robert! I will be with ya' shortly, so hang in there...1 point
-
Took a day or so off to organise. There's a lot to deal with in this project: about 17-18 armour pieces (made up who knows how many sub components), 2 blasters and a helmet that all need more planning than "that bit looks like a good one to do next". I went through all the blaster parts I have and decided what needs a reprint in resin. Modified some to make it easier to add electronics to them. Things like adding a switch on the mag holder, went for a bigger one to make it easier to use but in the correct place, and hollowing out the Hengstler to make more room. I now have a plan for all those and will slowly work through the list. Some parts will be grey as shown above and I picked up some black for bits that will be black to help with con damage. The first plate came out prefect but was ruined when I washed them. There was a build up of old resin in the cleaning tub that stuck to the new parts. This has now been filtered and so should prevent future mishaps. It was a bit cold today due to rain so will re-run that plate again another day. Picture for interest: on the resin front here is my UV curing "bucket". It's a Rogue One Popcorn bucket lined with almost 5m of 405nm UV LEDs. Don't look in there, it's bad for your eyes. I take care to ensure its not on when not covered. I also scaled all of the upper body armour to what I think should fit me. It's up at 105% in the horizontal planes, and no change to height. The scaling was done part using armorsmith, partly in meshmixer. Armorsmith I'm using for a "does this look about right all together", this is so that nothing ends up out of proportion with the whole. Whilst 5% doesn't sound like a lot it's better to be able to see it before you spend days and money printing. The actual scaling was all in meshmixer. I won't go into to much detail as the plan is to make some videos on this process but I need to figure it out for my self first. This shows all parts after import into mesh mixer, combining, scaling, separating and then finally renaming. I also did was a couple of sizing tests. I was a bit worried about if certain parts would fit me after my scaling. Rather than print 4 full sections at about 11-13 hours each and over half a roll of filament, I cut out a ring from the model in the area I was most concerned about. I have child bearing hips my mother used to say... This was then cut up to fit onto my printer and printed as fast as I could get it to. We don't need quality here, it's only a test. This hopefully shows what I mean, I've move the parts to exaggerate what I am doing. Once this was printed out, which took about 4 hours for all of it, I was able to super glue it together. You need to let the glue truly set, so leave it for a few hours or you'll just break the glue when you flex it. I also did a slice from the chest plate as a check for further up the body You can then use the slice as a real test of size on your actual body. Tomorrow I will start printing part 1 of 8 abdomen parts. I'm able to print about 1 a day as I only print during the day and only have a single printer. I've taken a short screen capture as an experiment to see how I will make the videos so you might as well get to see it. It's rough as I didn't plan on actually making it until I was checking my work at the end.1 point
-
Great photos! Clearly shows the AP button decals are correct in size and don't cover the entire bumps.1 point
-
Good luck Trooper,1 point
-
That's exactly how the originals were done, sir! It doesn't have to be pretty, just functional!1 point
-
I will add, and also have this added to Joseph original post, but there will be a very special piece of merch available for when we hit the 1000. Something to celebrate this auspicious occasion. It is already in the design phase, and will honor the old and the new. It will be a one off run as we only get to celebrate this milestone once, and I know you wont want to miss out.1 point
-
Pinned this thread1 point
-
I would love to be in the first 1000, unfortunately I’m only 16, and the 501st age restriction is 18 Oh well, I consider myself the luckiest guy in the world to even have stormtrooper armor1 point
-
I will try to apply next week... Sent from my LYA-L29 using Tapatalk1 point
-
Aiming to be one of those 37 as I blitz through my build!1 point
-
FIRST uniform piece arrived!! TrooperBay gloves. shiz iz getting real!1 point
-
That’s what I was thinking also. Thanks! Sent from my iPhone using Tapatalk1 point