Leaderboard


Popular Content
Showing content with the highest reputation on 03/13/2020 in Posts
-
Hello!!! I'm from the Spanish Garrison and I just want to be polite, and that's why I wrote the post to greet you all... I'm only 2 days old at the Garrison and I'm crazy for putting on the armor...But unfortunately, the horrible CORONAVIRUS( COVID-19), forces us not to leave home, to prevent it from spreading...Well, we will win this battle, I'm sure...I will be able to troop very soon... Best regards...Chemi.4 points
-
Here's what I came up with...
 4 points
 -
Hello... I just want to tell you, that is the first armor that I build from zero. I have tried to do my best and enjoying the moment. I also want to apologize for my English, I hope you understand me correctly and not make many grammatical mistakes... Thank you very much and greetings from Spain... TROOPER INFORMATION: Name: Jose Maria Username: Chemi TK-30173 Spanish Garrison Height = 1.84m Weight = 93Kg 501st Legion Member Page: https://www.501st.com/members/displaymemberdetails.php?userID=32315 ARMOR INFORMATION: Armor Maker = AF Props - Kit Helmet Maker = AF Props - Kit Blaster Type = E-11 Made by AF Props Boot Maker = Dakota Boots Canvas Belt and holster= AF Props Kit Hand Plates = Rubber latex plates with Rubber Gloves Neck Seal = AF Props(leather) Best regards...3 points
-
My parcel arrived today, everything accounted for, along with other bits I have been stockpiling for this build: Hope to start on the helmet soon!2 points
-
Wow! these are actually super helpful! thank you2 points
-
Yes! - I did it. It was a lot of hard work and attention to detail to get here but totally worth it. I'm ecstatic to join your ranks as an FISD Centurion and to represent my Georgia Garrison as it's newest L3. I could not have done it without you. This forum has been an invaluable resource to me and I relied heavily on the tutorials, advice and feedback posted by members of our detachment. As a new member I read as many forum posts as I could by members who had achieved the rank of EIB and then as EIB I read all I could from members who were Centurion. Every question I had, every concern / issue or obstacle had been experienced before by everyone before me. If you all had not taken the time to document it or to put together Tutorials and PDF's for others benefit I might not have gotten here as quickly as I did. So... I'd like to say Thank You ( to everyone ) for your guidance, support and encouragement. You are all certainly an inspiration to me. Troopers Helping Troopers2 points
-
Back in 2009 or 2010 I got into playing the Battlefield series games online, and wanted a new screen name which wasn’t related to my previous Lord of the Rings obsession. At that time my go-to name had been “darkelf,” but I wanted something less fantasy-like for my WWII and modern warfare gaming. I decided on a variation of my last name (Mask), and thus became known as “MaskedVengeance.” Fast forward to a decade later in 2019 and I figured the same name, though a bit lengthy, would work for Legion purposes. From time to time I may also refer to myself as “MV” for short. Or you can call me Caleb. =)2 points
-
Thomas Hagin TK-61601 Florida Garrison Everglades Squad Required Armor = Armor Master Helmet= Armor Master Blaster= Praetorian Blasters Optional Boots = Imperial Boots Canvas belt = TKittell Hand Plates = Joesph Neck Seal = Darman Holster = Darman Note: I am aware of the fitting issues at the moment. Mainly the overlap of the back plate and how the posterior plate pops out. I'm also going make mobility cuts. am currently working on fixing them. From what I've read this should affect my EIB application since its classified as fitting. This is my first hard armor costume, so I except I'll have to fix a few things. Thanks in advance! Front Back Left Side Right Side Action Shot Belt Front Belt Back Belt Note: My belt has two snaps on each side, I had to add two new snaps to make sure the belt sits right on my armor. The originals didn't. The new snaps have black dots next to them. Thermal Detonator Screws Det Note: The clips were too long, so I had to trim them. Also these screws are from Joseph's screw kit. Cod and Posterior Plate Attachment Note: The posterior plate has a crack in it, it is not visible when armor is worn. Abdomen Details Ammo Pack Rivet Ammo Pack Rivet (Inside) Knee Boots Interior Strapping Neck Seal Front Neck Seal Back Blaster Right Blaster Left Blaster D Ring Helmet Front Helmet Left Helmet Right Helmet Back Lens Hovi Tips Ear Screws1 point
-
Congratulations trooper1 point
-
Congratulations and welcome aboard trooper, hope everything calms down soon with the covid 19 virus, best wishes1 point
-
Nice work trooper, however looks like your large ab plate needs rotating. You could reduce the gap between shoulder bells and shoulder straps. TD screws could be closer to the ends of the clips Good luck with your application.1 point
-
Excelente Chemi, buenas suerte con tu aplicacion a EIB !! Great Build Chemi, Good luck with your EIB Application !!1 point
-
Bienvenido a la Legion !!! Los mejores deseos para todo tu Garrison en este momento complicado para todo el mundo. No es el mejor momento para Troopear pero La salud en primer lugar, ya vienen tiempos buenos. Saludos Welcome to the Legion Trooper !!! Best wishes to all your Garrison at this difficult time for everyone. Not the best time to Trooping but Health first, good times are coming. Cheers1 point
-
For me , the Helmet is the most challenging part of the armor build process. Keep on doing a great job mate. Cheers1 point
-
Its BBB day from 850 armorworks!1 point
-
Stick with it, mate. You’ve done a really good job with the mods here! :-)1 point
-
Thanks. I’ll be honest - I’m struggling to work out what going on. Might just be the shape of the molds. The right eye is quite a bit lower that the left, yet the cheeks/tubes seem to follow from front to back (suggesting that that’s where they’re supposed to sit). (?) Honestly, I’d say if you’re happy with the overall look, just leave it as is. If you’re up for a challenge, you could take the two parts apart and experiment with the faceplate/back and cap alignment. :-)1 point
-
HANDPLATES Pretty straightforward. Cut them to shape, and I drilled out the pillbox so I can back it with a black styrene later. And after priming, it's done.1 point
-
Congratulations Trooper, welcome to the ranks.1 point
-
Here you go , I was just adding the frown mesh so don't mind the magnets1 point
-
Not trying to throw a spanner in the works, but, don’t forget that there are two things that affect how the brow sits. 1: how the actual brow (part of the back&cap) is cut 2: how the face plate is mounted. Before I carry on, don’t think I’m saying that you should make changes - this is just information that you might choose to look at. :-) Although the angles are not exactly the same, the below compares brows with Han’s hero helmet. As below, the blue line shows how the moulded line on the back & cap usually* runs parallel above the eye sockets. Red line indicates the eye socket portion. *each helmet was hand made and slightly different; however, this is common across many, many helmets in ANH. Here’s another hero helmet as an example; The blue line shows how many brows had a slight lift at the brow compared with the imaginary green line. In this example with Jonas’ helmet, the actual brow (part of the back & cap) appears to dip down on the right hand side (left hand side does not). If you have photos from a few feet back (perhaps 5 or 6 feet) like the below, we can advise a little more on the brow. Best wishes Dan1 point
-
But it makes all the difference1 point
-
Way to go Thomas! Yes, mobility cuts are perfectly acceptable at all levels as they were seen quite a lot onscreen. Just make SURE not to cut beyond the top part of the ridge on the thighs or bottom part of the ridge on the calves.1 point
-
The Hero brows generally sit a bit lower than the Stunt, so it doesn't have to be a lot.1 point
-
Welcome back, Philip, and thank you for your Centurion application. CRL and Centurion Application Requirements: All required submission photos are present. Beautiful job on your build sir! . We are pleased to announce your armor displays all the necessary requirements as set out in the CRL. On behalf of the D.O. Staff,congratulations and welcome to Centurion! Way to go, Philip! You really did this armor justice, brother, and thanks for the updated pics. Now get out there and show off that shiny white armor as the newest Centurion in the Georgia Garrison!1 point
-
Lots more costume fun to be seen in the upcoming release - exploding thighs, popping wrists and more! Sent from my iPhone using Tapatalk Pro1 point
-
Now I see it.1 point
-
I would use a balaclava that goes up to the upper lip and skip the mesh, helps a ton with airflow. Also, don’t forget to fix the brow.1 point
-
You can see his gasket spilling out here... And screen ready here... Sent from my iPhone using Tapatalk Pro1 point
-
Ah so it is between ANH or ESB. Thanks for the heads up! I think I will go for the ANH variant since I am interested in the Heavy Weapons variant. Also just submitted my application at the garrison website. In the meantime, just need to plan out and ready the materials I need to at least get started on the helmet. Thanks again guys for your assistance!1 point
-
I wonder whats going on with this bicep? Cut down for stunt work?1 point
-
Congrats!1 point
-
Absolutely. Well, my official answer is to check your Garrison rules - for example, ours is supposed to be cleared with an SL, GML, or at least POC depending on what type of CRL variation you're talking about. Wanna wear binders? Just make sure the POC doesn't care. A pauldron or like seasonal decor like a Santa hat? Maybe clear it with an SL. Wearing a whole costume before having it officially approved and added to your profile? A GML needs to give you permission. Different black gloves? I honestly don't even ask. As long as the gloves you wear are all black and don't detract from the costume, almost no one is ever going to care. Some events that are higher profile (think sporting events where you might be on TV, etc.) are strictly CRL enforced. Most... aren't - and your comfort is more important. I wear my chemical gloves for Centurion photos and HPEs and I wear a pair of light Amazon running gloves for everything else. Official answers may vary. And if you're going to get R1 gloves, get Endor Finders1 point
-
Was delightfully mischievous in my youth and was called a rascal (at best) often, so I kinda just owned it and it became a nickname. When this song came out, it cemented that as my username on pretty much everything since I started using computers.1 point
-
I put my mesh in with E6000, just on sides and let the middle hang free. Never had an issue with it but even months later notice it is still a little sticky. Sent from my iPhone using Tapatalk1 point
-
Many thanks!, that's a good info Sent from my GM1900 using Tapatalk1 point
-
As it's a interior strapping recommendation. It wouldn't affect a Centurion application. As long as you have snaps and rivets in the right spots outside. How you strap it together on the inside is up to you and isn't judged. IMO I recommend using the double snap method. A little insurance never hurts.1 point
-
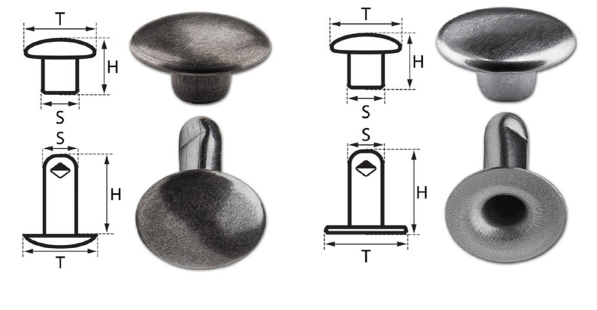
You can use them to attach the ammo thigh pack , the single ones are more screen accurate but these are not a requirement. the crl states for level 2 OPTIONAL Level two certification (if applicable): Thigh ammo belt is attached to thigh with a solid head rivet, painted white, in the upper corner and fastened to the lower thigh ridge. The rivets used shall be single cap, double cap or split rivets. No pop rivets allowed. Rivet should be approximately 5/16" (8mm) in diameter (exterior). cheers
 1 point
 -
Congratulations Thomas1 point
-
Great news!! Many congratulations. :-)1 point
-
Great news, congratulations and welcome to the ranks trooper1 point
-
Congratulations Trooper !!! Welcome to the ranks.1 point
-
Mics painted: NOW I guess I'm done with painting the helmet! Full helmet: Next up, installing frown mesh and visor. Is E6000 a good tool for that?1 point
-
Thanks for all the advice! I also emailed RS for advice and they are sending me a new chest piece. Awesome people! I used the t-shirt and superglue method to re-enforce the cracked and weakened areas, and have trooped a few times since then with no issue. I also ground away some of the bottom of the backs of my thigh pieces which made a huge difference. Thanks for all the advice!1 point
-
Nice to see you doing this Brien. I will be doing the same thing shortly. I ordered my Hero stuff from TM back towards the end of November which will also be arriving soon. Enjoy the mods.1 point
-
TK-92019 Reporting for duty. So proud to finaly reach this goal and be part of this awesome organization. Having a busy life, it has taken me 2,5 years working on my TK to get it finalized. The dream of joining is a lot older then that, so the road has been long. I am in the Outer Rim of Norway, and the foothold for the Empire here is fragile. In my city we are only 4, me included, to uphold the order in this region. Working hard to increase our numbers - in this part of the Nordic Garrison - the great city of Bergen. My wish TK ID was a risk - but i asked for 92019 becuase i had the Episode 9, 2019 premiere as my goal to finish. I made it with just a few days left, and the premiere being my first troop. We had great fun and my armor held up, didnt pinch too much and looked great. Photo of yours truly included. Btw: I have perfect aim!!
 1 point
 -
Congratulations trooper !! Nice picture1 point
-
The emperor is proud of you and welcomes you to the empire!1 point
-
Congrats and welcome! That pic is awesome!1 point
-
I sell the single cap rivets as well as the split rivets. If you need both sets (10 split and 4 single cap) the total cost with shipping (in the U.S.) would be $5.00.1 point