Leaderboard


Popular Content
Showing content with the highest reputation on 10/23/2019 in Posts
-
Just got an update on the class action lawsuit and due to the judges decisions the only states that will be covered at this time are California, Florida, New York and Washington.4 points
-
Major plot spoilers: 1. We will all watch it. 2. Most of us will enjoy it and watch it again. 3. There will be a few parts some people may not like, and they will wingh about it forever 4. Star Wars will live on, and the Legion will keep going, 'cause it's just that cool.4 points
-
That’s good news for those states, interesting to see if others are covered in the future. The compensation will certainly also be an interesting part of this long drawn out story. Good luck to all those still seeking satisfaction, and thank you for the update. Sent from my iPhone using Tapatalk2 points
-
Good to see another AM armor kit you may want to peek at my submission that's under review just a few down on the list. Will give you some ideas on what they will be looking at. One that I had issues with was that Gap in the sides. Good luck with yours.2 points
-
The biceps close ok though I should’ve done a better job glueing the inner cover strip. Getting glue consistently all the way to the edge of the bicep half was important and I missed some. It’ll probably be ok but if I had a second chance..... i also just started trimming the back and yoke. It’ll be interesting to see how many ways I can mess that up.2 points
-
Come on Angel, brother !!! You have the centurion range on your shoulder !!! Enviado desde mi iPhone utilizando Tapatalk2 points
-
WARNING: The following content may be controversial! DISCLAIMER: These are my opinions from years of experience, pure and simple. Over the years I have noticed many future Troopers doing an OT (Original Trilogy) TK ask about return edges before, during (and after) their build... If this is a subject that you are curious about, grab a cup of coffee or a tall glass of frosty blue milk (this is a long post, lol) and read on.... QUESTION: "What are they, what do they do, and should I leave them, trim them down some or remove them"? ANSWER: Return edges are part of the molding process and provide strength in certain areas on the edges of your armor. They also provide a heftier look to some pieces. To help you decide whether or not to keep them is why I started this thread. Here I will attempt to go into a few details about them. Know in advance that as mentioned I personally am NOT a fan of them in many areas for several reasons (listed below). Some people love them and some may disagree with my opinions... many of you may trooped for years with no problems which is AWESOME, but many folks have had issues and questions. 1. In most areas they are not screen accurate- In looking at the screen caps and film used armor photos below you will notice their scarcity. 2. They can (and in many cases will) get very uncomfortable- Many folks like the "thicker" look it gives their armor, but they can cut into you, especially in the area where your arm bends ("armor bite") and the groin area (chafing). As Troopers we do a lot of walking and arm bending carrying a weapon, so keep this in mind. 3. If aiming for higher levels they can cause fitting issues- Examples: A. If you leave them on your forearm openings and glue on the cover strips, they will need to be completely removed at the wrists for Centurion level, making the opening too wide. This can lead to you having to remove the cover strips, reduce the sides of the forearms and re-attach the strips. Quite a pain in the posterior plate to say the least. *** See EXAMPLE 1 below. B. If they are overly thick on the bottoms of your shoulder bells, they can prevent them from lying snug against the biceps. 4. They can cause splits/cracks- Especially on some armor areas. ABS is designed to flex, and in some cases a small amount of return edge is fine, but too much can cause stress on those areas. *** See EXAMPLE 2 below Over time that stress will take it's toll somewhere, and that is usually the return edge. Anovos armor is especially prone to this on the sides of the chest/back plates and neck openings. I suggest shimming these on the rear with ABS strips and E-6000 to prevent it. Let's start with the chest plate: Note how the ones below (including the back plate) have either no or minimal edges with no cracks or splits. Now here is a screen used one with a pretty prominent edge, Notice the stress crack. Now, onto the ab/kidney/back plate: To keep them in line and prevent them from overlapping, it is suggested that you LEAVE a fair amount of the edges on the top/bottoms of the kidney and bottom of the back plate, especially if using the "classic" strapping method. Yes, these can split/crack as well but not normally. Shoulder Bells Trimming off the entire edge on the bottoms is not only screen accurate (first two photos), it allows them to rest close to the bicep (bottom photo). Third photo shows "suggested" trim lines (red) of an untrimmed bicep. My recommendation is the blue line. Biceps/forearms For sheer comfort and a sleeker look, I recommend removing ALL of the top and bottom edges before fitting/gluing them. First, no one sees the tops (covered by the shoulder bell) and the bottoms can cut into your arms (armor bite). Suggested cut lines in red. Again, if you do get armor bite you will have to take them both completely apart, remove the edge and re-fit. Better to think ahead. Some (myself included) like to leave a bit of the return edge on the outside of the top of the forearm for a thicker look. However, I highly suggest removing all from the inside part (the "scoop") where your arm bends. Again, an armor bite issue. This should also be done BEFORE final fitting. Here are some screen used examples: For level 3 (Centurion) all of the return edge on the wrist opening must be removed, including the area inside the "hump" as seen below: Posterior (butt) plate: Again, it is suggested that you leave some of the return edge on the top (and bottom in most cases) to keep it from riding under/over the kidney. Now, the BOTTOM of the posterior plate is where we often find splitting issues. Should you leave some return edge? Sure! BUT(T), when trimming the corners, (see below) be SURE not to give it a sharp angle... this is where the trouble usually starts. Instead, give it a slightly rounded angle (as shown in green). Thigh tops The tops of the thighs are where we see a lot of questions. I recommend removing all the return edges from the entire upper parts, and here is why: As mentioned above, you will be doing a lot of walking. If you have the edges (or at least a large portion of them) intact, the friction and inside facing angles can really chafe the heck out of you, especially on the inside of the groin area. (Ouch). If there are sharp edges/points on the tops (below) these will poke into you. When trimming these, just follow the existing line. Also, if you do your final fitting, glue everything together and find this out afterward, you will have to take the entire thing apart, remove the return edges, trim down the sides and then re-build/glue them back together. The reason is that afterward the opening will be entirely too large and you will have a giant gap all the way around. Not a good look. Easier to do it beforehand, trust me. As seen below, there were no return edges (or at least minimal ones) used in the films. Sniper knee plate The bottom of this piece is an area often not trimmed enough. To allow it to sit flat (or very close to flat) against the top of the calf enough for the glue to adhere properly I suggest removing most if not all of the bottom edge. Note how in the first and third photos how the sniper knee is parallel to the front of the calf. Last up, a photo that best illustrates my point about return edges and how they were not really present in many places on ANH armor. *** Example 1. of what happens when you have to reduce the return edge(s) after attaching cover strips. NOTE: For the example below I am using an ATA bicep (first 3 photos). Be aware that ATA makes the "suggested" cut line on their return edges pretty slim (a GREAT thing in my opinion). As seen on the armor in the 4th photo, if followed, the "suggested" cut line makes the return edges much wider (red line). Top view Bottom view For the purposes of this tutorial, we will assume that the ATA has those wider suggested return edges. Okay, let's say you really like the thicker look the return edges give your armor, so you left them pretty wide during fitting and then glued on the cover strips. Enough to get your arm through with a little extra room. Should be good to go, correct? BUT, you find that after having your arm bent for a while they cut into you (armor bite), so you find you have to reduce or remove most or all of it. No biggie, right? Just break out the Lexan scissors or Dremel and cut away, leaving the cover strips attached. Easy! So you remove it and then you run into the fact that the opening is now enormous. This is not a good look, and can result in the piece(s) jangling around and not being approvable at higher levels (or even Basic depending on your GML). What I am getting at with the above info. is that if you decide to remove them, it's better to do it before final fitting/gluing. Side note: Many biceps have an unusual shape at the tops (in red, below) normally located on the inside. This can be completely removed. Doing this will not affect approval at any level, and is screen accurate. It sits under the shoulder bell so no one sees it anyway! Screen used bicep USELESS TRIVIA: Many have asked about the "thumbprint" that many armorers have on the left bicep (screen used example below). Some think it is so you can tell them apart, but I was speaking with Brian Muir a few years ago (he sculpted the original armor used in ANH) and asked him about it: "To be honest, I have no idea... it was not in my original sculpt, and must have been a mistake in casting". There you have it. *** EXAMPLE 2: What causes cracks/splits: ABS bends pretty well, just as it's designed to. BUT, when there are return edges involved that changes the game. For the below example I used a 2 inch wide strip of ABS with a 1/2 inch "return edge". Looks pretty solid, right? That's because the edge provides stability. Now I am bending it up/in to simulate use over time. (More than it normally gets bent in many cases, but only to prove a point). That stress has got to go somewhere, and it's the return edge that takes it all and gives way, again causing cracks/splits. The red arrow shows a weak area where the stress in concentrated and cracks can form. Even if trimmed off afterward that area will be prone to splitting, so a small shim behind it is suggested. To sum it up, return edges are not meant to bend a lot. I suggest inspecting your armor occasionally to spot any existing/potential cracks/splits so that you can catch them before they get worse. I hope this helps answer any basic questions you may have, and always feel free to ask more detailed ones here or offer differing opinions.1 point
-
Resin blaster from Branfuhr Studios.1 point
-
Really!? YES!!!!!!! I'll wait to the rest of the O.D Team and hope they see it ok too. Genial!!! Me esperaré al resto del O.D Team y esperar que lo vean bien también.1 point
-
Including all those waiting on their Kylo’s since 2016! Sent from my iPhone using Tapatalk Pro1 point
-
As I see in the other EIB approved armor, the knee is not aligned with the top and it's a bit curved in the frontal angle, not like mine, but a little bit. I'm trying to make the changes, but I think it doesn't pass the CRL. I will put the knee like the last attempt.1 point
-
You may try by trimming all the return edge of the lower section, this will allow you to level the alignment. below is another SDS Approved EIB, you can compare Algo que suelen recomendar en muchas casos es quitar el return edge de la parte dabajo del sniper Knee para poder alinear mejor . Abajo hay otro EIB aprobado con SDS1 point
-
This trailer was the one that finally got me hyped for it! Hoping for a Kylo redemption arc personally. Neat to see Endor again.1 point
-
Good, good.....1 point
-
Thanks for your feedback! I plan to work on belt and sniper knee when time allows.1 point
-
You need to upload your images at a hoster like imgur and then paste the direct link to your picture here. https://www.whitearmor.net/forum/topic/42381-howto-post-images-in-threads-using-imgur-easy/1 point
-
Yep, it was glued, so now I'm correcting the position and then I'll glue again1 point
-
Copy. I’ll get on that as soon as I can! Thank you!1 point
-
Take some pics showing the left/right side and the front amd make sure they are taken straight and not at an angle and also not so close up as the ones you already posted and I can have a look, from what I can see it looks like there are some glue to clean up1 point
-
Thanks for the shout outs Mario David (yay! Another Dave in an SDS...) Lining up the knee is a bit of a pain, but doable in the SDS. My link function to my Hero build is not working while on my work computer. Just go under my ANH Hero build, TK 98695. I lined up the center of the knee so it was perfectly level, so not angled low left to right. I clamped it temporarily without gluing. I then made sure the top left and right of the knee plate ran along the top edge of the calf armour as per the pics above. It won't be perfect, but you should be able to get close. I made a very light pencil mark on the front of the calf where the bottom edge of the knee would be. I then applied E6000 glue only to the MIDDLE portion of the knee, and clamped it in place and left it for 2 to 3 days to make sure the glue was set. After the front was glued, I glued the left and right "wings" of the knee plate down, and left it for 2 or 3 days. Hope this helps, and keep up the good work.1 point
-
Adding this to our reference links, and may be the Attache Tip for next month. Joseph, thank you for continuing to be an incredible source for so many trooper hopefuls. edit; I see that it has been done already! Nice!1 point
-
Looking good Derek, just a little work and you're there.1 point
-
Looking good. I’d follow the advice of those that have commented to get your armor looking even more sweet. We hope to see you at EI and Centurion in the future.1 point
-
Maybe the lawsuit will force Anovos's hand throughout. Might even force the mouse to step up and deal with the situation.1 point
-
3D printing is an option, but honestly not a good one for Stormtroopers. It's easier for some other costumes, but the suits were originally vacu-formed, and look best when that construction technique is followed. It would be a LOT of work and hundreds of hours of printing, sanding, and painting, and just not worth any cost savings you MIGHT get (probably not even). We do have a 3D printing section here on the forums you can check out, but it just isn't really practical for doing a whole suit. Custom lenses would be extremely expensive and probably not even work due to how they're positioned in the helmet. Visibility is never great anyways, but some guys can cram glasses in there. The best answer is contacts.1 point
-
I thought in SDS in line wasn't so accurate. Fortunately, it wasn't stuck at all...

 1 point
 -
"The saga ends, but the story lives on forever".1 point
-
Hi Derek great to see you going for a second EIB award We need you to do some work before that can happen though, as per CRL the armor is lightly scuffed (battle worn) but not weathered like a Sandtrooper. Your is currently to heavily weathered and we need you to tone it down. Look at the CRL model and the recently approved HWT applications to see what to aim for. Newspapers soaked in water and then rubbed over the armor can have a nice effect. I also like to have a close up of the ab button paint so I can take a better look. The armor itself is looking good so it should be smooth sailing ones you "cleaned up"1 point
-
I agree with everything you have all said. I watched the trailer, I felt emotions, and I am so excited and saddened it will be the last of the Skywalker series.1 point
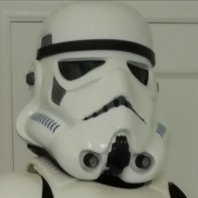
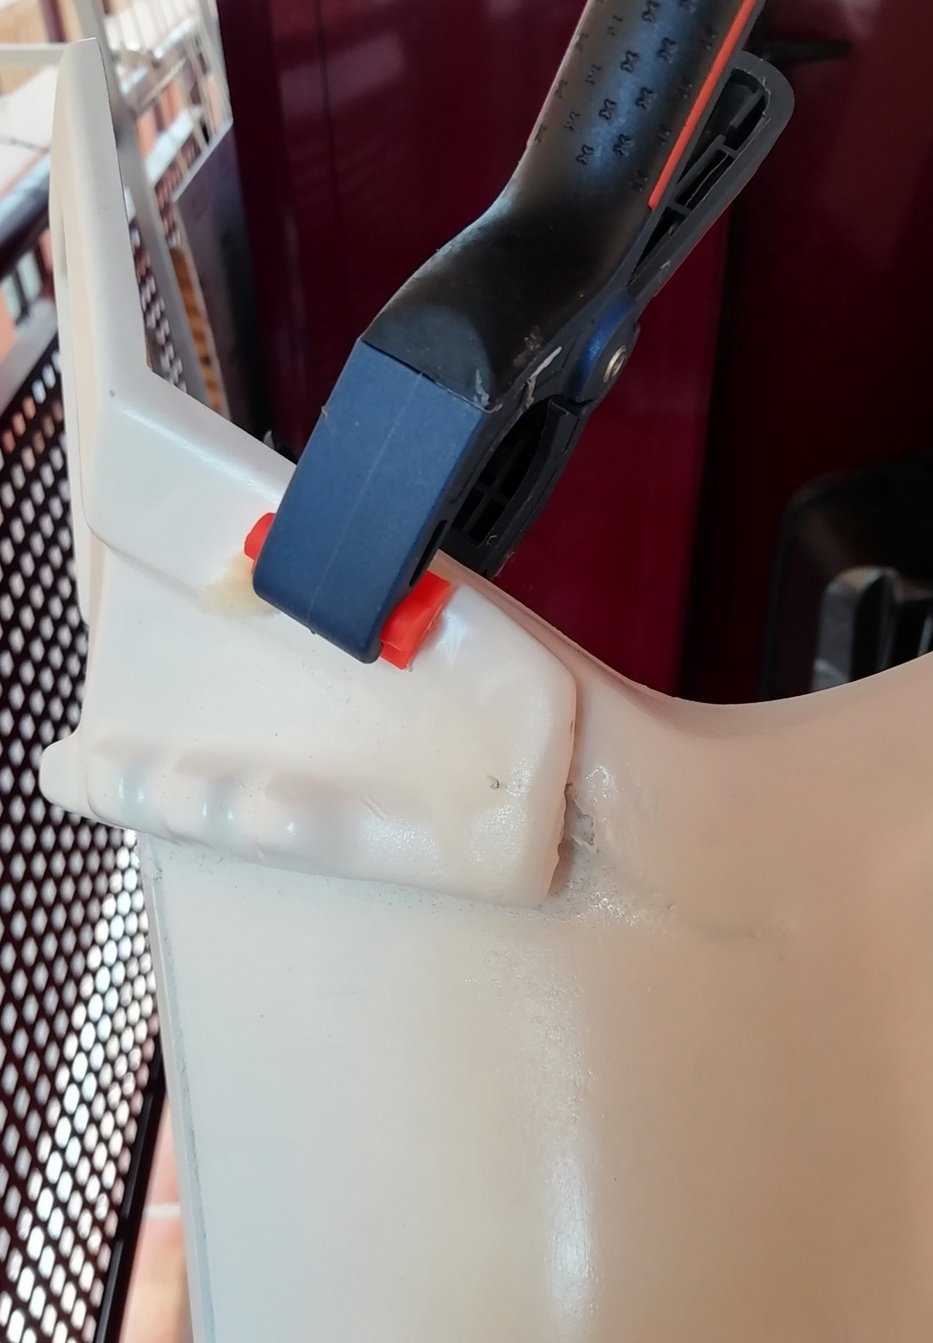
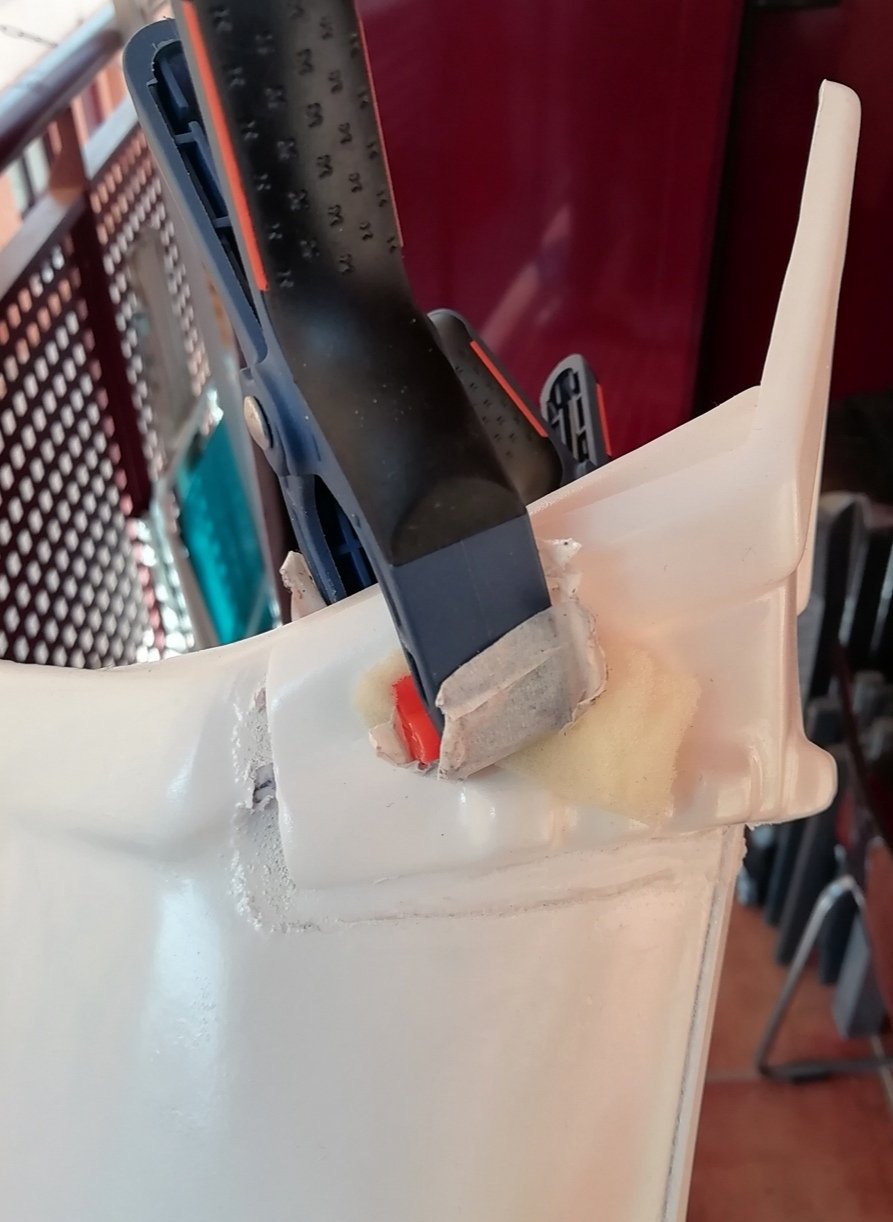
-
ABS paste will be used later, hopefully to cover up bondo in the seams. Torso work tonight, doing test fitting Trimmed. Looking at possibly cutting further down for the neckline, so I traced a possible cut. Back of the Thermal Detonator to be matched with the rails which....doesn't fit. Looks like I'll modify the inside rails. The middle piece, which joins the yoke and back plate. Trim lines get a bit faint here Applying pressure to line up fitment with the yoke, which is pretty good. Seam will need to be filled., with reinforcement underneath. And then lining up the back piece. Not sure if it should be place all the forward to the edge, or it its slightly away from the edge, as shown.1 point
-
Hi Jose, To echo what others said onFB, it looks like your main armour is acrylic capped ABS and the new parts look like standard ABS. You could see if your supplier offers acrylic capped parts in the larger sizes?1 point
-
You mean on the sides to add strength? I think I’m going to add some extra around those areas as I’ve seen lots of pictures of cracking1 point
-
Hey Fredrik, nice to see you back at it Measurements don´t need to be exact, for L2/L3 the posterior plate needs to have 2 male snaps present. Put them roughly in the proxemity of ref pic provided and your golden1 point
-
Yeah, I'm thinking the same thing. Great work so far! You know seeing all those magnets, I wonder if at some point we'll see people using those instead of snap plates to do connections between such things as shoulder bells, etc.?1 point
-
How does this explain why the kits aren't shipping when the few kits that did ship a few months ago did not have gaskets or helmets? If they were shipping them before without gaskets why did they stop? Show me proof that a single kit was shipped with gaskets. And WTF why would they have more kits than gaskets when they have had years now and countless delays to get the same number of gaskets as kits, is it that hard to count? I am sorry but even though I have supported Anovos from the start and held out hope at this point with another missed deadline and more excuses this is straight up fraud. I hope the class action goes forward and they lose their asses. In no way, shape or form should this company be allowed to continue. At his point I really don't care if I get my stuff I just want them to be shut down so they stop screwing people. This will now be the 3rd halloween that I do not have my Kylo Ren from Anovos and at this point my son has moved on and isn't even into Star Wars anymore and that I will never be able to get back. So yes I have gone from an Anovos cheerleader to being very bitter towards them and will do all I can to help others avoid them.1 point
-
Awesome work on your armor Robert! I have been following your build journey and know the challenges you were faced with. You haven’t give up and pushed on through to get your armor ready for this stage which is really the best part as it gets you into the legion. Wish you the best of luck with your application and can’t wait to troop with you soon! As mentioned above the forearm trimming will help reduce the bite. If you are apprehensive to take a chunk off right away, I suggest doing it in small stages so you can see if it’s the look you want to keep and also the comfort factor. I did this approach with a few parts of mine and felt more at ease than trimming lots off at one time1 point
-
Looks like his helmet is about to fall off lol. Sent from my iPhone using Tapatalk1 point
-
Cool, Easy Basic pass mate !!1 point
-
Nice job, Robert! As mentioned above, you will probably want to trim up the forearms. Those bit can either dig into your skin or cause the forearms to rotate a bit while trooping. You may even want to lower the forearms a touch. Approval will be a snap.1 point
-
I have a dog named Sandy (Sandtroopers) and a cat named Mara Jade.1 point
-
You can do it Angel, almost there.1 point
-
Amazing what a bit of a rant can accomplish..... Doesn’t look like the cleanest of casts but I’ve nothing to compare it to. Lenses were included, but what do people typically use?1 point
-
We have a new green-cheek conure that we named Neeku after the character on the show Resistance1 point
-
Very nice work, shouldn't be any issues for basic, then a few tweaks for EIB. Good luck on approval1 point
-
Good to hear you got it working. Could you share/show the one that worked?1 point
-
Hey Jonathan, Welcome to FISD1 point
-
Welcome, Jonathan. I read that you said you have a helmet. Do you know who made the helmet? I do not want to discourage you, but if it is not from one of the vetted vendors, it may be difficult to get approved with that helmet. I have an older armor kit and the helmet that came with mine had to be replaced by an updated helmet because of inaccuracies. Again, I do not want to discourage you on your journey. I want to make sure that you understand as everyone is saying this is not a cheap hobby and getting something that is not from an approved vendor may be possible, but it will be scrutinized much more than vetted vendor. Good luck. We are all here to help with questions.1 point
-
Veering away from the detonator for a bit........ Did some research on the threads about screen accurate gloves. Found an informative thread stating that black marigold cleaning gloves were used on the original screen used outfits (credit to Troopermaster) the palms and finger nail area have a texture to it. I found some gloves that look very similar to the marigold gloves (including texture on the palm and finger nail area) but alas they felt too roomy for me and most gloves I have found come in medium or bigger size. I decided to do more searching and ordered these bad boys online. They are a little smaller and the texture in the palm is a little different. There is also no texture on the finger nail area but it fits me better and I like it: THUMBS UP!!! Also got glove liners.....I tend to sweat a bit more than the average human....so this is a must as per the forums. Gloves still fit while wearing the liners. As soon as a get my flexible hand guards I can glue them on.1 point
-
Trooped the Mothman Festival this weekend and got my strapping to sit better and more secure. Was able to get a few 3 hour long stints in armor even with the heat in the upper 80s. Mobility in the R1 kit is so much better. Just a few comfort tweaks to do, and some more troops to fine tune it. Sent from my SM-T597P using Tapatalk1 point
-
First field test with the armor went great! The only minor issue was my left thigh drooping a bit because I didnt have the slide buckle above the quick release secured well enough. Other than that, went from 10:30am to 3:30pm in the kit, with about 3 hours with the pack on. Nothing on the armor felt too constricted and no armor bites. Pack sits great and the rubber straps kept the pack strap on place, not sliding off and resting on my shoulder caught under the bell like my Anovos kit. I even sat in a chair when helping judge the kids costume contest! Even made the local paper on the first outing! All in all, great kit, and I learned a lot more building tricks along the way to make the kit comfortable, durable, and easy to get in and out of on my own. Still not thrilled about the R1 belt design, but managed to make it semi presentable. Sent from my SM-T597P using Tapatalk1 point