Leaderboard


Popular Content
Showing content with the highest reputation on 08/25/2019 in all areas
-
Hey Josh, Don’t panic - we all started somewhere. Personally, what I’d suggest is like Tony said: to take a break from your armour and check out some build tutorials etc. The below link is the tutorials that I followed and were incredibly helpful: (This is the first - there are many). Now, this is for a different make of armour but many of the principals are the same. For my build, I probably watched each of Ross’ videos twice before making a cut, just to get a feel for what was going on. I then sat with the tutorial, listened to a short instruction then paused and copied, listen-pause-copy etc etc. You can still make good what you’ve got so just kick back, watch some YouTube and get into the groove. You’ll do great. :-) Dan3 points
-
Hey Josh welcome to the FISD. Looks like you're well on your way and also looks like Rat has given you an abundance of assistance already. Just in case someone isn't able to respond to your questions right away I highly suggest you also refer to one of 100s of pinned and/or completed build threads as reference, even Rats. These are a great resource and usually can answer most of the questions you might have. Again, welcome and please let us know if there's anything we can do to assist you in your build. Tony3 points
-
The introduction of a Jet Trooper is cool. The execution is awful. Sent from my iPhone using Tapatalk Pro2 points
-
I’m not feeling any love towards this “Jet Trooper”. Similar helmet shape to the RO Tanker and many strange and unflattering features from every angle. Thanks for sharing the images people. Sent from my iPhone using Tapatalk2 points
-
It's been ages since I started the build! I've been busy with my personal life and works, but decided to get back on the build to get my minds off a bit. I started modeling the bucket to get the most accuracy, especially since we have 360 reference in hand. It's actually my first time modeling something that's not natural, so I've been struggling a bit with using one of the worst program (Maya, since I am not comfortable enough with CAD) to do the job, but I guess it's getting there and I am happy about it. There are a whole lot to do left, but I just wanted to show you all to say that the project is still alive.
.png.1d36aac89944559a54af60672ab1a3e4.png) 2 points
2 points -
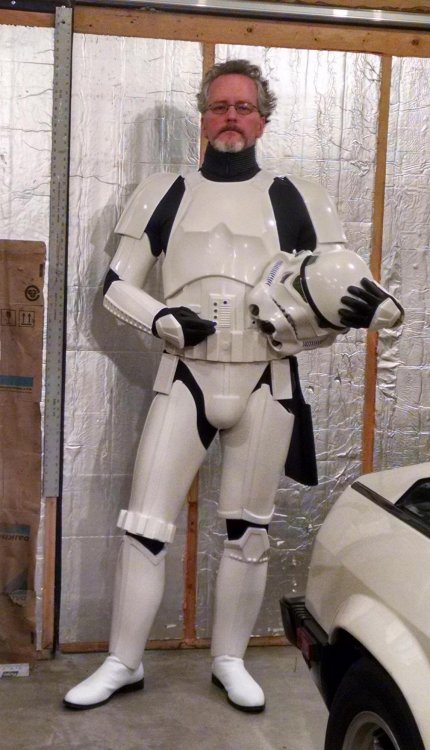
I got the armor last week and am still waiting on the helmet. First impressions are that it’ll need a lot of trimming. My ANH TK was AM2.0 so I’m a bit spoilt with the thickness of that plastic. This seems a lot thinner so I’ll be reinforcing as I go. A couple of parts look different to the KB threads I’m following. The back-yoke is a 2 piece not 3. The firearms are 2 piece opposed to 4 and the torso back is shorter than the front. If anyone has put one of these together recently I’d love to hear how it went. My last TK took 18 months, hopefully this’ll be around 6.1 point
-
Fingers crossed!!!1 point
-
Good luck with your approval Jesus, looking awesome brother.1 point
-
Almost there Jesus. See you on the other side trooper1 point
-
Looks like you have a lot of sanding ahead of you.1 point
-
Nice work1 point
-
You could trim your smaller ab plate a little more, also don't make the button paint too big. Appears you may also have trimmed too much from the larger plate.1 point
-
Dragging my build back from the bantha ....... I sourced what I have been informed is Shepperton studios..... from a guy who worked there...... here it is in the boot of the car and at the hotel before spending a week in storage!!!! Sent from my SM-G950F using Tapatalk1 point
-
Thanks for the encouragement. I’m going through your build thread page by page and it’s amazing. I’ll be starting soon with the arms, hopefully that’ll go smoother than with my TK. As before I waited til the armor arrived before really researching, so it’s all slowly falling into place. I have a ton of questions but I’ll ask as I go.1 point
-
Lol, me too. Coming soon. Sent from my iPhone using Tapatalk1 point
-
No worries, do what you can. Looking great1 point
-
I have fairly big shoulders, so I will try to heat them to get a better fit. As for the gap on the sides, need to lose a bit of weight and it should close up better.1 point
-
Fantastic job Brien. Looking forward to seeing your armor when it's finished.1 point
-
5mm is pretty close to about a 1/4", well between 1/8"-1/4". Sent from my VK815 using Tapatalk1 point
-
Nothing is really unfixable. Read through some of the EIB and Centurion approval threads. It can help a lot. Sent from my VK815 using Tapatalk1 point
-
Yes and no it sort of becomes a personal thing for people. Using the bracket system you need a bare minimum of 5mm preferably 8mm to make sure you have room for your screws. The less you leave more likely it is you'll have to use snaps and nylon or elastic strapping. Sent from my VK815 using Tapatalk1 point
-
So rule of thumb is always leave about 2-3mm of return on everything just in case? Like I can always trim it down to fit later right? Sent from my Pixel 3 XL using Tapatalk1 point
-
For the bottom of your bells leave about 2-3mm it helps. Sent from my VK815 using Tapatalk1 point
-
A good point of reference is that your 45° notch on the belt should line up with your fabric belt. This will leave you with around 2-3mm overhang with the plastic belt. Sent from my VK815 using Tapatalk1 point
-
As for the general depth of return edge 2-5mm seems about the average. Sent from my VK815 using Tapatalk1 point
-
A good start Brian. May I just kindly ask, why you have chosen to cast the lower end of the magazine? As far as I know this kit, the magazine housing is a solid piece. Does that mean, you are planning a hollowed version, so people can slide in the magazine?1 point
-
Trying to build my motivation back up. Yesterday went out to a store called Tokyu Hands and bought some tools. Today decided to get past my nerves and took out the paint materials I bought months ago. Took a deep breath and started painting. After I finished painting I used a toothpick to clean up some of the lines and the odd spot of paint that got away from me.1 point
-
Your reply is a great help. I'll check the link you just sent me. Thank you so much good sir!1 point
-
Avoid, avoid, avoid. You can do MUCH better. https://www.whitearmor.net/forum/topic/11538-the-various-types-of-armor-and-where-to-find-them/ This list includes kits used and endorsed widely across the trooping community. There are various price points in there. Also, I’d suggest avoiding TKUK and SDS/originalstormtrooper.com due to their inaccuracies. :-)1 point
-
Red lines look good.1 point
-
Brian, looking at your thigh ammo belt, you may want to color the rivets white as per the CRL states: Level two certification (if applicable): Thigh ammo belt is attached to thigh with a solid head rivet, painted white, in the upper corner and fastened to the lower thigh ridge. Keep on doing a great job.1 point
-
Hi, Brian, You are going in the right way to Centurion. Great job Trooper !!1 point
-
I totally printed these instructions out a while back and didn't remember till earlier today!![emoji41] these are helping tremendously! Thank you! Sent from my SM-N960U using Tapatalk1 point
-
https://www.dropbox.com/s/snajmo4wxtklq9w/E-11 BLASTER KIT INSTRUCTIONS.pdf?dl=0 If the above link works, it is a pdf for putting together a 3D printed blaster. I have a build log for my blaster as well, printed in PLA and using dichloromethane as a chemical weld. Once my armor is finished I will return to working on the blaster.1 point
-
Okay, that clarifies my question. Thanks!1 point
-
They simply cleaned up and reused the TLJ kits. No change. Sent from my iPhone using Tapatalk Pro1 point
-
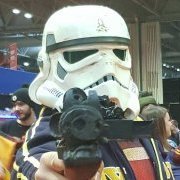
Stormtrooper with same angled gaskets1 point
-
Epic job mate - watching anxiously to announce your achievement to the Garrison!1 point
-
Have painted today. I've some good results ! Will show you soon ! I love this blaster !!! Meanwhile I show you my painting booth (don't forget to use a mask, glasses and gloves)1 point
-
Looking good so far, abs paste tomorrow.1 point
-
Probably going to be a slow build but have some progress to share: After trimming various parts, the biceps are now glued: And the Thermal Detonator is completed: Probably going to keep this at level 1 depending on how much upgrades are... I have a lot invested in two Vaders and wanted a cheaper, and less stressful, build.1 point
-
Most of the time it is layers of paint not drying before others are applied or too thick coats, temperature, humidity, to dry a coat can give a very sandy orange peel look and also what type of paint you use. I painted mine with automotive acrylic as it has thin coats, dries quickly between and is a lot harder than a lot of enamels. I use a generic paint stripper from the local hardware, brush on, leave to interact and then it's a case of using some gun cleaner/thinners and a pain brush for those little hard to get places. You will need to wash it down with soapy water afterwards to make sure no residue remains. Can you post up some pics.1 point
-
Okay. Time for the big reveal. I always wanted a TK helmet that was as true to a real one as possible, and I think I've come pretty close. I will probably modify the items as time goes on to make them more durable and user friendly as they are made out of thin plastic card stock. Everything is made out of plastic scrap and bit and pieces I use to build models. Everything except the battery modules cam from TK Products. AWESOME STUFF I used the well known Stormtrooper interior helmet pics you can find online, and spent MANY hours figuring how to fit everything inside. Poorer quality ref pic with items named: It is a VERY snug fit with all the wiring, electronics and 4 fans. I don't need padding to hold the helmet in place, but may add some thin stuff for comfort. This helmet is fully functioning with all the prop pieces in it. ICOMM box is above left ear Two of the fans are the silver "speakers" on either side of the helmet. The silverish cording running from the fans to the central unit are decorative The USB power modules for the fans are located under the blue / grey button panels on left and right The central " air exhaust,/voice filter unit / comlink microphone" large panel piece is easily removable (with velcro) and hides the main part of the Hearing assist unit. The microphone for the Hovi's is free floating in front and sits right against my lips. The thin black cord running out of the helmet comms from the Hearing Assist module is to my ear phones. The microphones for the hearing assist are installed under the helmet ear pieces out of sight, just behind the silver fans. The 9V battery for the hearing assist is over my right eye with cabling running around the edge of the eye and down. The air intake and exhausts are covers for the rear of the Hovi speakers. The black plastic tubing running from the Hovi's to the button panels is decorative with no function. ICOMM voice Amp and junction box. One of the buttons for the fans is just up and left of the AUX input. One additional black fan is above the AMP Back of helmet: Most cabling is tucked in the 3/4" wire lume along the back neck area. 4th fan is to the left, beside silver fan. You can see the two fan buttons (one controls silver, the other black) just above the wire lume. There is a wire Y cable coming out of the SPKR jack on Voice Amp. One leads to the Hovi tips, the other attaches to the Satellite speaker I have installed on my chest plate. I just run a long 3.5 mm cable from my chest, under the neck seal to the back of helmet. Right side: Straight in view Central piece removed. Battery cover removed Issues I have with this. With the fans running right by my ears, they create a resonance in the helmet. Even with the hearing assist on and earphones in, there is a constant buzz in my ears. It doesn't help that the silver fan only fit on top of the hearing microphones located in the helmet ears. I can only hear people when they are talking fairly loud within 3 or 4 feet of me. Without the fans, no issue and the hearing assist works extremely well. I have tried placing soft foam between the fans and the helmet. This helps ALLOT, but now the fans are too far out from the sides of the helmet and I can barely get it on. If all this annoys me a may have to forgo accuracy and place the fans just behind the Hovi tips. These fans are 40x40x20's. I have ordered 40x40x10's, so they are half as thick. Hopefully they will arrive tomorrow before I depart for my troop. I will use them with some soft backing foam and see if that knocks down the helmet noise. Hope you like!1 point
-
Hey Simon! First, congrats on earning your Centurion! You need to update your signature to reflect that you are *done* with your TK now! Second, thank you for the kind words about my little tutorial. I'm glad that it was able to guide you through your build! Aren't magnet closures simply awesome?! I couldn't imagine trying to fuss with velcro or bra hooks now. Magnets make TK life much easier. Yep, it's always important to account for the additional material on the inside of the boot when you're fitting these for sure. I didn't really highlight this because I've always built my own shins on the smaller side, so it's never been on my radar! It's true that you don't want to size your shins to be super-duper snug before installing the magnets. Maybe leave an extra few millimeters around the bottom to allow for the buttons at the ankle, I suppose. That said, those magnets should still remain closed, even if they are a little tight at the ankle. Definitely a great tip for sure, Simon!1 point
-
Well Apparently I'm terrible at build threads. I found out this morning that after a couple of minor corrections I was approved. Thanks for everyone else's helpful posts and threads.
 1 point
 -
1 point
-
Next steps: - I picked up a 5 yard spool of 1" velcro the other day ($$$?!?!), so my first test "assembly" will be soon. - I will be dropping my undersuit off for some tailoring this week (it came a bit big, but better than it being too small!) - I found a place somewhat near me that specializes in fiberglass and has a showroom/dealer area. I'm going to bring a few pieces of my suit in and see what the pros recommend for reinforcing the kit in key areas. I don't want any cracks and the kit is light enough that I won't mind adding weight. - My gloves are already in, but I'm helping coordinate a group buy from Imperial Boots for some FO boots - we are even bringing other folks from our Garrison in so we can all save a few bucks. Our build group is meeting up this weekend to go play "The Void", the virtual reality Star Wars experience in Downtown Disney, have a few brews, and strategize, so I'll have more to share this weekend and I'll try to post some more pics too. This will be part instruction thread, part just random info and documentation of our adventures - thanks for coming along for the ride!1 point