crema
-
Posts
44 -
Joined
-
Last visited
1 Follower

About crema

Recent Profile Visitors
1,985 profile views


-
So I am guessing since the new Mandalorian version’s pauldron has matching color with armor paint, I should go with the same principle and have the pauldron to be the same red as the armor red even though the in-game model’s pauldron is a bit yellow-er? I do think matching color does look better but since I am particularly going with the game version, I thought I should go with, to be frankly, “uglier” version as that’s just how it was done. How does the wine color fabric I linked above look? It’s a bit different from the armor paint color but looks darn close to the game screenshots. Or I can just paint it with the actual red paint I used for the armor so it matches perfectly. I will make the sewn line less crisp while changing out the fabric also if that’s needed too.
-
Oh yeah the in-game color correction definitely makes it more red! I looked through online fabric stores for that interesting red-brown color and came across this one. It’s listed as wine red and looks pretty close. http://naver.me/5zvP78kP (Sorry for Korean link) I think uploading it de-saturated it a lot and made it to look very brown, which is weird,(the original image is up in the store review link above) but here's a screen cap of the reference and the fabric side-by-side. Should I go with this fabric? Or should I just go with The Mandalorian version bright red?
-
Since the CRL for Incinerator Trooper needs updating, I thought I would go with the in-game reference as my main source. I used textures ripped from the game and saw that the pauldron was orange with brown-red weathering, and the normal map had stitch lines going through the orange area. Some versions of the game used lower quality models which may have not used the normal map and AO, which makes it to look flat. I guess I will have to wait until the updated version of the CRL goes live one day...! Or make red one for now
-
Just finished sewing up the pauldron and making ammo pouch with some 3D printing and gluing on the leather for sharp shape like in the game. I do prefer red pauldron but since the game reference is heavily weathered orange, I had to go with orange. Maybe I will make a Mandalorian version set in the future… I printed out the bucks using the in-game 3D model and cleaning it up for the printing. Using laptop screen to get the accuracy checked for detail parts was actually pretty helpful haha Rigid plastic with leather wrapping was added on the back for the accurate look and support. Now the 1st pass on the weathering is done, all that remains are finishing up the belt and the helmet, black and brown wash, and Plasma Thrower electronics. Almost there…!
-
Since May the 4th is coming up so quick, I focused on making the Plasma Thrower as it was lagging behind. The base paint is basically all done, with detail paints and weathering remaining, and electronics. Everything was 3D printed except the metal mesh and the large vent thing which was made from rubber cut and laid out for pleated look. Kinda proud of how the magnetic door for refilling fog juice turned out. I accidentally shorted a board while trying to fit everything in the blaster so the replacement is ordered but I still have a demo video on how it’s supposed to work(I guess I can upgrade LEDs in the future so it can be seen in the bright daylight) Video
-
Good catch! Yeah I realized without the rubber trim, the brow sags down due to the curvature of the dome pressing down the faceplate. I still haven’t started actually weathering the helmet and only masked the parts that looks like paint chips and will be sanding other parts down for more blended look. Hope I don’t go too far and make more work for myself… I also need to make some changes on the unit marking with the trim on for that abrupt ending of the marking above and below the brow trim as you mentioned. Also below the trim like seem to not have angles on the model unlike the raw texture, which I should’ve used as a secondary reference….
-
It’s been a while since my last update, I was a bit distracted by other builds I was doing. The base paint for all the armor pieces was done, so I started adding unit markings, also using the toothpaste weathering technique. Still a lot of touchups, detail paints, and weathering left, but seeing it getting close to being done feels nice. The helmet was a nightmare to paint since the old paint was flaking AND the previous owner apparently used silicone caulk to fill ear gap….. Before (with some paint and silicone caulk removed): After base paint and unit markings: I finished modeling the Plasma Thrower and started printing all the pieces. Since it’s a pretty huge blaster, I decided to make it into 3 sections that can be assembled by a PVC pipe and a retention screw. I am planning to install DIY mini smoke machine(still waiting for the vape to arrive), so I hope everything goes well!
-
That looks awesome! Yeah that’s what I’m trying to achieve. It’s quite tricky to make sure all the chipping lines up with the reference due to the game’s symmetry, etc. but trying hard to at least get the looks right…. A long way to go but after seeing yours, I feel more motivated to finish it!
-
Oh yeah sorry I wasn’t super clear on what I was going to trim from the belt. I am still in need of assembling the belt and I was planning to get on to the belt parts as soon as I’m done with the ab and kidney pieces so I can fit them properly. Still less than 50% done and going steady…! Thanks for the keen eyes though! It really helps as my priority goes mostly on fixing broken things from this old armor set……
-
I had quite some progress but didn’t have good enough pics to post until now! A whole lot of removing the rivets done by previous owner was done, reassembled, and the size was reduced a quite lot to fit my small build. The thigh pieces had to be made symmetrical unlike the movie versions to match the game references. The belt still need trimming and assembly. Just a rough test fit on my duct tape mannequin! Did some sanding to remove old paint that was starting to peel due to the age, etc. Then I added plastic primer and filler primer to make sure it won’t end up the same as previous iteration. It’s my first time doing severe weathering like this so I tried toothpaste weathering and worked out pretty good! The color contrast is a bit strong as the white is too white but after some wash and extra weathering, it will look better. The body armor pieces were all painted and ready for weathering and red marking. So the rubber u trim was added (It was quite hard to find local vendor for the trim… So glad there was ONE online Korean vender that sells one with accurate dimensions and color). Finally started some final fitting and strapping. It’s starting to take shape! Now only things left are painting red markings, weathering, and to prepare myself to work on the helmet. It will be a rough journey trying to remove all the old paint and fix cracks….. I have a feeling that just getting a new kit or printing one would be way easier haha….
-
I’ve been gifted a set of TK kit that has been badly assembled and painted, and I wanted to revive it by making it into an Incinerator set. I have gathered references from in-game model and I’ve started some modeling to make Plasma Thrower (flame thrower) printable and be able to install electronics too. I will post the progress on the model when it looks decent enough. Here is how the kit looked when I received it: I finished trimming shins to fit me and I realized I can make it closed all around and still wearable and look proportional, which was surprising. Never been so thankful to my small feet. I am tiny for sure though, being 5’2”….
-
I've made a document with all the inaccuracies on the current CRL noted. https://docs.google.com/document/d/1L2lmDnEviOKRhfSitYCS8e7v2go89cnjIBTzK5KJZ8Q/edit?usp=sharing Please let me know if images are needed to confirm them!
-
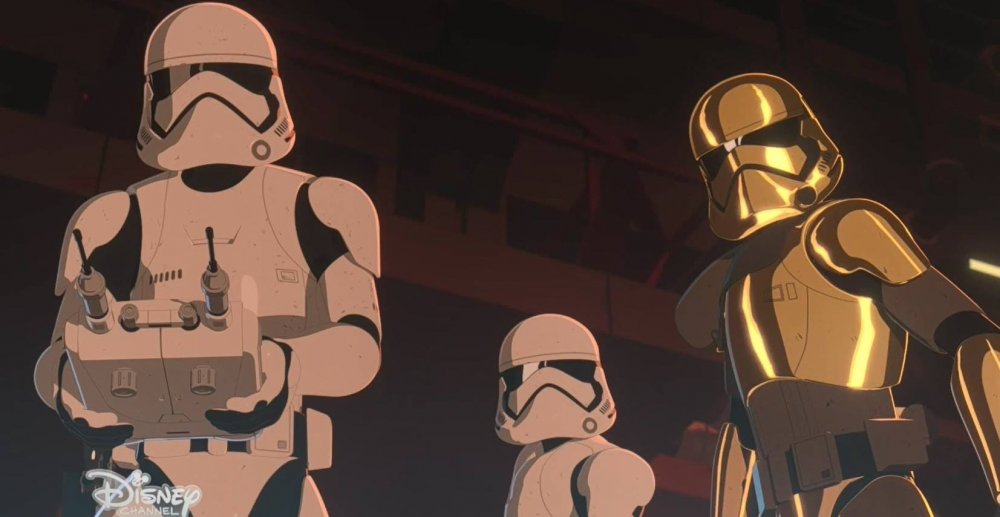
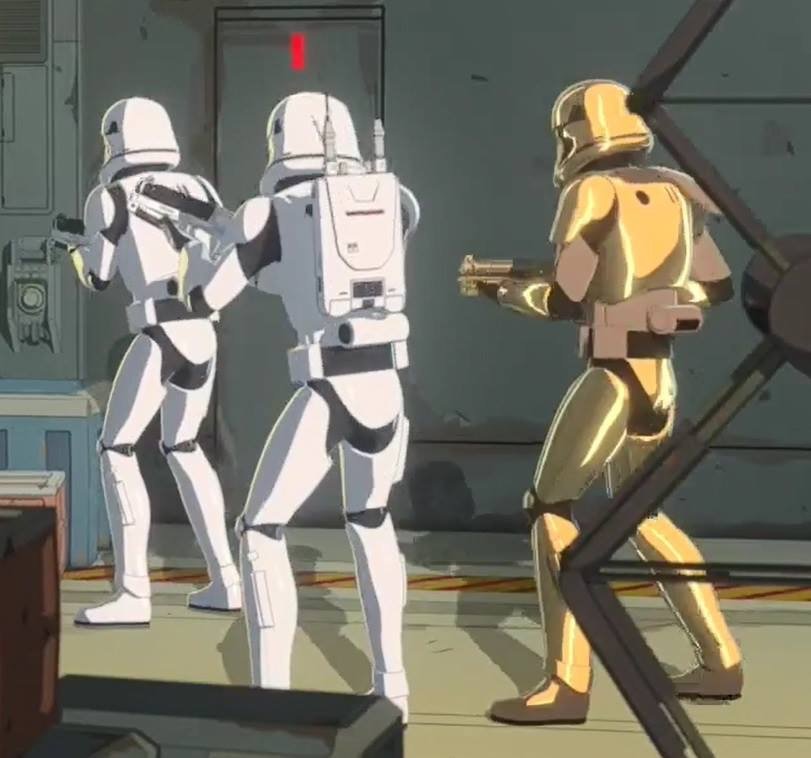
I have made some screenshots of the in-game model that's been updated with better quality textures few years ago. I am including images of plasma thrower/cannon too, which would be super helpful to build an accurate one. I am planning to make 3D print files using this super low poly model as a base. Here is the photo dump link: https://drive.google.com/drive/folders/1c_hOc1ejHGla3RzQvcGZmRE8sXiqG_44?usp=sharing I've found out that there are some details that don't align with the current CRL such as the knee ammo pack. Is this the place to talk about this? Anyways, here are some sample pics
-
It's been ages since I started the build! I've been busy with my personal life and works, but decided to get back on the build to get my minds off a bit. I started modeling the bucket to get the most accuracy, especially since we have 360 reference in hand. It's actually my first time modeling something that's not natural, so I've been struggling a bit with using one of the worst program (Maya, since I am not comfortable enough with CAD) to do the job, but I guess it's getting there and I am happy about it. There are a whole lot to do left, but I just wanted to show you all to say that the project is still alive.
.png.1d36aac89944559a54af60672ab1a3e4.png)
-
Will do! After hours of digging, I think I now have at least 3 different scenes of each sides in full body shots saved for my reference folder. I’m glad that they are having some good amount of screen time on the animation. And the sweet new backpack!