Leaderboard


Popular Content
Showing content with the highest reputation on 08/20/2018 in all areas
-
Whew. What’s also nice about the new server is that the legion web team have pretty good monitoring on memory, CPU. database connections etc.... If we find that we are outgrowing the server we can add resources on the fly. Or the next time there is a racing shirt run or some sort of (more) plastic spaceman drama erupts and the forum gets really busy -Eric Sent from my iPhone using Tapatalk4 points
-
Fantastic job thank you for choosing AP! Mark (AP)3 points
-
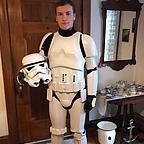
Hi Luc, Thanks for the response! I talked to my local garrison at Boston Comic Con and they were able to help me and demonstrate how to fix some of my issues. The reason my shins weren’t closing was because I didn’t have a strong enough Velcro and I switch to an industrial Velcro and that worked like a dream. For my thighs though I have to have bigger cover strips for the back because my thighs are a bit too big so I had to make some adjustments.3 points
-
Officially a TD! Approved!! Although I'm keeping my "TK" official designation.3 points
-
Ok, managed to squeeze in a lot of work on the torso over the weekend. I started off by adding snaps to connect the AB and Chest. I used double-snaps in doubled-up 1.5 inch elastic. I made a loop out of the elastic, sewed the ends together then punched the holes and installed the snaps. Next I installed the COD split rivet. I installed a snap on the inside to make it functional. Then installed the posterior snaps. The AP kit comes with a pencil line which shows how the movie suits were trimmed. This is drawn on both the AB and Kidney. I did a test fit and it looks like I'm going to be really close to the movie trim line. I trimmed about 1/2 inch larger than this line and did another test fit. It was way too big. Then I trimmed right to the movie trim line and did another test fit. Still a little big. I had 1 to 1.5 inches at the small of my back. I wanted to keep the seam near the middle of my side, so I stopped trimming the AB and took one last 1/4 inch off of each side of the kidney. I think I'll go with this. I measured and drilled the holes and cut 3 lengths of 1 inch elastic. I found the center of the elastic and punched two holes 1 cm either side of the center line. Next I cut a strip of ABS to use on the inside and then hammered the split rivets in place. Then I realized that I had a small gap where the kidney and AB meet and I had to take the whole thing apart again. Measure twice, hammer once. That's what I forgot. So I took it apart, cut new elastic with the holes 9mm from the center line and put everything back together again. Now it fits good. Then I installed the snap on the right side (Han Snap?) and glued in a snap on the kidney to connect it. No, it's not misaligned. I'm just holding it crooked because there's still wet glue on the kidney. Then I still had a couple of hours so I got the chest buttons done... The stickers that come with the AP kit work really well. It's really thin vinyl. You put them on at the center and hit them with a hair dryer to soften them. Then you can work down the edges with no air bubbles. It's super smooth and looks like paint. Plus it's a perfect circle, something I wouldn't be able to paint by hand. I think that was a fairly productive weekend. I'm feeling more comfortable about my "self-imposed" October 31 deadline. Mark3 points
-
Hello everyone, Referencing the pinned post in this thread, I'll start out by offering some advice that I wish I had known myself when I first purchased my first TK kit: The price you see on the ANOVOS website is not the price of the kit. There have been a lot of purchases since then that were needed to complete my build. Next, a top five list of things I have learned: There will always be something that can be improved on the kit. Especially as a first build, no kit is perfect and relentlessly striving for perfection, although admirable, can sometimes create unnecessary stress that soils what should be a fun experience. Plus, sometimes being madly driven by a desire for perfection can actually have the opposite result (i.e. maybe you took a bit too much off an edge that didn't really need trimming in the first place. Buy these Du-Bro scissors: Amazon I cannot iterate enough just how much of a luxury these scissors are. They are designed for cutting plastic and, to me, offer an advantage to first-time builders who may be wary of the score and snap method. It is unlikely that, especially if a TK is your first costume build, you'll be approved in the first go when you submit for basic approval. There probably will be changes that need to be made. Maybe others will dispute this one or had an easier time getting approved. I had to resubmit once myself and rebuild the thighs. Measure thrice, cut once. Enough said. Wear PPE! Despite yet another cost, it is worth it to get a respirator like this. I was hesitant to get one myself because of the price tag, but, reading of some of the symptoms and long-term complications of E6000, I am glad I did. Most come with the organic vapor cartridges which is what you need. And one extra thing I learned: Accuracy isn't everything. Yes, I said it. I am an accuracy hag myself, but if getting that belt rivet cover just right or aligning the belt takes a toll on your happiness while building, take a breather and realize that, at the end of the day, enjoyment comes first. As for challenges, I've already mentioned the thighs. My legs still continue to give me problems despite being approved. I am 5' 8" at ~145 lbs., so I have had some difficulty getting the thighs to not only close in the rear with no gaps (I used ABS paste; shoutout to Kalani for his tutorial here: https://www.whitearmor.net/forum/topic/42866-how-to-make-abs-paste/), but also some difficulty to keep them from hitting my posterior plate. More work to be done. Like I said, always something you can improve somewhere on the armor. I received countless warnings while building, so please simply consider all my acknowledgements later on as thanks for said innumerable warnings. To give some anecdotes, I'll provide just two to keep this short of a master's thesis. Firstly, my most embarrassing one stems from an acetone accident. I did not attempt to intentionally clean or even touch the armor with acetone, but I was cleaning some paintbrushes with my ab plate nearby and, unfortunately, splashed some on the armor after the lid came off surprisingly fast causing acetone to splash out of the top, in the air, and then down onto the surface of the armor. Long story short, I have managed to restore the finish using Novus products, sanding, and extensive buffing, but it was still a setback/scare nonetheless. To close my post, I'll offer my inspiration for joining the 501st and offer thanks to everyone who helped me get here. Upon attending my first Star Wars celebration with my father, I was fascinated with the atmosphere. The franchise of which I had been a lifelong fan of, albeit only being seven years old at the time, was literally standing in front of me on the show floor manifested in armor-clad people that seemed to have jumped right off the screen. So when my dad purchased a child's Jango Fett costume (nothing fancy; probably ripped off honestly) from a vendor, I was proud to wear it and walk among those who I quite literally looked up to. And then I found it. The 501st room full of costumes and members, and, ever since then, I've been dead set on joining once I mustered enough savings that I could spend on a kit without jeopardizing my financial integrity. This story is not even to mention the time when Marvel superheroes visited my younger brother in an oncology ward at a Florida children's hospital. The way terminally ill children light up when they see their heroes in front of them, despite all their adversity, is enough to even bring a grown man to tears. It was at this time that I knew I'd be joining the 501st sooner than later. A year later and here I am. I would definitely like to thank @justjoseph63 and @ukswrath for all their help with the latter providing an amazing build thread suited for beginners. I would also like to thank @Commander Gree @menschie @BrinkHouse and @kman to name just a few in addition to the countless members who made a dream a reality. And a huge shoutout to members of the Florida Garrison Everglades Squad who are a joy to be around and have provided invaluable pointers and recommendations. I know I could not have made it here without them. Thanks for reading. For the Empire!, Eric
 2 points
 -
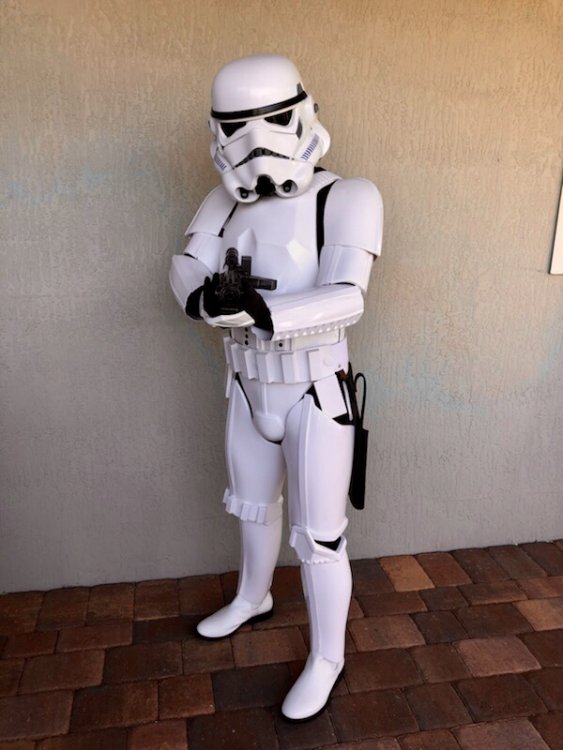
Hi Mark, Hopefully a moderator can move your thread over to the correct sub-forum under Request TK Pre-Approval. Moving on, here is some feedback. Regarding getting your basic approval: From what I can see here the only thing that will be an issue with basic approval is the rivets on the holster. Four rivets for Hero, two for Stunt. Your helmet is a Stunt so removing the upper rivets is the easiest way to address this. Depending on how the belt looks after you remove them, it is possible you may need a new canvas belt. Getting a sturdy one will help avoid those folds you can see in some Anovos canvas belts too. General suggestions to improve your overall look: Your thighs could definitely come up quite a bit. If you are able to wear them higher definitely do so. This not only looks better, but will give you greater mobility. I think that your biceps could be worn a little higher and your shoulder bells could come in a little closer to the biceps. There's some difference in how much black is showing between parts for both your arms. Your drop boxes could be secured to stay at the ends of the ABS belt (this is a higher level requirement but is easy to do). Your belt could also be worn just a little higher, overlapping the large button plate slightly. Your rivets on the left side of the ab and kidney are not aligning. Can't see how you've secured these with the shim, but ideally they should be lined up and not be staggered. Your right side closure of the ab and kdiney are not lining up in your photo of the side. Typically the top of the kidney and ab will line up though the shim may be making this difficult. You could remove some of the flashing from the eyes (Anovos is known for leaving a bit too much in there) and extend the frown a bit past the undrilled holes. I know these look like a lot of criticisms, but they are meant to be constructive and in a lot of cases, they are fairly easy. Great job on getting your shoulder bells touching the shoulder bridges and pretty minimal gap between the back plate and kidney plate. If you need more detailed suggestions on how to address something, let us know! We're here to help you look your best. Basic is just a small step away and then if you want to shoot for higher accuracy, we are ready to help you with that as well!2 points
-
This sounds great. and so you know, there are a lot of things within the "preferred" area that will not keep you from obtaining Centurion. We want our troopers to look as best as possible, but like Joseph mentioned, we totally understand and recognize that not all troopers are built the same. This is also why NO armor kit is 501st approved. Armor is only approved in conjunction with the wearer. A kit is not approvable on its own. When talking to your Garrison mate, the one that's on the approval team, be sure he knows that your end game is Centurion. He may be telling you "Ya that will work" but merely talking about basic, which may cause you to do something that will require even more work later down the road for Centurion. If you start out with Centurion in mind, set that as your goal, it makes the build a lot easier. Basic can be achieved with a rushed kit. Centurion takes just a little more work, and time, and a touch of love for the Empire, and you will be there. Just keep it coming, let the photos flow, and we will get you there. No problem is too big to handle.2 points
-
Some pics as promised. First the handmade recoil spring. I didn't think it could be so hard to turn a steel wire into a spring. First the work in itself, and second to find the right diameter to wrap it around. Please note that the spring grows in diameter when you think you've finished it. Third time was finally good, sore fingers and sweating included. I don't have a better pic of the spring alone. You can see the receiver and grip modifications after reducing the grip width. I glued a strip from aluminium between the grip and the pipe, the previous holes didn't were in the correct place and the several tries to screw the grip firmly enlarged them a lot, so new holes and happy with the results. You'll also note the terracotta Milliput to cover the old cut for the wide/old grip. Enviado desde mi SM-G360F mediante Tapatalk Here you see one of the screws that fixes the grip. Had to drill the receiver to screw them properly, didn't want a wobbly grip. I'll cover them later. I used conical head screws to make them flush in order to not stop the block when sliding (yes, it does!!!) I'm trying to achieve maximum resistance in this build, and it's been a hard time to find a way to fix the cocking bolt. M3 conical hex screw and a square nut that I found inside an electrical switch. Cut to get the nut flush, screw and done... Well, when I came back to my parents-in-law holidays house ( you'll have noted the yard and the trunk as a workbench, LOL) I'll try to take pictures of the proceed to fix it correctly, note that you don't have access to work from outside. Time for the barrel fittings/fixings, don't forget your caliper to measure every pipe/tube you see in the yard/garage/caveman. I can't remember the correct dimensions of every pipe used, I'll try to post them in a few days. Main barrel is a copper pipe, 12mm OD. I saw it slim through the vent holes, a quick reference to read that the main barrel is about 15/16 mm OD. Solution? 15 mm OD copper pipe in the outside, it slides perfectly and if it rattles too much I can solder them easily. The fittings inside the receiver are also pipes, the black one is for garden watering, the green one is used in buildings for hot/cold water. Hope it make sense...It such a tight fit that holds the barrel perfectly without gluing it, though it's fixed to the receiver with a screw. Did I talk about soldering? Next to come... One of the most feared pieces ( as I've read many times ) besides the end cap is the folding stock. Here you see the piece that fixes the stock to the receiver. Made from 15/12 mm copper pipe, soldered. Difficult task, when I had finished soldering one side and started the other one, it started to desolder, moved, dropped and start solder again. D-ring and fitting. You'll notice it's a chain link, it's the nearest in dimensions that I found. My fingers soared after making three springs, and I didn't want to look for something that made me work more. Near enough is good enough, isn't it? Didn't take pictures of my last wooden fail, very bad luck lately drilling wood. More wood to start the next barbeque... I had to make it in plasticard after five or six tries in wood. Rear sight and rivets glued. Didn't glued the 200/100 piece yet because I don't really like the rivets look, don't know if I'll let them that way. Lastly a pair of pics, one of the magazine well, and the other of a general view of my build. I think it starts to seem a Sterling, what do you think, guys? Cheers from a sunny beach in Spain. P.S. With free wireless internet access, LOL!2 points
-
I gotta give props to all of the people that have built this weapon before me as it made it so much easier. So starting out, I used a G36 airsoft gun as the base, 3" pvc for the barrel, 1/2" pvc for the fuel dispenser, and a Monster energy drink can for the fuel canister. I modeled and 3d printed all of the detail pieces like the tip of the flamethrower, the box right behind the tip, and some small pieces that were added to the body of the gun. The overall length is shorter than other builds I have seen, mine comes in right at 36 inches.1 point
-
Hi all, in late June I started my Stunt build of the RS armour, I am not that far until now. I have cut a few pieces and decided to really start with the Bucket. Here I am rather far. those picks are a few days old, the helmet is assembled, but I have no current picks. Will post them this evening or tomorrow.1 point
-
When I started the process of building my ANH Stunt TK I regretted not spending the extra to get the kit fully trimmed up front, or even fully built; however, nearing the completion of the build I found myself becoming more than a little nostalgic for this part of the journey that was ending. I’ll have to relive the journey vicariously by following other trooper’s new builds, because my wife will kill me if I attempt to start another. Shout Outs: - Thanks again to the following troopers for being welcoming, supportive and providing great threads to learn from: Willeywonka, Wook1138, Neb Sgird, gmrhodes13, TheSwede, Lucnak, Hollowbodies, FencingCorvetteTrooper, CableGuy, Pretzel, CoatHanger, JenEcho, Suspend, ABS80, Ukswrath, Commander Gree, Thumpy, Magni, Sgt Garand, Frank75139, Tolo, TK-34288, 68Brick, Zarlon, Steaditrooper, Shanester, Ninjamove, jethroskull, Pyrates. Rob1 point
-
And we are back.... Ok so here is what happens when the site is down for a week. Well Crap! Bad timing on my part. The site has been down since I began this build to I am typing it all up and will post everything I have done once the site is back up. In the words of that Supreme Sith Lord Jar Jar Binks, “Hello Boyos, Mesa Back”. I have decided to do this in a separate thread from my ROTK and keep this thread here on FISD rather than on MEPD for a few reasons. To avoid and confusion and/or misconceptions here are the reasons: #1. I believe, and have always believed that the (as it is now being called) Crystal Patrol Pack is NOT a sandtrooper. The Crystal Patrol Pack is clearly noted in literature from Rogue One that it is a “duty patrol” not a classification. Further, I have read that the “bottom line” is that MEPD gets the “dirty” Stormtroopers. Well, there are numerous pictures of the Crystal Patrol Pack “trooper” that are clean, clean, clean white armor troopers (ex. Celebration Europe pictures). So not all the crystal patrol packs troopers are dirty and to be quite honest, I have a dog in this fight. I do not want to “dirty” my $1,800.00 investment in the ONLY ROTK to be both EIB and Centurion approved. Regardless, this Horse has been beaten to death and it is clear that at least some of the parties who made the decision to give this pack to MEPD are not willing to change their minds at this point. Further, it really does not matter what I and numerous others think, what is done is done. So that is reason #1 why this thread is here first and will eventually be cross posted on MEPD. Please do not respond to this reason by arguing for the “why” the Crystal Patrol Pack is now an MEPD asset, it is not the reason for this thread and I do not wish to get into a “Johnson” measuring contest. #2. All of the research for the ROTK CRLs and the Crystal Patrol Pack were done here on FISD by you guys. Sure many of you are MEPD as well but this discussion was started here and since you all did the heavy lifting, the credit should stay with you here. #3. I do not know the people on MEPD as well as I have come to know you guys. All of you have been instrumental in me accomplishing my TK build and attaining EIB and Centurion. I value your input and suggestions. I do not have any issues with MEPD or the people on that forum but I started out my 501st adventure here on FISD and I just feel more at home here. Like I said, I will cross post this build on MEPD in the future. Anyway here is the link to my ROTK build if you want it. https://www.whitearmor.net/forum/topic/44463-11b30b4’s-rotk-build/ So here is my Crystal Patrol Pack Build… When I ordered all the stuff for my ROTK, I also started to collect all the parts needed for the Crystal Patrol Pack. In a very short time I had everything I needed and just required the time to build this thing. For anyone looking to build this pack or has questions about building this pack there are several build threads here on FISD in the RO section, on MEPD in the RO section, and on the FB page for the pack build. I will link everything relevant here: FISD https://www.whitearmor.net/forum/topic/39073-celebration-europe-2016-rogue-one-stormtrooper-back-pack-build/ https://www.whitearmor.net/forum/topic/38162-rogue-one-stormtrooper-back-pack-part-found/ MEPD http://forum.mepd.net/index.php?/forum/66-crystal-patrol-field-pack/ Face Book https://www.facebook.com/rogueonetkbackpack/ The Build… I am hoping to achieve a very close approximation of the Celebration Europe examples of the packs. It will not be perfect but very close to what we have seen and know about the pack. Ok so for my build the thing that I expect to take the longest is the dyeing of the Alice pack and shoulder straps so I started this first. This is my Large LC-2 Alice Pack and LC-2 Shoulder Straps. Most people who build this pack use the woodland camouflage LC-2 Shoulder Straps but I located the Shoulder Straps in OD so these are what I am using. I posted a link on where to get the OD straps on the Celebration Europe thread on FISD if you are looking for them. The LC-2 Alice Pack comes in three sizes and the pack used for this build is the Large Pack. Most military surplus stores have them and there is information on the previously mentioned Celebration Europe thread to be able to distinguish the differences between the sizes. The Dye I am using is the Rit Black powder dye and the Rit Black DyeMore liquid dye. So I mostly followed the recommendations of the Celebration Europe thread and soaked the pack in1 gallon of boiling water then mixed the powder dye and 1 cup of white vinegar with another gallon of boiling water. I then added the dye water to the pack bucket and stirred everything about every 20 minutes for the first hour then made sure everything was submerged and left it for another 2 hours. Then I pulled everything out and hung it to air dry overnight. While the pack was dying, I knocked out the six 1”x22” bed roll straps. The Celebration Europe thread says to use tan cotton webbing but I used 1” tan polypropylene webbing I had on hand. The weave was the same as the cotton straps used so I figured I can make this work. The key was to paint the webbing but leave the ends tan. For the paint, I used a can of Rust-Oleum Camouflage OD spray paint I had on hand. I did a test and it worked great. I needed the ends to remain tan so I used a Q-tip and some petroleum jelly to mask the ends of the straps about ¼” on both sides, then I tacked the straps to some card board. I spray painted the straps with a very heavy coat and let them dry, then flipped them and did the same on the other side. Next, I took the cam-loc buckles I ordered and spray painted them with the OD paint as well. When the straps were dry I used a paper towel to remove the petroleum jelly and then cleaned the tips again with some rubbing alcohol and a paper towel. Exactly the look I wanting. Next, I stitched the straps to the buckles. The Celebration Europe thread says to do this by hand but I have an industrial sewing machine and some tan thread so I did it with the machine. And that finished the bedroll straps. Next I worked on the Grande box. Following the Celebration Europe thread I disassembled the box. Then I marked and drilled the twelve 5mm back mounting holes. Then I marked and did the twelve 1+” wide hole cut-outs. And that was Day one in a nut shell. Day two… I started by taking the dry Alice Pack and Shoulder Straps upstairs and threw them in the washing machine with no soap for a rinse and spin cycle. Once they were done, I again submerged them in 1 gallon of boiling water. I then Mixed the Rit DyeMore in another gallon of boiling water and added it to the bucket with the pack. Again I stirred the pack every 20 minutes for the first hour then l let everything sit submerged for another two hours. Took everything out and hung it to air dry. While the pack was dying, I started working on the antenna. The Celebration Europe thread had identified the fishing pole used for the antenna was the Avanti Precision X 12ft 3-piece Float Rod; however, that rod is no longer in production. A very close alternative is the NGT Float Master which is rumored to be made in the same factory. I managed to find several for sale for $24.95. I posted the link on the Celebration Europe thread and on MEPD. The only significant difference it that the threads at each eye are silver on the NGT vs red on the Avanti. I will fix that later but for now I wanted to get the antenna mostly done. In this picture you can see the silver threads (yellow circle) and also notice the rod wrapping (green circle) which are exactly the same as the Avanti. For the antenna you only need the top part of the 3 piece rod which is about 50 inches. The very top end of the rod is cut off removing the top eye. The cut should be about 50mm from the top of the second eye. Using my dremel cut off wheel, I chopped off the top. Next I removed all the plastic inner rings in each eye with needle nose plyers and an x-Acto knife. For the tip I got an assortment of vacuum caps from AutoZone and used the smallest one (5/32”) cap but it was still a little big for the rod end. So I added two layers of heat shrink to the end of the rod then added the snug fitting cap. Next I threaded the ¼” rubber surgical tubing I got off amazon through the top three eyes and wrapped is for the area between the third and fourth eyes (counting from the top) then continued the threading for the reminder of the eyes. The Celebration Europe thread calls for a 4mm ID black silicone tubing but I figure my tubing is close enough. The one issue I had was that when wrapped in the spiral, the tubing compressed and looks flat. To fix this, I inserted some black para cord inside the tubing for the area that gets wrapped and this made a big difference. So this finished the antenna with the exception of coloring the threads to red from silver. Next, I made the bed roll. So on the Celebration Europe thread there is no consensus on what was actually used for the bed roll. It looks to me like they used a USGI shelter half which would be consistent with most US military stuff so I snagged a shelter half from a surplus store and cut it in half. One of my concerns with this pack was the weight and how it has the potential to damage my TK armor so I want the weight to be a light as possible. Next I took the half and filled it with some poly fill and rolled it. Presto, bed roll. And that wraps day two… Day three… I started off with taking the now dry pack and shoulder straps and running them through another rinse and spin cycle in the washing machine and then a quick tumble dry in the dryer. While that was happening I painted the threads of the antenna red. For this I used Tamiya clear red (X-27) acrylic paint. I simply applied it with a small brush on the threads and presto red threads that are a damn near perfect match for the Avanti rod. After the pack and shoulder straps were dry, I took the shoulder strap that is worn on the left side and masked it off. I should note that this is actually the right shoulder strap. For some reason they are reversed on the pack but this is the way its done so this is the shoulder strap I used. After masking, I spray painted the shoulder strap with Rust-Oleum OSHA Orange spray paint. This took numerous thick wet coats because the nylon would absorb the paint. The guys on the Celebration thread used a plastic-dip type of paint that avoided the nylon soaking up the paint but I had the Osha Orange on hand so I used it. Eventually the paint began to settle on the top. Once it was sort of dry in the thin areas, I removed the masking. Since I was spraying the paint so thick, it did bleed under the masking tape a little. Once the masking was removed I cleaned up the bleeding a little with a Q-Tip and some acetone. I did leave it somewhat messy though since it needs to have the “used” look. I also smeared some of the wet paint in the two masked off areas inside the rectangle to give the impression that they had once been orange. All this will get more weathering later on but for now, it looks good to me. Next, with a seam ripper, I removed all the straps and back pad that are required to be removed as indicated in the Celebration thread. Next, I took some 1” black polypropylene and the correct brass buckles and made the four buckles that would be added to the pack. Once these were sewn, I sewed them to the pack in the correct spots. Next I stuffed the pack and 3 outer pockets with closed cell foam, then mounted it to the M75 frame. Next, I mounted the grenade box to the M-75 frame with black zip ties. I lined the inside of the grenade box with some black spandex material I had and then mounted the grenade cover. And that wraps day three… Day four (FISD site still not up)… So I only got a few things done today. First I mounted the shoulder straps and the lifeboat hook greeble. Next I mounted the bed roll and antenna. I am thinking I may have too much stuffing in the bed roll but I can fix that later. Overall, I like how the pack looks and all I need to do now is whether it and it will be done. And that is it for the update. Thanks for the interest. Day 5 update… First, I unstitched the end of the bed roll and removed some of the foam. I re-stitched the end and mounted it on the pack. I mounted the antenna and it looks better now. Next, I mixed up some craft paints using several browns, greys, greens, and black to develop about 4 colors of mud for weathering. I applied each color with a small 1” brush using several methods (splatter, dry brush, wash, etc…). One of the colors I sued was a champagne pearl brown, this color added the effect of light glittering that one often sees with actual sand and mud (yellow circle). I am also in the process of adding some black felt to the inside of the frame to help protect my armor from wearing the pack. And that is it. The pack is mostly finished but I need to try it on with the armor and see if any additional protective padding will be needed. I am also curious if I will need to remove my Thermal Detonator to wear the pack. That’s the update so far. Thanks for the interest. Update… and this site outage really sucks since I am not getting any feedback from you guys about this build. Well I put on my kit with the pack and surprisingly everything seems to work well together. No issues with the shoulder straps, Thermal Detonator, or back plate. Walked around a bit in the back yard and I think we are a go for the DragonCon Parade. Here are some pics my wife took. Thanks for the interest.1 point
-
Is that any different than say, Thor's suit changing every single film if only so the costume designers can 'put their stamp on things' as well? Just the way Hollywood works now, I suppose.1 point
-
Congrats man! Such a great feeling to get that approval email.1 point
-
Congratulations Garrison AP Brother! Sent from my iPhone using Tapatalk1 point
-
Great job mate - it looks phenomenal! Sent from my iPhone using Tapatalk Pro1 point
-
Thank you so much for the input. I will try to make those adjustments. Sent from my iPhone using Tapatalk1 point
-
Welcome brother1 point
-
Amazing!! Well done, Greg. :-)1 point
-
Jordan nailed it. Your GML may point out certain things that will get you to basic, but if you look over some of the approved Centurion submissions they will show you the finer details that while not specifically mentioned in the CRL are suggested and/or required for that level. Here is a link: https://www.whitearmor.net/forum/forum/66-fisd-centurion-program/1 point
-
Sounds good. I have a few more pieces to cut out of molds then I get to start truly working on the fit. Just couldn’t wait to try something on Sent from my iPhone using Tapatalk1 point
-
Congrats on the MEPD deployed1 point
-
Is that a technical term Eric1 point
-
Whoop whoop!! Received my approval last Saturday !! Adding TK to.the TI and TN designations... now mentally prepping for my first troop in TK.1 point
-
Ol betsy has been done for a while, other projects creeped in before I posted pix. I love her. Only peave is wiring and battery placement in the clip, doesnt fit as secure as I'd like with all the wires in the way, plus the clip is rather large but Instill like. Need to weater the lil red spiril things, leaving them red [emoji16] Sent from my SM-G960U using Tapatalk1 point
-
Scrap ABS or sign plastic can definitely help reinforce thin areas, just make sure you rough both areas before applying glue to help the, hold. Depending on what are you may also need a little heat to help form the new pieces to sit it better Looking forward to the progress.1 point
-
Yes but you went about it the right way for this kit. Use the Anovos lines then test fit and now you can go about fitting it to you. Sent from my VK815 using Tapatalk1 point
-
It did Thanks. You confirmed what I suspected and finally figured out. The molds have excess edge that needs additional trimming after fitting. Sent from my iPhone using Tapatalk1 point
-
This is super, super clean work, following for my own mods!1 point
-
So, still waiting for my pack and I have a couple of other little things I’m waiting for. I also have to finish that T-21. But I went ahead and submitted pics for basic approval. Here are some pics. I have a few dressing issues and perhaps some strap fine tuning that I will revisit for upper level pics (arms keep riding up for one and my one pouch slide around), but I’m pretty happy with it. Let me know if I missed something. Sent from my iPhone using Tapatalk1 point
-
You mean if lay them flat you can't tell well cool if cracking is screen accurate then where good to roll1 point
-
Actually, the crackling effect is 100% screen accurate, as that is what they did in the films. The reason they are bent in Centurion submissions is to show that they are indeed the flexible type.1 point
-
Added some bling to the field pack cover1 point
-
You didn't mention what part(s) of the thighs are tight, Ron. Have you removed all of the return edges from the tops? (If not, you should). Some detailed photos would be great. As Mathias mentioned, wider cover strips are way more preferable to return edges in the back. We understand that some troopers are larger than others, and that fact is taken into consideration when applying for EI and Centurion. While wider cover strips on the backs of the thighs is not exactly screen accurate, the width is not specifically mentioned in the CRL. As long as everything is uniform you should be good to go.1 point
-
I’d rather see a wider cover strip than to leave the return exposed like that. Sounds like that guy missed the forrest for all the trees.1 point
-
You beat me to it, Tino! Honestly though, Ethan, his kits are awesome!1 point
-
Alright, I wasn't going to post this........but I also did a quick test fit just holding the AB... Mark1 point
-
Ok, I'm playing "catch-up" here.... So I decided for now that I would KEEP the hooks that I made for the biceps to shoulder bell straps. If I find I don't like them later I will remove them. I went ahead and attached double-snaps to the inside of the shoulder bell to connect the bicep. Then I sewed the sew-on snaps on to elastic for the shoulders. And finally attached the arm pieces together. I originally used the wider (more screen accurate) elastic to attach the forearm to bicep (close to the inner elbow) but I was getting the same "bunching" of elastic that Wook mentioned when I bent my arm. I used a similar solution by going with narrower elastic and attaching it to the front inner cover strip. This seemed to work much better. Not sure if this issue is specific to the AP armor, but not a big deal. Next up I did a lot of trimming and sanding for the torso parts... That's it for right now... Mark1 point
-
Got temp approval for a troop, so heres the first picture. the harness holding the thighs up tends to sag after time, so im going to adjust that a bit.1 point
-
Blue- I will try the nylon and see if that fixes it. Green- I may try to undo some the the sewing and cut the Velcro shorter. But that seems like a lot of work for so little. Maybe another day when I’m feeling ambitious. Here is where it is sitting now. I added snaps below the ones I had to bring it up. Sent from my iPhone using Tapatalk1 point
-
Blue - Too much, either tighten or ditch the elastic and use nylon webbing. Yellow - No, it's perfectly acceptable the way it is. Green - Optimum would be covered but it's fine the way it is also. ? Now that you have everything on how's the ammo belt to Ab button gap?1 point
-
You can use Velcro to hold foam padding inside you armor (instead of using glue directly on armor/foam). Like this, you can always remove the foam if you don't need it, or you can also change the foam piece if you need a bigger one, for example. And as Daniel said, look at some overall photos and try to get that look while your pieces are padded. You might need to put foam at the top and at the bottom of some pieces so that they look even, as some other pieces might just need some padding in the middle or on one side, for example. Try it on yourself while holding the foam using some tape, and by trial and error you'll find what lookas the best in the end!1 point
-
Thanks, Ensi! I appreciate you taking the time to post that!1 point
-
Stampy here with another Minecraft video!! My kids watch those damned Stampy videos non-stop. Can't get it out of my head. Anyway, here's a video entitled "How To Put White Armor On Your Wife And Get Away With Molesting Her Too" https://www.youtube.com/watch?v=3dbdlHbNkoA1 point
-
All individual parts, larger resolution than the CRL photos: https://drive.google.com/folderview?id=0B3j5J1aCXC3zflo0bWJxaXhaVkR1NzlYblQxVDNqcjE5SllwaG41YjFSMUdSdW1lT21iWDA&usp=sharing There's also a few internal views, as well. Any other photos you want to see, let me know. I'll shoot an assembly video this weekend. Unfortunately, I'm a stormtrooper, so all you'll probably see are Shannon's feet, or maybe the wall beside her.1 point