Leaderboard


Popular Content
Showing content with the highest reputation on 01/19/2020 in all areas
-
Greetings troopers! I am pleased to announce that the updates to the TFA and ROTJ TK CRLs are now live! For more information: https://www.501st.com/forum/viewtopic.php?f=29&t=91327&p=1334021#p13340213 points
-
NICE job on trimming those return edges, sir! I hate to be a stickler (can't help it, lol) but you may want to take some sandpaper to the top portion (blue line). There is also one tiny indentation (red arrow) toward the upper part where this is especially important. Even a tiny nick like this can lead to a split, but it's easily fixed. Looking forward to seeing your pre-submission photos!3 points
-
Thanks for the great compliments everyone! I'm glad to know I made the right decision with my purchases. Next up is the blaster which I got off eBay. It is a rubber like material with metal accent pieces. There are decals where the LEDs would be. This was an upgrade from a 3d printed blaster which just didn't have enough weight to it and the print lines were visible. Really liking this one! Sent from my Pixel 3 using Tapatalk2 points
-
Yes, you are 100% correct. One of my garrison mates pointed it out when I did it :/ It will be done!2 points
-
Took a while but we got there. Solid group effort and it was great to work with you all on them. Sent from my iPhone using Tapatalk2 points
-
Hey Don actually from the outside perspective your pretty close. Here's a reference photo from the movie armor2 points
-
Nice looking blaster Zack Robust foam blaster are great for trooping.1 point
-
Good night trooper! Nice looking armor!! I have a couple suggestions that you will need to do for your approval. First of all, you need to fill the gap between your abdominal and kidney plate... It's just, too much, it's pretty easy even when you can left the seam for basic approval. As well, the little gap at the front on the lower ridge of the left thigh, just put some abs cement that match the same color as the armor and you will be fine so far! Hope to see you trooping soon! Good luck! Enviado desde mi COL-L29 mediante Tapatalk1 point
-
Excellent tip!1 point
-
Nice work, coming along great1 point
-
Visible seam eh? Could we maybe get a CRL for these guys?1 point
-
I'd recommend taking a look at Lee's excellent build thread: https://www.whitearmor.net/forum/topic/48090-lee_c-anovos-tlj-build/ He is one of a handful of people who have completed the Anovos build....unless you count the guys who did the work for Disney1 point
-
The shoulder seam is purely an Anovos design feature and has nothing to do with production used FOTKs. Those that have already built these kits have filled the seam prior to painting. All the Anovos kits at SWGE were built with the seam visible. Sent from my iPhone using Tapatalk Pro1 point
-
Hi All, Was wondering if there is a thread discussing the new ANOVOS FOTK kits now having split shoulder yoke/straps? ..and if/how those can be fixed or approved? Seems all new ANOVOS FOTK armor design has the front and back shoulder yokes molded to their respective sides and split at the top of the shoulders. Was this change seen in TLJ or TROS FOTKs?1 point
-
You did well. That is the Anovos produced F-11D replica. Sent from my iPhone using Tapatalk Pro1 point
-
The cat wants your attention, mate.1 point
-
(6) Super hero Saturday 2020 Made it to Phoenix with CDZ4861 and CDRO4877 Sent from my sorrosuub C1 comm link device using Tapatalk1 point
-
Great work Nada, we look forward to seeing your pre approval shots. You got this. Sent from my iPhone using Tapatalk1 point
-
lol you must have posted while i was adding exactly that to my response, re read1 point
-
Here is a replica holster by Gino who had access to a complete original ANH suit to cast, and it's a perfect example to show. I might be able to show the details on screen used armour but I don;t have a dead on shot like this. Notice how the mounting straps are on the front of the holster? There are two ways the straps were mounted to the belt but the way they were attached to the holster are the same. Let me explain. It's my belief that the holsters were originally made using loops to hang the holster from the belt - just as they did in ESB. But for whatever reason they changed their mind and decided to rivet the holster directly to the belt, so the loops were cut. The cuts were made either to the front of the strap, leaving a small black tab commonly seen on the front of the holster and the tan colour of the inside of the strap showing going under the belt, and some were cut at the back of the strap so you see black straps attached to front of the holster (as in the photo above) and the tabs would be on the back of the holster. This is why you will see some troopers with black straps and tan straps, but the main retaining straps and the shape of the holsters were always the same as far as I have seen during my research over the years. So, while it's acceptable to have the straps mounted from the front of the holster, the way Darman has done it shouldn't have the tab on the front but on the backside of the holster and the straps should be black with the tan to the inside.1 point
-
New bicep sizes Sent from my iPhone using Tapatalk1 point
-
Hi troopers, More updates on this Troopermaster stunt helmet. The following video runs through gently removing the masking fluid to recreate the ‘chipped’ appearance of the seen-on-screen helmets. https://youtu.be/dDmuw5OQJYk The next video shows the first round of painting the details, in this case, using Humbrol Satin black #85 for the traps, tears, ears and vocoder. https://youtu.be/Saqc67Fkvnk I’ll post some photos later today. :-)1 point
-
Redid the strapping in my butt plate and have resized my bicep pieces Sent from my iPhone using Tapatalk1 point
-
Lovely work, sir. :-) If I may give the mildest of constructive feedback, the t-tracks, rear part of the Hengstler counter and the grip were plastic on the E-11 so, ideally, would not have the ‘metal effect’ weathering. This is now listed as a Centurion level requirement, if you choose to go that route. :-)1 point
-
Thank you very much.1 point
-
If you look on the inner chest piece, there’s a ‘very’ faint line where they tried to give us a place to cut. It’s supposed to match the curvature of the back piece very close to the vents. It’s a bit hard to see. (Pic is screenshot from KB’s FOTK Armor Building Facebook page) Sent from my iPhone using The Force1 point
-
Here's an updated pattern with more detail.
 1 point
 -
Wow this is awesome!1 point
-
Does Jimmoroqui / Jim Tripon have an email? As far as undersuit research, I found some posts on here that refereed Trooperbay / ExtremeRacing's 1-p body suit. Do you use a 2p or 1p undersuit? Brow. No idea Trooperbay had these! I'll definitely be purchasing the brow and neck seal! Thanks for that suggestion. May aswell just get everything on TB since its there. Mesh, Visor, Brow and Neck seal. Convenient! Balaclava... I'll certainly do trial and error, first starting with the thinner ones that operate more like a filming fullhead hairnet. As for technical work, no way I would assemble the full thing without proper sizing / testing! While I feel this would be common sense, I think there's a reason it was mentioned... Hopefully those who suffered before with this didn't have too hard of a fix up job.1 point
-
I agree, Wilson’s SLA printings are hands down the best! I have the pistol as well, and now the F-11D. Just waiting on the latest Blastfx kit before building. Absolutely minimal sanding if any at all...1 point
-
The Anovos holster is more screen accurate than both of those from Darman. Problems with Darmans are: 1. V cut-outs are wrong shape 2. Retaining straps should not slot through the holster 3. Mounting straps attached to the front1 point
-
Got a few more hours in over the past days. Belt and thermal det are finished. Have been reading about cover strips and the different widths. Started work on the right arm. Lots of trial fits with masking tape and have glued up.1 point
-
Yep, no need to replace anything out of Mark's kit if you don't want to. Well, the only thing I would recommend changing out is the green visor Mark supplies. Although it is more screen accurate, it does not do a very good job of hiding your face when people are up close and personal or taking pictures with flashes. I ended up getting a green visor from TrooperBay - it was much darker and does a great job of hiding your face.1 point
-
Welcome, Jake! Some great advice so far. If I could throw in my 2 credit's worth, AM is a fantastic set of armor. My Stunt and HWT are from them, and after years of trooping no cracks, splits or yellowing, and Dave is GREAT to deal with! As for "having to put it all together" that is where we come in. Many (if not most) folks here had no experience building a costume like this, but with our help you can do it, I promise. You don't need a workshop, just some spare room and the correct tools. When you receive your kit, just start a build thread here. That way, you can ask all the questions you like (no limit, lol), post up pics of your progress and any issues you may come across. It may seem daunting, but with some time and patience we will help you achieve your dream of becoming a shiny white spaceman!1 point
-
The AP belt and holster will get you all the way to level 3, Chris, so no worries there.1 point
-
I love how this photo has more then the actual movie lol Sent from my iPhone using Tapatalk1 point
-
Thanks for the welcome folks. Feeling a little less nervous about getting into all this Hah I may have to get a Stormsurgeon pauldron just for kicks and giggles. To be fair at least the medics have better accuracy than most troopers Sounds like a few you guys mix-and- match parts eh? I've got about $1500 saved up. The only thing I'm weary is having to probably add shims and making it all flush, I'm not particularly much of a handyman- then again I suppose a dremmel, scrap test parts and youtube ought to at least help out.1 point
-
Hey Shaun and apologies for not thinking to say this sooner, when trimming the bells you should idealy trim them with a curve. Perhaps not as wavy as the back of this ex. Also, to get the bells to fit right you need to keep the biceps as small as you can (not too small as they need to be proportioned to the rest of the suit) Bottom of the bicep should idealy be smaller than the elbow end of the forearm. Lastly, my advice would be to try and avoid any hot water treatment unless you really and I mean really have to! The pinching of the shoulder bell is one of the things that gives the suit an organic feel, just as it was intended by the sculptor that invisioned the armor to look as it had grown onto the body. Same as trying to make the bicep and forearms rounded, they are meant to be oval as that is the general shape of the actual limbs. TK-awesomness1 point
-
Thanks mate. I’ve really tried to keep this as neat and as tidy as I can. I tried kitting up again but the wife wasn’t here to do up that pesky side snap or do the belt up tight so things still didn’t quite line up. Will have to get someone over soon to help dress me properly. (These are mirror shots again so obviously everything is backwards) The butt plate is still a little out but yes I do have some return edge there (not much but some) to play with if need be. I need to tackle these shoulder bells next. Not exactly sure now much I’ll need to trim them but I would guess not much at all. One thing I’ve realised is that my neck seal is too big on me. I’ve just ordered one from Darman with custom neck measurements.1 point
-
Welcome to FISD Erina. Not only do we have page after page of very good information, we also have many members eager and ready to help answer all of your questions. We offer the right advice and have many experts who have built several different sets of armour, so you will never be alone on your journey to becoming a Stormtrooper.1 point
-
Welcome aboard!1 point
-
Cricket's build thread will likely be your best friend. Soak it all in. I got an ATA kit, and at 5' 4" or so, it suited me quite nicely as it's on the smaller side of kits. It's also a nice thick ABS and I'm all around super pleased with it. Anyway, welcome welcome!1 point
-
Hello and welcome aboard, you will find a lot of kits can be downsized, lots of builds as a guide in the builds sections, here's just one Getting Started section should be able to help you too1 point
-
Some great ABS goodness right there and those trim lines look like a solid starting point.1 point
-
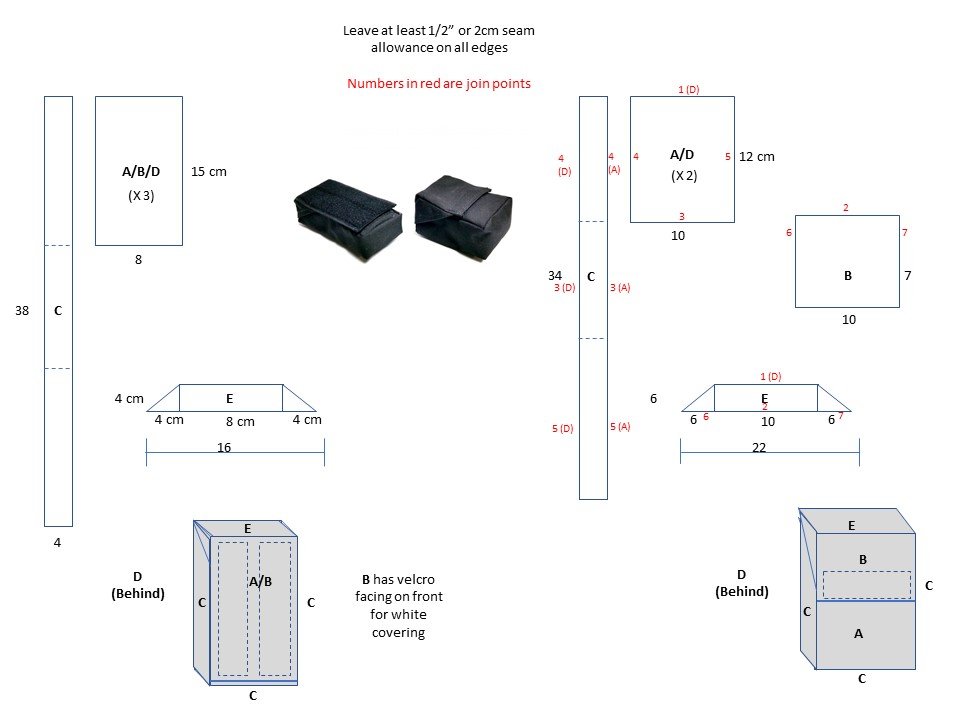
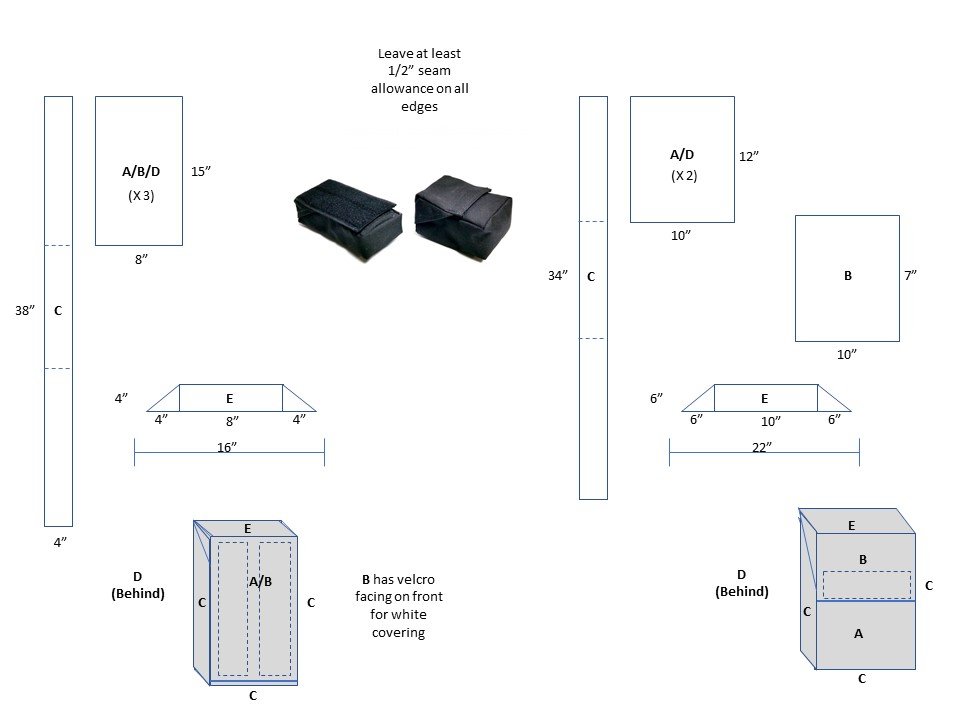
Based on the images I've seen and seam placement, here's a pattern I came up with. Hope it helps you or future builders. EDIT: Pay no attention to the inch measurements - this is all in centimeters.
 1 point
 -
Many build there own, here's a nice thread with rough measurements https://www.whitearmor.net/forum/topic/44125-does-anyone-have-a-pattern-for-the-canvas-belt-pouches/1 point
-
Great work once again, good luck with approval, although I don't think you'll need it1 point
-
Looking sharp! Get those approval pics in and then you can move in to that special next kit [emoji6] Sent from my iPhone using Tapatalk Pro1 point
-
OK so I had the opportunity to test out the “new” product and hell yes! In the picture above you can see the version 1 (on the right) of the shoulder strap that connects the chest to the back armor. The side strap is to connect the shoulder bell and the soft Velcro is intended to adhere to the underside of the kit included fiberglass shoulder straps or the urethane shoulder straps I make. Version 2 is on the left and was made from the new elastic/Velcro webbing. I also decided to make a version 3 which is the same as version 2 but the shoulder bell elastic/ snap is velcroid rather than sewn on the shoulder strap. This allows the wearer to adjust it on the strap for best fit. Going forward I pan on making the strapping kits available for purchase at $110.00 shipped to CONUS and will include the version 3 straps in that kit. I am still working some of the details for the kit and will post a link to the sell them once I have ironed everything out. This also means that if you have are planning on buying the urethane shoulder straps you should order them with the hard Velcro on them is you also are considering buying the strapping kit once its available. Ok so here are some pictures of the version 3 straps in full kit. They performed even better than the version 1 straps. I will continue the tutorial and refine the cut list in the coming weeks. Thanks for the interest.1 point