Leaderboard


Popular Content
Showing content with the highest reputation on 07/29/2019 in all areas
-
What better picture to show an anniversary like this?
 2 points
 -
Hello Sha Sha and everyone else who has viewed and guided me through this process. Thank you guys very much for everything. I will get on all of those changes immediately and have them ready for the Centurion application. Thank you guys for all of the help and thorough guidance and encouragement. Means a lot and super grateful for everything. I will go through and work out all of those changes and look forward to presenting them all to you guys for the next round. I may post them here as well for reference. Thank you guys very much for everything. Fortis Fortuna Adiuvat Ardeshir R. TK-421282 points
-
OK so I had the opportunity to test out the “new” product and hell yes! In the picture above you can see the version 1 (on the right) of the shoulder strap that connects the chest to the back armor. The side strap is to connect the shoulder bell and the soft Velcro is intended to adhere to the underside of the kit included fiberglass shoulder straps or the urethane shoulder straps I make. Version 2 is on the left and was made from the new elastic/Velcro webbing. I also decided to make a version 3 which is the same as version 2 but the shoulder bell elastic/ snap is velcroid rather than sewn on the shoulder strap. This allows the wearer to adjust it on the strap for best fit. Going forward I pan on making the strapping kits available for purchase at $110.00 shipped to CONUS and will include the version 3 straps in that kit. I am still working some of the details for the kit and will post a link to the sell them once I have ironed everything out. This also means that if you have are planning on buying the urethane shoulder straps you should order them with the hard Velcro on them is you also are considering buying the strapping kit once its available. Ok so here are some pictures of the version 3 straps in full kit. They performed even better than the version 1 straps. I will continue the tutorial and refine the cut list in the coming weeks. Thanks for the interest.2 points
-
Love the smell of E6000 in the morning!! Well not really it’s pretty potent stuff but great progress on your build. Sent from my iPhone using Tapatalk2 points
-
And avoid “Buy one get one free” offers. ;-)2 points
-
After nearly a year, I finally finished my ANH Stunt armor!! At least enough for basic approval. I have aspirations of moving up to EI and hopefully Centurion levels with my TK, so I'll continue making improvements, I think I'm pretty close to EI already. Made a couple mistakes along the way, learned that when trimming it's better to err on the side of too big and go back and adjust later if needs be. Had to shim my biceps wider after cutting them too narrow and am actually in the process of shimming one of my shins. Somehow I cut it almost a full inch more narrow (in circumference) at the ankle than the other . It looked fine (a little skinnier) but not really noticeable, but it dug into my ankle pretty bad even with my boots on and I knew I wasn't going to be able to troop with it that way. Some advice to my newb self probably would be, to do a little more research, I always found a better solution shortly after deciding to make a move. But what do you do?? Part of the journey right? Haha! I learned a lot along the way and I had a lot of great help! Thank you so much everybody that chimed in when I was stuck or asked for advice and to everyone that was always so quick and willing to take time to help, everybody on the FB groups as well!! Troopers truly helping troopers!! I want to give a special shout out to @TK-42775, @justjoseph63, @gmrhodes13, @TKSpartan, @Bud Spaklur, for the all invaluable build info and also my son Jackson, daughter Samantha and also Michelle for always being willing to listen to me drone on and on about my build and always being supportive and cheering me on. Thanks again everybody! My childhood dream of being a Stormtrooper has finally been realized and I couldn't be happier!!
 1 point
 -
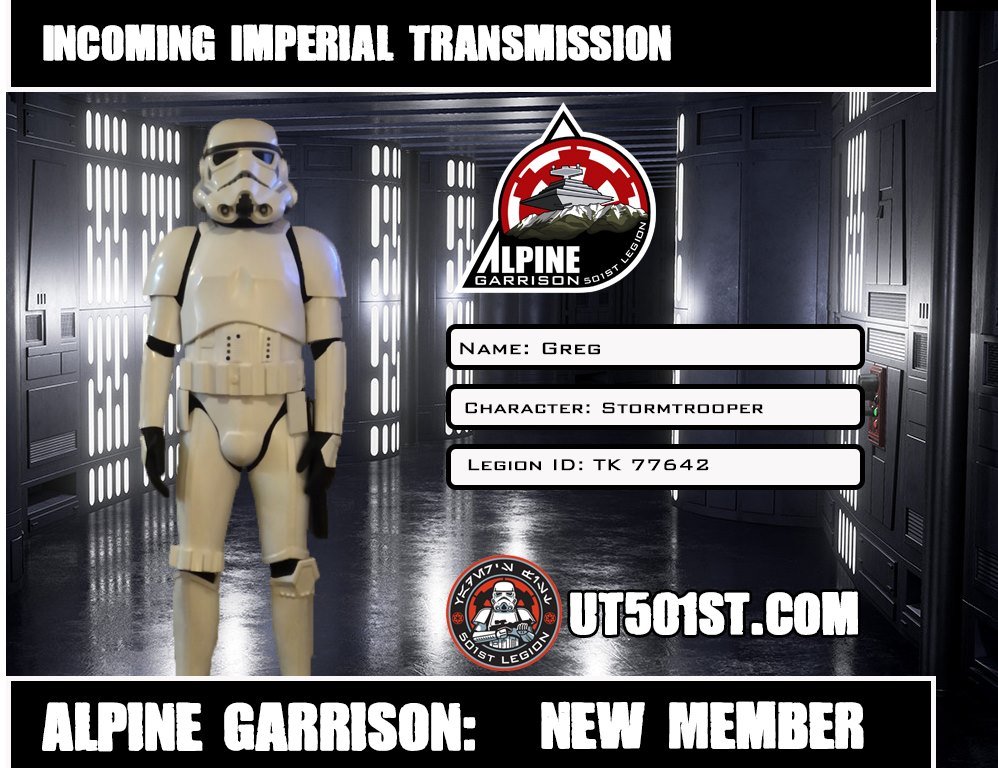
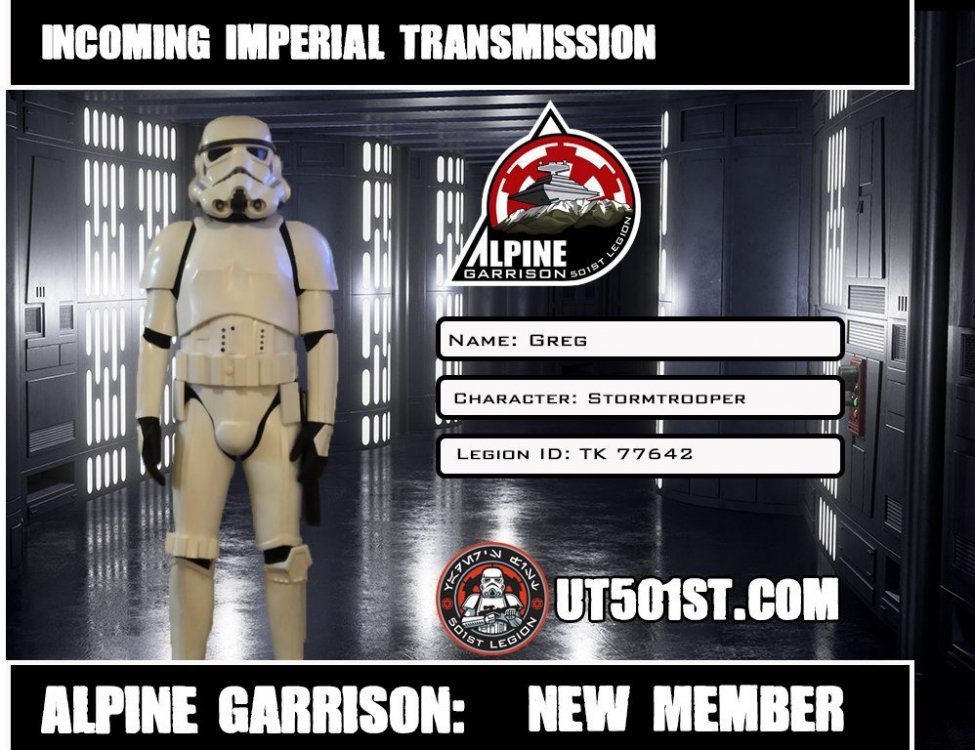
Hello there. I have been an Active member of the 501st since November/December of 2016. I have done many troops and many costumes since joining, but finally got around to doing a TK. So, I am honored to finally be a Detachment member and look forward to getting to know you and trooping in my TK.1 point
-
Once again congratulations trooper and welcome to the ranks, "troopers helping troopers' is FISD's motto and we are all happy to help NOW1 point
-
Thanks Dan. I'm holding off on the shim for now. Still slowly losing weight (this armour was a good incentive). Once I hit about 170 I'll see how the armor fits. More updates. I trimmed the back of both calves. Thanks for the reminder gm. Before. And after on both I added the strapping for the bell to bicep. The SDS TD is too long at about 197mm. The end caps were both cut off. It took me a while to figure out how to remove the ring of grey ABS from inside the cap. I originally thought they were glued on, hence the cutting. I later found out they were simply press fitted (very tightly mind you...) into place. I f I knew this I would have simply used the hot bath sooner. Anyways.... I placed the cap in hot water and tried to pry out the grey ring, but it wouldn't budge. So, I screwed two screws into the ring, and then used pliers grasping the screws to pull out the ring. The original screw holes will be covered by the new clips (to be made) and screws I am using. Left, new screws. Original screws on the right. The end caps are reinstalled with just a dab of E6000. After cutting the caps off they don't overlap the pipe by more than 2 or 3mm, so some help is needed to keep them on. The TD is now 185mm.1 point
-
Looking sharp Greg, congratulations and welcome to the FISD and Legion.1 point
-
Congratulations Trooper, first step taken, go ahead with personal goals,(EIB and Centurion) and keep on being Bad guy doing Good.1 point
-
Nice job! Sent from my iPhone using Tapatalk1 point
-
Congratulations, Trooper!1 point
-
Thank you Mario. Appreciate it very much1 point
-
Hi Ardeshir, Great to see you going up for another EIB! CRL and EIB Application Requirements All required photos are now in and, after review, we are pleased to award you another Expert Infantry approval! On behalf of the DO team and myself, many congratulations! Other-Armor Fit/Assembly In this area we review observations made by your fellow troopers and the DO team. Some observations may lead to suggestions to improve the overall look of your armor. Note that we consider both text (CRL) and pictures (screen caps/reference images) when reviewing submissions As always, let's start from the top. *Really* nice job on the helmet! You've clearly done your research. One suggestion I have is that the bottoms of the ears are a bit on the thick side. Ear trimming is one of those tasks that every TK builder dreads, but if you're up for the challenge, thinning out those bottoms will really elevate the look of your helmet. Reference Images: Moving on to the tube stripes, you pointed out that you're doing the 11-stripe variation, which is totally fine. However, when compared to screen caps, your stripes are a bit thin, making them look too far apart. It's a very minor detail, but if you made each stripe a bit thicker, they would not look overly spaced out. Reference Image: Next, as was already pointed out, the Hero helmets had just some white weathering on the rims of the hovi tips, but were not painted white on the inside. (I believe the text of the CRL here is actually incorrect, but the screencaps are clear.) Reference Images: Continuing on, this is just a minor dressing detail, but when suiting up, be sure the black gaps are even. In this set of photos, your left forearm is sitting too high, and is actually touching your bicep, leaving a larger-than-desireable gap at the left wrist. Next time you're out for a troop, just have a handler give you a once-over to make sure you're looking your sharpest. As your fellow troopers already mentioned, the corners of the ab buttons should be squared off, not rounded: Your butt plate alignment is a little wonky. This is particularly obvious in one of your action shots, so we're recommending you add or tighten the strapping in that area. You could also consider doing some heat bending to make sure it wraps around your body properly. Be careful too about your left thigh running into the left side of your butt plate, as that can lead to painful armor bites. Reference Images: Finally, as was already pointed out, you may want to double check your calf closures, as your left one appears to be sitting a bit open. The best advice I got during my build is to make sure my calves stay closed without any fasteners at all. I personally use Velcro, but I also did a bunch of heat bending to make sure my calves want to stay closed, even without the Velcro. Reference Image: Centurion Requirements In this section we prepare you for Centurion. More photos may be requested in the future that allow us to make better decisions on possible adjustments. If there are any areas of concern they will be discussed here. Because Centurion photos show much more detail than EIB, items to pertaining to Centurion might be seen there and not here. We try to point out all that we can from what is seen, but the final accuracy is the responsibility of the trooper. You did reach Centurion with this set of armor already (congratulations!) but after consulting with @msouza and @TheSwede, there are a few small corrections we're going to have you make before applying for Centurion with your Hero. Hopefully you'll agree they're in the interest of making you look your absolute best, and none of them should be very difficult to make. First, we'd like you to trim off all of the return edge on the vertical ab buttons. While this is not an item specifically called out in the CRL text, we do consider reference images when doing application reviews, and it should be a simple fix. Pry off the vertical ab buttons, trim off all the return edge so they sit completely flat, then re-glue. Reference Images: Next, the L3 CRL states: Back plate shall have no, or minimal overlap of the kidney plate. The right side of your back plate is overlapping the kidney. I actually had to make the exact same correction on my own application, as I have scoliosis so my back is curved. I corrected it by adding some foam underneath the right shoulder bridge, bringing the right side of my back plate higher. In your case, it may even simply be a matter of how you're standing in the photo. Reference Images: This looks like something overlooked in your original Centurion application, but the L3 CRL states: No return edge on the inside of the front of the forearm is allowed. It's possible it's just the photo, but your forearms appear to have a few areas that still have return edge, so those will need to be trimmed. Reference Images: And that's it! Congrats on your second EIB award, and we shall see you very soon for your second Centurion!1 point
-
Doh! Thought it was just above the bottom. Easy fix. Thanks!1 point
-
Noticed that when we reviewed the photos. And changed it. Unfortunately I held my arms pretty strange in the corrected pictures1 point
-
Fantastic! Thank you so much for your guidance, will keep an eye on this thread for the result1 point
-
The choice is certainly yours on how high you wish to go. One thing I can say is, it will be a little easier to build to Centurion from the outset. It will save you time in the long run, the little extras aren’t very expensive to obtain, and you will have a great sense of pride knowing you went all the way. Sent from my iPhone using Tapatalk1 point
-
Hi No I meant to update the first post to have the correct photos. There are quite a few photos that’s not needed and the added photos are in following posts so it’s a long post to look over. But to avoid confusion and accidently removing photos that should have been there you can leave it as it is, I’ll get cracking1 point
-
Congratulations trooper and welcome to the ranks, look forward to seeing you at EIB1 point
-
Excellent Jesús, Good luck with your application. Excelente Jesús, Suerte !!1 point
-
Congratulations trooper and welcome to the ranks1 point
-
Hi, James. so fast posting your pictures. great job. I'm Sorry I forgot to tell you to post a close photo of your boots as per the CRL: Level two certification (if applicable): There is no seam present on the front of the boot. Boots have a black sole Looking at your armor lower back section, notice the two white snaps. As the CRL states: Two male snaps are present on the lower center tab of the Posterior Armor. Snaps do not need to be functional. Snaps are silver in color with the bottom of the snap facing outward and are not painted. You may want to remove the white color in advance before the D.O. Team review your application. cheers1 point
-
Yeah Greg ! Welcome to the Legion and FISD trooper. First step, keep on going forward. Enjoy being Bad Guy Doing Good.1 point
-
Looking fantastic!! Sent from my iPhone using Tapatalk1 point
-
Congratulations! Many helpful ideas in this thread, especially with the helmet. Best of luck shooting for Centurion.1 point
-
You can totally look at my build. But remember this is my first build and there are far better people than me with more experience that have their own threads. You can get at least an idea of what to do if you look at my progress. I follow Sha Sha and Crickets build threads. Their build threads are more tended for smaller people who have to trim down their armor. But it is still an amazing source material for everyone else.1 point
-
TK-77642 reporting for duty I'm gonna keep moving towards EI and hopefully Centurion, so I'll keep updating though. Thank you all for helping get to this point!!1 point
-
Ok, tomorrow i will make the last photos for some details and post it on the EIB request part, if they do ask me for a blaster, then i will have to wait until i get one. Thanks you!1 point
-
Like Chris says, the cost in material isn't that much. It's the molds that are extremely pricey. But we're talking about injection molds, so most likely two part molds that are CNC cut from aluminum. I also guess that all the stuff and equipment required to inject the resin is costing a lot too, so unless you're doing that as a bussiness and already have the tools, the set up cost for a propmaker would be far too much. However a regular mold would probably work fine too, you would only lose the inside details. But the issue with resin is that the more flexible it gets, the thicker (gooey) it gets too and the faster it kicks (start to harden) which makes it more difficult to work with. Because of that short lifespan it's more difficult to cast large parts, but also to obtain something that has a somewhat even thickness, and free of air bubbles. In this case the best way for us (one that doesn't involve a crazy amount of money) is to project it with a spraygun. But if you look at what MIMIC has done with his armors this is pretty much it (I'm not here to debate his reliability or else, I know he can't be trusted anymore). Flexible gelcoat on the outside for the shine and smoothness, and fiberglass to back it (done with a flexible resin of course) and you get something that is extremely close. Even what Jimmiroquai is doing is not bad. I only wish he'd spend the time perfecting his surfaces before molding.1 point
-
Mario and Joseph already chimed in with some great sources! One thing to remember; AVOID EBAY! if it feels like a deal or a steal, it's probably a ripoff in disguise! Etsy can also be very hit or miss! Also, buying completed kits from other members can be problematic; to be approved it will need to fit *you* properly, and adjusting a built costume can sometimes be very tough! Just buyer beware1 point
-
Welcome, Austin, and you are doing the exact thing I always recommend, which is asking questions! Although this site can appear a bit overwhelming with all the info available we are here to help guide you through. The link Mario gave you is where you will find many of the answers you need, but always feel free to ask if there is something you can't find. When considering an armorer, the ones in the "vetted" section are tried and true: https://www.whitearmor.net/forum/topic/11538-the-various-types-of-armor-and-where-to-find-them/ Note that depending on your body shape/size, some armorers have variations for taller/larger troopers. It's also important to know who NOT to buy from: https://www.whitearmor.net/forum/topic/19329-where-what-and-whom-to-avoid-when-buying/ Again, we are always available for any advice you need so don't be shy about asking!!1 point
-
No worries, thanks for giving me an update. I appreciate the feedback from Glen and Mario.1 point
-
DANGED fine job on that armor, Jennifer! If I could make a few small suggestions, they would be as follows: 1. Trim down the tops of the thighs a bit, There should be a small gap between the tops of them and the cod area as shown: This is a really easy fix with a pair of Lexan scissors and perhaps a Dremel tool. It will give you a greater range of mobility and prevent that "clicking" sound (which you may be experiencing) when you walk. If you opt to do this (suggested) just follow the existing lines when trimming. EXCELLENT job on lining up the back/kidney and especially the posterior/kidney.1 point
-
Almost weathering time. Honestly, if I hadn’t had extra thighs to scavenge, it would have been a pain to rebuild the bottom from scratch. If I had to do it again, I would have originally cut out an hourglass shape instead of just the top triangle, so we could save the bottom lip section, and put it back on straight. Lesson learned. I never foresaw them inverting upwards that badly when we split the top so wide, but it makes perfect sense in hindsight. Sent from my iPhone using Tapatalk1 point
-
lol. E6000 is a life saver, I still use it on a majority of my projects.1 point