
Leaderboard


Popular Content
Showing content with the highest reputation on 11/02/2021 in all areas
-
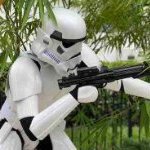
Happy day after Halloween everyone. I replaced the window tint on the helmet cause I had ripped off the previous tint before the silicone spray. And I added a nylon strap under the shoulders to keep them in position better. Before the shoulders liked to fall towards the back. here’s me and my sis on Halloween. Used a rebel pilot helmet as a candy bucket haha. And just stuffed an unmodified hasbro blaster in the holster.3 points
-
Hey everyone - if you or someone you know has a paid order outstanding with Daniel Hellhounds for a blaster or armor parts, please reach out to me. I'm putting something together and would like to hear from as many people as possible - hopefully it will help. Thank you!3 points
-
Thanks for the diagrams! I heated and bent the right backplate shoulder joint a bit because it did stick up versus the left. Also put a light curve to the arches.2 points
-
After lots of sanding and filler primer the boxes are ready to mount. I got some 8/32 machine bolts and JB welded them into holes I drilled in the back of each box. The longer bolts are to mount the belt to the abdomen. This is my first mock up-exciting!2 points
-
Thanks for the suggestions! I'm working on getting that TD to be a bit better. As for me, I'm approved and got a TK number!!!! TK 89400 reporting for duty!! Also, I did some work on my blaster. It's a vintage Hyperfirm B grade, apparently one of the last they sold. It had weathering all over the place. Lots on the grip. Some on the T-tracks. TONS of brass on the scope. So I repainted it completely. I'm a fan of weathering. I like it and tend to weather most of my models. But it needs to be at least realistic and not too obvious. Major wear areas should have weathering visible from a few feet away, but the rest should be very subtle. At least in my opinion. I tried to do that here. I also added an accurate D ring to the blaster. I drilled out the scope a bit and fit a dot of black vinyl with an epoxy dome to give the front a bit more character. Sad black rubber scope was sad... and now it's much happier. And then I printed up a counter sticker and something fun for the scope! I drilled the scope out to a bit over 24 mm and gave it some depth. Then I filled it a tiny bit with resin to give it a flat base. And then I printed a scope sticker on holofoil with an epoxy dome. The design is based on Crosshair's scope in Bad Batch with a little bit of tweaking. Even with being stuck in a shallow well, the holofoil manages to catch light nicely and reflect rainbows as it gets waved around. Super fun. The counter sticker is black and white printed over dark grey vinyl. The design is simple, but overlaid on a hengstler counter photo to get the dimensions right. I'll swap this one out for one with my TK number shortly. The nicer weathering and small personal details have me loving this little E11. Fun to combine my day job with TK tweaks!2 points
-
Hello all, Grew up a life long fan of Star Wars and getting my children involved as fans as well. After much research on this site, I have chosen the route of purchasing a ESB tk outfit from RS propmasters. I am currently thinking of applying to be a member of the 501st in the Wisconsin garrison. I will have to kit up sometime, get some pictures taken and sent in here for pre-approval. Always good to have extra eyes to help see what I am missing, and hopefully get approved and out trooping to help bring smiles to peoples faces young and old.1 point
-
Hello everyone, Just wanted to drop in and say hello and ask a question. I have been following the 501st for several years and now that my work career is winding down and I should have more free time, I am eager to try and join the 501st. I will be trying to join the Canadian Garrison once I get my armor completed for review. I have spent several hours mulling through your forums and am amazed at the wealth of knowledge there. The idea of building and having my own TK armor has been a dream since watching ANH in theatres in the summer of 1977. I am, about ready to order my stormtrooper armor and helmet but am looking for a bit of advice on the 2 options I have narrowed it down to. ‘’I am looking to order from RTpanda or Authentic Props, as I am in Canada and feel it will be easier. I am 5’11 and weigh about 220 to 230 pounds. I believe this qualifies me as a “husky” trooper. LOL. I originally thought to go with RTpanda but I read that these armor builds are geared more for taller troopers as well as larger bodied troopers. Being average height, would I need to do a lot of trimming to get the pieces to fit? Is the AP armor a better option for normal height but slightly heavier set people? From what I can see, both seem to be great options. Just wondering if one would suit my body type better than the other. I want to try for centurion level armor certification as well. Is one of these better suited for that? Thanks Gerald1 point
-
Thank you.1 point
-
Thanks Glen I'm thinking same, that's theres maybe too much padding in the helmet, meaning it has to be tilted forward more for visibility. As an example my helmet has some padding near my forehead, but no padding at all at the top. The top of my head rests against the plastic of the helmet.1 point
-
Hi there and welcome. Can only reinforce what has been advised already. There’s plenty of info on where to buy your whole suit, and where not to as well. Stay away from eBay and Etsy and mass produced toy shop type vendors as a rule, it will save you money and time in the long run. Sent from my iPhone using Tapatalk1 point
-
This is going to be very very cool. Can't wait to see the finished product, so you must post a video when done1 point
-
This is Shawn. I had almost finished minus the boots and cape, but I was under the impression no CRL would be approved. I could have been wrong. Sent from my iPhone using Tapatalk1 point
-
I didn't see a definite NO, the LMO's requested a different helmet so there may still be a chance but @Sly11 would be able to shed more light to this1 point
-
Welcome to FISD and ESB is a good choice (similar to @CallMeMrTibbles I am not biased at all :-)).1 point
-
Hi! Welcome to 501st and FISd. It's great to have you here. Great choice on the ESB trooper (not that I'm biased [emoji1]). Have you ordered an assembled commission from RS or are you building it yourself? Even you've ordered a commission don't be worried if you need to make some adjustments when it arrives; that's very normal and there will be plenty of help and advice here and in your local garrison to get you through to clearance. Post lots of questions and pictures, and I'm looking forward to seeing your build thread and pics from your first troop [emoji106] Rich1 point
-
Congratulations Trooper !!1 point
-
Hey everyone! I recently purchased some new AM armor from Dave, and I am so stoked for it to get here! I previously built an Anovos ANH Stunt TK back in 2017, but unfortunately had to sell it. I've been armor-less for awhile now and am beyond excited to get back in that beautiful white plastic! After thinking a lot about it, I'm leaning toward doing an ESB version of the TK this time round. I love the look of the all black frown, it doesn't seem to be done very often, and ESB is easily my favorite of all the movies. (Super unpopular opinion, I know) I'm starting this thread now to see if anyone has any advice or tips they'd be willing to share before my BBB day and getting started? With my Anovos kit, I didn't have to build the helmet, and I'll be honest that's what I'm most nervous about haha. The ears specifically seem pretty intimidating. Any advice is welcome! Thanks for looking! MTFBWY!1 point
-
Thanks Mario! Excited to get started!1 point
-
Great to know you're going for higher levels Kalin, looking forward for your BBB day .!!1 point
-
Coming on nicely Richard. Sounds exciting what your planning sound effects wise. Do post a video when you get the electronics working. Sent from my iPhone using Tapatalk1 point
-
Looking nice Trooper !1 point
-
More tabs glued in, and it's already a pretty good friction fit1 point
-
Found some foam blocks and wooden battens exactly the right size for internal support. Much stronger now.1 point
-
SUPER nice job on this WTF armor, Dan! One of us will be with ya' shortly, so hang in there!1 point
-
Brilliant armor. Good luck brother Pipertrooper TK-270561 point
-
Hey, great effort with the kit, look after it and it will last years of trooping, with the ear try mixing some ABS paste with your scraps and acetone, you won’t need much ABS as it’s a small hole, take the ear off glue a small piece of abs behind then fill from the front, once it’s dry drill the new hole. Try it on a scrap piece first. Keep up the good job you are almost there.1 point
-
Congratulations!!!!!!!1 point
-
Excellent news Kalin, and you are right, not many do the ESB so it will be great to add another to the FISD ranks. Good luck on your journey and i hope you get to keep this one. Don't forget we have 2 additional higher levels of approval that don't take much work to achieve, so I hope you consider going all the way to centurion. As Glen mentioned, go and check out the ESB build threads, lots of info to garner from them.1 point
-
Amazing what can be made with foam, hope you had a great time1 point
-
Many find they have to make some adjustments, I do commission builds locally and I've been pretty lucky with most being around my size, I still like to get a mid build trial fit just to get any tweaks addressed. Good to see you are making the adjustments and taking them in your stride1 point
-
Still amazed by the work you put into this project, once again thanks for sharing and all of your hard work1 point
-
The boot soles are tan, not black, and the forearm armor is painted with red wheras the battlefront bersion isnt1 point
-
Yep, they pop up on eBay here and there, but ensure it's actually Anovos not recast - new in original box is usually safe from a reputable seller. Or, honestly, I wouldn't be surprised to see Denuo Novo start offering them next year... Alsoalso, ensure it will fit you. Anovos is not easy to shim or fit for larger folks and there really aren't replacement panels available anymore.1 point
-
THIS IS NOT A BUILD THREAD... per se. Now that resin E-11 kits have all but disappeared, many are going to the 3D printed version. 3D printing has some advantages over resin builds, especially the fact that you can have MUCH more accurate finished product. This tutorial will show you how to get all those print lines out for a smooth-as-glass finish before assembly without as much work as you would think, especially if you are aiming for Centurion level approval as there can be no print lines on your blaster. I spent a total of 3-4 hours (not including drying time) on this project, so it's a lot faster that you may expect! This tutorial is for a classic E-11, but the process will work for any 3D printed weapon. For this purpose, I am using a kit made with Bryan's (trooper96) awesome files (link). Know in advance that it contains basically every single part of a real Sterling, down to the nuts and bolts... literally, and is in my opinion the most accurate ANH blaster kit out there. The fully functioning folding stock is a nice touch! When it comes time to put it together all those little parts can get confusing, so I suggest checking out Glen's @gmrhodes13 thread here. I couldn't have done this build without it! IMPORTANT! Printing the kit (or having it printed) in PETG will decrease the time you spend sanding dramatically compared to PLA. Trust me. You can also have it printed in resin, but that can be a costlier option. Another advantage to PETG is that it contains minimal "threads" as opposed to some PLA prints. NOTE: I did not include the power cylinders or Hengstler counter. I am using a real counter and making my own cylinders/assembly, but the same process would apply to the printed ones. More on that at a later date. LET'S GET STARTED! To begin, you will need the following supplies: 1. Filler Primer- This is a great option for filling super fine lines but requires a lot more fine sanding prior to use. I didn't use it on this build, but I have in the past. 2. Bondo Glazing & Spot putty- This is miracle stuff. Unlike regular Bondo which requires mixing, it is a paste that you can simply apply with your fingers or a craft stick. It fills fine to medium lines like magic, dries hard in less than 20-30 minutes or less and is SUPER easy to sand! 3. XTC 3D epoxy coating- Since this was the first time I had used this, it took some experimenting but the final results speak for themselves. It also provides some additional strength to the pieces. IMPORTANT: Mix this in very small batches. I can not stress this enough, as it sets up fast. Be SURE to read all instructions before using. 4 1" (2-3cm) Foam brushes- These are used with the XTC coating. You will need at least 5 or 6, as the epoxy only lasts a few minutes after mixing so you cannot re-use them. Link here. 5. Sandpaper- 80, 150 and 220 grit. 320 grit optional. (No photo... we all know what sandpaper looks like). 6. Spray paint- I suggest Krylon Fusion. You will need flat black, gloss black (for the grip). Silver is not needed if you plan on painting all areas black. 7. Super glue gel- Get the gel type. It doesn't run. 8. Super glue accelerator- Optional. 9. Mask (PPE)- I strongly suggest wearing a mask. Dust from sanding and the fumes from the XTC can be harmful. 10. Small plastic medicine cups- The ones that show the exact measurements work best. These are only good for ONE use for each batch of XTC epoxy and are good if you don't have a precise scale. Link here. 11. Wood craft sticks- For mixing the epoxy. Can be found at your local hobby store 1 2 3 4 6 7 8 10 11 I am not including photos of me sanding down the parts. That would be pointless, and I did NOT sand down the interior parts as they will not be seen. I started with 80 grit to get the larger print lines down. After that, 150 and then 220. There is no need to go crazy with the sanding, as it does NOT have to be perfectly smooth. For the T-tracks I used a foam sanding block wrapped in the various grits to get into the crevices. Like I mentioned PETG sands down FAST and EASY. Hints: Do NOT use any filler on the bottoms of the T-tracks, just sand them down fairly smooth. Sand the interiors of the holes using sandpaper wrapped around a pencil to remove burrs. Do this BEFORE gluing the 2 parts of the barrel together. The more you sand down the parts with the 220 the less filling you will have do. After wiping down ALL surfaces with a damp paper towel to remove residual dust and letting them dry, I applied the Bondo paste pretty liberally. Like I said, this stuff sands VERY easily so you can go fairly heavy when applying it Dry time is less than 30 minutes or so, but make SURE it's completely dry. It already looks/feels a lot smoother, but after that I went back to the 220 grit sandpaper. After final sanding: (Only some parts shown) Note original print lines Special notes- 1. In order to keep the details in the interior part of the grip, after the Bondo I used a dental pick to clean them out. When using the XTC later I went VERY lightly as not to fill them in. 2. The textured part of the grip was actually perfect and required no sanding. filler or epoxy coating so I left it as is. 1. 2. Due to the fact that most 3D printers cannot print long objects some parts will need to be glued prior to applying the paste/filler. The folding stock comes with 2 tabs which I glued to the U shaped stock part and then filled. NOTE: The arms have distinct curves- there is a left and right so make sure you have them on the correct side before gluing. Finished look Real Sterling The barrel jacket/exterior also comes in two parts. The print came with tabs to help line them up, but before making them one piece I added/glued in extra plastic tabs for increased strength. I suggest that you do this as well, but be SURE the added tabs are flexible and conform to the interior as seen in the last image below. Sanding the added tabs down before gluing will help with adhesion. The main body has not been epoxy coated or primed, just some Bondo paste where needed. Being a PETG print it came out ultra smooth with just sandpaper, and I didn't want the epoxy dripping through the holes and puddling. Be VERY careful when handling the assembled barrel. Until you get the T-tracks glued on it can be somewhat fragile at the joined seam, so use minimal pressure when sanding after you apply the Bondo. NOTE: Because of the added tabs and because it fits flush you will need to sand down the rear end of the interior barrel insert in order to get it to slide all the way in. DO NOT FORCE IT, or you can knock off the tabs. (Sorry, I forgot to take a picture beforehand). For even MORE added stability, the T-tracks should have a bit more glue on those seams when doing your final assembly. OK, time for the messy part, lol. HINT: Don't try to coat too many pieces at one time! After your first batch you will be able to tell how long you have before it starts to set up. As mentioned, the XTC epoxy filler dries fast. Really fast. You should figure on about 5 minutes (or less) of working time per batch, so plan accordingly. You can mix this by volume or weight. If you have a scale that measures grams that is what I would highly suggest using. The mixture needs to be precise. IMPORTANT: The fumes are harmful. Use a mask and apply/let dry outdoors. I suggest doing this in an area where there will be no dust/insects/debris that can stick to it while curing. After wiping all parts down with damp paper towels and letting them dry, I added the first coat of the XTC. Since I hadn't used this product before I went light, applying a very thin coat. You can see a big difference immediately! HINT: Always go in one direction when applying. If you apply it too fast you may get bubbles. If you go too heavy, you can end up with "puddling" of the epoxy as it not viscous and will settle quickly while drying in the flat areas/crevices. I wiped out as much as I could with the sponge brush immediately, and in the end they came out pretty nice. Again, GO LIGHT! After 4 hours I hit some of them again a bit heavier as needed. No need to sand between coats. Cure time depends on heat and humidity. Read the instructions for details. After drying... smooth as glass. Yes, there are a few miniscule bubbles, but they won't be noticeable and can be lightly sanded out. To ensure paint adhesion, you will need to sand everything down. I used the 220 grit. You can go with a finer grit but in looking at the finished product below I don't think you need to. When applying the XTC to the breach block I did not coat the numbers to keep them from being filled in. These pieces have been painted. A few notes on painting- To make sure you have proper adhesion for the glue, before painting apply blue tape over the areas where you will be attaching the various components. An easy way to do this is to put the piece where it goes on the body and draw a line around it with a thin Sharpie marker. When applying the tape, keep it about 1/8 inch INSIDE the lines. Although the paint may SEEM dry after a few hours, be aware that it takes a lot longer for it to completely CURE. I know it's tempting, but after final assemble try to let it sit in a dry place for 5-7 days for a much more durable finish before you run around the house with it yelling PEW PEW at your pets. Assembled product I am adding the scope rail, Hengstler counter and power cylinders later, but I wanted to show how smooth the parts came out. I forgot to cover this area before painting, so it will be sanded down prior to gluing on the power cylinder assembly. Finished! Final notes Yes, you will notice that some areas I have left silver/metallic. I may paint these black at a later date, but as seen below on these screen used blasters some were left "au naturale" (or the paint rubbed off during filming). It's a matter of choice. I will add some light weathering as soon as I attach all the various components. If you have any questions about anything included here (including assembly) always feel free to ask.1 point
-
Thanks! I wish I had known about Bondo paste, XTC epoxy and PETG printing before I did my DLT-19 a few years ago. It would have taken 5-6 hours instead of 40!1 point
-
I've purchased from ATA to replace my botched bicep (used heat gun like a noob). The color is not noticeably different, and they do sell in parts. Trooping in the day would yield a good contrast, indoors with weird lighting might trigger an eyebrow raise from a Centurion.1 point
-
Some info in this thread, it's mentioned that TM (Troopermaster) is a good color match Here RS is mentioned You can find contact info in this thread1 point
-
Hello and welcome aboard. The Black Series First Order helmet needs a little work to get it approvable, a great thread by Chris posted only a few days ago For everything First Order head to the First Order Battle Group, you will find maker information in this thread Good luck with the journey and research1 point
-
I am back on this now. The armor I had received from MIMIC was too rigid and cracked....of course after I painted it red. I have new armor coming from KB and will be able to complete once I receive. I will still need the cape, red boots, and red gloves....as well as the helmet confirmed (TFA or TLJ). I stand by TFA since that falls in the timeline of the book and he originated prior to Phasma joining the First Order.1 point
-
Like many others, I didn't get a chance to pre-order the figure. I even tried waking up in the middle of the night just before the "release" time with the tiny glimmer of hope that I could snag one and not have to run out, still to no avail. I got up and went to Target before it opened and found there were two people there in front of me. I made nice small talk with both of them just in hopes they wouldn't just horde whatever figures were available. The first guy bolted when the doors opened and managed to scour every toy isle before I got there. He was angry because he said he saw them on Friday, but the register wouldn't allow them to be rung up. What really got him going was there was not a single Target exclusive out on the shelves. He ran off to find a manager who went to the back and after about 10 min she returned with a small cart of all the Target exclusives they had. She asked what you guys are looking for and the first guy pointed at the black series figures and she said grab whatever you want. I looked and saw there were only three Capt. Cardinals. The first guy grabbed all three and my heart just sunk. He immediately turned around and handed one to the second guy and then to me. Faith in humanity restored. What a roller coaster of a morning. Link to photos in Shawn's Build thread...1 point
-
Started the thread on at the following location:1 point


.thumb.jpg.a76e0f48e0bb54184765760e710c5f96.jpg)


