Leaderboard


Popular Content
Showing content with the highest reputation on 02/17/2021 in Posts
-
Congratulations to our continuing LCO, Ingeli Hedberg7 points
-
Finally made it, getting approved on 17 Dec 2021. Its taken a few days short of 2yrs to complete my build, so its been quite a journey. Completing a Masters, working full time and juggling a family, all impacted on my original plan of getting things finished in 2 months. As this was my first build I learnt a ton and made a couple of mistakes. Still need to make a few adjustments to fit before going for EIB and Centurion, as over the 2yrs lost some weight and gained some weight so different pieces are better fits than others. I enjoyed the build process learning a lot more about the armour than if I had of followed my original plan of buying a commission from RSpropmasters. Though not saying I wouldn't have been happy with that as they make good quality stuff and I would have been able to troop before COVID. Thanks to those that provided comments and advice along the way including: justjoseph63, gmrhodes13, TheSwede; ukswrath; sly11; Tarok; TkSpartan; husky68, + many others. Couple of tips for new builders (going to get a bit more philosophical than usual). 1) Research research research; 2) Be open to asking questions on the forum and open to feedback given in good faith, someone has probably come across the same issue previously and will have the answer; 3) Measure three times, cut once, if unsure measure again or take a photo and ask for advice on forum; 4) Be prepared to make some mistakes, if it can't be fixed its not the end of the world as there are more important things in life, you can always repurchase a particular piece; 5) If your getting frustrated take a break (You will find out about the sniper knee) even if its a few weeks/months; 6) Take lots of photos, really rewarding to look at where you have come from by the end of the process; 7) Real life happens, and is more important; 8) Enjoy the journey, not just the destination;
 5 points
 -
I did get the other ear trimmed and fitted. Any thoughts or suggestions?3 points
-
Hey troopers, I think we all know that this very forum is a hot bed of experienced troopers and helpful information. Years of experience and TK knowledge. To that end, here are some of the key features, (sometimes subtle, sometimes obvious), that I feel really make an iconic ANH Stunt Stormtrooper, all in a simple, easy to digest video. Topics include; -brow height -eye trimming -ear trimming -vocoder painting styles -hovi tips ...and more Enjoy the video, and please feel to ask any questions or comment. :-)2 points
-
Here I am again. I was first approved back in 2017 with a First Order Stormtrooper and given my 501st number. Over the years and other kit builds later here I am again, a newly approved with the Imperial Stormtrooper (ANH Stunt). During that time with many troops under my belt my journey has me living my dream and seeing the smiles that I can bring. It has been a totally awesome ride!
 2 points
 -
Mucha suerte en esa solicitud Guillermo!!!2 points
-
This is very sound advice. I did this to my doopydoos E11 using a fine drill and a finishing nail that I snipped the head and tip off of. A little e6000 everywhere and it’s solid as a rock.2 points
-
I somehow missed this thread. I was approved October 28th, 2020. I was approved EIB #1007 November 9th, and Centurion #485 on December 2nd. I look forward to trooping!2 points
-
It's amazing how much more productive I've been now that I'm feeling a bit better - I just kept going and cut the other thigh! The right side with the ammo pack has now been cut decently symmetrical - I used a template and measured several points logically, so I'm happy enough with it. I also sanded the inside lips smooth on both in preparation for paint. Still unsure how I'm gonna safely mask them without peeling the clear and would love any suggestions... If you didn't notice, I also removed the interior strapping mounts I had glued in (you can see where I scuffed up the paint to help them stick). I'll probably respray the interior flat white real quick before I figure out where the new mounts will go, and I'll also be using TWO snaps for the attachment on both, unlike last time. The single snap mount on the outside of the leg would make the buckle swivel and it would get lost down the side of my leg... Dumb design, but hey I'm learning. With the thighs cut, I can hang them a little lower and hopefully have more mobility at my knee as well. I'm glad I left some room for adjustment in the belt drops. And just to give you an idea of how much I removed... I absolutely should have test fit better early on and done this before paint, but here we are... Looking forward to my next suit up and hope this will help a lot! Okay, what's left?! - black outlines on the rear traps, and final helmet cleanup in general - final barrel paint cleanup - reinforcing the shoulder straps more with epoxy and adding foam and a bit of velcro to the undersides - painting the areas I trimmed white again, and... Clear? I don't want to buy more 2K... (On a side tangent, I've been appreciating how tough and shiny it is. Peeling and the price have been the big issues...) - remaking the mounting tabs and reinstalling the thigh strapping - installing the blue mesh for the tube stripes - not needed for submission, but the helmet will need fans at some point too... And I'll install my audio system in the helmet, and likely behind the chest plate again... It works well. - blaster? And that should be it! Hopefully I'm on track to suit up and take photos this weekend. Thanks for stopping by!2 points
-
Congratulations Mark and welcome to Legion. Enjoy the additional access and posting permissions.2 points
-
I've been on a roll lately and actually nearly finished the helmet last night! Got my frown mesh attached using some black 3M VHB tape - this stuff works great! I also attached the lens (I picked up a bunch of green material when AM switched over to Florida, shhhh don't tell Dave haha) after trimming it down a bit, adding a nose notch, and adding velcro in the center and edges. I like my lens to be removeable instead of hard mounted for easy cleaning, and the slight gaps allow a little more airflow to prevent fogging, without looking too bad. I didn't show it, but I also sprayed and wiped the lens with some "Spit" brand anti-fog spray from my scuba bag. I also threw my airsoft helmet padding in - I gave a new type a try and I think I like it better! Here you can see my interior. I temporarily used some blue masking tape to back the tube vents, but @TK 14166 is gonna mail me some of the blue mesh material he used on his (big thanks!). And with that, the helmet is almost done! I've been struggling a bit with the engraved black lines on the tears and traps... I had at least two major mess-ups where the Sharpie extra fine oil-based paint pen I was using bled all over the place, and I had to wait for it dry, then polish the marks back off and try again. The front tears look good but the traps need another attempt when I've calmed down a bit and cleaned them back up... it's been frustrating. Damn, she shiny... I also finished cleanup on the thermal detonator paint to an acceptable level and mounted it. Same as belt boxes - scuffed the surface, then a little E6000 before screwing it on to the belt, then more craft foam to cover the screws and magnets and prevent them from rubbing. I committed and chopped the first thigh - after checking out some reference material and marking it out with tape/pencil, I went to town with my Dremel cutoff wheel. I used the sanding drum and some sanding blocks to get it to a shape that looked good to me, but did have some issues with the clear peeling at the edge (surprise, surprise). I plan on spraying the lip white again, but am concerned about masking it and making the clear worse if I have to peel the tape back off. Unsure how I'm gonna handle that, and hopefully it doesn't look too bad. I ended up taking at least 2" off the top of the front, and went DEEP on the inside of the leg after seeing the mortar trooper - hopefully it's way more comfortable now, but I really didn't want to mod the rear coverstrip. When I was happy with the shape on the left thigh (without the ammo pack), I set out to recreate it on the right thigh. I taped a couple of pieces of paper together and used a pencil to mark the edge and make a little template, which when marked with a sharpie and flipped inside out, worked well to mark the same pattern on the other thigh. I'll be cutting it soon as well! Here they are for comparison... pretty big difference. Daniel is still working on my blaster, but I did purchase a "proper" fake, working M300A Mini Scout flashlight for when it arrives! I think that's it for now! ALMOST DONE!2 points
-
Name: Guillermo Chicón Lorente Username: Starkiller_2021 TKID: TK-22021 Garrison: Spanish Garrison Mandatory Information Armor = Armour Factory Props Helmet= Armour Factory Props Blaster= Armour Factory Props Optional Height = 1,82 m (5 ft. 11") Weight = 85 kg (187 lbs) Boots = Armour Factory Props Canvas belt = Armour Factory Props Hand Plates = Armour Factory Props Electronics= None Neck Seal = Armour Factory Props Holster = Armour Factory Props Blaster = Armour Factory Props FULL BODY PHOTOS Full body front and back Full body sides Side details Action photo HELMET PHOTOS Front and back Sides Hovi detail and lens (from the inside, backlit) ARMOUR DETAILS Abdomen close-up Cod and posterior plate connections Interior strapping Wrist opening Sniper plate detail Thigh ammo detail (outside) Thigh ammo detail (inside) ACCESSORIES Neck seal Thermal detonator Holster Belt Boots Gloves BLASTER1 point
-
all right, thank you very much for the information. I'll think about it in the near future. best regards and good night1 point
-
Oops, seems that I have some shopping to do then. Thanks!1 point
-
Duly noted, thank for the feedback! Most of what you point out seems to be due to bad posture and careless suiting up; I'll be more careful and take some better pictures tomorrow1 point
-
Hola Guillermo!!!. Me alegro de que hayas decidido presentar tu solicitud para EIB.... Tu armadura se ve genial, sólo un par de pequeños ajustes, que son sobre todo de colocación(fácil solución).Si necesitas ayuda o cualquier aclaración, solo tienes que pedirlo...Un saludo!!! Hi Guillermo!!!. Glad you decided to apply for EIB .... Your armor looks great, only a pair of small adjustments, (easy fix)... If you need help or any clarification, just ask ... Greetings!1 point
-
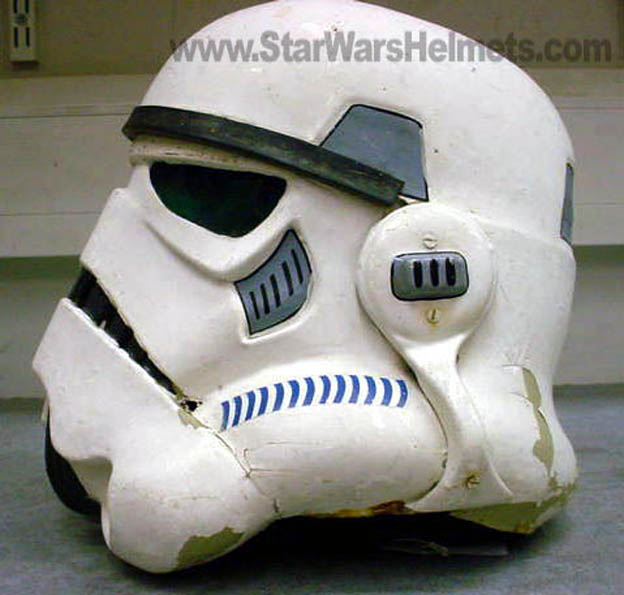
Nice work trooper, a few things you could adjust before the DO's get here: These are mainly dressing issues, your shoulder bells gaps should match, you can see your right side has a bigger gap at the top. Coverstrips on legs should be in alignment. On the backplate your right shoulder strap is not central to the backplate. Detonator and belt are angled. Left rear shin looks open, perhaps some heat to help it fully close You have a gap between the kidney and butt plate, I came up with a V tab method that helps this With a heat gun you bend strips of ABS plastic into the shape of a V, only glue one side and the other remains free to allow movement when you bend. Just helps stop the butt plate from pushing back from the back plate. You have gaps between the ab and kidney on both lower sides. Also tops should align Vocoder could have a little more paint Black rank on ear should be thicker. Tube stripes do not appear to be decals. Could you try taking another photo of your blaster, appears bent in this image. Also handle would have no weathering as this was a black plastic piece. Could you also post a close up of your Ab rivets and "Han" snap (upper right corner left side Ab) Good luck with approval
 1 point
 -
Thank you, I'll make the corrections before I submit. I might have to make slightly shorter straps for the bicep and forearms. Easy day. The belt naturally likes to slide up on the left side. I will see if not making it sonsnig will help.1 point
-
Now... the fun begins! Harder, (AKA TK-91918).. reporting for duty! Nearly 6 years ago, I learned about the 501st, simply via googling to buy a stormtrooper "costume". I admit, I used the excuse of a Madri Gras party to be the reason to pull the trigger and do it. But upon searching, and discovering the 501st, peaking my curiosity, later to see all the good they do... albeit was already a passion, became purpose. I have been a fan as many here clearly are, since childhood. LOVED Vader. What a bad A** mother right there! The Stormtroopers to me were the elite group and front line, the true power and force to be reckoned with. When my children were little, a friend of theirs was diagnosed with Childhood leukemia. He was one of 14 children in the cancer wing at the local cancer focused hospital. Through a 7 year battle, he was the only child within his ward to survive. I visited him often with the kids and this young man became a son to me as well. I cried when I left, but left him laughing and with hope. "See you tomorrow... stop faking it, its getting old... Love you." One day, I was there, when I witnessed the 501st, trooping through the hallways. At that time, I only thought how cool it was, and those are nice people. Come back to 6 years ago, discovering the 501st existence, and then tying it back to such strong emotional ties, plus fandom... Hence my passion grew. A few years back went through a hurtful divorce. I found myself needing to rediscover myself and re-establish purpose. I had access to money that I could use just for me. After the support of the new love in my life, and family, I purchased a fully commissioned set from RSP. As a plastics degreed mechanical engineer, I knew I could build it, but I wanted to get to trooping and help brighten anyone's day with this persona. After two months, it came!! But the legs were 3" sized too big every dimension. Initially I was heartbroken, but RSP followed true with their reputation. They immediately rushed to correct the mistake at no cost. While I was waiting for the 501st approval, I decided to dawn the armor and report in as an off duty storm trooper. I had so much fun with this, and sending some pictures to friends, I was overwhelmed with people asking for more. I love making the photos. So, I got my approval! "TK-91918.. I AM.. at my post!" I want to thank so many of you for helping me with questions and adjustments, snap strap fittings, where to procure, who to trust, all the plethora of information available... And while I can't possibly thank everyone, @MaskedVengeance @justjoseph63 @CableGuy @ukswrath @Sly11 @gmrhodes13 @Firedog @TKSpartan y'all, have been an incredible help and of the highest value to help me make this purpose and passion a reality. Thank you! Now... I'm gonna return that kindness and assist anyone else with a purpose and passion. Oh, and start my trooplog lol. Regards to all Troopers and aspiring.. Harder, AkA Craig Best1 point
-
Congratulations Trooper Sent from my SM-G981B using Tapatalk1 point
-
Hi I was recently accepted on Nov 10th one day before my birthday and was very pleased with my early birthday present!1 point
-
Congratulations Mark and welcome aboard. 2021 is going to be a great year and glad you are on board.1 point
-
Awesome! Welcome to the Legion trooper.1 point
-
Reading this, I somehow feel bad now for buying a commissioned TK back then. Congratulations Mark and welcome to the ranks. As you said, a few tweaks here and there and you will surely have loads of fun with that suit.1 point
-
Congrats Mark!1 point
-
Congrats again, Mark! Hopefully we’ll be able to troop together soon. [emoji4]1 point
-
Congratulations and officially welcome to the ranks trooper1 point
-
Congratulations trooper, welcome to the service of the Empire. Sent from my iPhone using Tapatalk1 point
-
Thanks Mario and Tony. You guys have definitely helped a lot. Part of this approval is yours too.1 point
-
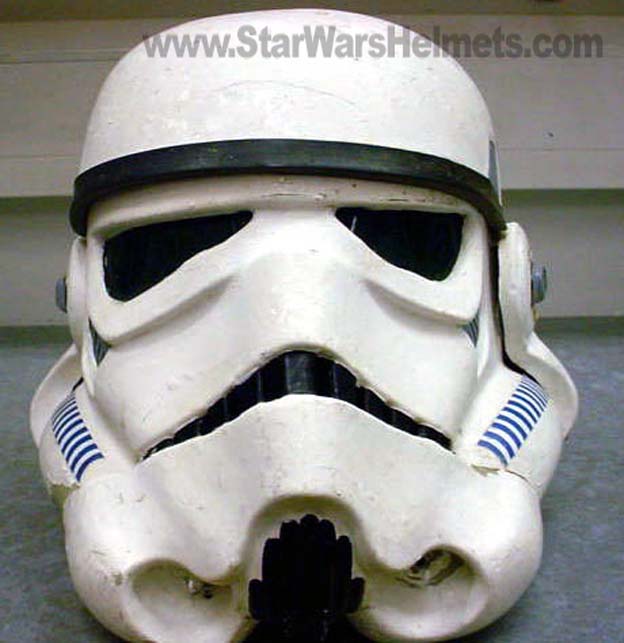
Looks like you may have trimmed a little too much from the teeth/gum area. I would add some tape behind those and apply some ABS paste, then sand and polish. Over trimmed Excess paint How to make ABS paste
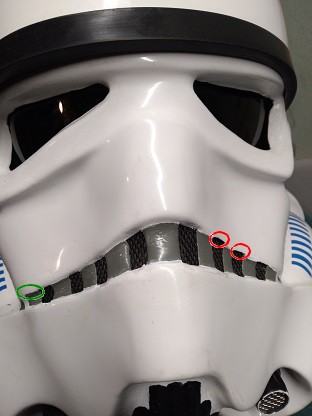 1 point
 -
Small update. I finally gutted out the resin on the stock wishbones so I could install the extension arms. For the original DVH stock I am not going to do much more with it as I don’t have time to spend on it. It would take a lot more time and work to make it look better. I am using a bad cast of the extension arm for the DVH stock and using a homemade aluminum arm for the Phoenix prop/DDay stock. Not perfect but adds more realism than it had before and has reduced the weight too. next step is to patch up with epoxy, prime coat the parts and paint.1 point
-
Hi Brett, It looks like required photos were submitted. Joseph will be with you shortly . Good Luck1 point
-
Hi all, For those of you who may not know, RS Props have sadly had a fire on their premises this week. Thankfully their contingency planning has protected their moulds but most importantly, everyone at RS Props is safe and unharmed. They have posted this update on their YouTube channel on how this will impact orders. My fascination with the stormtrooper has been lifelong but it is only recently I’ve embarked on my ambition to acquire the full armor. I’ve been following their content and even ordered a hero helmet from them only yesterday. Whilst they will be devastated and it will hit them hard, I wish them the very best in picking up the pieces, dusting themselves down and getting back to doing what they do best; making awesome armor. Tim1 point