Leaderboard


Popular Content
Showing content with the highest reputation on 10/28/2020 in all areas
-
Original DVH E-11 Blaster Kit (2014) Already started to build the kit but will try to record progress from here. I have a few other blasters in progress too made up from spare parts from Doopy, DDay and my own casted parts. I will update those blasters here as well. Stay tuned! The DVH kit came with a 40mm diameter pipe and the inner diameter was big enough for the bolt to fit inside. Unfortunately the 40mm pipe looks too big so I went with some locally found pvc pipe that measures almost exactly 38.1mm outer diameter. The walls of the pipe are too thick to fit the bolt so for this blaster the original DVH bolt will not be used. I might make a custom bolt plate or make a partial bolt cast that can be trimmed and glued in place. Other parts that still need some work are the t-tracks and the folding stock. The power cylinders are too big looking so I will not use the ones supplied with the kit. The scope and counter have some issues but I will use them anyway. In general most of the parts came very unfinished and required lots of trimming, sanding and re-shaping with epoxy putty. This was a new groundbreaking kit at the time being cast from original parts that still preserved the paint & patina finish. It paved the way for more accurate cast from original part kits and inspired me to have a go at casting original scopes. Thought it was about time to break out the parts & bring this kit to life.2 points
-
Thanks to Authenticpros in Canada especially to Mr. Mark Harrison for the Stormtrooper suit is a masterpiece. Recommended
 2 points
 -
Hey, Craig! Yes, Sir! I took those with my iPhone X. I wanted to get some great shots of what this AM v4.5 helmet looked like, especially for the rank beginner like me. A lot of photos here on the FISD, but don't REALLY give you a good sense of what you're actually getting. I was really blown away by the quality of these vacu-formings and the details and pre-trimmed stuff that Dave does. I couldn't recommend it highly enough for a new guy! I am told if I like the helmet, just wait until I get the rest of the armor! Most impressive as well! Just got a new iPhone XII today. currently moving my stuff over to it. I will post my COMPLETED photos here as soon as I get a chance and my phone frees up again. Hurry up, Phone!!2 points
-
Hey i am from CA and You1 point
-
I am planning on adding the decals. I just haven't got to them yet. Same goes for some electronics.1 point
-
No worries! Just wanted to check in! Thank you for the update!1 point
-
Good luck, hope you hear something soon1 point
-
thank you very much someone else just told me about the button snap system so I may just be switching out from this Velcro.1 point
-
Quick update: My ANH Stunt Stormtrooper was just approved by my GML. Now to take photos for EIB and Centurion!1 point
-
I firmly believe one of my cats stole the outer switch piece that I had painted but not yet puzzled out the stun/kill selection switch mock-up. I think I have that figured out now but now have a friend printing up a replacement GR-5 piece. Will likely have to modify it's "clocking" to get the internal pin GR-6 to swing where I need it to and the outer switch to be pointing where it needs to. Will temp the switch in with hot glue to one side of the trigger housing, the trigger, it's switch and plastic spring are on the other. I'll be able to get both sets working before mating them together permanently. I'm also going to take an ink pen spring and cut it in half and use for both the trigger and the selector switches so I don't have to depend on printed plastic spring for the trigger cause once it's glued together...1 point
-
Thank you for the files, I just finished putting mine together.
 1 point
 -
Hi David. as Mathias pointed, shortening the elastic should do de trick, looking at your photo it looks like the snap is located a bit down into the bell, you may want to check this out according to the following references. let us know if need further assistance1 point
-
Excellent! I sorta figured it was one of the latest iPhones. Your intent of clear pics Untrimmed and trimmed is a great idea. It definitely helps. Side note, I was “eh” about the new iPhone 12. You’ll have to tell me how you like it! Sent from my iPhone using Tapatalk1 point
-
I’ve done the exact same thing with my build thread photos—taking tons of photos of even the components untrimmed—so future builders can see exactly what they’ll be getting. And just like you, I use an iPhone, though I’m running a bit older with an 8+. Good stuff! Keep it up with your build! Sent via Imperial Tapatalk Comms1 point
-
The thigh gaps look PERFECT in the second photo, JC, but I see a couple of other issues.. Although not a requirement for Basic approval, the kidney/ab plate gap will need to be 1/2 an inch or less for Level 2 and have no gap for Level 3. Your posterior plate is riding over the kidney in the back. Some strapping adjustments should take care of that! Note that for Basic approval and above the cod must be attached to the bottom of the ab plate, and not a separate piece.1 point
-
Try shortening the top strap first. It can be a lot shorter than you think it needs to be.1 point
-
Speaking of the garter, here's the design I put together. I've used 50mm nylon, elastic and velcro to make straps that can adjust at the top (velcro), stretch a little in the middle and then fix to the inside top of the thighs with snaps. The belt is a military-style web belt off eBay. Finished strap at the top; cut pieces at the bottom ready to sew. Both straps sewn and ready to fit. Fitted to the belt. The final belt and straps, with snaps fitted and snap plates ready to glue inside thighs.1 point
-
It feels like I'm on the home straight now. Gluing the thighs is taking a little time, owing to the differences in edges between each half. I had to rip off a cover strip and re-glue because it rode up slightly, despite all the magnets and clamps - SERENITY NOW! I've marked up the tops of the thighs with trim marks, in line with ANH stunt gloriously random thigh tops, but I'll do a fit test with the garter I made before making any cuts. In the meantime, I've glued the bra hook elastics into the grieves. I thought I'd do a strength test first on three glues to work out the best for the job. I figure the elastics will be fine once the grieves are on, but will stretch a lot when fitting and taking off. I glued elastic to a piece of ABS scrap with: contact adhesive (Kwik Grip, in Australia), Zap-RT glue (a CA gluer made for rubber tyres) and E6000. You'll never guess what happened next! After two days of curing... the winner is Zap-RT! The E6000 came off with a generous tug; the contact adhesive took more force to pull away; but by far the Zap-RT took some real force to remove - more than I would ever need to pull the elastic and fix the hook in place. Incidentally, I used the Zap-RT last week to make some new gloves (because why not) and the outcome is great I have another pair of Joseph's hand guards on the first set of gloves I made, but the latex guard started to lift (the fabric remained stuck to the glove with RT). A few dabs of white silicon and the guard is now sealed closed again.1 point
-
So my landlady got a corgi puppy, that will be my future roommate once SIP is over. Since we're both Taiwanese gals, she named him Boba But he needed a middle name, so she bestowed Fett as a middle name (which I am truly honored and grateful) ...but now I need a Boba Fett dog costume. The only one I found was a hoodie from Petco from 2013, and there's only a Large size on Ebay. Anyone have any recommendations, even a good custom one? Obviously not for Halloween at this point, but even a future commission....1 point
-
Cool Mark, asked just to confirm. thanks !!1 point
-
Great work, and I love your imagery and descriptions. I’ve seen Troopers use XTC 3D on printed helmets before; cool to try it on a blaster. And that knurling on the front sight looks excellent! Really neat to read about the burnishing as well since I actually accidentally did that on a painted photo frame with sandpaper that was too fine. Never knew it was something one might want to do on purpose. Sent via Imperial Tapatalk Comms1 point
-
Just put on a layer of satin black. This is my favorite part, when you can really see all of your hard work pay off. Always nice when it is painting time to have a few days of hot, but not too hot, dry windy days. I did notice when putting a piece out yesterday to dry after washing dust, that it started to warp a little in the sun, so I am trying to get my painting done before the sun beam cuts through my painting area in the afternoon. [Note: It is still "glossy" being wet.]1 point
-
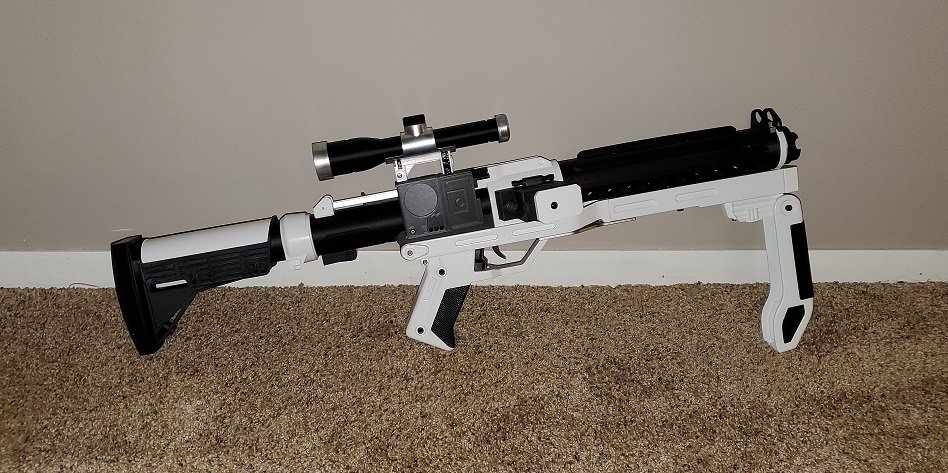
Blaster continued: This kit does have some nice details, and many of the fasteners are functional or real, but not all of them. I usually modify most kits, replacing any printed "screws" with real ones, or any other round details I can swap out. Like on the rear sight, I sanded off the round detail, and sliced two pieces of a wall anchor to glue on for that perfect round shape. I also added in that 5mm LED for the domed detail on the end of the magazine. Reading the threads on here, I also added the rear sight notches, and added the knurled texture to the front sights. I used epoxy putty, the first time I laid it on and rolled the tool, and it rolled it off the piece. Second attempt worked, I put the putty on, waited five minutes, and then tried the knurled texture. Success! The parts all primed, I moved to assemble some pieces before black painting. Parts that were smooth and nice already got standard flat black primer, Parts that needed a final smoothing got filler primer (grey). Some nice things I discovered about this Imperial Arms 3D kit: In the upper right, you can see some of the things like the flash guard and the sights actually go through a slot, and down to the barrel, for strength (flash guard piece marked in magenta). Many parts use functional fasteners, aesthetic on the muzzle end here, but many pieces like the handle and the scope rail, and the magazine all get "bolted on" which should make for a stronger prop than one that is all glued: A note on filler primer. It works well as it is as a matte surface, but to get an even nicer surface, you can use fine steel wool to quickly rub the rough surface off (30 seconds), and the "burnish" it with a dry paper towel (30 seconds) and it literally shines. I have used this to prep a master for casting, but now I do it on everything if a shiny surface is what I am after. Painting and gluing more today, so I should have this in my holster by Halloween!1 point
-
Congratulations Trooper! Great to have you here.1 point
-
I adjusted to 9mm down and 13mm on from the edge. Looks about right to me.1 point
-
As per advice given to me in the above posts, I made two new holes and to lower the holster a little to yield a 2.5cm gap. I've also used a rivet and snap combination to attach the holster, so I can remove it when/if needed (which also means I could use it on another TK build in the future and swap back, etc). Thanks to everyone who chimed in with advice!1 point
-
Congrats Welcome1 point
-
Woot, welcome KC! Awesome to see you in here1 point
-
Great place to be, David. I’m new as well and have had so many nice and encouraging guys offer their help. Good luck with your TK!1 point
-
Welcome, David! You've come to the right place.1 point
-
Pulled off a joke at a internal meeting last week. Had my TIE pilot helmet on for the entire meeting. Caught someone confuzzling me with Darth Vader due to that.1 point