Leaderboard


Popular Content
Showing content with the highest reputation on 08/13/2020 in Posts
-
Hey Everyone...5 points
-
So, you got a set of ROTK vacuum formed armor and you are not impressed with the level of detail for the hand guards… Not to worry, I got you covered. If you are not familiar with a product called Sentra, Sentra is a brand name for PVC foam board. This is not craft foam, it is rigid like a PVC plastic pipe; however, it is also a thermal forming plastic. This means you can heat it with a heat gun and shape it. There are numerous videos on YouTube on how to work with Sentra. In addition to being a 501 member, I am also a member of the Mandalorian Mercs Costume Club (MMCC) and we use Sentra extensively in making Mandalorian armor. There are a lot of other bands of PVC foam board and it is available at most plastic supply stores as well as thicker version at most Home Depots and Lowes but this thickness is normally ¾” thick and too thick for use as armor. I recommend 3mm (1/8”) for this application. Here is a 12” x 12” x 1/8” thick PVC board available on Amazon for $6.99, this is more than enough to make the hand guards. https://www.amazon.com/Expanded-PVC-Sheet-Lightweight-Displays/dp/B079NWDW8F/ref=sr_1_3?dchild=1&keywords=3mm+pvc+foam+board&qid=1597343357&sr=8-3 I have made a template for this tutorial that is scaled and will print out properly on an 8.5” x 11” sheet of paper., look for the template as a pdf attached to this thread. Other things you will need: · Xacto knife · Ruler · 220 grit sandpaper · CA glue (Super glue) · Glazing putty or Bondo · Primer paint · White Gloss spray paint or whatever you used on your TK If you have any of these other things, it will make the process easier: · Band saw · Belt Sander · Foredom or a Dremel with a 1/8” (#194) carving bit Let’s look at some reference images of the ROTK handguard. And these are some images of my Jimmiroquai ROTK handguards. Things to note are the curves where the hand guard conform to the back of the hand. There is a sharp angle portion between the index finger and thumb knuckles. First you will need to print out the template and cut out the parts. You can just cut out one top and one bottom section if you want and just mirror them on the Sentra. Once you have the templates, make sure they will fit your hand, make any alterations on the template as needed. Next, trace the templates on the Sentra with a pencil. Now you can cut the Sentra in half and tape the two haves together to render two of both parts (the main part and the top part. Once the parts are taped together, cut the two parts out with a band saw or use the ruler and Xacto knife. You should now have 4 parts. I transfer the bend line and alignment lines to all parts. Note that the top part is oversized. This is because you will need that extra material when you bend the parts. Next, sand the top parts. Once they are glued on to the main part, it will be harder to sand the sides of the top part. Next, use a hot air gun or hair dryer to heat up the main part along the bend line. Be careful to not overheat and cause the Sentra to curl, shrink, or burn. Wearing some work gloves and using a spare board and a flat surface, bend the Sentra on the line at about a 30-40 degree angle. Next, apply CA glue to the underside of the top part and align it on the main part and clamp or tape it in place. Note, because we have not bent the top part it will protrude over the angled section on the main part. Next, remove the clamps and tape and gently heat the handguard along the back edge on the top and bottom then gently curve this section to the handguard conform to the back side of the hand. Next, gently heat the top part that overhangs the angled section and using a spare board, bend the top part to conform to the main angled part and hold in place till it is cooled and set. Next, gently pry the two angled parts open enough for you to apply some CA glue then clamp and let cure. Next, trim the top part so that it matches the main part then sand the handguards with the 220 grit sandpaper. I choose to round all the sharp angles since the screen used had guards are rounded. Next, using the Foredom or Dremel, carefully hollow out your indention on the font of the handguard. Since this part is not 6mm thick, just shoot for center and only go about 1/8” deep. If you don’t have either a Foredom or Dremel, it is possible to do this with a 1/8” drill bit and an Xacto knife but it will be difficult to make it look good. Just take your time. Next, use the sandpaper and Xacto knife to clean up the indention. Next, use the glazing putty or Bondo to fill anything that needs filling such as the separation between the main part and the top part or any imperfections you may have caused with the clamps or tools. Next, lightly sand and blend the filler then prime the hand guards. Next paint the handguards. Once they are cured, you can apply Velcro to the back side and mount them on your gloves. I hope you found this tutorial helpful. ROTK handguards.pdf3 points
-
Secured the action figure. Cost me an arm and a leg, but i should get it in September. Also, anyone know where I can source a really good blaster and sidearm for this? I have 3D printed ones for my FOTK, but I would like something more sturdy and durable that I could paint.2 points
-
Lots of ABS goodness right there Chris, let the fun begin.2 points
-
Got my lexan scissors recently, thought i'd get to work on trimming some ABS. Got more soft goods on the way as well! Cant wait till they get here! First thing I did was cut out this chest vent with a dremel. Seemed easy enough. Thank god I didnt have to do the other method of cutting it out and inserting a resin piece like I've seen some people do on here. The pill boxes I'm gonna need to find a drill bit or something to go on my dremel to cut those out. I'll see whats in the dremel box but I know I'm missing a couple pieces... I decided to test fitment of back piece and yoke together and trim out the middle of the yoke like i've seen a lot of people do. It wasnt an option not to, there was no way my bust was fitting in there without cutting the middle lol I think the fitment of front to back is pretty good. I'm still deciding how to cut the opening for the arms though. They cant stay the way there are for sure, the chest piece ends up riding up too high and if I wear a helmet it will end up resting on the shoulders which is no bueno. This is how im planning to trim it so far from the build threads I've looked at. Any thoughts or adjustments? Excuse my totally unapprovable ninja turtles FOTK helm But I currently cant see out of my TLJ helm so this will have to do for now to get an idea how it looks. I already feel like when I get to the ab plate its gonna have to be cut almost in half cause its so long on me. I also feel like cutting off more of the yoke in the front, like the part that goes under my arms. Something similar to this. Would make putting it on ALOT easier too. Being short was a challenge already, but I'm not the skinniest of short people right now D: I'm working on that too! Dieting and walks, with some biking. Hopefully in a few months this stuff will fit better! Till then, more trimming...2 points
-
Name : Sergio Bescós 501st ID : 10650 FISD forun name : Keko Bescós Garrison : Spanish Garrison Armor : Armour Factory Props (AFP) Helmet : Armour Factory Props (AFP) Blaster : Armour Factory Props (AFP) Height : 175cm Weight : 80kg Boots : Armour Factory Props (AFP) Canvas Belt : Armour Factory Props (AFP) Hand Plates : ArtNeo Neck Seal : Armour Factory Props (AFP) (Leather) Holster : Armour Factory Props (AFP) (Leather) Audio system: TRamp https://501st.com/members/displaymemberdetails.php?userID=29694 https://501st.com/members/displaymember.php?userID=29694&costumeID=124 ADDING WITH THE REST OF THE IMAGES SENT TO EIB, I MARK IN YELLOW THE PROPOSED MODIFICATIONS TO BE ABLE TO OBTAIN CENTURION STATUS Front action Front Back Left Right Casco - helmet Cinturón - belt Botas - boots Blaster E11 Detonador – Detonator Cuello - Neck seal Muslo derecho – Right leg Muslo Izquierdo - Left leg Pantorrilla derecha – right calf Pantorrilla izquierda - left calf Brazos - arms Brazo derecho - right arm Brazo izquierdo - left arm Cuerpo – Body armor Han snap corrected Electrónica - Sistema de voz – Audio System Guantes y handplates – gloves & handplates1 point
-
Greetings everyone. As an FYI, the current Rogue One TK CRLs are being discussed for revisions. If you have an approved FISD costume you can read and comment on the proposed revisions here: https://www.whitearmor.net/forum/topic/49812-rogue-one-tk-crl-update-2020/?tab=comments#comment-697602 If you do not have access to the “Detachment Only” thread, then I will see if we can post the proposed changes here, but I am not sure if it will be permitted. The proposed changes are mostly wording and a few better (more detailed) descriptions of the parts and how they should look.1 point
-
Appears separate Just note also that the CRL's are going under review at the moment and there may be a few changes on some pieces, I don't believe there will be any change to the belt at this stage
 1 point
 -
DarthBiscuit, I was contacted by someone who had a set of vacuum formed armor and he was planning on ordering some hand guards and i told him he could make some that would be just fine and cheap to do so I knocked out the tutorial. I am very happy with my hand guards from Jim but many of the newer builds have been with vacuum formed armor and I do not like how the vacuum formed hand guards look.1 point
-
Looking good and I think the belt boxes look good. I hate all the little pin holes in my armor and after numerous coats of glaze I still did not get them all.1 point
-
I taped and clamped some pieces together to get an idea of fit and mark the rear belt half and the side plates. My wife walked out and just stared at me before going back inside lol. The gloss white on the chest and back are much better than they were! Then I setup the barrel for priming. I poked some toothpicks into the cardboard to keep it from falling off when I turn it. I might keep that method when spraying gloss white, since it didn't obstruct the spray too much. There must have been a lot of debris floating around, because it's not a very good coat of primer, but it's good enough to wet sand to 400 tomorrow. In between sprays I marked a few pieces for trimming. I think it all worked out! The shoulder bells look more symmetric now, the rear belt half should overlap the front half just short of the outer boxes (what? lol), and the side plates shouldn't pop out under the chest and won't extend all the way into the center.1 point
-
They came out great, nice work1 point
-
Final reveal: As you can see, my helmet is more of an "inspired by" piece than a near exact replica of the original. Here are some more shots: This was a really fun project and an excellent learning experience. I'm thinking of a scout or AT AT next but maybe I'll try out another TK/TD. Thanks for following along. If anyone has any questions I'd be happy to answer them as best I can1 point
-
Congrats and welcome1 point
-
Absolutely no problem whatsoever. Thanks for taking the time to have a look. I've added a couple of new pictures that show the side view a little better. Hope this helps.1 point
-
The one printed in resin is awesome and has hardly any sanding needed. Feels very sturdy and uses the fifth horseman files (so they are super accurate). I have a build thread where I am adding electronics to it.1 point
-
Buen trabajo Sergio. Suerte en tu solicitud de Centurión!!! Good job Sergio. Good luck with your centurion application!!!1 point
-
Ahh, ok sorry lol yep I know Head Shot Props1 point
-
Ok, I already have ~3&1/2' elastic snaps on both of my shoulders.1 point
-
I have all my ABS pieces rough trimmed and final sanded now. I've started gluing together pieces. I start by gluing together the front/outside of all the pieces I can which include: Bicep Forearm Thigh Shin I do not feel, never have, that you need to start fitting the parts to you body at this point. These suits were made on an assembly line of some kind and made to fit different body types. What I mean is they didn't fit a single suit to a single person. Each suit was made to fit different height, weight, and body size. I don't feel that a perfect fitting set of TK armor matches what is seen on screen. That said this WILL fit my body very closely when I am finished. The cover strips are the big thing here. They will cover up the seams on the front and back when fitted to my body. If there is too much excess I'll cut each piece down until it fits me. Key here is not to get hung up on things that don't need to be hung up on. The next thing I'm going to say goes against the CRL 100%. The back plate. I not convinced that the back plate that goes over the kidney sections is removable. On my Shoretrooper it is glued down and I open on the left side down the black line and my belt overlaps backwards. On my Deathtrooper the front and back armor is all one piece and comes together like a clam shell and splits down the sides. My Tank Commander is the only set of armor that opens under that kidney back plate and it doesn't like to stay on and pops off very easy. My theory goes back to having these sets of armor fit different people and how the belt connects on the left side. I'd be more in line with splitting and adjusting on the left and right sides down the ab sides and down that black line and adjusting the belt overlap on each side. You'd easily be able to tighten up the armor or let it out a bit. So when I build mine I'm going to first see if the kidney plate has enough reach without cutting down the middle. I'll glue the center plate onto it if it does. If it doesn't and needs more reach I'll cut it and use the center plate to glue it further out and give me the reach. Either way I do it that center plate will be glued down BUT it'll appear to not be glued down. I'll leave the outer edges un-glued to give that appearance. Nothing I'm doing is sexy with the armor now. All the abs is final sanded as much as I can until I fit, glue, and add the resin bits where needed. I still need to sand down all the resin bits and work on the helmet frown.1 point
-
Make sure you take the time to wash off all the resin parts to your TK kit. The chemical released during curing can and will cause glue not to stick and the worst it does is not allow paint to stick. Wash with soap, rinse and air dry.1 point
-
Let the fun begin! My suggestions: Start with the easier pieces to get the feel of working with ABS, stay organized, post lots of photos, ask lots of questions (especially before cutting/gluing if you have any doubts), keep all the scrap ABS (for now) and most importantly take.... your.... time. Trust me.1 point
-
Well, this is going to be a project.1 point
-
Imgur seems to be down right now, otherwise I'd post the "unpacked" photo. And yes, holy hell, what have I gotten myself into?!? #FullPanic #FullExcitement1 point
-
Oh happy days, now open that bad boy up and get to panicking1 point
-
I've asked for the gallery tab to be put in a more prominent place as many don't see it nag nag @Sly111 point
-
Loved the fresh leather smell upon opening the package! They're slightly big, but nothing an insole won't take care of. Thanks Mark!1 point
-
1 point
-
Oh damn how did I never find that!? Thanks!!1 point
-
Hi Justin. You're welcome. We are here to serve! Only points 7, 8 and 9 are mandatory for L3. Your girl is doing a great Photography work. Cheers mate!1 point
-
@gmrhodes13thanks! Do you just have a library of screenshots?? Lol! Actually...what if each suit's forum had a thread where we just post reference pics for future use? Consolidate them all into one place (for each costume)! @TheRascalKingI think I'm following your measurements lol! I'll definitely get good measurements once I go to actually mount them, that way I can place the outer boxes and space all the others evenly off of them. I'm still waiting for your R1TK progress...1 point
-
Some great references here;1 point
-
I figured that I would need to, but was concentrating on the join between the chest and back plates in these photos. Once I get this done the next job was to tighten the shoulder straps to bring the top of the chest plate in and down a little. Strapping a R1 kit is more complicated than my previous ANH kits. Sent from my iPhone using Tapatalk1 point
-
Yeah I tried to use a download script to grab all of Billhag’s photos when I stumbled upon a link to his PB several months ago, but I could only ever auto-download the square thumbnails. This is another reason I’ve been trying to compile helpful threads into PDF format—so that photo-hosting issues will never be an issue in the future. I plan on keeping my google drive links active indefinitely, and I’m assuming that some people will also download the files, and could possibly re-upload them in the future should my drive ever go down. Sent from my iPhone using Tapatalk1 point
-
Since I won't start a build thread until I order my kit, I'll post this here. Normally, when people say "Happy Monday", I'm grumbling under my breath. But IB and DHL made me extremely giddy today! End of July, I saw that IB had a wave starting 8/1, so I ordered my 421s on....8/1! Got my tracking number on 8/7, and look at what was on my porch when I got home from work today!! First non-supply item to arrive, it's a start. I'm so excited, and you guessed it, I just can't hide it!! AWESOME!!!!!1 point
-
So this is where the fun stuff begins. 3D printing requires a lot of patience, trial and error. For the helmet, I initially really didn't know what I was doing and was limited to what I was discovering online. One of the first things I kept seeing was people breaking their prints into several smaller pieces, hoping they'd fit together, and going through what appeared to be an endless supply of E6000 and CA Glue to get it all put together. Again, something didn't seem right about doing this, plus with a 300 X 300 X 400 print volume on the CR-10S... why? I was excited to see that I could get the entire helmet to fit on the bed, But after hitting "Prepare to Print," I was greeted by this screen: Look closely: That's a nearly 5 day estimate, and anyone who's used Simplify3D knows that the program is a liar. My best guess is that the actual time would be closer to 130-144 hours, basically 5 1/2 to 6 days. But, this was using the standard settings, not the ones I showed earlier. I decided to break the model into three parts, a face, rear, and dome. My thought was that this would limit the "puzzle" aspect that I was talking about earlier and it would give the machine less opportunities to screw up the print. Unfortunately, I learned a valuable lesson about 5 hours into the face print when I started seeing a bridge being built from the left tube, through the left hovi mic area, into the vocoder. Unfortunately, I didn't take a picture of this, but after talking about the issue with NerdForgeDesigns, we realized that there were holes in the mesh, which the designer corrected immediately. Regardless, the lesson learned is to inspect your prints thoroughly on the slicing software before beginning the print. Since this was my first attempt at a helmet, I let the print finish and was left with what I decided would be a practice piece. In this picture, you can see all the bad lines as well as the seam where the bridge traveled from just under the tube stripes through the hovi mic area and into the vocoder. Additionally, after I pulled this off the bed, that's when I noticed the deep lines on the bottom of the chin, which apparently is common with printing helmets. I keep seeing videos of people 3D printing helmets where they barely do anything to these lines. Maybe a little putty and some filler primer, but no one seems to really take the time to clean this up, probably because it's not in a highly visible area. Regardless, it doesn't look good. I decided to reprint in two pieces, but if I had to do it over again, I would print the entire helmet in one shot. My final pieces of armor should be done in the next couple days. Afterwards, I'm going to print a Mando helmet and just let it go. I'll let you guys know how that turns out. Here's my two piece print: Notice that I don't use any supports under the dome. Again, check out this Nikko video where he explains how this works: https://youtu.be/LF10A1UEAaU. Basically, you put supports around the perimeter of the model, but nothing on the inside. The printer operates in a sort of "stair climbing" fashion, which creates supports for the next layer as it goes up. The difference in print times is astronomical. Again, look at the whole helmet with full supports: And now without the dome supports: Wow! Even the material cost difference is crazy. What's notable about this is that I forgot to adjust my filament cost settings in Simplify3d, so it's still assuming $46 per kg, which is crazy. The Inland filament costs $18 which is 39% the cost built into the Simplify software. The real filament cost for the full support model would be $53.43. Without supports it breaks the bank at about $10.56. Next, I'm going to actually start putting pictures of the work in progress. This is where it gets cool. Please let me know what you guys think. Also, if anyone has any questions about 3D printing, I'll try my best to answer.1 point
-
The empire is very busy in my area. Even if there are some well known rebels in action, it doesn´t last long for our troops to react. Lord Vader shows up1 point
-
Hi all. I've just posted the new abb button pic but it has gone into the start of the post! I thought I was doing well with the technology but every day is a school day! Just noticed that the trim pic's disappeared! Added new one. Thanks for your patience with me and the tech, sorry for any inconvenience. I hope that I have now supplied all the relevant pictures and I look forward to seeing what you think. Thanks as always for your time. My nerves are building, add that to the anticipation, I'm a wreck! But a good wreck. .....1 point
-
Welcome to the ranks, trooper! stay safe.1 point
-
Congratulations trooper, welcome to the Legion.1 point
-
Congratulations Trooper and welcome to the ranks! Looking sharp!1 point
-
Congratulations and welcome to the ranks trooper1 point
-
Congratulations on your approval Andy and welcome to the 501st sir.1 point
-
Congratulations! Welcome to the 501st! Have fun out there!1 point
-
Hello Andy!!!...Welcome to the 501st, and welcome to FISD...1 point
-
Congratulations Trooper !! Welcome to the Legion, Enjoy being a Bad Guy Doing Good and Stay Safe . Looking Great !!1 point
-
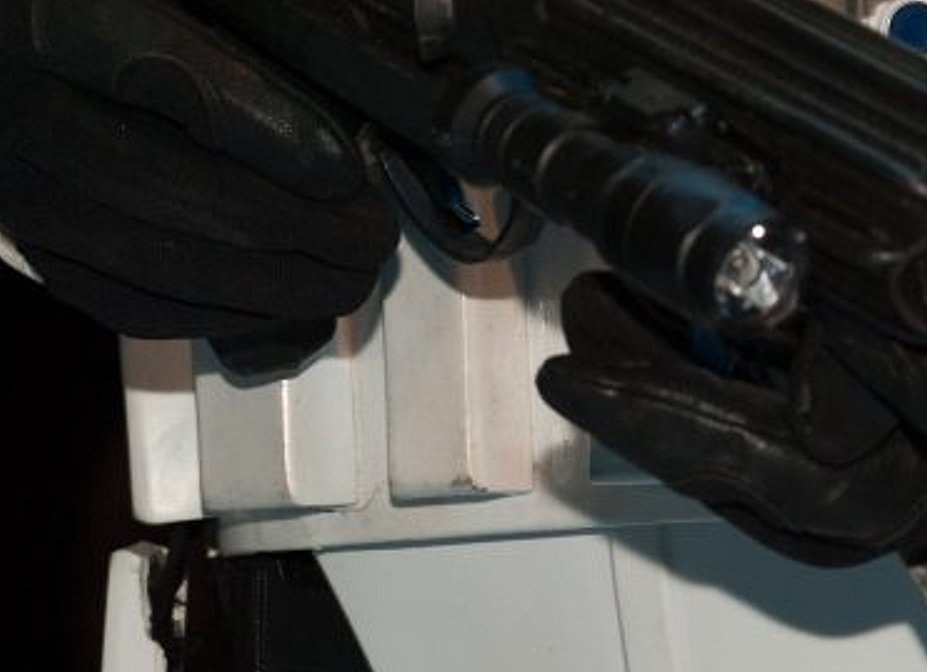
Ok, so honestly there are only really 2 issues I can see, and it might be more for Centurion and not EIB, but good to fix them now if needed. Your TD is rotated too much "upward". you should be able to see the "button" in the picture above. may just need to roll it down some and "pinch" the bracket closed a little more. Second is the butt plate, where you have your snaps are set. that part of the plate should actually come off, and the be set just above that. I figured you did it room as you are a bigger trooper, but again, looking at the photo above, you don't need it. removing it will help with comfort as well. I have a feeling that trooping with that "tab" still on the armor may get uncomfortable. Again these are just some things that have stuck out to me, and may not be required fixes for EIB. At the end of the day its up to Tony and Joseph to give you the title. Hope this helps not only reach EIB, but Centurion soon after!1 point
-
Wow, you are making it way too easy for the newbie-newbies. This newbie did a lot of digging and cloak & dagger research to learn all this.1 point