Leaderboard


Popular Content
Showing content with the highest reputation on 06/27/2020 in all areas
-
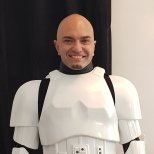
Hi all. Just received my TK ID tonight! Absolutely thrilled to be part of the 501st!3 points
-
Looks like you're definitely going in the right direction, Emma! Since you're planning on shimming the kidney/ab, it would be a good idea to take care of that first before tackling the cod slice. I don't envy you having to do the shim work. Any sort of sizing mod on a TK kit is never fun, though! Keep up the good work!2 points
-
Un saludo desde España !! Soy nuevo en 501 y estoy preparando para subir de nivel mi traje.2 points
-
Boring stuff first, exciting stuff after that! For the other thigh, I had to glue a second small inner cover strip behind the front ridges, just because it indents outward and one continuous piece of plastic wouldn't bend at that angle. So I just added a little bit of spared plastic behind the front ridge for reinforcement before gluing the outer front cover strip tomorrow. Exciting stuff now! I did my first torso fitting and boy was it actually really fun and exciting!!! Here's some pics: (I didn't know my dad was taking a picture so my face is atrocious, pardon that ) Here, the butt overlaps the kidney slightly. It just slid up a little bit but it's no big deal, it still fit me height-wise when it slid down a bit too. It was hard to keep it even because right now there is no return edge on either the top of the posterior or the bottom of the kidney. More on that in a minute. I decided there are several things I want to do to get this torso to fit me a bit better. Here is my game plan: 1. Add kidney shims! I measured approximately a 4 inch gap from the ab to the kidney. Because of how the ab sits unevenly and not completely vertically when it rests against my stomach, I measured from the top of the kidney to the top of the ab and the bottom (before the inner notch) of the kidney to the bottom of the ab. I went with the largest measurement, the bottom of the kidney to the bottom of the ab, which, when I make the shim, will push out the ab slightly on the top and help set it more vertically instead of lying slanted against my stomach. I also will make the kidney shim height slightly taller than the actual kidney height to fold over the top of it into a small return edge to make it continuous with the kidney proper. 2. Use the heat sealing iron to make new return edges on the butt and the kidney for the bracket installation! I calculated the overlap between the butt and the kidney that I was most comfortable with (not shown) and will divide that measurement by two to determine how much return edge to make on both the top of the posterior and the bottom of the kidney. This doubly functions to shorten the back profile, which the overlap helped simulate during the fitting. 3. Slice the cod! I have been messaging Cricket about this for advice and recommendations about the ideal distance from crotch to cod. I will have to bring it up slightly I think, but this one is still a maybe. 4. Install chest brackets and then trim the remaining return edge on the bottom of the chest and see how else to lessen that gap between the chest and ab (heat?). Once I install the chest brackets, I can see how much of that excess return edge I can afford to trim. Then, if there's any issues, I can resort to heat reshaping, or just accept the gap for what it is. Here is PART of my game plan illustrated: You can see how I am referring to the shim "pushing out" the top of the ab so it is more vertical, using the bottom of the kidney to the bottom of the ab measurement (the wider width) to configure my shim. You can also see where I plan to slice the cod and bring it up, and an approximation of the butt overlap (again, here, there is TOO MUCH overlap from it riding up, and was not the actual measurement I used to calculate how much return edge to make on each piece. This picture is slightly misleading, but it's all I have). That's it for tonight. I honestly feel really recharged and excited seeing some of it fit on my body.2 points
-
I had the distinct pleasure of assembling the first ATA ABS lid. This is just how I do it, it's not the way everyone does it, it might not be screen accurate assembly to 1976 standards, I use unorthodox tools - but who cares! Get over it. Build, troop and enjoy. The pulls are nice. Plastic is slightly off white, not as beige as AM, very similar to TM. This is ATA ABS #1 The face pull is VERY sharp. The sharpest I have seen, and I have built a lot of lids now. Ears Plastic is pulled with a clear sticker coating to prevent scratches / damage. Simply peel this off. Update: Helmets made after November 2011 may or may not have the clear film. I mark about 1.25" above the eyes, and use a plastic strip to draw a line. I also mark the cap back edge for the ear area (will be covered by the ears) Punch or drill a hole at the intersection to prevent the plastic from tearing Trim off the excess1 point
-
Hola buenas tardes mi nombre es Fernando baro Nick BARETA y Tk 29415 .me gustaria tener informacion para ascender a nivel experto . Gracias Enviado desde mi SM-G955F mediante Tapatalk1 point
-
Hi all! Trevor from Gibraltar. I’d always dreamt of owning my own Stormtrooper outfit (or at least since 1977!). And now, after starting the process in October last year, I finally have not one outfit but two! I am now the proud owner of a TK Commander and a ANH Stunt! Was originally going to apply via the UK Garrison but seeing as it’ll be easier to join events in Spain (Gibraltar is a British Overseas Territory connected to Spain via a land border) I eventually applied via the Spanish Garrison and, on the 26th June, I was accepted and given my long-awated TKID! Over the moon is an understatement! I’m so looking forward to meeting everyone I’ve already made friends with over WhatsApp! Over and out...
 1 point
 -
Hi everyone. I've been following the forums off and on for some time now with hopes to eventually start my own build. I've wanted to have my own TK armor and join the 501st since I was in my 20s. I'm 44 now. My son started college last year and we began discussing building armor and joining 501st as a way to share a hobby, stay close, and make even more friends and lasting memories together. Well, that being said, we just put in our order for our kits and are about to start this exciting journey. I look forward to meeting you all and learning from the seasoned vets.1 point
-
Or is it "Old New Member?" Eh...anyway...I've been a forum member for about 4 years now, and have posted occasionally. I primarily joined so I could research my AM2.0 kit build for MEPD : Now, I'll finally be building a bright, shiny white ANH Stunt TK to Centurion level (AM4.5)...with a stop at EIB1K along the way. I'll be starting a build thread, and hope to keep it updated. I'm very bad at taking pics of things in process...be it vacations or builds (this will be my 6th costume overall, and 1st build thread ). Thanks for reading my rambling. BTW...looking for a basic, current FISD patch or 2 for my helmet bag.1 point
-
No not done. Need to do some more filing and trimming1 point
-
Hahaha! Thanks for that suggestion, but I've already got an amp system in the works for Cameron. In his previous kit, I rigged it up similar to my TK, with the amp velcroed into the ab, and the mic wires running to the lid. That said, I'm eagerly waiting to hear when you plan on releasing that FOTK sound glove setup you were working on. Nothing would be cooler than my mini FOTK sounding like a full-sized FOTK.1 point
-
"They're too small for an amp or trading cards, unfortunately" Possibly, but you probably mount something in the helmet . I'd be glad to help you if you're interested1 point
-
Thanks Shane! We ordered the AM 4.5 ANH Stunt TK kits from Dave at Dave's Darkside Depot. I'm 6'3" and around 205lbs and my son is 6' and around 150lbs. From what I have read, these kits work well for larger/taller troopers and can be cut down for most anyone.1 point
-
The black and white can be any gloss, you may find acrylics may be easier to use and source. For the #5 grey and #14 blue you probably are best going for the umbral enamels but I find them more of a pain to use.1 point
-
Thanks guys, not sure I would call it epic. Still too much room for a disaster! Traditionally my printer sits on my desk in the lounge, and I only print when I am home to be able to keep an eye on things. With lockdown I moved the printer into the conservatory as it meant we could use the lounge for home schooling the girls, but meant I could print every day. We did order a new table to move it again into the spare room but this was requisitioned for homeschool. At the moment I'm not sure when this move will happen as I either need a new table or the girls to no longer need it. This means the printer is in the conservatory, which hit 45-50ºC for a couple of days this week! In order to make sure I didn't damage the printer I stopped printing and hid the printer under the table for a few days. It's cooled down again today so I was able to start printing again. I lost some time as I needed to recalibrate the printer due to having to move it. I have been working through the helmet at the moment. A few things are making me nervous but if I at least get a helmet out of it I got somewhere. Today I printed a bit I've been excited for but like a lot of this 'kit' will prove to be a pain. Essentially the vocoder doesn't fit. Some of this model is designed to be printed at once as the parts overlap, and apparently this is one of them. I am hoping that I'll be able to file the back edge of the vocoder to shape and it will fit in. I just need to look at some reference to get the orientation correct before I start marking the bit that needs to be removed. Once I can make it fit I'll be able to mount it and figure out a way to mount it.1 point
-
Awesome!!!! ...1 point
-
Thank you all very much for the welcome, do not doubt that together we will make it possible to level it up, a hug to everyone !!!1 point
-
Can’t wait to see it all happen mate and welcome to the FISD!! Sent from my iPhone using Tapatalk Pro1 point
-
I asked for refund they said I could only do in store credit :/ I said no I want my money back I don’t wanna purchase from them anymore. They haven’t replied Sent from my iPhone using Tapatalk1 point
-
Welcome to the FISD, trooper! Waiting to see your build.1 point
-
Welcome back and so great to hear you are aiming to be in the first 1000 EI, I wish you the best of luck in your journey. Sent from my iPhone using Tapatalk1 point
-
For really wobbly black lines you could go over with a black permanent marker1 point
-
Here is a link to some photos which may help, Caleb: https://www.whitearmor.net/forum/topic/48335-quick-crl-reference-guide-for-your-ot-build-pics-notes-tips/?do=findComment&comment=673646. One thing I did notice is that the top of the ear on the right side could come forward a bit if possible. Ideally, the screws should line up with the rear line of the trap right above them and the top screw should be centered right below the line, (just as you have on the left side). It may be the photo, but it looks like a gap between the face plate and cap is showing (yellow arrow). Moving the top of the ear just a quarter of an inch forward would eliminate both issues. Neither are huge issues in themselves (and Heaven knows the originals had their flaws lol) but for a more polished and symmetrical look this is something I would suggest if you feel up to the task.1 point
-
hello, I'm Tanner, since I'm going to be getting a suit from ATA Works soon, i figured it would be the time to introduce myself on these forums. I'm in the final stages on getting my first armor approved, a Clone trooper Sergeant Appo. i was going to wait until next year before i got a new armor but I've needed another project to work on. I'm excited to have my second suit of armor and hopefully get to know some of you. as of the current moment i really only have one question, and its about weathering. not that it makes much a difference, but is weathering of TK armor allowed?1 point
-
Welcome Luke and nice work! I sat on my Anovos kit for over a year after I received it in 2018 so I know where you're coming from! I just earned my Centurion badge for my ANH Stunt this month so I'm excited for you to get there too!1 point
-
Hi Emma, looking really good. I my experience, in this stage (I call it the blue tape stage) you can have an idea about how things are going, but not the final look, so be careful in measure but don't make any cut till you are in the Straping stage where thing get the real place. keep om doing a great work.1 point
-
Excelente compañero !! Great mate !!1 point
-
Felicitaciones Trooper, Bienvenido a la Legion !!! Congratulations Trooper, welcome to the Legion !!1 point
-
Thanks for the tip, One side seems to always be lower when I wear them, as you can see the armor touches between my thighs and one is always pushed down. Ill double check the connection strap length and try and bring the right one up a little bit and see if that helps.1 point
-
Wow Caleb, you looks amazing!! Great work. About what you mention on the Shim , a closer photo with no Holster and belt could be useful , at least for me, to have a better idea of the issue. By the other side, If I can make a suggestion, probably you have noted already. There's small detail on the thighs alignment as you can see in the following photo. You can adjust the straps to align then better and try to find a middle point where you leave the smallest gap and still walk without problems like armor bites. Almost there Trooper , keep on doing a fantastic work.1 point
-
Thanks! I'll keep on keeping on. I started doing the measurements for the shins today so this was a big help!1 point
-
Looking great so far Luke1 point
-
Hola y bienvenidos a bordo.1 point
-
Great work! I used 2" thick memory foam cut to size for Boba's pouches, looks like you could use 1" thick for that pouch. I like the memory foam because it doesn't give the pouches hard edges, which makes them look naturally full. Then again, they're thinner cloth pouches. It's also still easy to cut to accommodate a speaker or a small box for trading cards.1 point
-
Nice work, looks great1 point
-
Naaa, only it it opens up a kit option to build yourself1 point
-
I initially made this post on imgur public by mistake, (Can't edit those to resize them), and comment within minutes- "You'll never hit a pedestrian again"1 point
-
"Display only"... someone will troop it. I guarantee it. You all better act fast before our replica guys buy them out.1 point
-
Looks great! Another trooper pointed out that making a box (ABS sheet) to fit inside will help it keep its shape. You can also use hard foam for a fit it and forget it. If sized right, perfect for carrying trading cards. Maybe industrial velcro to attach the plastic cover to pouch in case you need to clean or replace? Keep up the great work, hope to get a pic at a future troop with mini FOTK.1 point
-
That's good, Luke! Keep going with your build.1 point
-
Hi Luke, Don't worry about making questions, we love questions, photos and help others so keep on making questions and posting photos. For the Shins , you can leave a small return edge at the top and they don't have any return edge in the botton as you can see in the references. Cheers.1 point
-
I've been looking through your thread and it is great to follow along with someone who is on the same path with the same armor! Can't wait to see it when it's done! Good stuff1 point
-
Alright, I did a lot of sanding, filling holes in ABS paste, sanding again, filling holes, etc... I now have 2 mostly done shims. They are fairly shiny and nice, but they aren't perfect. What do you all think? I tried to capture the shine, right on top of the not as shiny spots. There is a little different color there, some of that is from the NOVUS polish, the rest... idk, I'm guessing that the white ABS paste had some pencil marks or something else in there so it's a little off but most people won't notice. Here are the pics. well... I'm done with this for the night... I think. lol1 point
-
Lots of broken photos and no text at all. But it does have measurements.1 point
-
A great tutorial on pouches can be found here------------1 point
-
Awesome thanks Tony and Mario! So yeah the last few days have been very busy armor-wise which is exciting. After cutting everything out (which I did prior to starting this build thread) I decided to go in order of Tony's build thread: Which meant starting on the forearms (deciding to do a bit of a recap here). I went ahead and did the sizing for both the right and left (Joseph's return edge thread was very useful here). I ended up losing the return edges on both the top and bottom of each forearm. This made it way more comfortable as well and most likely I will be removing most (if not all of the return edges for the rest of the build. I tried to make sure to leave around a half-inch of space inside for each arm (per Tony's suggestion in the build thread) and everything felt great after cutting out. Per suggestions that I've read in various build threads, I decided to reinforce the forearms with a cover strip on the inside made from excess ABS from cutting out the original pieces. For my first go at glueing together, I feel pretty good about it but I'm slightly worried about glue getting everywhere on the outside like it sort of did on the inside. Would goo be gone be the best option for removing if needed? I also found that using clamps here was tough for me as the pieces were sliding all over the place so I just went with the painter's tape and magnets. Maybe I need smaller clamps, but these did the trick for now. Tomorrow/later today the plan is to glue the opposite inner cover strips and then start on the biceps. Throughout the week I'll move to the outer cover strips for the forearms (while remembering to remove the protective film). I do have a question regarding the right forearm. So there is this pointy piece that sticks up by the upper opening. I've been looking at various threads and I believe that in Shane's (Blast 'Em!) thread it was suggested to trim that down so it doesn't snag on the armor. I just wanted to make sure that it is still groovy to do that, and that it will still be approvable before I start slicing and dicing. As always, thanks for everything! Until the next post...1 point
-
Took an around hour to glue some of the parts together this afternoon. The butt plate is fully built now. Bit worried about this for the same reason as my abdomen, I have hips. Hopefully it will be okay. Cod is done too. This isn't the one from CG Traders but a more accurate TLJ style one my friend provided. Think I'm okay sizing wise but may need a tweak closer once I can get more suited up. Made a start building up the chest plate. Minor miss-alignment on the part I fixed. I may have miss shaped it a tiny bit when I was making the changes. Nothing that can't be filled though. Also started on the helmet dome. Again 1 small miss alignment, right most part is a shade high in the centre of dome. I've filed off some of this to even the levels but I daren't take any more off. The rest will be handled with filler. I just need to take care to align the rest of the dome with a shade more care. This is the big problem with using super glue, you get a few seconds to see any errors before it's forever. None of this has been welded on the back yet. I will do this before I start on the filler work to help with strength. I may also fibreglass some parts, certainly the broken abdomen plate, but maybe others. I'm not overly worried about the filler work, none of it is any worse than what I have seen a Jimiroqui kit need.1 point
-
couple updates, had a shenanigan that I fixed, the bottom screw on the right ear decided to pull through. Where it should be, Where it is when I tighten it, So I ABS pasted the hole, and since I could reuse a hole I drilled before the ear was fully trimmed I just had to drill one hole. Here is the final product. I also bought a hardhat and have modified it a tad.... Now I can put the important bits in the helmet. I'm planning on using E6000 to glue the yellow mounting points to the inside of the helmet. I guess I could have plasti-dipped the inside after... oh well, forgot about the mounting when I did it the first time , Here is the approximate location (as in, it fits but I haven't measured at all) I also finally finished the snap on the holster, and attached the holster to the belt. I did try and fix that seam on the kidney plate, it's drying right now so I should be able to sand it down again tomorrow or monday, then it should be good to go for sizing, final trimming at the ab plate, and finally rivets installed Not sure what else is on the docket for the night, probably playing a bit of DCS, I might convince the wife to paint a little on the helmet, as you saw before I shouldn't be trusted with the fine details like that. I did get some vinyl stencils to use, so I might put those on tonight, idk.1 point
-
1 point


.thumb.jpg.77bd551337f7adc46a4b151e703df6be.jpg)