Leaderboard


Popular Content
Showing content with the highest reputation on 06/24/2020 in Posts
-
Masked the outside edge of both main pieces with painters tape and a garbage bag and sprayed the interiors with my favorite Rust-Oleum truck bed liner. Did about 5 coats, ten min apart or so. Removed the masking! Touched up the teeth and eyes with a brush. I think I'll be trying to emulate this helmet and will probably try to mask and paint the frown next!4 points
-
Just want to say a big thank you for the very nice visual upgrades to the forum. I really love the new section banners. They pop nicely and make scrolling through even better. Great work to the individual or team doing this!3 points
-
All I need to do now is: -Finish Thermal Detonator -Do boot strapping -Paint rivets white VERY close, feels weird look back in older posts seeing how far i've come!3 points
-
I finished the additional bicep/forearm gasket, then decided to dive straight into building the shoulder gaskets. For my pattern, I asked Cameron to donate a shirt that he didn't wear anymore, but still fit loosely on him. I marked roughly where the gasket vest would fit on the shirt, and then cut it up. I made a similar style vest for my shoretrooper kit, so I'm somewhat familiar with how to make this from scratch. I traced out the pieces of the cut up shirt onto headliner foam. I made sure that the front and back halves were well marked, because they are different! Same for the shoulder/sleeves. Here you can see how I clipped things together. Beginning with the sleeves, I attached a corresponding piece of ribbed fabric to the foam. I sewed along the bottom edge with right sides together (where my finger is pointing). This results in a nice finished edge at the end of the sleeve. Once sewn together, it looks like this: Next, I used some adhesive spray to attach the fabric to the foam more securely. Then I flipped the fabric and stuck the two halves together. Easy! Next, I stitched a length of hook velcro onto the end of the sleeve. Setting the sleeve aside, I moved on to the chest/back part of the vest. I attached the fabric to the headliner foam with the basting adhesive spray first. Then, I sewed along the shoulder seams. Because I had raw edges on the inside seams, I finished them off with a zig-zag stitch that emulates a serger stitch. This way, there shouldn't be any fraying of the edges inside the vest. Here's how it looks. Then I attached the sleeve along the shoulders and sewed things together along the curve, making sure that the raw edges were also finished with a zig-zag stitch. Sleeve on! Here's what it looks like before the final stitching, all flat. Next, I sewed under the arms and along the inside chest to close off the sleeve and vest half. And that's all I had time to finish today! Tomorrow I'll finish the other half of the vest assembly, then connect the halves with a few elastics in the back and a quick connect buckle in the front. I'm thinking that I'll make some black bias tape to finish the raw edges of the vest off... or I might just do a zig-zag serger style finish instead. Still trying to decide on that. I've got the pieces for the knee gaskets already cut out, so those will be easy to quickly finish. Very happy with how these are turning out.3 points
-
Hey all, glad to finally have gotten here. I've wanted to join for the longest time but wasn't old enough yet! And then the transition from high school to college put me back a year. But I'm here now! I've already ordered my Rogue One TK armor from Jimmiroquai and just waiting for that to come in. I'll be starting my own build thread soon because Lord knows I'll need the help XD2 points
-
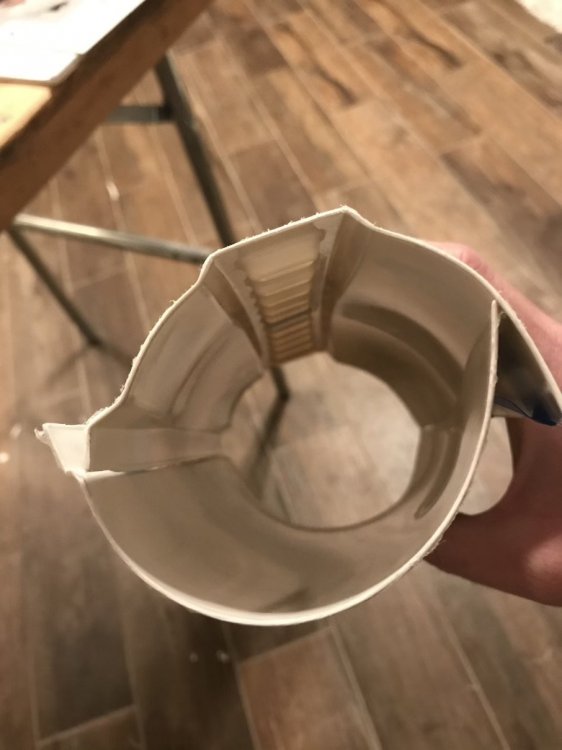
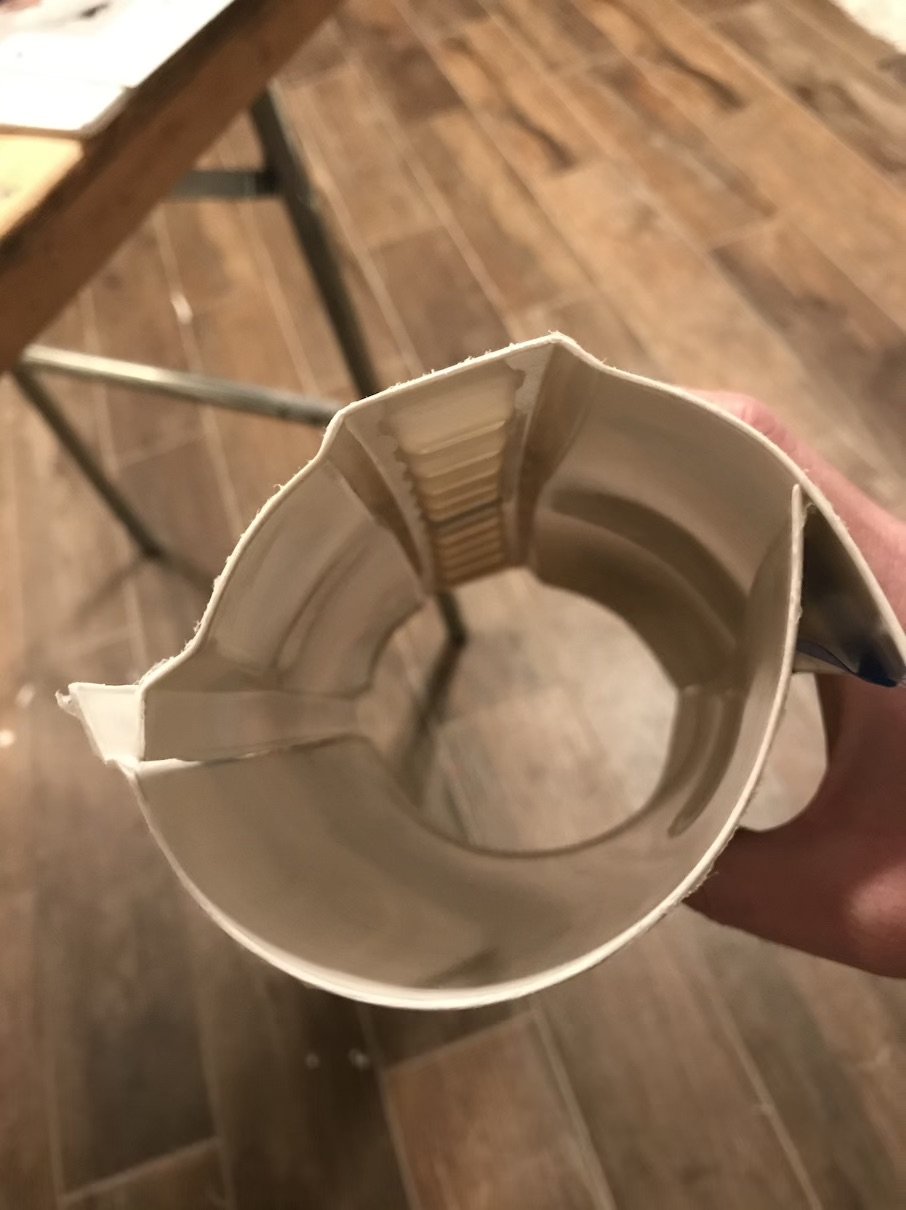
Here is the wrist side of the forearm with the return edge removed. The protective film is still on the armor so that is why there is fuzziness around the edges (Definitely will make sure to remove partially before glueing). Does that look like there's enough return edge taken off?
 2 points
 -
Hi David, Thanks for your application - it's great to see ROTJ armor in a sea of ANH armors! You are actually my first ROTJ approval. CRL and EIB Application Requirements All required photos are now in and, after review, we are pleased to welcome you to Expert Infantry rank. On behalf of the DO team and myself, many congratulations! Other-Armor Fit/Assembly In this area we review observations made by your fellow troopers and the DO team. Some observations may lead to suggestions to improve the overall look of your armor. Note that we consider both text (CRL) and pictures (screen caps/reference images) when reviewing submissions Just a small note here: your shoulder bell corners are rounded which is required for ROTJ; however one is more square than the other, so you may want to round it off a bit more to match. Reference: Centurion Requirements In this section we prepare you for Centurion. More photos may be requested in the future that allow us to make better decisions on possible adjustments. If there are any areas of concern they will be discussed here. Because Centurion photos show much more detail than EIB, items to pertaining to Centurion might be seen there and not here. We try to point out all that we can from what is seen, but the final accuracy is the responsibility of the trooper. Starting from the top, the L3 CRL states: The plastic shoulder straps need to be held down in the back via a white elastic band to the white fabric that connects/bridges the chest and back piece. It doesn't appear they are present on your build: Reference Image: (Sorry; you'll have to squint to see them ) Next, the L3 CRL states: Shoulder bells have foam padding inside. Shoulder bells are slightly pinched and worn slightly higher, compared to ANH/ESB. The language is a little confusing, but if you take a look at the screen used suits, you'll see that the shoulder bells sit quite far out from the troopers' bodies, and this was accomplished with some simple foam padding. Should be an easy fix! Reference Images: Moving along, the L3 CRL states: No return edge on the inside of the front of the forearm is allowed. This is the same requirement as on ANH and ESB armors, and should just be a few minutes with some scissors or dremel to remove all that return edge on the wrist side. Reference Image: Finally, after some discussion amongst the DO team, we've concluded that unfortunately your blaster won't pass for Centurion. You've done a *great* job with the print, but there are several details that are just too far off from being screen-accurate to pass for L3. 1. Rear sight has holes in both sides Reference images 2. Scope mount missing details Reference image Reference image 3. Bottom arc of end cap is cut too deep. Reference image 4. Missing forward D-ring (L3 requirement). 5. Muzzle needs 2 countersunk Allen bolts (L3 requirement). Although the CRL states that these should be in the 10 and 4 o'clock positions, none of the references I could find show this. The closest I could find was 11 and 5 o'clock positions. Either way they probably shouldn't be at the 9 and 3 positions. 6. Ammo clip is inaccurate. Reference image Here are a bunch of detailed photos of an ROTJ blaster: https://www.whitearmor.net/forum/gallery/album/44-mgc-sterling-mk-iv/ Looking back at previous approvals, it appears that most people seem to buy blasters from CFO, but it may also be worth searching around for some different print files if you go that route. And that's it! Again, it's a pleasure seeing an ROTJ application, and there's a bit of work for Centurion, but the DO team is always available to help you out. Until then, congratulations on reaching EIB!2 points
-
Mario is absolutely correct. Wait until you know you need the cuts. Here's a link to a post from Joseph which is very helpful for higher levels of approval. https://www.whitearmor.net/forum/topic/48335-quick-crl-reference-guide-for-your-ot-build-pics-notes-tips/?do=findComment&comment=6736582 points
-
I’d remove the mic tips, and fill the incorrect holes with ABS paste and sand. There’s a “how to” on making ABS paste here: Best of luck!2 points
-
The key to a great build comes down to 2 things, Luke: Ask lots of questions and post lots of photos. If you have even the smallest doubt about an issue, it's better to post up a photo along with your question so that you can get the correct advice instead of forging ahead. Trust me. I noticed that you listed your undersuit as Anovos. My advice would be to promptly ditch it, and here is why: Anovos undersuits are infamous for bleeding onto armor, an in many cases the black marks are very difficult or impossible to remove. You can pick up a shirt on Amazon like this and pants like this, which are fairly inexpensive, just make sure there are no markings (logos, colored stitching) which are visible when you wear your armor.2 points
-
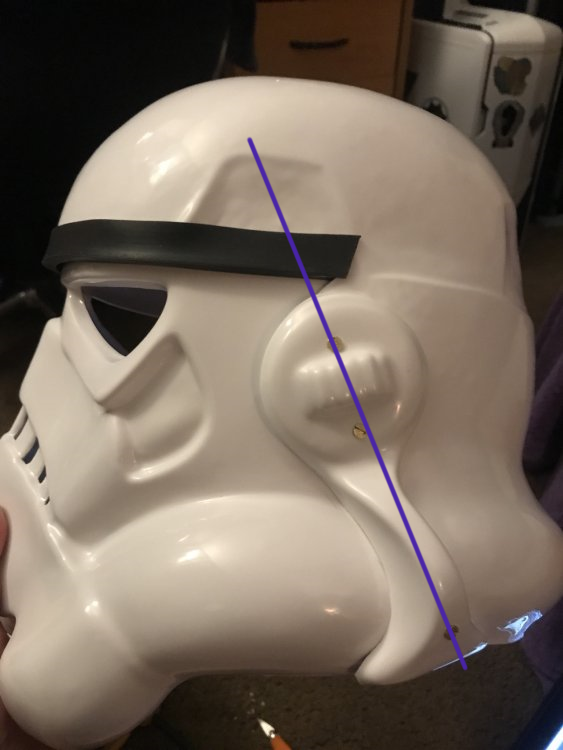
Great progress, Emma! To clarify about the mobility cuts—they cannot extend above the raised ridge which I’ve marked with a blue line in the photo below. I’m sure somebody else will provide some reference photos, but this is all I can do from my phone at the moment. Sent from my iPhone using Tapatalk2 points
-
I think I need to go through the dictionary and find some more words to describe the job you are doing with this build, Mind blowing!!!2 points
-
Took an around hour to glue some of the parts together this afternoon. The butt plate is fully built now. Bit worried about this for the same reason as my abdomen, I have hips. Hopefully it will be okay. Cod is done too. This isn't the one from CG Traders but a more accurate TLJ style one my friend provided. Think I'm okay sizing wise but may need a tweak closer once I can get more suited up. Made a start building up the chest plate. Minor miss-alignment on the part I fixed. I may have miss shaped it a tiny bit when I was making the changes. Nothing that can't be filled though. Also started on the helmet dome. Again 1 small miss alignment, right most part is a shade high in the centre of dome. I've filed off some of this to even the levels but I daren't take any more off. The rest will be handled with filler. I just need to take care to align the rest of the dome with a shade more care. This is the big problem with using super glue, you get a few seconds to see any errors before it's forever. None of this has been welded on the back yet. I will do this before I start on the filler work to help with strength. I may also fibreglass some parts, certainly the broken abdomen plate, but maybe others. I'm not overly worried about the filler work, none of it is any worse than what I have seen a Jimiroqui kit need.2 points
-
Congratulations on reaching the Expert Infantry level! IMPORTANT: PLEASE READ THIS BEFORE POSTING- In order to receive your certificate, you will need to supply information listed below in your post on this thread. Please double check your spelling and TK number, as corrections can not be made once it is generated. Do NOT add, forum names, armor designations (Stunt, Hero, HWT etc.), as these will not be listed. All information MUST be included, or your certificate will not be issued. PLEASE NOTE: One EI certificate will be issued per TK number. Your Certificate data will only be stored here and available for you to download for 12 months, after that the back end data is removed for storage purposes and you would need to request a certificate to be reproduced. Please be prudent in downloading and saving your file to a PC or device. ONCE YOUR CERTIFICATE IS GENERATED, A LINK WILL BE ADDED TO YOUR REQUEST POST 1. First Name 2. Last name 3. 501st ID (TK number) 4. Paper size* (See below) 5. The name of the DO that did your final approval. (Sha Sha or myself). This is an example of how your post should look. Nothing more, nothing less: Joseph Pedigo 10963 EIB letter size Sha Sha PLEASE READ THIS CAREFULLY BEFORE SUBMITTING YOUR REQUEST!!!! * If you are American and want a letter (8 1/2 x 11) size certificate, (suggested) write Letter. If you want an A4 sized certificate, write A4. PLEASE NOTE that the A4 is a completely different size than the letter, and those in the U.S. may have trouble printing it. It also will NOT fit correctly in a standard 8 1/2 x 11 frame. It comes in a 300 dpi png-format picture, so you can send it straight to your printer if you want. *************************************************************************************************************************************************************************** I try my best to get these to you within 24 hours, but it may take up to 48. If you haven't received it within that time frame, please feel free to PM me. Please do NOT "BUMP" your request.1 point
-
I've been slowly working on a 3D print build of Nico Henderson's R1TK helmet. Nico is well known for his accuracy on his Shoretrooper helmet design, so when I saw him post on Facebook that he was going to be releasing a 3D printable model of the R1TK I knew I had to give it a try. It's a beautiful design and I believe it to be the most accurate I've seen. I didn't know how far I was going to get with this build tbh so I hadn't started a build thread, but now that I'm getting close to painting I figured now would be a good time to post my progress. I'll probably need some advice on paint here soon as well, so any advice on paint and/or threads to read would be appreciated!! Here are some pics of the freshly printed pieces: And here's a few of the mockup of the raw printed pieces (except for the chin and ears which I had already started to sand): So after I had sanded things down a bit, I wasn't sure which method I wanted to use to fill the print lines I couldn't get with sandpaper. I had heard some people talking about using XTC3D so I decided to give that a try. My opinion is that it's good if you don't want to process it too much further than the initial polish, but I ended up with bubbles in the dried resin and found it difficult to sand, I think I could've gotten the same results easier just using filler primer, which is WAY easier to sand and get smooth. After endless hours of sanding I was finally ready to attach some of the pieces together. I started with the face and the back, then attached the dome. I wanted to fill the seam line between the back of the helmet and the dome. I wasn't ready to attach the chin yet as I wanted to get the face/back/dome piece as well as the chin up to paint ready smoothness with wet sanding before I attached the rest of the face together. Mostly so I wouldn't have to try and sand the seam between where the chin and cheek tubes meet, as well as the surfaces leading into the frown. So finally, I'm caught up to my current progress. I've got everything wet sanded up to 2000 grit and I have attached the chin to the rest of the helmet. I've mocked up the ears, brow trim and vocoder for looks, everything else you see is attached. Now I need to know how to proceed with painting. I've been trying to research rattle can options and the steps I should follow. I've never attempted to spray paint a project that needed to achieve the level of gloss and smoothness that this requires, so I want to get all the input I can before I proceed. I'm not sure if I should be laying down a particular type of primer first (should I use white primer?) and then what type of paint is best and how I should be going about getting all the angles without missing spots or pooling problems. Also, I've seen people talking about just using gloss white, but then I saw someone mention appliance epoxy, which I think might be a good idea due to the fact that it resists chipping? I found some at my local Home Depot but wasn't sure so I haven't gotten anything yet. This is what I found: Alright, well I'd love to get some feedback on the painting process as well as how to proceed with painting the greeblies (tears and traps) as well!1 point
-
Hi there! After years of having the Anovos pre-ordered kit sitting in the box, I am finally getting at it and building my ANH Stunt TK (going for Centurion)! These boards have been a great help so far and you all have helped more than you know already. I can't wait to troop alongside you all in the Southern California Garrison and around the world! Thanks so much for having me and for all that you do! Luke Here is a link to my build thread:1 point
-
Hi @Code3345...Just a few minutes working with imgur and you will succeed...Only 29 spots left, TIME TO STEP-UP1 point
-
I'm 6 feet and I can only bend my legs so far, but because of gaps between the armor to make the cut outs would leave a huge gap at the back which I don't like the looks off. I'd suggest kitting up first, checking all your gaps before any trimming.1 point
-
I use industrial paints for props which seems to adhere a little better than other paints, you could use an etch primer, or even just give a light sand with some fine wet/dry sandpaper, it will help the paint adhere. I would first give everything a wash, some times you can have grease spots or finger prints which can react with paint.1 point
-
Congratulations trooper and welcome to the EI ranks1 point
-
Looking forward to the progress, good luck1 point
-
Great Luke, following your build right know.1 point
-
just right Luke. Reference Photo1 point
-
Awesome sauce! You will need to remind him of his facial expression when he is a stud at his next troop (going to look awesome)! How about belt pouches, boots, neck gasket, shiny shorts? Sewing minds want to know the plans. If you are not already, you should plan to get him trading cards.1 point
-
Thanks for the kind words, troopers! It really means a lot coming from such an amazing group as you all! Keeping up my momentum on the gaskets, I finished everything today! I started by sewing the sleeve to the other side of the vest. Then to finish the edges, I simply folded them under, making sure it fit Cameron correctly as I made my adjustments. It's not the most elegant solution, but it'll do. I sewed two pieces of 1.5" elastic at the back. This allows for good movement. In the front, since there's not a lot of room for a buckle, I opted to sew in some loop velcro on either side of the vest in the middle. I sewed some hook velcro to a short piece of 1.5" elastic to make a closure of sorts. Again, not the most elegant solution, but it works well to keep the vest closed. And it's easy for Cameron to attach, so win-win! Here are all the finished gaskets. Can you tell that Cameron was a little tired of having to "try on-take" off the vest? He was a real sport about it, though. I think I had him in and out of the thing about a dozen times as I tried to figure out how to position the elastics and figure out the lengths for connections. And now I'm at the point where I can't work any further on the kit. :/ Everything is waiting for the last coat of paint and clear coat. The weather isn't cooperating at all, and won't be improving for at least a week. Grrr. Ah well. Maybe time to clean the nerd room, I guess? Anyhow, thanks for reading, and I'll be back in a few weeks once I've got everything painted.1 point
-
I don't have any scrap, but found some .06 white ABS 12" x12" sheets on Amazon. Thanks, all!1 point
-
Congratulations Trooper, welcome to EIB.1 point
-
Superb work, Peter. You’ve really earned this award through hard work and great research. Welcome to Centurion, brother. [emoji1303][emoji16]1 point
-
Congrats, David! Well done! Sent from my iPhone using Tapatalk1 point
-
Hi Emma, may be this can help. If I can make a suggestion, wait to the final fit of your amor to be sure if the mobility cuts are really needed and if so, how much plastic you need to cut.1 point
-
Unfortunately those are old photos in the CRL and need to be updated, Fred. Although it is not a requirement for Basic or EI levels, it is listed in the Hero CRL as a requirement for Centurion** and is screen accurate. **The top of the ABS ammo belt should sit at or just above the bottom of the central and vertical abdomen button panels1 point
-
I have a can of unused 2K spray, I think it has a 48 hour limit after popping the 2nd tube. But your can should have good instructions on how long you can wait before it cures inside the can. The build looks great! it's good and bad that my 18 month old wont be big enough for armor for a while... I'm doing enough work for my armor, I don't need to do that for his yet haha.1 point
-
Today was a day of progress, revelations, and questions. *inhales* alright, here we go! First of all, one thigh shim down! A test fit with some other armor held up just to make sure the thigh slides on all the way. It's a teeny bit tight but any larger a shim and I fear I would have put too much strain on the armor. Already it feels pretty strained... I had to use some CA glue already to secure a loosening inner cover strip, but now it's super glued. I feel I can get used to it (wearing armor is a strange feeling). Here it is compared to the ab (which I accidentally placed too high in the pic) (I have to trim the cod to make the ab sit lower... more to come on that later): and the butt plate (which I held a bit too high up on my body, but you get the point). I want to make sure I can make a mobility cut out of the back... otherwise I can hardly bend my leg! Would something like the red line below be acceptable? Just up to the height of the shim, cutting out some of the back ridge. Next up for the night, ab plates! I trimmed the larger ab plate a bit more per recommendation on this build thread, and I trimmed the smaller ab plate, using the inside indents as guidelines. That's all on the ab plate front right now! Since I trimmed the larger ab plate, I might not have to give it a hot water bath, glue might be enough for it to lay flat, but we'll have to see. I trimmed the chest plate bottom return edge a bit more but again have encountered the same problem: there is a gap between the chest and the ab. The armor makes contact at the points circled in red, preventing a flush fit. I cannot figure out what I need to do to fix this. If I trim the return edge much more, no room for the brackets. Can I bend the chest plate around with heat to better fit the contour of the ab?? Any ideas would be hugely appreciated, I'm a bit stumped but want to move forward on the torso. Lastly, a new revelation: I am going to have to trim the ab by slicing the cod. I decided to do a test fit, placing the kidney directly above where the butt plate is going to go, and letting the ab sit on, well, my "abs," I should say my stomach . I made sure it didn't sit too high, otherwise it starts to ride up on my chest, or just sit on my chest completely. Since the top of the ab has to align with the top of the kidney, I will use this as my marker to orient the rest of the torso pieces. Like so: This looks fine until you realize that once I orient that ab plate to actually sit at the proper height on my body, the cod is WAAYYYYY too low. Like, my hand is where the cod is Supposed to end. Look at that height difference. It's hard to tell because my dark leggings and shadows obscure it, but I can assure you, when I adjust the ab to be the proper height on my torso on the top, it goes way too low on the bottom. The alternative is that I raise the ab, but then it cuts into my chest, places the kidney too high (and subsequently the posterior) and the whole thing becomes skewed. So.... must I slice the cod? I think so..... I was afraid of doing this and have no idea how, but like with all else on here, I must research research research and then execute the best I can. It's looking like at 5'6", slicing the cod is going to be a thing. I was in denial at first, but now I see in order for this to be comfortable, that's what I must do. I read that of all torso pieces, the ab is what sets the rest. So I must have it sit comfortably, which means slicing the cod. this will also make moving my legs easier. I feel this is what I have to do now. Oh, and I started gluing the inner front cover strip of the right thigh! And I'll have to do the back outer cover strip of the left thigh (over the shim) once I verify if I can make that mobility cut as proposed above. Phew, that's a lot of posting for tonight! Thanks for tuning in1 point
-
This build is just more than amazing!!!1 point
-
Super-awesome work1 point
-
Hi Tanner, maybe this thread can help you. Check it, and feel free to navigate the Assembly forum.1 point
-
Friend finished printing my helmet! Once its sanded and primed it's being sent my way to get painted and finished. I also received my pauldron and ammo pouch from Trooperbay (will get a backpack once the build is done to more resemble the Squad Leader/Commander).1 point
-
We are planning on getting more Hombrol White Enamel paint soon. Hopefully the model shop guy is open. For some reason he has the huge tower of Hombrol paints near a heater.... So we got our paints all fine, but the white one somehow seperated, soo there is a huge gloob of white paint. I've tried mixing it but it just does not want to mix together, it comes out as a cream colour. Thanks for the heads up, I'm not super familar with all the different paint types. Also thank you @Sly11 on the final strech now for basic, then onto Ex-Inf and eventually Centurion! Hopefully wont have to make huge changes and only minor ones, time will tell!1 point
-
Well, my ESB decals came in today from TrooperBay! They're definitely... symmetrical in shape. The helmet forsure isn't. We'll see how it looks! Still working on scrubbing the paint off... Goo Gone hasn't really worked, nor Novus... Mineral spirits? Suggestions anyone? Also, before I spray my interior black, can y'all confirm that these eye opening cut lines look proper? Theyre pretty much supposed to be maxed out to the edge for ESB, ya? Thanks!1 point
-
Hi Tanner! Have you checked out Pandatrooper’s ATA helmet assembly thread? I’d link you to it, but I’m on my phone now. But it is included in the All-In-One reference thread link I mentioned earlier in this string. Perhaps you might find it helpful. You can also upload photos of your current progress on your own build thread for us to see, and then better assist you! Sent from my iPhone using Tapatalk1 point
-
First time making gaskets. Started with this photo. Figured it wouldn't be difficult to emulate this kind of thing on my own and save some money. Using shiny ribbed black pleather and headliner foam to add bulk. I took my measurements from the bottom circumference of the bicep. I want the gasket to fill in the space, not fit skin tight. For Cameron, it's 10 inches in there. I added three inches for seam allowances because I was sewing two pieces of fabric together first. Total piece I started with was 9x13 inches for the biceps. Attached right sides together, securing everything so it wouldn't slip while sewing. After sewing three sides, it looks like this. Clipped the corners and extra material along the seam allowance, then flipped it right side out. To finish the open end and hide the raw edge, I folded in the edges like this. Secured the folded in edges: And sewed along the outer edge to close. Next I secured strips of hook velcro to the material and sewed them on. Next, I folded the long ends together with the right sides together, lining up the edges. Sewed the edges together with a 1/2" seam allowance. This closed the bicep gasket. Laying flat, it measures 5 inches- exactly the size I need for Cameron's biceps gaskets. Finished. And seam side is clean. I had Cameron try it on with the armor pieces. The armor is currently in "scuffed" state because I'm waiting for a cooler, drier day to paint the armor with the final coat of white and 2k gloss. Hopefully I'll have time tomorrow to finish the rest of the arms and legs. I think the shoulders might take me a little longer than these simple tubes, but I know I'll get them tackled eventually!1 point
-
Ears I found had been the hardest part to the whole build when I started. Your ear does appear to angled a little too much so you may want to tweak it a little.
 1 point
 -
Can anyone guess what I'm working on today? If you guessed a BELT, you're right! I'm using Tony's outstanding FOTK belt assembly tutorial for this. Cameron's belt is smaller overall, at just 1.5" wide instead of the typical 2" width. And it's currently looking something like this when sandwiched together. Mmmm... FOTK belt sandwich... I sewed the webbing around the female part of the quick-release buckle. Then I realized that I needed to drill a hole into the ab for a snap. My first hole on this... I've made many, many holes in armor, and for some reason, this time seemed to terrify me. Ah well, progress won't happen until holes are made. And thus, the hole was made. And a snap was set into the armor! I set the corresponding snap into the webbing of the belt as well. It fits! That's all I had time for today. Will be painting belt boxes this weekend!1 point
-
Let's discuss the thigh holster for the blaster, shall we? I printed out a functional thigh holster bracket (found over on Thingiverse) and scaled it so it would properly fit Cameron's thigh armor. The files aren't perfectly accurate, but they'll do for the most part. Scaling it to fit involved a bunch of eyeballing and scaling in Windows 3D program, but I got it right. It came in three pieces: base part to attach to the thigh, a middle bracket, and an upper (smaller) bracket. Typically, I'd just glue them all together with E6000 and call it a day. But even though I printed these in ABS, the bracket needs to be quite structurally sound because it's intended to be fully functional. Time for a mod. After lots of thinking, I decided to reinforce the bracket piece that holds the most weight (where the screws of the blaster lock into the holster) with a layer of sheet aluminum. I had printed out two of these parts due to their small size, and I used one of them as a template. I traced the bracket, cut it to shape with some tin snips, and drilled out holes where the screws would go. Here is a rough beginning: The big dog-leg hole was my biggest challenge to get cleared out. A little more drilling in the middle, more trims with tin snips, and sanding with a metal file, and the hole was clear. I hit it with more sandpaper to smooth out rough edges. See, it fits! This piece is now quite strong, and I won't worry at all when Cameron holsters his F-11D. Here you can see what I had to work with. These parts are covered in spot putty right now, and the 3D "screws" leave a lot to be desired. Much better with actual screws, amIright? In case anyone was wondering, the screws I'm currently using on the modded bracket are M3s, and that's an M3 ball bearing on there as well.1 point
-
Today's the day when I finally begin to make the armor look more like... armor! I snagged about 30 minutes this morning when the temps weren't too hot and the humidity hadn't creeped up yet to apply two coats of white gloss to some of the parts. It's so exciting to see this part of the transformation. In the pic below, you can see most of the parts painted white. I stuck the primed shins in there so you could easily see the contrast from gray to white. And after two coats applied to the shins... Even though I've applied just two light coats, I'll give these parts a few days to cure before wet sanding with 400 grit- which will be followed by another few coats of gloss white. I really want to get the painting stage of this right, so I don't want to rush things along too much. And I'm out of wire hangers for now. I may end up just buying a few more wire hangers, though. I splurged on a few cans of 2K gloss to apply once the paint is done. I've read that 2K is essentially spray resin, and once I pop the can, I should use it all in one go because of the two-part mix in the can. Anyone know if this is accurate?1 point
-
Awesome! There are plenty of ATA resources out there, including a great helmet tutorial by Pandatrooper, which I’m sure you’ve already seen. I’m currently building an ATA kit myself, and look forward to following along with your progress! Sent from my iPhone using Tapatalk1 point
-
Just spray a small amount on a lint free soft cloth and wipe on before putting helmet on.1 point
-
My few edits in my armor have been made and just been approved on my First Order armor. The image doesn’t show my edits I’ve done, but I’m now officially a stormtrooper.
 1 point
 -
OK so I had the opportunity to test out the “new” product and hell yes! In the picture above you can see the version 1 (on the right) of the shoulder strap that connects the chest to the back armor. The side strap is to connect the shoulder bell and the soft Velcro is intended to adhere to the underside of the kit included fiberglass shoulder straps or the urethane shoulder straps I make. Version 2 is on the left and was made from the new elastic/Velcro webbing. I also decided to make a version 3 which is the same as version 2 but the shoulder bell elastic/ snap is velcroid rather than sewn on the shoulder strap. This allows the wearer to adjust it on the strap for best fit. Going forward I pan on making the strapping kits available for purchase at $110.00 shipped to CONUS and will include the version 3 straps in that kit. I am still working some of the details for the kit and will post a link to the sell them once I have ironed everything out. This also means that if you have are planning on buying the urethane shoulder straps you should order them with the hard Velcro on them is you also are considering buying the strapping kit once its available. Ok so here are some pictures of the version 3 straps in full kit. They performed even better than the version 1 straps. I will continue the tutorial and refine the cut list in the coming weeks. Thanks for the interest.1 point
-
glad to see someone else asked this as I was looking too and everyone kept suggesting the UA Heatgear stuff but obviously i was only seeing 2 piece, question on the 2 piece stuff, how do you keep them from riding up or exposing skin between top and bottom? Do people add Velcro or something combat that or is just not that much of an issue?1 point


.thumb.jpg.77bd551337f7adc46a4b151e703df6be.jpg)