Leaderboard


Popular Content
Showing content with the highest reputation on 05/22/2020 in Posts
-
Hi FISD staff, members and friends. I’d like to thank all the FISD staff for working tirelessly over the last week on this nightmare. I know it’s not a decision you and the other staff members have taken lightly. Believe me the last thing I wanted was to bring down a trusted vendor who I respected and trusted. But in his own admission of guilt has done this to himself. I’d also like to thank all members I have known on this forum for many happy years and members I hope to get to know, a heartfelt thanks for the overwhelming support I’ve had through this whole debacle. It really has been a humbling experience in more ways than one. THANK YOU ALL. Sent from my iPhone using Tapatalk18 points
-
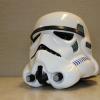
Official Statement TM recast CFO JoeR helmet. Fellow troopers, Thankfully it is not often we need to deal with situations such as what has unfolded over the last week, with the subject of recasting one the Detachment has always taking a strong stance against. Our members are our priority, having you all feel comfortable with buying various products from reputable vendors and honest vendors falls into that mandate. We supply a trusted vendors list that brings that confidence to purchase and is governed by several factors some of which are, quality, reliability, accessibility, integrity, honesty and trust. This recast thread, the above factors and content within have all formed part of the tough decision making the staff has had to make. We feel the integrity and trust has been broken between members, FISD command staff and other vendors with one of our long serving armour suppliers. This is not a subject that the staff or I have taken lightly as we have poured over this since the initial post was made. We have looked at the very compelling evidence and we have seen the response from the accused sent only to the accuser. TM (Paul) has been given equal opportunity to respond directly and state his case here in this thread but he has chosen not to do so. The evidence has been viewed as irrefutable, and Paul's response to CFO (Mark) a full admission that this was done with ill intent. This has led the command staff no choice but to make some decisions and take actions in the best interests of our FISD membership. First decision was to have TM removed from our vetted sellers list. This does not prevent anyone from making purchases from him, we simply wont feature TM any longer. The second discussion was in regards to a possible forum ban. A poll was set up for staff to vote anonymously with four options: No ban, 6 month ban, 12 month ban and Indefinite ban. The top poll placed was the indefinite ban, so from this point forward an indefinite forum ban period will be put in place against Paul. Paul is not a 501st member so there is no maximum period a ban can be in place. An indefinite ban period also gives flexibility that if this or future command teams decide to lift the ban, that option exist. We are not sorry for taking this hard stance as I have stated our membership is our first priority and we believe they should be able to procure their costuming needs from vendors that uphold honesty and integrity. Thank you for your time15 points
-
SUITED UP PHOTOS Here are some shots fully suited up to show fitting, proportions and overall look. Forgive the somewhat droopy front scope. I would need to heat bend it back. Probably due to old resin...5 points
-
Progress! Not much, but it still counts . I found an hour on Tuesday night and glued a 25mm wide cover strip over my bicep shim (both biceps are now done) and I glue an inner strip and teeny shim to the back of a forearm. After gluing the cover strip to this forearm, both forearms will be done. Forearm inner strip + shim setup: I determined the shim size by taping the forearm into the desired size, based on the measurements I took back on Page 1. I sanded the inner strip with 120 grit, cross hatching my sanding, and rinsed and dried the piece. I did the same for the top and bottom of the thin shim. I coated the inner strip with E6000 and placed the shim where intended, then left those to get tacky over the next 15-20min. Then I clamped everything together, slapped on magnets, and taped it up to keep things from migrating. Last step, cleaning the glue from all over my fingers and work station haha. I have learned that using a popsicle stick or tongue depressor to spread the E6000 really is the way to go. I was a doubter at first. Forgive me, Joseph. But spreading around the glue makes things slide around less when clamping and applying magnets. Next up are the backs of my shins. I'll cut them to size and then water bathe em. I'd still like to entertain magnetic closures, but we'll see how much time I have this weekend. Cricket's guides are awesome and I have all required materials, but the quickness of velcro is calling to me...4 points
-
So in keeping up with what happened in Lethbridge Alberta on May 4th, updated signage from the pizza cantina.
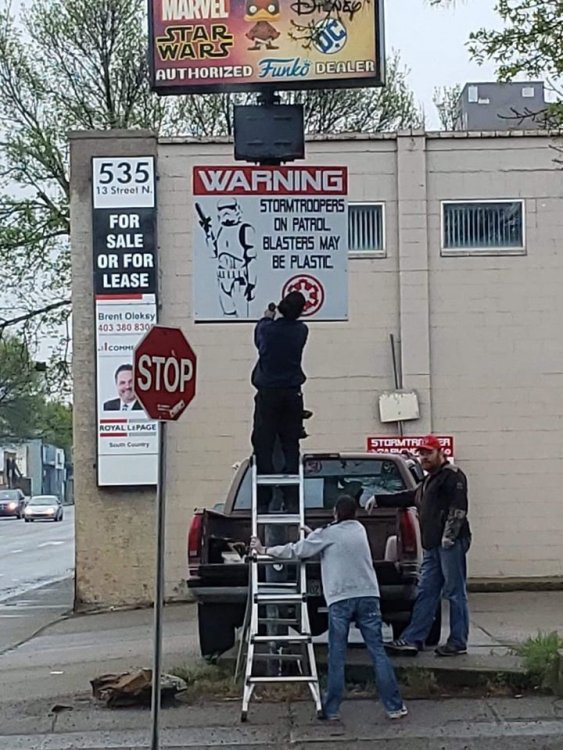 4 points
 -
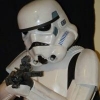
I've been rough cutting ears, and starting to get a better feel for the bucket. I'm almost ready to drill and bolt (or rivet) the face and cap/back. Then I'll get to cutting more on the ears. Wanted to get feedback on how I have the brow set up. I've scoured pics of ANH Stunt -and honestly you can find them all ways (high brow, low brow, tilted up, not tilt, etc.) Would like some input if/how I should tweak before I drill and bolt together. Thanks3 points
-
Painting Using Templates We tend to see a lot of folks who want to use paint instead of decals on their helmets, but sometimes they just don't turn out as planned. The main issue folks have is that the paint bleeds into the sides of the template, leaving small streaks on the sides which can look awful. The following is my preferred method, which has had pretty darned good results in the past. Will they turn out 100% perfect? Not always, but I have the remedy for that at the bottom of the post. For the purpose of this tutorial I am using blue painter's tape in lieu of a decal just to show the basics. What you will need: 1. Craft (popsicle) stick- This is to stir the paint. Do NOT shake the bottles... this causes bubbles. 2. Pencil with a flat rubber eraser. 3. Paintbrush- Use the best quality, softest bristle type you can. Cheap stiff bristle brushes will leave lines. 4. Paint. For this example I am using French Blue (as used on the tube stripes) and white. 5. Paper towels. Step 1- Use the flat end of the eraser to make sure the edges are pushed down as much as possible and remove any bubbles in the decal. Do this gently, otherwise you may peel up the edges instead of flattening them. Step 2- Using the craft stick, mix the paint thoroughly. Wipe off the end with a paper towel and set aside. Step 3- Starting at the top corner (either side) add a light coat of white paint. (Yes, white). Go from side to side all the way down to the bottom. Do NOT go too heavy, just enough to cover. Let this dry at least half an hour. Step 4- Repeat the same process with the white but go from corner to corner over the entire area. Let this dry completely. (An hour or so at least). NOTE: The reason for the white paint is that it will fill/seal any tiny spaces/gaps on the edges of the template. Step 5- After mixing the blue paint with the other end of the craft stick, using up and down strokes add a thin(ish) layer of the blue. Don't go heavy and try to do it in one shot. Trust me. Let this dry completely (at least an hour or 2). Step 6- Repeat step 5. Allow to dry at LEAST 2-3 hours or more, depending on humidity. If you press your finger on the paint and see your fingerprint in the paint, it's not completely dry. Be patient. Step 7- Time for the reveal!- Slowly (and by slowly I mean sloooooooooowly) remove the decal from top to bottom (in the same direction as the lines). Because I used masking tape the lines aren't as crisp and clean as you would get with a proper template, but you get the idea. One of the reasons for an imperfect line is that you must wait until the paint is positively, 100% dry before removing the decal. FIXING LINES If you have some bleed-through, or need to remove paint around the teeth for instance this is what to do: You will need: 1. Paint remover- I always use Goo-Gone, as it contains no chemicals that will damage the finish (like acetone based removers can). It really works great and has no chemical smell. 2. Another craft stick shaved at one end. A wooden toothpick will also work, but I like wider edge of the craft stick, 3. Cotton swabs 4. Paper towels. Let's start with this mess (done on purpose). Step 1- Dip the end of the tick in the remover and gently go side to side along the edge(s). Take-your-time. Step 2- Get the line as straight as you can. You can always touch it up with more blue paint if needed. Step 3- Remove any blue haze with the swab(s) dipped in the paint remover. Done! There are more ways to do this, so if you have any suggestions or questions, post em up!2 points
-
We chatted. I'm holding off making kits a little while longer as I'm recovering from my battle with cancer. Hopefully this summer!2 points
-
Congrats. I'm striving to join the ranks in the near future. :-)2 points
-
A while ago I started a YouTube channel with the intention of producing a full set of armour building tutorials. I have abandoned the channel and will not be doing any more with it but I will leave the tutorials on there for reference. I got quite far with the build so there's quite a lot of material which may be useful to people just starting out. Here are links to the two relevant playlists: PLAYLIST 1 "Stormtrooper costume: General information" PLAYLIST 2 "Stormtrooper armour build tutorials (Star Wars)"2 points
-
Spats done, no picture and hand plates done. Probably do shoulders next. My ABS paste came out perfect I think, consistency of honey.
 2 points
 -
Little update... While waiting for my armor to arrive I have started the process of gathering everything not arriving in the box. I started down the rabbit hole of getting a blaster. I toyed with the idea of 3D printing my own out of PLA filament. However, with my printer and the wonky nature of some of the shapes that was a LOT of hassle. I'm sure that I could have done it, but there would have been massive headaches to overcome. So, this made me look into shopping around for a kit or pre-made blaster. Again, I got in touch with RS Prop Masters. Turns out, RS prop masters will not sell me a blaster unless I purchase armor through them. As we have covered previously, they will not sell me armor because I'm too tall and too big. I found this practice odd, but, if they do not want to take my money that's cool. I finally found a thread on the forum for Imperial Factory. I could not ask for a better experience! So, blaster kit ordered and assembly will follow. I will make either a video of me assembling it or take a plethora of photos to document the build. Since I am missing streaming I am thinking it will be video time. Thanks for all the support!2 points
-
COMPLETED PHOTOS HELMET NECK SEAL CHEST, YOKE AND BACK THERMAL DETONATOR SHOULDER AND ELBOW GASKETS SHOULDER BELLS BICEPS FOREARMS GLOVES AND HAND PLATES ABDOMEN COD AND POSTERIOR BELT UNDERSUIT THIGHS KNEE GASKETS KNEE PLATES SHINS ANKLE SPATS BOOTS That's all the completed photos! As mentioned, blasters builds will be detailed later when my parts arrive.2 points
-
OP (MV) Post #19 40 years ago today was the premiere of my favorite Star Wars film, so I guess I know what I'll be watching during my build session(s) today. Thus far I've had How I Met Your Mother on in the background while I work, but once I finish ESB tonight or tomorrow I may need to transition to my collection of Star Wars soundtracks, as @Blast 'Em! has been doing during his build. That or just play the films themselves. Harmy or Adywan, anybody? =) Do or do not. There is no try. Today is arm day: Haha, jk. To continue my up-tempo progress, I've removed even more of the returns on the bottom of my forearms as well as continued trimming the forming excess on various pieces. I've been taking lots of photos for documentation purposes, but I'm starting to wonder if I should continue posting all of them, or simply keep them archived for future review if necessary. My recent posts have been quite photo heavy, and I don't want to overload any of those of you following along; your continued insight is invaluable, and I don't want to burn anybody out. Here are some samples of my progress on all the arm pieces; first up, the forearm bottoms. With my trimming I continued to remove return edges, but haven't gone all the way yet. I figured I'll have more to take off once I get to the fitting process; I just didn't want to hastily shave off too much. Best to leave a margin for error or adjustment in the future. While revisiting saved forum threads and various resources I came across this nugget below, from @pandatrooper on MEPD. This screenshot from his ATA TD build thread confirms that my identification of the forearms was correct, and at least tells me how the biceps were intended to be worn. Since both biceps have a thumbprint, per Joseph, I could decide to interchange them depending on how I elect to carry my blaster (and bend my elbows). I'm including my own armor parts in the second photo below for comparison. I've also begun the holster stretching process, per the guidance of Christine (Cricket). Here are the steps I'm taking: Remove the blaster strap secured by a Chicago screw Fill a 5-gallon or similar bucket (or your sink) with hot water Place the holster in the water allowing the water level to reach all the areas which need to be stretched Let the holster soak for 10-15 minutes, or however long it takes for the leather to be soaked through. I have Darman's 8oz version. Remove the holster and set aside and empty the bucket Wrap blaster, in my case a Hellhounds E-11, in two grocery bags and two large ziplock bags Squeeze the blaster into the soaked holster to stretch it out while drying. I'm leaving mine in the bucket and expect it to take a couple days. Repeat the process, adding more bags for extra stretching if necessary, until the blaster is easily removable Once a properly-stretched fit has been achieved, consider adding holster lubricant to the leather Quote Responses: Joseph - Hopefully I took enough off on my second go, with images shown above. I still have sanding to do, so that will likely shave a tiny bit more too. I'm definitely going to make sure everything fits well with the appropriate returns (or lack thereof) prior to gluing, since I want to minimize deconstructing pieces. I always assumed the reason for southpaw TKs was due to the E-11 protruding magazines on the left side, as you state, so I figured I'd avoid the rubbing myself and carry left handed. This will also leave my dominant right hand free to wave passers by [move] along and cuff rebel scum. Andrew - I'm so glad you mentioned the forearm dimple counts, as I had saved that distinction in my research notes from 4-6 months ago, but had forgotten about it while trimming this past week. As is seen in Terry's arm piece photos above, and mine below, my bicep outers have 11 dimples each, which I take it is common in some derivations of TE armor. To close, today my wife, who is a kindergarten teacher, received a shipment of books she bought her students, and Scholastic gifted a sheet of these cards as well. Baby "Leia," meet Baby Yoda.2 points
-
Thank you for the kind words, I very much appreciate it! Here are the photos of the corrected teeth. Please let me me know if this works or if I need to remove any more paint. When 15 minutes turns into an hour ...2 points
-
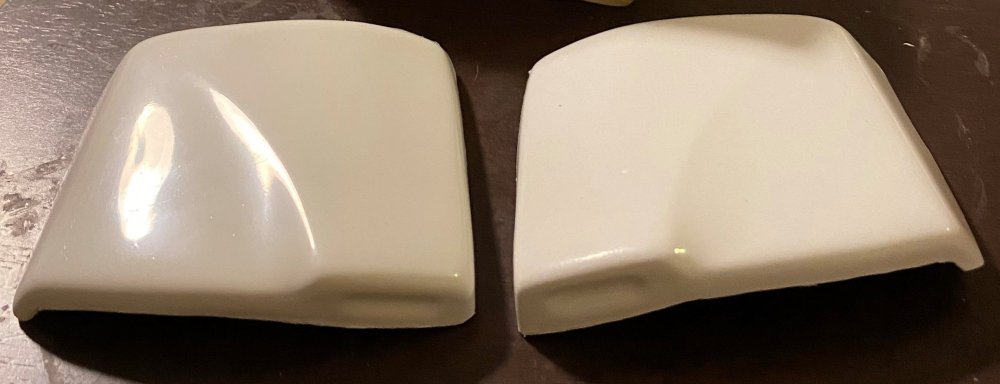
Correct, and the facts remain... Recasting is bad for everyone Mark has proven his armor was recast by TM. People can choose to believe it or not. Garrisons and Detachments have taken their stand which undoubtedly will cause a rift in the force, for a while at least. A vote from the FISD staff by the end of the week will determine if TM remains on the vetted vendors list and a member of the FISD. FISD staff DO NOT promote one armor over another, our sole purpose is (as Caleb nicely put it) guide members/newcomers toward vendors who have a good reputation and deliver accurate and timely products, while not showing undue preference.2 points
-
Please don't buy into the "I got the moulds in a trade" bullshucks. Someone has tried to disguise where they come from when they were created. Someone has form for doing this time and time again and someone has been very quiet on this subject.2 points
-
IDK who Chad is, or really anyone else on here (but thanks for all the good threads and help I've received), but I see his point but I think it is an incomplete thought. If we are just talking about staff showing preference to a specific vendor it can set a bad precedent. I know some staff members are vendors and will obviously support and promote themselves, but if a staff member heavily promotes/supports a single vendor (as in they only promote that vendor no matter the quality, and ignores the existence of others) then that would not be acceptable in my mind. In that case I would be suspicious of some type of foul play, under the table deals, bribes, or other shenanigans. I am not accusing anyone of this nor do I expect to, but if it happens I would expect that member to step down from their position or to change their ways and to support all approved vendors equally. On the other hand, if a staff member guides newcomers like myself toward vendors who have a good reputation and deliver accurate and timely products, while not showing undue preference, that would be acceptable by my interpretation of the charter. Hence the approved vendor list. Once a vendor, 501st member or not, shows bad intent, is unable to deliver quality parts, or is shown to marginalize and degrade others work then they should be publicly removed from the vendor list. Their accusations should be laid out, and then forum members should easily be able to find why they aren't a good person to buy from. Nobody has control over what armor anyone buys, or what they do with it on the own time, except the person who bought it. If they want to paint it pink, or rainbow, or blue, or turn it inside out and wear it to walmart then that's impressive, but just fine. The legion, and the detachments, should make the accusations known, and if they are valid they should remove said vendor, and that's it. I have watched a recaster in the SLD get called out, get help, and is now back on the "approved list" for vendors (I think there is a list somewhere there, but it's a smaller detachments so they may not have an actual list, just recommendations). So it is possible, but in this case I don't see that happening. Now, back to the subject at hand. I really hope my comments aren't controversial, I just followed 40+ comments and figured I would summarize a little of what a lot of people are feeling, and also help get the thread back on subject. To sskunky, That totally sucks. I can only see a few minor differences (not been looking at white armor long, but I can spot a vader version from 100 feet away haha), but the ears and a few other tells makes me believe your accusations. Ive seen your work over the past few years since I started this hobby and I really wish this hadn't happened to you. I wish the best for you and your family. If able, I would find it easier to spot the similarities if you compared both of the helmets in the pictures to another vendor's helmet. The shadows and other small details you mention are just not visible to me yet. But I understand if you don't have the time/patience/desire/ability to do that. To TM (assuming you read this), I would be interested in what you have to say about the accusations, and I would like to see if you have any proof that sskunky's accusations are incorrect. If you can prove that you didn't recast this or any other items that you sell then I will happily refer people to your quality products and I hope others will follow. If there is no proof, or no response then me and (most of) the rest of the legion will assume you are a recaster and will try to keep current and future members from purchasing from you. The ball is in your court, I hope you don't drop it. To everyone else, HI! Thanks for all the help, I'm getting close to finished on my TK and the forum has been invaluable, as expected. Sorry if I sound uneducated in TK stuff, it's because I am , if you have any questions about Vader, R2D2 building, or MSE building there is a good chance I can answer them (or at least direct you to a good source) so please don't hesitate to ask. Keep up the good work, don't get the Rona, and I hope to see you trooping soon! LLAP (oh wait, wrong forum) MTFBWY (uhhh... nevermind, how about) Long Live the Emperor!2 points
-
DISCLAIMER While there are some really good threads on this subject here on the FISD, I just wanted to highlight a few areas with some more detailed images. As many of you know, I am not a computer savvy guy, so I designed this for those who are in the same boat I am. Now, on with the show.... Whether you are just starting a build thread or just have a technical question, posting a photo is vital for getting solid advice here on the FISD. A verbal description is one thing, but a picture really is worth a thousand words. You will also need to post photos if you are applying for Expert Infantry/Centurion levels. In order to do this, you will need an image hosting server. For the following I am using imgur (imgur.com). This is a free service, and allows you to crop, re-size, rotate, post and store your photos. It may be a bit confusing at first, but I promise that once you get the hang of it you will be a pro in no time! NOTE For the purposes of this tutorial, we will use as an example that you have a question about the center of your ab-plate section. Instead of posting a photo of the entire costume, you can (and should) crop and re-size it to show a close-up. Assuming you have installed imgur and the photo(s) are downloaded on your PC or laptop in the Pictures section. To add a photo to your imgur Gallery: 1. On your imgur home page, click on your name at the top right (Step 1). This will give you a drop-down menu. Click on Images (Step 2). This will bring you to your Gallery (library/storage area). Go to the task bar at the bottom of the screen and click the New Post button. In the next window you can either just drop image directly to the drop images here box or select Choose Photo to browse your PC and select the images you want to upload. Finally go to Step 1 and 2 to acces your gallery to see the images you uploaded. The photo is now part of your Gallery... time to Edit! 1. Scroll over the image you wish to edit. You will see a pencil symbol and a trashcan. Click on the pencil, which will highlight the image in a green box . Click on the Edit tab on the top right. To crop/re-size: 1. Click on the Crop/Resize button. 2. Using your mouse, create a box around the area to be saved. 3. Hit Apply. To change the size, go to the numbers on the top right of the page. 4. I normally just use the one on the right (399 in this case) but you can use either. Click on the box and back out the number, then add your own to reduce or enlarge the image. 5. Hit Save. VERY IMPORTANT! The edited image is automatically changed and added to your Gallery. To Rotate your image: 1. 1. Scroll over the image you wish to edit. You will see a pencil symbol and a trashcan. Click on the pencil, which will highlight the image in a green box . Click on the Edit tab on the top right. 2. Click the Rotate tab. IMPORTANT: You may have to reduce the size first in order to get the entire image on the screen and successfully save it. 3. It will give you 4 choices like this: 3. Click on the one you want and hit SAVE. NOTE: You cannot Crop/Resize until you have saved it. O.K. time to post it up! In your Gallery, LEFT click on the center area of the pic you wish to post, which will bring you to the area as seen below. 1. LEFT click on Copy next to Direct Link. 2. Paste into your post or thread. DONE DEAL! Posting using a mobile device (phone): *** ***Special shout-outs to Glen (gmrhodes13) and Colin (OddViking327) for the following info. !! From Glen: After adding the imgur app., upload to Imgur then click on the image, then hold thumb on the image, it will open an options page then select copy link, on left, then post into your thread. Doing it this way will give you a link with the image tag, ie: jpg or png and so on. From Colin: Use the phone app to upload to Imgur right from your phone (set it to private and you can post them here, but they won't be searchable in their feed, and you don't have to title them). On each image on the Imgur in your Gallery, click it, and copy the BBCode tab *** and paste it into your post. It won't show while writing your post, but will show after you hit "Submit Reply". Super easy. And if people want to see a bigger version, clicking on it takes them to it. *** IMPORTANT!! Once you have attached a photo into a post or thread, do NOT delete or edit it in your Gallery. If you do so, it will disappear from your post. If you have any questions or issues, please feel free to ask on this thread.1 point
-
1. Name: Eric F. 2. 501st TK ID: TK-37423 3. FISD Forum Name: GoofTrooper 4. Garrison: Dune Sea Garrison 5. Armor maker: Anovos 6. Helmet maker: Anovos 7. Cloth belt maker: Rob Kittell 8. Neck seal maker: Darmans Props 9. Boot maker: Imperial Boots 10. Blaster maker: DoopyDoos E-11 kit 11. Height: 5’ 8” 12. Weight: 160 lbs In Armor: Action Shot With Plain Background: EIB Compliance Photos: Helmet: Blaster:1 point
-
So I sanded the putty with 400 and it just didn't seem to do enough. I could still feel raised spots. So I sanded to 220 and it went great! Took down the putty and left the holes filled in. Washed it off, but now I need to wait for it to dry before applying primer coat #2...1 point
-
Looking good, adding a mist coat of black can show imperfections when sanding1 point
-
No worries! Normally I'd appreciate the plug haha Not quite as nice and complete as mine imo (sorry!), but Sarah sells sort of a similar kit if that helps! https://www.etsy.com/listing/609695611/stormtrooper-costume-strapping-kit1 point
-
At the rate you are going, I expect it!1 point
-
Ok, I didn't know you have already talked. Get well soon mate.1 point
-
Teresa sells them https://www.whitearmor.net/forum/topic/40849-geeky-pinks-phantastic-gaskets-and-so-much-more/1 point
-
Are there special permissions? We can't access it.1 point
-
The brow would look a lot better if it were even all the way across.1 point
-
Looks better Garrett and glad I could help. Shoot me a message through FB if you have any questions.1 point
-
Exceptional!1 point
-
Wow! What a good armor you have there bro! Impressive build! Good luck! Sent from my LYA-L29 using Tapatalk1 point
-
I love the finish of the resin printer...The only problem is the size of the pieces that can be printed (In a resin printer for home, of course), and maybe its cleaning...Otherwise, the finish is spectacular...Very good job... I'm looking forward to seeing that blaster painted ... Regards1 point
-
The armor looks great!!! ...Two easy adjustments and you're done Good luck with your application1 point
-
Looking good there Trooper !!! Good luck with your application!1 point
-
TESTING IMAGE HOSTED BY IMGUR Please let me know if you can view this so I know my privacy settings are correct. Thanks!1 point
-
Hi Gary. Thank you for the official stance in regards to the thread on the UKG forums. At this point I believe both sides of the issue in regards to the thread on the UKG forums has been discussed to the fullest for our purposes here on the FISD. So again, at this point the DCOGs are letting everyone know that this thread will need to be kept on target from this point forward. We would really like this thread to continue on for discussion in regards to the original post of Troopermaster recasting Cast from Original. If this thread derails then we will have no choice but to lock it and warnings may be issued. This will do nothing but circumvent the whole purpose of this thread which was Mark bringing this information to us and then to a hopeful response from Paul. Thank you.1 point
-
Amazing, following your thread now and looking forward to se the progress photos. Good luck !!1 point
-
IMO people in staff positions have a duty to remain neutral among vendors. I am all for letting people post all the evidence they want as long as they aren't breaking forum rules. If staff members show a preference, I don't think that's fair to vendors.1 point
-
I just went over the the other forums and read the lot. I am embarrassed to be part of the UKG at this time. Some of those people are in top posts and their attitude sucks balls. As a costumer, I cannot fathom who on earth can not give respect to people who are lucky enough to be in a position to get their hands on any screen used prop, and have the guts to make accurate copies for others at the risk or ruining an item that can sell for hundreds of thousands of dollars. just unbelievable. I have huge respect for people like Mark and Joe for doing this and I think that being up front and completing above board business practices is paramount and deserves the respect of others.1 point
-
Whether he made the castings (molds/forms) himself or bought them from an un named source, I would think (as any reputable armor maker would) that being in the armor business he should have known it's not right to pull and sell without talking to and getting permission from the original mold owner (in this case CFO/Mark, and or JoeR). I'm sure if someone was to make castings (molds/forms) from one of his helmets that he would be livid especially if someone started pulling helmets or armor from them and sold them to the community! Being mad because of pictures on a CD in the past doesn't hold water with me and make it right! Just my opinion!1 point
-
It's always the same handful of folks from the same couple of Garrisons. Rarely matters what the topic is, but you can bet they just won't be happy . TBH they have become white noise to me these last few months. I see a ceetain screen name and my brain automatically tunes them out. Sent from my SM-J320FN using Tapatalk1 point
-
Might I suggest that this thread stays on topic. This is not a thread about the UK Garrison. At this stage, Chinese whispers is not constructive to the original post and purpose.1 point
-
Yup, already planning on touching that up, waiting on the current layer to dry, thanks!1 point
-
Oh wow, ok, I'll fix that then, thanks!1 point
-
Very good work !!!. Maybe the ridges of the vocoder a bit more rounded... You are doing a perfect job. Keep it up, trooper Regards.
 1 point
 -
Hi Charlie, welcome to FISD. Both helmets are ok for basic approval and with minor adjustment in the Anovos one. For levels 2 (EIB) and 3 (Centurion) The crl states specifically for the Vocoder: The vocoder must be integrated into the helmet, and not a separate piece As I know, the Shepperton Battle Spec has the vocoder as a separate piece. (Can you confirm this with the vendor?) The Anovos Helmet will need a few adjustments for L2 and L3 too but they're easy fixes like change ear screws , modify the hovi tips mesh and some paint details. In my personal opinion, the Anovos one is easier to upgrade for high levels. Cheers.1 point
-
I still have my license for solidworks 2014. I have been tossing the notion around of trying to build some parts in solidworks and printing. However, RT mod and AM are looking like the better routes to go. I did see another trooper my size here. Not sure if he is still building or not. But that gives me hope that even a tall example of pure male perfection like myself (joke) can join in on the fun!1 point
-
Hi Robert, and Thank You for your submission for Centurion level (and your patience)! CRL and Centurion Application Requirements All required photos are now in and, after review, we are pleased to welcome you to Centurion! On behalf of Sha Sha and myself, congratulations! Other-Armor Fit/Assembly In this area we discuss areas that could benefit from additional improvement. Note that we consider both text (CRL) and pictures (screen caps/reference images) when reviewing submissions Not a lot to say here, brother... You did an outstanding job on re-painting those traps/ear bars and fantastic work on those drop box fixes! Know that it's always a pleasure for Sha Sha and I to see when someone steps up to plate like this and goes the extra mile to reach level 3. We really do appreciate it. The main issue we were having is that while the gaps between the shoulder bells and chest/back plates look great, the tops of the bells are a little farther from the shoulder bridge than we normally like to see. HOWEVER, we understand that troopers come in all shapes and sizes, and after looking into the matter with multiple PMs and additional photos, we have decided that you honestly did all you could to address the issue so we are happy to welcome you to Level 3! Although you can't troop just yet due to what is going on the world, once you can you will be representing the Japanese Garrison, The FISD and the 501st proudly as it's newest Centurion level TK. Well done, sir!1 point
-
Hello everyone, Updates… I got a respectable amount of work accomplish over the weekend. First, I attended an armor party on Thursday and had some help positioning some of the plates to get a feel for what needed to be trimmed. So, I learned that the abdominal plate will need to be trimmed about 1” along the top and 1.5” on the sides. This should also help in allowing the chest and back plate to sit more flush to my body. This will also mean that I will lose the top ¾” side release buckle on the abdominal plate but that is not a real problem. Also noticed that the undersuit from Jim will need some adjustments (it’s a little baggy) and the mesh area along the back neck and sides of the back plate will need to be backed with some black material. Ok so trimming… I needed to take 1” off the top of each thigh and about ¾” off each side along the back of the thigh. So I cut off the cover strip and re-attached it with PC-7 ¾” to the outside, side of the thigh. I cut off ¼” of inch to the inside side and presto. For the CRLs they will need to be closed with Velcro. I think some trimming will need to happen with the side hard plates but that will come once I get a better feel for how they fit. So after some cutting, sanding and fitting, I used PC-7 to seal up all the front seams and add strapping to some strategic parts. I also wanted to reinforce areas where snaps would be used lake the large black area on the inside of the abdominal plate in this picture. Note the abdominal plate is upside down and the top 1” has not been cut off yet. Once all the PC-7 was cured, I sanded all the seams down and added some bondo in areas that needed it. Next, I tried on the arm plates and decided how they would all fit together. I had planned on doing the same “J” cutout on the bicep armor that was used for the movie but decided against it. I opted for snaps and elastic so I made up some snap stud strips on styrene and adhered them to the inside of the armor with PC-7. I also attached the side plated to the back plate with PC-7, they will attach to the front plate with velcro or snaps then get cut down similar to what Yosh did with his side plates. Lastly, I decided to hard mount the shoulder straps to the back plate. I drilled and glued in some nuts in the underside of the shoulder straps. These will be attached with small bolts from inside the back plate and will be removable. The straps will attach to the chest plate with some other method (possibly magnets). So that is what I have accomplished. What I am planning to do is add an elastic suspender system to the abdominal armor that the chest plate, back plate, and shoulder bells all connect to. The bicep will attach to the shoulder bell with elastic. The groin and posterior plates will attach with the straps from the abdominal plate. The thighs will attach with straps and side release buckles from the abdominal plate like the screen used armor. I do not know if I will need some strapping for the forearms and shins at this time. I am holding off on adding any Velcro until the painting is done. I think the armor is coming along nicely and I hope I am staying on schedule. Thanks for the interest.1 point
-
Okay here is what I came up with to hold the right side a little more closed. I had bought some neodymium magnets a while back. As they are super strong I set them down near each other and they scooted across the table to each other and broke almost perfectly in half. For some reason (science) the two halves now reversed polarity so they couldn't be glued back together. So I had encapsulated them in duct tape....until now. Dun-dun-DUN! (Sorry, Interstellar just came on and it's influencing my post, it's a very "dun-dun" filled movie!) I marked the "like" sides of the magnets. I took 2, 4" long pieces of 3" elastic and sewed 3 edges. Then made three pockets for the magnets and pushed them all the way to the end with a pencil. I ran a seam as close as possible to the magnets to keep them from flipping over and stitched and X to make the the elastic more rigid and more like nylon strapping. I then CA glued the loose halves to the inside of the kidney with the correct side out. I then made a pencil mark for aligning it with the other side and affixed it. Once the glue dries we'll see how well my idea works. Jim1 point