Leaderboard


Popular Content
Showing content with the highest reputation on 01/17/2020 in all areas
-
Hey Logan! As the rest here were saying, buying a commission is always an option, and I can totally understand how nervous you are! Personally I'd go the "Blaster first, armor later" route, that's what I did back then. Making the blaster can be just as challenging as you'd want it to be because there are so many modifications you can, but don't have to go for. You'll find your own way, and once you're done with that, there's still plenty of time to build the armor (or buy a commission). However, in the meantime you will have probably "grown out" or, you'll have noticed you don't grow anymore. Either way, just take your time, and if you ever feel comfortable building the armor yourself as well, like many here said before, we're here for you and always happy to help!2 points
-
A test fit tonight! Comments welcome! Now back to working/finishing more. Sent from my iPhone using Tapatalk2 points
-
I'm actually starting this build up again since I have the time now Only difference this time is I'm not really aiming for approval, and doing more of a modern take on this trooper instead, A new helmet is also being made to fit the changes (the new helmet file might be put for sale once my build is done). Can't wait to show progress2 points
-
Hello everyone! After a grueling wait I received my 3D-Props DLT-19! I'll be starting with some photo's of everything you get, and will then go onto the build. Along with the basic build of the gun I will be adding the Blast-FX system that I purchase a few months ago. So, this should get interesting. Before I begin I do have to put in one disclaimer, and a review on this build. I am a military Flight Engineer Instructor and when we instruct new students, we have ways of providing new students what we call Constructive Criticism, or Points to Improve Upon. It is a way of pointing out errors to students in hopes that they improve on future flying lessons. It is not meant to bash students, but it is an honest way to try and help them. I will use the same technique to address some issues I had with 3D-Props in hopes that they (Eelco Sanders) can improve their customer service. I write this fully knowing this is a one man operation, and that we should expect some delays in a garage business. At some points in the last 7 months I was truly frustrated with 3D-Props, and held off writing a nasty review, in case Eelco decided to cancel my order and keep my money: POLICY:I DO NOT ACCEPT RETURNS OR CANCELLATION I will be going onto Etsy and his website to provide an honest review of my experience with 3D-Props so that other potential customers know what they are getting into. I then cooled down and went back to my training. I decided to wait until I got my package and then write this review. I placed my order for a DLT-19, paying IN FULL, through his website on 11 June of 2019. The disclaimer on his page stated: MADE ON ORDER - CHECK CURRENT WAITING / SHIPPING TIME Shipping time is determined by the number of orders in queue. 8-9 weeks1 1 Applies to shipping within Netherlands. Information about shipping policies for other countries can be found here: General shipping information Thank you for buying our product, if the product was out of stock it means it will be made on order. This takes around 8-9 weeks due to the amount of pending orders. https://www.3d-props.com/about-1/ After placing my order and waiting 3 months (Sept 2019) I emailed Eelco. It took a couple tries (with an automated email response) and he finally got back to me, stating he was busy but would get to my order. I emailed once again on 04 Nov, and he stated he was in the middle of a DLT print run and would mine done in a week. By 03 Jan 2020 I had still not received my DLT and emailed Eelco explaining that I understood he was busy, but it had been 7 months and I had not received my order after . He got back to me right away and my DLT shipped within 2 days. I received it on16 Jan 2020. So, start to finish it took almost exactly 7 months to get my order. I did read on FB he was having issues with production due to volume of orders and he was a one man operation. My simple solution for this: Change the disclaimer on your website and state an order can take 6 months or longer to fill. So my overall impressions don't get lost at the end of this post and a ton of photo's, here is score: Quality of 3D printing: 4.5 / 5 My first experience with 3D printed items. I'm not sure if some of the raised ridges could be improved upon. Minor flash and excess material on some parts. I have seen posts of what can be made of this kit and it is outstanding. Quality of material: 5/5 Looks sturdy and will hopefully stand up to lots of Trooping Ease of assembly: 0 / 5 There are NO instructions for something detailed and consisting of 84 parts. Thankfully, I have very good knowledge of GPMG's (but not MG-34's) and due to my model building / aircraft maintenance technical skills I can figure stuff out, but the exclusion of basic assembly instructions or diagrams is puzzling and dis-heartening. I understand there is this fantastic Forum and awesome Trooper help out there, but I personally think this is unacceptable Customer service: 1 / 5 I gave him a token 1 because he is a one man shop, doing the best he can, and others state he is a good person. It's just my personal dealings with him that bring down his score. I honestly hope he improves and continues to put out good products. I would even order from him again, IF (Big if!!!!) he could deliver in a timely manner. Okay. enough preaching. Onto the pics!!! Sorry for some grainy shots. My crappy point and shoot... MBB (medium brown box) All the stuff. Charlie is waiting for a box fort... Included 2 posters. would have preferred instructions... Strike off pack sheets for shipment? Nice customs explanation form All the parts. 62 parts Plastic and metal. 22 parts Hardware Parts broken down for reference by colour. For future help from Troopers (Joseph ….) I posted on my TK build page about not knowing what half these parts were, and Joseph got back stating to post pics and he could help ID them for the build. I took a page from my modelbuilding expertise and will label everything as follow: "O" = Orange "W" = White "B" = Black "H" = Hardware Two main assemblies, Upper / lower receiver with butt, and barrel assembly. This is how it is when shipped: Upper receiver feed cover (the long grey piece behind the orange rectangle) is removeable. Butt can be removed, as well as one or two other pieces. They all slip onto a grey PVC pipe that is used for main structural support: Barrel assembly includes a length of aluminum tube, and 5 pieces that slip on: Top of upper receiver: Bipod and pistol grip parts. Bipod can be pivot opened or closed: Grip has a "working" trigger mechanism with reset spring, Comes assembled: Bipod printing ridge details. Not really that bad: Feed cover ridges. Rearward portion of cover: Forward portion of cover, near where the removal pin would be and where it pivots upward: Puppy break: Flash hider: Gas plug(maybe....?) detail: Upper receiver barrel attachment point: Trigger details: Ahhhhh man...….: "O" Parts: Some O part detail shots. Not sure what some are, or how smooth all these will have to be sanded: Bipod leg ridges. Very minor: "B" Parts: Grip details: Cool! Rear graduated sight out to 2000 Meters LOL WTf is this? is this And this? "W" Parts: Are the steps supposed to be there? Reference pics of finished and painted parts would be nice...: "H" Parts: That's it for now. Overall I'm happy with the product.1 point
-
And here is the thread!!1 point
-
Yeah that would be ideal so I could mount it on my holster without being concerned about it. I'll weigh mine when I get some time.1 point
-
Most impressive1 point
-
A lot of armor suppliers do sell spares so it may be an option, just watch purchasing from different suppliers as color can be different. I trooped 6 years with a shoulder strap issue then got a crack in one, I added a strengthening strip of ABS plate behind which has given more strength, could be an option.1 point
-
great to know there's another person nervous about starting an armor build as I was the day my kit arrived. Don't be afraid, at least not much. You're not alone in this process. We are here to help you.1 point
-
Absolutely. I take everything here very seriously and consider it highly. I am kinda lucky in that I may tone it back completely or take another set of armor I have an mock it up to more what you are all referring to. Just not sure yet. I don't have to take much off to tone it back, so I will probably do that. Just waiting to hear back from Basic first. So we will see. Again, mine is mostly in the lines and recessed areas, so I was hoping grace on that. But I get it. Mine is closer to be honest with you to the after photo of the first set you posted and can get there easily. So I will have a decision to make here haha1 point
-
Ok, continuing with the abdominal plate. The front of the OT abdominal plate is one of the most detailed parts of the body armor. The groin plate is incorporated into the abdominal armor. In this picture I have several images to illustrate the details. In the top left is the inside (faces the body) of the abdominal plate. Note the return edge along the top, the return edge is present on a lot of the OT armor but not every part has a return edge. Also note the groin plate is all part of the same piece, it is not a separate part. The two detail parts, the center box with 5 button discs and horizontal lines, and the side 4 button box are parts that are glued to the abdominal plate. The bottom left image is the front of an unfinished abdominal plate where you can see that the center box has not been attached. The center image is a completed OT front abdominal plate and the two right images are close ups of the detail parts. Notice the other raised detail in the abdominal plate and how the edges are not as drastic as the edge detail we will see on the RO abdominal plate, again this is the result of vacuum forming. In the image above from ANH, you can see how the chest plate sits on top of the abdominal plate. The ammunition belt sits on top of the abdominal plate and is attached with snaps. The ammunition belt is constructed from a single piece of vacuum formed plastic that is trimmed. This piece is about 3” wide and all six ammunition boxes are formed with this part. The belt is attached to a white cotton belt that you observed in the back-side images. Additionally, there are two drop boxes that are made from 4 vacuum formed rectangles and are suspended from the ammunition belt with white elastic. In these images you can also see the attachment of the holster. The front of the RO abdominal plate is significantly more detailed. In the two images above you can see the vertical raised lines and how much more defined they are from the OT abdominal plate. Additionally, notice the three detailed sections. First, on the left there is a raised rectangle with three horizontal raised lines. Next is the center raised rectangle that starts from the abdominal armor with an angled top. Then there is another raised rectangle inset with the 4 discs on the left side and raised ridges on the right. Notice the detail of the depressed rectangle above the ridges. Even the discs have a raised outline. The raised rectangle on the right side of the abdominal plate has similar staggered detail. Lastly, there are two depressed vertical boxes in the center above the large center detail box. The RO ammunition belt is also very different from the OT. The belt is plastic and has a front and back section. The back overlaps the front belt on the sides and looks to be connect with Velcro. The front belt is about ¼” thick and has teeth along the top that align and lock (like gear teeth) between the raised vertical segments of the abdominal armor. The bottom front of the belt protrudes below the two center boxes and then tapers at an angle to a uniform belt height the same as the back belt. On the front belt there are six ammunition boxes like the OT belt; however, not all of these boxes are the same size or shape. The two center boxes are simple rectangles with beveled edges. The next two boxes are rectangles but slightly wider and have a unique angled top with beveled edges. Next the two outermost boxes are larger nearly square boxes with beveled edges. Lastly, the two drop boxes are larger rectangles similar to the OT drop boxes, but the RO drop boxes have beveled edges and are suspended by black 1” Velcro or nylon straps. And that is it for now. More to come and thanks for the interest.1 point
-
Ah... my go to trusted Joseph helping again I totally agree about the Hero. LOL I only managed a cursory look at the parts last night. I will be laying it all out tonight and taking detailed photos and doing the post. This is my first time working with anything 3D printed, so it will be a learning curve. I actually thought the ridges would be worse, but they look very manageable. Eelco definitely does good work. To top it all off I ordered Blast FX systems separately for the DLT and my E-11. I could have had Eelco install them when I ordered the DLT, but it was pricey enough as is. So I will have to contend with all that as well. I've mentioned before that I build models for a hobby and am used to parts clean up before assembly. I always have to take my time doing it, so this won't be any different, just on a Much larger scale. Leaving work now!1 point
-
Plugging away on soft goods and supplies. Darman premium neck seal (velcro) ordered. Paint, nylon strapping, elastic, magnets, and a few other smaller things all been ordered. Boots will be ordered on Feb 7 when Imperial opens up again. Blaster will be the last thing I research/order, and probably wont move on that until the actual build starts. I'm happy with the progress so far. What once seemed a like huge daunting list doesn't seem so bad anymore. I should have almost everything in place to hit the ground running once BBB Day arrives (then real terror starts. Lol.)1 point
-
Before I built my TK I didn't even know what ABS plastic was (aside from the plumbing in my house). With the money you've saved up, you should be in good shape. I highly recommend going for an untrimmed kit - not only is this a more economical option, it also gives you a bit more latitude to make pieces fit you properly. There are many "how to" threads on this forum too. And yes, Youtube has some gems as well. A dremmel is good to have. Some lexan scissors and various sandpapers are good too. Depending on your body shape and the level of accuracy you are going for, you may not even need to shim. But if you do, it is not as daunting as it seems... and we are here to help.1 point
-
Thanks for the welcome folks. Feeling a little less nervous about getting into all this Hah I may have to get a Stormsurgeon pauldron just for kicks and giggles. To be fair at least the medics have better accuracy than most troopers Sounds like a few you guys mix-and- match parts eh? I've got about $1500 saved up. The only thing I'm weary is having to probably add shims and making it all flush, I'm not particularly much of a handyman- then again I suppose a dremmel, scrap test parts and youtube ought to at least help out.1 point
-
Looks great Jorge! My Tapatalk was blowing up when you were posting your progress yesterday, but I enjoyed watching your fast-forwarded progress in “real” time. Haha. I believe I saw in the 3D forum that you use a Creality printer. Perhaps someday I can get my own; I’m sorta eyeing the same one, or an Anet A6. Definitely can’t afford a Prusa. Looking forward to your progress! Sent from my iPhone using Tapatalk1 point
-
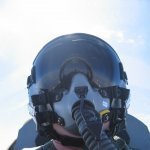
Hey there folks, A few photo updates to post. The helmet is now gloss coated and lacquered. After the primer, I applied two coats of Halfords Ford Diamond white paint. Unfortunately, the helmet fell over whilst the paint was drying and damaged the paint work: Thankfully, I was able to salvage this, flatten the damaged paint over that area, then lightly sand once the paint had dried. More paint had to be applied to cover the damaged areas. After this, I applied a coat of clear lacquer. The helmet is, to be honest, shinier than I was planning, however, this will be lightly weathered. Also, checking many screen caps, despite the scratches, chips and damage, the originals on screen were clearly glossy and reflective as seen here; Painting details and weathering to come. :-) Thanks for stopping by.1 point
-
I'll keep updates here, so following this thread to keep up-to-date on any posts I'd make1 point
-
I completely understand your point about the weathering, brother, believe me. However, the amount (not the color) of the weathering you have is much closer to what a Sandie would have, which is why there is a concern. You may have seen this amount on those at Basic level, but for L2 and above it has to be toned down. To give you an example, below is a recently EI approved HWT trooper who was asked to do the same thing, (and he had less weathering than you do). I have included 3 other examples of EI approved HWTs as well. Note the minimal scuffs/marks. Before After I hope you take this into consideration and if you have any questions, just ask. Best of luck on your Basic approval, sir!1 point
-
Way to go Mike - almost there1 point
-
Thanks for the good words Andrew. Appreciate it. I guess it's my RCAF SAR Flight Engineer training. Problem solve and don't give up. Keep the chopper flying and complete the rescue Once I start my DLT thread in the weapon forums I'll post a link here. Cheers!1 point
-
I was thinking of trimming maybe 10-15mm off the top and bottom of the bells and then following the curve around from there. It will definitely sit much better/closer against the chest plate if I do this. Unsure yet just how the bicep will sit (It’s just held there with painters tape in this image) but once the elastic is on the shoulder bell it should be ok. I think...1 point
-
Put your shins on AFTER your boots.1 point
-
Winner winner, roasted Kowakian monkey dinner!!!!! WIll post pics soon. May bump any further info to the weapons / DLT-19 build pages. I will have a TON of questions there, because I also have the Blast-FX sound / lighting packages to install in the DLT and my E-11. Ohhh, boy. Another project!1 point
-
Nice work, you could drop the biceps a little to reduce the space around the elbow area1 point
-
Well, a long time since I posted here. I haven't made any changes to the armour, but a MBB (Medium brown box) arrived today. It's been something I've been waiting on for about 7 months. Hazard any guesses?1 point
-
Hello and welcome, really depends on how much you will grow, costumes are made to your size and some can be adjusted but it is some work. There is a group for under 18's and it's called the Galactic Academy, http://www.galactic-academy.net/. Now although they don't organise events some garrison's, squads, outposts allow GA members to attend some of their events (normally if an adult is present) but you would have to check with your local garrison, you can unit listing info here http://www.501st.com/members/displayUnits.php#garrisons No issues with you being on this or other communities. Good luck1 point
-
Good question belloq, I am curious to find out myself. My doopydoos E-11 weighs in at 1.12 kg so approximately, 2.24 lbs.1 point
-
Welcome Erina! I'm 5' 3" and the WTF kit fits me great, but most kits are flexible enough that they can be sized up or down as needed. I have a regular helmet and I don't *think* I look like a bobblehead, so I think you should be fine with the helmet.1 point
-
Thank you very much - I'd be really happy about that! Is there anything missing now?1 point
-
I bet there are a few FOTK legion members that wish they had a Temperature controlled body glove [emoji23][emoji28] Sent from my iPhone using Tapatalk1 point
-
A lot of soldering of components and crimping connectors later, the main electronics are done. To have easy access to the battery, I printed a new mag. There is a small spring in the bottom, which holds the battery in place. Here you can see all the parts of the new mag: There are connectors glued in place inside the main body and the mag, which connect once the mag is fully inserted. So Glock closed with all electronics inside: Unfortunately the sound is not very loud from inside the blaster. But if it is not too loud around, you can still hear it go pew pew. For such a small blaster, I am satisfied with the result. Blaster fully assembled and operational:1 point
-
There are both good and "not so good" aspects of 3D printed ones. The good is that they can be relatively inexpensive, are VERY light and the details are nice. The "not so good" is that yes, they can be somewhat fragile, and depending on which printer you use they can take a LOT of prep-work. When I received my kit (not the same one as shown above) each piece was covered with pretty heavy print lines. I figure I have about 12-15 solid hours worth of sanding and filling involved, as I wanted each one as smooth as glass (I'm kinda' OCD that way). I drilled out the entire center and reinforced it with a 5/16ths aluminum rod to help with durability. It still seems a bit fragile, but I only use it with my Hero armor and since I don't troop in that much it's mostly for display.1 point