Leaderboard


Popular Content
Showing content with the highest reputation on 01/07/2020 in all areas
-
Some of us enjoyed Solo3 points
-
Tros related, looks like we may get to see the full JJ version of the movie. 192 minutes long Here is a link to one of the articles http://www.sntstory.com/2020/01/02/the-192-minute-j-j-abrams-rise-of-skywalker-cut-is-coming-sooner-than-you-think/?fbclid=IwAR2Th8aAmhZ_gKy3gvjz0QL9xNRNhRB3ZMR-wIFLWmwRt0G-vog0X3vANE43 points
-
Same here. There’s a good story line there with the rest of the film that could expand that time period in the universe. Han and Chewbacca met a lot of characters everywhere they went. So the potential for more movies is there. I just think it didn’t do well in the box office because the average moviegoer doesn’t really care for Easter eggs or backstories. Sent from my iPhone using The Force2 points
-
It's been a long year and a bit. 2018 was rough, and then 2019 I was fighting health issues. It's been kinda crappy honestly.. I've managed to troop a little bit but not like I have in the past.. fingers crossed for 2020.. I completed a fun little build on a MSE Droid.. I'm working on a GONK Droid now.. truly a fun build.. still have my TK.. and my Tie Pilot.. Hoping 2020 is a better year.. Still around and checking in!!2 points
-
OK, future Troopers, many of you have asked about how to set snaps for your armor connections, so I thought I'd whip up a little tutorial. Please note that the example that I am making is based on using the "double snap" connection system (see last photo). I highly recommend this method, especially on the back/kidney, kidney/butt, and ab/kidney connections, as it provides an extra layer of confidence. Yes, it costs a bit more to do due to the extra snaps involved, but you can be sure that no matter what happens, you will NEVER have a piece come loose or fall off on a troop. Some builders may have used others, but after countless troops I have experienced no problems. So here we go.... Materials needed: 1. Hammer 2. Soldering (woodburning) iron. (Available at home improvement and craft stores. WELL worth the $10-$12.00 investment). NOTE: The tip of this thing gets CRAZY hot, so be very careful where you set it. Many come with multiple tips, but I suggest the pointed one. 3. Snap setting kit. (Available at all craft stores). Please note that I am showing both sides of the base... more on that later. Convex side Concave side 4. For this purpose, I am using 2 inch (5cm) wide black nylon and 1 inch (2cm) black nylon. The 1 inch strips will be attached directly to your armor. I suggest using E-6000 glue and clamps for this. 5. Snaps, of course! Don't "cheap-out" when buying these. The cheap ones come undone very easily and are garbage. For this tutorial, I am labeling the 4 parts as such: STEP ONE Cut the 2 inch strapping to about 4 inches long** (or as needed) for the particular connection. Cut the 1 inch nylon into 2 inch lengths as seen below. **NOTE: The actual length will depend on there you are using them, i.e. the kidney to posterior plate connections will be shorter. Just be sure there are no gaps, and that the 1 inch wide base pieces are in the correct position before attaching them. Example: The ends will be a bit ragged and will fray. Use the soldering tool to seal them. Again, using the soldering gun, make 4 holes in the 2 inch wide nylon as seen below. Be careful not to make them too large (just larger than the shaft of the snap base) or the snap may eventually pull out. Take one of the 1 inch wide nylon pieces and slide it up under one end of the 2 inch wide piece, even with the end. Once it is lined up, use the soldering iron to make holes in the 1 inch wide piece. This will assure that the holes for the snaps line up correctly. (VERY important)! You should end up with this: Repeat for other side, but be sure not to get the sides mixed up, as one set of holes may be farther apart. Insert one of the male bases into one of the holes in the 2 inch wide piece. Flip it over and place one of the male snaps on the post. Place the base in the concave side of the snap setting kit base. Place the striking rod in the center (straight up and down) and strike it several times firmly with the hammer. The inside shaft should be sufficiently widened to keep the top from coming off. There... your snap is set! NOTE: Do not attempt to do this step on a regular table. You need a hard surface, and a heavy duty workbench or concrete surface works best. Repeat this step for the remaining 3 holes. Now onto the 1 inch wide strips.. Insert one of the female bases into one of the holes, then (as above) place one of the female snaps on top. Place the female snap base into the convex side of the snap setting base. Again, using the striking rod, give it a few good whacks. (Getting the hang of this now)? This is what you should have at this point (only one end shown) CONGRATULATIONS, you have one strap completed! Now that you realize how easy this is and have it down to a science, repeat as necessary. NOTES 1. For added security, the double snap system can be applied to other areas as well, including shoulder bridge attachments and bicep to shoulder bridge, (example below) This is especially good for those who wear packs (HWT, Sandie, Spacetrooper). 2. Snaps set in elastic (as seen above) can pull out over time with repeated use. For added strength I recommend doubling the elastic over before attaching the snaps. 3. Be sure to use the female base on all the straps that will be glued to your armor. The reason being is that the bottoms are flat, insuring a tight seal. 4. Some folks set the female snaps in ABS instead of nylon when gluing them to the armor. There is absolutely nothing wrong with this, it's just a different way of accomplishing the same goal. The reason I use nylon is that I find it conforms to the curved parts of the armor better, and gives a larger surface area for the glue to adhere to. 5. Some use CA (super) glue to attach the 1 inch nylon to their armor. I have found that it can get brittle and break off or even cause warping on ABS due to the heat it puts off while drying. E-6000 needs to be clamped and takes more time, but trust me, it's worth the wait. 6. When gluing the 1 inch nylon to your armor, do NOT keep the 2 inch wide nylon attached with the snaps. Some of the glue may seep through the hole in the snap and glue the whole connection together. Not a good thing. If you should have any questions, just ask here or PM me, and best of luck on your build! Photo 1 (Double snap system.. note clamps). SHOUT OUTS: Gary jr. ( @flashpoint0214 ) The guy who introduced me to the double snap system! Jeremy (Copper) who supplied the nice clean photo of the double snap system.1 point
-
This is a mini tutorial about the use of Neodymium ("rare earth") magnets. As you may have read here in different build threads, these little devils are invaluable when constructing a set of TK armor. BUT.. there are a few things to consider before purchasing and then using them... For purposes of this tutorial, I will be referring to magnets that are 7/8 inches (23mm) in diameter and 1/8 inch (4mm) thick, (as seen below) with a strength of N40. First, know that these things are STRONG! (Imagine a regular magnet the same size, but 10 times more powerful). This is a good thing for our purposes, but you should know a few quick facts first: 1. I mentioned that these are strong already, but know that the strength is such that they can (and will) jump up to 8 inches to reconnect with each other or another metal object. If your finger is between the magnets and this happens, it can cause injury, from bruising to serious cuts. They also can (and will) shatter if allowed to connect from a distance, and flying chips can cause eye injuries. In a word, be careful. I highly suggest wearing eye protection. That is up to you, but please read this post from Glen located below. 2. Due to the strong magnetic field, those with pacemakers or the like should take extra caution when handling these. 3. Whatever you do, keep these away from children. Now that I've scared you a bit, on with the show! When considering what size to buy for your build, I cannot recommend the 7/8 x 1/8 size enough. The reason being is that you will only need one on each side of the connection you are gluing, and they have a large surface area. Anything smaller (or thinner) and you run the risk of having to "double up" (stack) them to get the proper adhesion, and the thinner ones shatter more easily. When you receive them, they will have little plastic separators between each one. To get them apart, the easiest (and safest) way is to slide them. As you separate them, again, be sure to keep them as far apart as possible to prevent shattering or injury. (Save the plastic inserts). After separating them, I strongly recommend doing one of 2 things... 1. Wrapping each one in masking or painter's tape, (this will prevent them from scratching your armor) or 2. Making mini "sachets" for each one. The tape method is quick and easy, but the sachets are really handy if you have the time. To make them: Cut 4" (10cm) squares from a piece of fairly thick cloth, (not t-shirt type material) for as many magnets as you have. Place one magnet in each one**, and secure it with a zip-tie. (I used a rubber band for the photo, which will not work in real life). This gives you a "handle". NOTES: **Be SURE that you do half facing one direction out and half facing the other (north/south poles). Otherwise they won't adhere. Using a sachet will not prevent them from shattering. Cricket added a great example photo and tips in a post below. After you have applied the E-6000** to the seam you are gluing, place one magnet on the top of the cover strip, and carefully add one to the opposite side (inside). To keep the cover strip tight to the join along the entire length, I suggest placing magnets every 3-4 inches apart. If you see any areas where the cover strips are not flush with the armor, add more magnets. For the ends, you can use clamps as seen above. Be sure they have rubber or plastic on the ends, though. After the E-6000 has cured (usually 12-24 hours) it's time to remove the magnets! IMPORTANT! I have found the best way to remove them is this: First, remove the clamps. Then, using one hand, grasp the magnet on the top closest to the end. Using the other hand, SLIDE the one on the inside out, keeping them well apart. Stack them using the plastic separators they came with. Now, it's time to look at that perfect seam and think "Hey, I'm one step closer to approval"! NOTES: ** As the vast majority of TKs will tell you, E-6000 is really the best adhesive out there for armor. Unless you are an experienced builder, if you choose to use CA (super) glue, know that if it drips, you run the risk of it running onto your armor or causing the magnets/sachets to adhere to your seam. You have been warned. 1. There is no such thing as having "too many magnets". I know they are not cheap, but the more you have the more pieces you can glue at one time. I recommend having no less than 12. 2. There are many sources to purchase this size magnet, and the prices can run up to $3.00 each. But, you can find them on eBay most of the time for a lot less. This seller for instance offers them for $9.99 for six, which includes postage. https://www.ebay.com/itm/6pcs-Super-Strong-Neodymium-Rare-earth-Magnet-Disc-for-sale-7-8-dia-x-1-8-thick/281060567507?ssPageName=STRK%3AMEBIDX%3AIT&_trksid=p2057872.m2749.l2649 Another good source is here: https://totalelement.com/products/3-4-x-1-8-inch-neodymium-rare-earth-disc-magnets-n52-8-pack Tim (PICTreed) found a great site that is a fantastic magnet source here: https://appliedmagnets.com/neodymium-disc-magnets-1-in-x-1-8-in-w-countersunk-hole-p-601.html 3. When you have completed your build, please consider "paying it forward" to someone in your Garrison/Squad who is starting their build by selling them your magnets at a reduced price. "Troopers helping Troopers"!1 point
-
Finally started un-boxing, inventorying and test fitting the armor pieces yesterday. I thought what better day to start than on "501st Day" (meant to post this yesterday, but became consumed with all the parts and wanting to see that "smile/frown" - ) Will be posting pics as soon as I get my Imgur account setup. Seems PhotoBucket is not the "preferred" choice due to their new pay model. Does anyone use a different photo-hosting service that may be easier/better/etc? Bit of a pain having to upload to one site and then link it in each post. I understand the limitations on this site due to space considerations, just trying to be as simple as possible. Cheers Everyone, Ant1 point
-
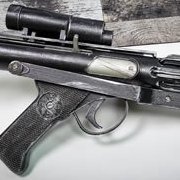
https://www.thingiverse.com/thing:4087124 Hi all, I just spent about 100 hours modeling an E-11 for 3D printing and giving it away for free. I made it as true to life as I could as well as adding in support for light and sound elements. It has: - Working trigger/selector with light and sound changes by mode - Light up scope - Addressable LED fire effects with focusing LED on front, range is about 10M with indoor light, not a laser so eye safe - 3D printed spring with cycling bolt - Removable magazine with battery inside - Removable rear cap with D ring mount - 3W speaker, as big as I could get to be heard in noisy areas - Plays the imperial march when you hold the selector for 3sec - discreet wiring guides, no wires are visible or in the way - Stock folds out and locks in place - All major parts are removable via snap lock or screws, so you can upgrade or replace anything without a full rebuild (and get at the electronics) I'm trying to improve the model as much as possible so feedback and suggestions would be appreciated. If anyone wants a custom TK number on the Hengstler let me know and I'll model one for you.1 point
-
Good day folks. I have been out of the loop for a long time, too long so I am going to just consider myself a newbie at this point and get started. Been doing some reading and my have things changed in my absence! I used to sport a MTK kit that was 501st approved and an ATA kit that I never finished, sold both. Now I am ready to get back into it. Looking to do another ANH stunt I am so lost as far as who is who in this arena as far as armor goes, theres some new things that have popped up so I am basically re learning all this from scratch. Its good to be back.1 point
-
I'm an ex-pat in Korea and am trying to get a TK armor from RS (experiencing technical difficulties with shipping). Thank you FISD for the plethora of information on what to look for from an armorer (was considering SDS for originality, but went with RS for Screen Accuracy). I want to outfit the bucket with iComm, fans, and ears (assisted listening). I see a lot of you use UKSWrath's rig, any other suggestions?1 point
-
Welcome to the Legion !!!1 point
-
Congratulations and welcome to the ranks trooper1 point
-
Hello and welcome aboard, check out some other build threads as well as EIB and Centurion applications, also use the reference gallery, don't forget the CRL's (costume reference library) great images you can refer back to while building. There is also the Reference Image Depository here: Here is a great supply list:1 point
-
Oh good it wasn't just me I thought it filled in the early part of Han's life well, it wasn't a film for the public, more for the fans in my opinion1 point
-
Congratulations Trooper and welcome to the Legion Sent from my SM-G960F using Tapatalk1 point
-
Congratulations and welcome to the Legion Trooper1 point
-
Thank you all for the input. It was very helpful. TK 51550 reporting for duty!!1 point
-
This is GREAT! I hadn't gotten to that thread (yet), but it will obviously be a huge help. Bookmarked, and thank you!1 point
-
Hi Andrea, welcome to FISD and the Legion. Enjoy your armor and have fun when trooping.1 point
-
It’s actually funny you should point this out. I’ve long suspected I’ve positioned these incorrectly and just tonight I’ve begun replacing these with snaps instead. I’m leaving the screws in place but have removed all the brackets. Lots of snap setting occurred!1 point
-
Glad to see you have been doing your research, Chris! Yeah, there is definitely a TON of information here, but if there is something in particular you need help with and can't find just ask. Building a set of armor can be a lot of fun, but it can also be frustrating at times, which is where we come in. What I always suggest is to start your own build thread here. That way, you can ask as many questions as you like all in one place (helps you to keep track) as well as post photos (lots and lots of photos) of your progress and any issues you may have. Great to hear that you will be aiming for Centurion! If you haven't had the chance to see it yet, I have a thread here which will help you on those little details we look for when applying for levels 2 and 3 that can be a bit vague on the CRLs. Take your time, ask us about anything you need to, and I look forward to seeing your build!1 point
-
Thanks gents. Not the longest build ever but certainly up there! With the bushfire smoke being so bad outside here lately it’s good to have something to work on to keep busy. Really trying not to rush things but aiming to be finished before going back to work!1 point
-
I got them made from Gungnirs Flight in the SCG forums, got my holster for my TK off him as well. I think he just only ships in Australia not sure tho. Does amazing work Sent from my iPhone using Tapatalk1 point
-
Those pouches look great! Might I ask where you purchased them? I’m in search of some myself for my HWT build. Sent from my iPhone using Tapatalk1 point
-
Three hours and twelve minutes.. can you imagine? I would watch it. And so would so many others. Especially even if they released it as a DVD special edition only or even as a special event for theaters. It has the potential for extra revenue. But wow.. so much time could help with so much of the story, only if it was done well and was balanced for a good flow. I say bring it on. Sent from my iPhone using The Force1 point
-
Would be nice to see all the intended scenes, hated how they cut the Han tie scene from SOLO, how he trained as a pilot and how he became a grunt, CUT, made no sense at all.1 point
-
Hello Andrea, Welcome to the Legion.1 point
-
Hi Andrea, welcome to the legion and welcome aboard FISD. You look great!1 point
-
Hello and welcome to the ranks trooper1 point
-
Congrats and welcome to the FISD!1 point
-
Great news. Sent from my iPhone using Tapatalk1 point
-
Hi guys, I'm, Andrea, TK-91186 ready for duty! I'm from Italy (Genoa, North-West) and I'm very honored to have become a member of the 501st (Stormtrooper ANH Hero). I hope to meet you in future events. Requesting status, entering in 501st access and 1ISD badge! Ciao a tutti! Greetings! https://www.501st.com/members/displaymemberdetails.php?userID=31220 Finish TransmissionAndreaTK-91186 'Lago86'1 point
-
hello and welcome to the 501st!1 point
-
:Seems like you got murphy on quick dial towards the end.... That guy (crossref murphy's law) likes to mess up all plans...... the more ways to trouble you got the quicker you get issues...1 point
-
Look over at the pathfinders detachment ==> https://www.501stpathfinders.com/ they do the biker scouts. Here is the stormtrooper detachment1 point
-
Newb chiming-in again. So, FISD has really ruined my life over the last week...but in a good (great?) way (I'm spending all my free time reading stuff). I finally finished reading all 54 pages of this thread, and it was really, really, really helpful. Not only did it provide great info, but it also made me aware of questions I didn't even know I had yet (most of which where answered a post or two later). I still haven't decided on the exact vendor I'm going with, but have certainly narrowed it down a bit. I also have a new favorite pass-time of going through the photos in the Centurion Status Request sub-forum to see what details I can spot (and more importantly miss) that lend itself to a top-shelf build (that is the level I am aiming for). I am sure I will have some questions going forward, but am doing my best to do as much research on my own before asking (personally, it's part of the fun, and I'm learning so much other stuff in the process). In any event, a huge thanks to everyone...clearly a great community here, and I can wait to become more immersed in it.1 point
-
So, the vacation is over and the next batch of photos is coming! First the newly glued calves (closed outside over inside): Front and both sides of the knee sniper plate: Different views (front panel) of the TD: Close ups of the abdomen rivets: The rest will follow soon...1 point
-
Only a small update today but it’s something that I’ve been fretting a little about, mainly because of the shimming issue. But I don’t think it’s actually going to be an issue after all. Phew! Split rivets and webbing are installed on the left side of the ab and kidney plates. It may look a little wonky here but I was trying to hold it in place on the other side and take a picture at the same time. There was some weird contortion going on It is tight but not not uncomfortably so. Plus I was wearing normal clothes and not the proper undersuit. I will need to do some minor trimming and tidying up but that was expected and planned for. I don’t plan to paint these or re-attach the ab buttons until everything else is done. On the other side I also installed the Han Snap in the top corner. But that’s a boring picture.1 point
-
Well, the bad news is the magnet closure didn't work. The good news is they were easy to remove. I had a bad feeling about it and test fit it at the 24 hour cure mark (I leave E6000 for 48 hours), and it was a disaster. I think the concept works (well, I know it does, because a friend and fellow Squad member did it with his KB FOTK and it worked, I copied the design from him). It just doesn't work if you've got a snug or very fitted armor. Then I think the pieces shifted a bit when gluing, and so they didn't line up as perfectly as they did when I left them. Basically the magnets just didn't line up perfectly (and they have to be PERFECT), it's an awkward spot on a woman (contending with hips and bust, one would be enough), and it's a snug fit, so the magnets just didn't have the strength to hold. I ripped them out and have snap plates gluing now. Probably should have gone this way to begin with, because several of my concerns about using the magnet idea did turn out to be realized. My advice, and if I were doing this again- either shim it or make it fit so it's not a snug and fitted fit, but extra wiggle room and do the magnets, and line them up perfectly and use math and geometry to make them perfect, or just do snaps. You might want to do snaps anyway. I think women will benefit from snaps way more than men regardless- or at least women with prominent hips and/or busts. If it attached decently at the bottom, it wanted to overlap at the top, and if it fit right at the top, it wanted to splay open at the bottom. Are you ready for the weirdest selfies I've ever taken in my life? I had to stop working for a while because I dissolved into uncontrollable laughter after I took these. They're just too ridiculous. The cod fits in the right spot, the belt looks good. Except... Falcon wanted to get in on the action, too, and posed appropriately to match. The butt plate sits REALLY high. I need to fit it again with the armor, but even then, on previous test fits it's kinda riding high. I mean it's totally covered by her cape, but it just feels so weird. I don't exactly know how to fix this, as there's a very obvious connection at the top of the plate and that fits under the belt, and the belt goes where the belt goes, and the cod is sitting pretty good. I'm actually wondering if this is another male v. female body type issue- it's because of how it hits on the hips and then how the curves are different (on different people, as well). Not to keep blaming that, but hey, we're shaped differently, it's just life- and these suits were designed with men in mind- and very lean men at that. My TK butt plate does stick out similarly at the top, but it's larger and so it's less noticeable because it covers more and evens itself out. Way to give me a complex, armor. I can shimmy it down a bit, and that helps. I could raise the cod a bit, but it is pretty much sitting perfectly in terms of how much you see of it. I'll figure it out, it will just be an awkward and hilarious processes. I added the piece of Magic Eraser into the helmet in the front. It still touches my nose, but it's better. When I have time I need to take out the lens and trim it. For now, I think it's fine for a trial run- there's always issues you never find util your first troop anyway, it won't be the only thing I'll be tweaking. The shoes fit snug enough I can't shove a foam piece/Magic Eraser in there, so I'm back to trying to do an elastic stirrup around the boot ant my foot. Thankfully cutting elastic and sewing the ends together to make a loop is a less than five minute job. I finally just added a whole lot of corresponding Velcro to the belt for the butt plate attachment. It's longer than I need, I think, but then I'm covered in terms of attachment. Having the ab/kidney did help do the trick on placement. To Do: Elastic stirrups for shoes OH YEAH, AND THOSE DAMN BLASTERS. My dad's a genius- he said to put the paint bottle in warm water and hold the blasters directly in front of the space heater for a bit before trying to paint. Gonna try it and hope, it's all I've got left until Spring at this point. Test fit! Approval photos!1 point
-
Now that's what we like to hear, Carsten!1 point
-
Could I add a suggestion to your great info piece? When making magnet sachets, it's a really good idea to make sure that you've got polarity-correct pairs. An easy way to help identify magnet pairs is to assemble them using fabric with high-contrast colors. Kind of like this:1 point
-
Everyone, I have locked this particular thread. Not so that nobody can make any more posts, but in order to allow the thread to function more like the welcome threads. If each new member makes a new topic, it will allow others to reply to it more easily than trying to contain all of this in one thread. Apologies for not explaining the intent very clearly, early on.1 point