Leaderboard


Popular Content
Showing content with the highest reputation on 01/21/2019 in all areas
-
Odds 'n' Ends -- Part II Working on the Shoulder Bridges and waiting for glue to dry between photos, so I thought I'd tackle a few more odds 'n' ends that needed doing. First up was to attach the Button Plates to the front of the Ab. I'd put those off as long as possible so I wouldn't get them scratched up wrangling the Ab around doing strapping and whatnot. But I expect to be taking submission photos this week, so the time had come. I used sparing dabs of E6000 around the edges to attach both Button Plates just in case I ever wanted to go Sandy. The next item on my to-do list was to install the Frown Mesh. No idea why I waited so long for this task, other than it was yet another little detail that didn't fit neatly into any other particular section of work. To adhere the Mesh, I used a dab of E6000 between each of the tooth openings, and held the Mesh in place with some tiny magnets till the glue set. After that, I cut and fit the S-Trim into place on the bottom of the Helmet (flat-ish side out, rounded side in). In this shot and the previous one, it's obvious I've decided not to coat the inside of the bucket with black Plasti Dip. I don't really like the stuff. However, I do want to troop a bit with the Helmet without it and see how it goes. I may eventually change my mind and do the dip on the inside, but I'll save that for another day. I'll also need to do a bit more Helmet work -- those screws could use another coat of white paint, which I'll do before I do photos, plus my Ukswrath cooling fan system. Also, you can see some preliminary padding up in there that's just taped into place, so I'll need to do the final padding. I have the pads, but installing them is just another one of those little things I haven't done yet. And finally for this post, I added a nice little tweak to my Hyperfirm E-11 by inserting a reticle into the gunsight. I did this just for fun. I'm thinking that down the road I may replace the Hyperfirm rubber sight with something nicer in resin, or I might even invest in one of Field Marshall's metal E-11 sight kits, but for now adding the crosshairs seemed like a nice little touch to add. OK, that's it for the latest round of odds 'n' ends. Back to the Shoulder Bridges to check on how that glue is drying.2 points
-
2nd day of 40deg celsius (that's 104 for you using the old scale) boredom won. Variant2 points
-
1 point
-
Hi Josh, I’ve posted in your build thread. :-) Dan1 point
-
Thanks for the tips! I can remove the weathering from the T-tracks no problem (I think—if not, I'll paint over them with black). As for the hengstler (that's a new word for me!), I don't think I can move it. The whole piece came as one resin model from Quest Design. If any fellow owners of this model can correct me on that, I'd be glad to hear it :-) Thanks so much!! I appreciate it! Haha! I promise I'm not rushing. Just super motivated! As for the blaster, I don't currently have plans to do more work on it—unless I am missing something for L3 :-) Today, my drop boxes had finished drying, so I got them hooked up to the belt. They seem like they'll do a fine job of storing small things like cash and ID! The velcro on top keeps them securely shut, so no worry of anything falling out. In fact, they're a little too hard to open, but I don't anticipating needing to open them mid-troop often, if ever. Like my other elastics, I wanted to reinforce these straps with ABS. I cut out 1" squares to fasten into the elastic. Because of the extra layer of ABS, my pop rivets didn't reach all the way through, so I used chicago screws instead. I also put a small dab of superglue at the top and bottom edges of the canvas belt to stop the elastics from sliding out of place. And here's everything I have so far! It feels so cool to wear. Lastly for today, I got the first pieces glued that I'll need for the tab and slot on my right side kidney/ab. Tomorrow I'll glue the top plates on these pieces and they should slide between each other nicely. That's it for now! I've just started cutting out the thigh pieces. More to come later on. Thanks in advance for your critiques! :-)1 point
-
Hi Eric! Almost done, brother, but there is one thing holding you back. Please back one of your TD screws out 3 or 4 turns and take a close up side pic for us. It may be the angle of the photo, but they look a lot like V-heads and should be pan heads. Thanks!!!1 point
-
Here's a link to Billhag's photobucket1 point
-
There's some nice build threads around great for referencing https://www.whitearmor.net/forum/topic/14806-how-to-assembling-ata-abs-helmet-1/ Also for ear fitting https://www.whitearmor.net/forum/topic/29238-my-helmet-ear-tutorial/ https://www.whitearmor.net/forum/topic/41250-ear-trimming-made-easy/ Brow height Angle of ears1 point
-
I don’t know the full story on the RS suit (R standing for Rob and S for Simon) but it does have shins of only outer parts and so did some of the suits on screen.1 point
-
Easy fix, Tony. (Another reason I usd glue sparingly.) Thanks!1 point
-
Looking good so far Dave1 point
-
I was gonna' wait, but what heck... (you know me too well, lol). This is the "ideal" angle/placement for the ears, Josh.1 point
-
. Well done! Moving right along.1 point
-
That's awesome. Great work on those snaps. I love the reinforcement.1 point
-
Glad to hear, just wasn’t sure what posts in any media you have been reading, they are not that hard to manage1 point
-
Hey Frank. Its GML1 point
-
Nice one! And like the others suggest, if you end up deciding to go with a chipping effect for the paintjob, you will kind of have to use masking fluid. Because if the paint flaked like it did on the original helmets, it is greatly due to the HDPE surface underneath that doesn't adhere well with paint at all. Very difficult plastic to paint over. You will probably never be able to achieve the same flaking effect with an ABS helmet. But if you don't have any masking fluid at hand I've heard of people using toothpaste or mustard with good results too.1 point
-
Looks like you are right on track, Josh.. great job so far! If I may make a few suggestions, they would be: 1. I'm jumping ahead of you, but since you are aiming for Centurion try not to round off the edges of the ab button plates, and make sure that the smaller one is thin enough to where the "hump" is visible on all 4 sides as seen below. I know a few of you following this who know me were waiting for this comment, lol, but looking at the your forearm and bicep openings,I would recommend trimming them down. In the forearm photo below, I can see where the return edge is already digging into your arm (blue circles), and since while trooping your arms will be bent most of the time (holding your E-11) it will get uncomfortable.... quickly. The same with the bicep openings. Trimming these is acceptable at all levels, and is actually screen accurate. NICE job on the knee plate!! Keep up the fantastic work, and keep those photos coming!1 point
-
Congratulations.1 point
-
Congratulations on achieving Expert Infantry rank!1 point
-
That was a good one.1 point
-
Great job!!!!1 point
-
Wow, great start, that's +1 on the feel.1 point
-
Congratulations and welcome to EIB!1 point
-
Perhaps in some cases but I don't have any issues what so ever, I have Velcro on the rear attachments and they don't open unless you want them too, you just have to make sure when you put the calves together that the closure is nice and flat, I see a lot at angles and it's not surprise they open. Keep the shins from coming up I loop elastic through the loop on top of the boot, then attach snaps to the elastic and inside of the shins, stops them from moving around nicely1 point
-
Think you are getting mixed up with thighs1 point
-
I like how you kept the same feel & style as the 501st merch as well!1 point
-
Excellent. I'll get the other pictures in there, XD. Thank you!1 point
-
Congratulations and welcome to the EI ranks trooper1 point
-
Congratulations. Welcome to EIB!1 point
-
Time for a test fitting of the main components: 20190120_214645 Might try pointing it at the moon tonight to see if it will make it turn red... Cheers!1 point
-
The Counter is mounted to the scope rail using a bracket located beneath the scope between the feet. You can see this blaster is missing the counter as well as the mounting bracket between the scope feet. I should elaborate more on this in my Rogue One E-11 Blaster Reference thread. Sent from my iPhone using Tapatalk1 point
-
Incredible! Really like what you've done Tino [emoji106][emoji106] Sent from my SM-G390W using Tapatalk1 point
-
Okay, here are some close ups of the stands after equipping them with E-11 blasters. Below is the small fat stand. And here the slim wide one (looks better in my opinion). The top view shows the different dimensions and positions on the base: While one stand was meant to sit on the bottom of the large cabinet, the second stand required a shelf to rest on. Another MDF board seemed a bit simple to me, so I added two drawers, which I had found at work and painted them. These are perfect for smaller things like scopes and my counters. And this is what it now looks like with everything in there: Enjoy your weekend.1 point
-
Here´s the result of the dust-spray test and I´m happy with it1 point
-
Here’s how I made the cod plate:1 point
-
Great to see another ROTJ!! Although I'd usually advocate studying the CRL for new builders, in this case I'd recommend not doing so for the reasons already mentioned. I built mine years ago..and even back then the CRL was wonky. Best bet is to do as suggested and follow any recent EIB/Cent threads for advice. Sent from my SM-J320FN using Tapatalk1 point
-
My mark 3.0 central capacitors. Thanks again for the tips Christian. Added some color too before inserting the 0.65mm wire (couldn't get .70mm). Now curing will take place with my capacitor ends at the right color. Resisters also had wire upgrades. Green stuff to fill in the larger hole ahead of time, now wires are snug. Thanks for following my crazy adventure!!! Sent from my SM-G390W using Tapatalk1 point
-
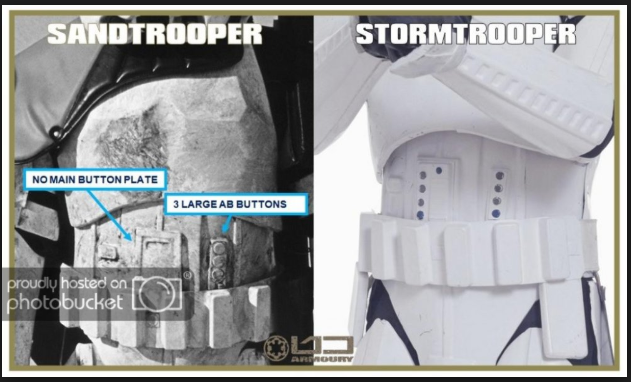
Looking great! I *think* the three buttons on one piece is for the Sandtrooper version, but you made it work!
 1 point