Leaderboard


Popular Content
Showing content with the highest reputation on 12/06/2018 in all areas
-
After being asked a gazillion times about how I built my magnetic shin closures, I've finally compiled everything from my TK build and put it all in one post! Let me begin by stating that I followed the tutorial here for the most part when building these magnetic shins. However, I deviated from it in order to make the closures super strong by using a magnet-to-magnet closure rather than the magnet-to-steel method outlined in the tutorial. I have worn the magnetic shins I made for my RS Props TK out on over a dozen troops, and I have never had them come apart on me. I've only had to reglue magnets twice on these shins over a two-year period: a single magnet came off after being handled a lot (opened and closed dozens and dozens of times at an armor party by those who were trying to figure out how they work), and regluing a single magnet after trooping underwater for a few hours (well, not exactly underwater, but it was a parade where it rained for HOURS and I had to walk in the rain the entire time- for hours I tell you! My boots took days to dry out!). The small amount of maintenance I've had to do on these over 2 years of trooping is quite minimal. Once you get this mod on your kit, I swear you'll never go back to anything less than a magnetic closure on your shins. STEP 1: There are many steps necessary to build magnetic shins, so I begin with making a critical component for them: ABS buttons. The buttons are necessary to hold one half of the magnet assembly in place on the inside of the shin. I'm using 12mm x 3mm n50 magnets. You'll need a total of 20 magnets for the shins (10 on each shin). I strongly suggest buying more than 20, though. I've found that they can easily break, and you'll want backups on hand! You can find them in bulk- and cheap!- on eBay. First, I begin by making a template with a hole in it that is slightly larger than the magnets I will be using. I trace the magnet on a sheet of ABS. Here's what it looks like when done. Yeah, I know my hole isn't perfectly round. It's not terribly important for it to be perfect. I used two magnets to make each button. One on top to help me see where my hole template needed to go, and one underneath to form the button shape. Heat up one section of the ABS sheet using a heat gun on LOW until it gets slightly warpy. You can even leave the magnets attached to the ABS while you heat it up. Once the plastic is soft, quickly press it onto a flat surface, pressing the hole template around the exposed magnet. This is what it looks like on the top and underneath when you're done. And here's how it looks from the side so you can see how the magnets attach to the plastic. See how the bottom magnet sits flush in the new ABS button? I spent about forty minutes repeating the process until I ended up with 10 buttons. I will cut down and shape the buttons to fit each shin later. There will be five buttons installed on each shin. Still lots of work to do, but it's a pretty good start! STEP 2: Another step necessary for how I make my magnetic shin closures is to make sure that the backs of the shins meet up as perfectly as possible. This is to avoid any unnecessary strain on the magnets. This was acheived by some gentle shaping via a hot water bath. Before putting the shins in the water, since I don't have any cover strips installed on the outsides, I reinforce the closure with blue tape. The e6000 gets really soft when subjected to boiling water, and I don't want to weaken the join in the front. Blue tape holds up nicely for this application! Here's a before and after of my shins so you can see how the backs line up a bit better. I will be doing some further fine tuning on the lengths at the bottom later as I move along in my fitting. STEP 3: This stage involves making and securing the "holes" part of the closures for the magnets. I begin by cutting out two 3/4" x 12" strips of ABS. You should have this when you're done. Next make a lengthwise mark in the center of each strip to help keep your holes lined up in the middle. Then mark 3/4" in from each end. That will be the center point for the magnets on the end. I like using magnets with holes in the middle for this, so I can easily find the 'crosshairs'. Trace the magnet. I like to use extra magnets underneath to help keep it secure while I trace. Next, find and mark the center of the strip. It should be at the 6" point. From there, measure 2 5/8" from the center mark on either side. Mark and trace your magnets. When you're done, your plastic strips should look something like this: Next, I used my drill press and a step bit to drill out the holes. It went really quickly! When you're done, you should have two strips with holes in them that can easily fit the magnets. The next part is where people tend to get confused, so I took this photo to show what goes where. The "hole" strip will be glued to the inside half of the shin on the inside. It sounds kind of confusing, but it's not all that bad. Remember that the "hole" strip will be hidden! I begin with my left shin. I mark the center of each hole to assist when I line up the edge of the shin. Next, I test fit the strip on the shin to verify placement, clamping on both ends. Then I apply e6000 to the area of the strip that will be in contact with the shin, clamp and add magnets. This is what it looks like when glued together: Here's the right shin after gluing, but before I added the magnets. Here are both shins as the e6000 cures. I'll be allowing a few days for this to cure, which will give me ample time to get my ABS buttons ready for installation. STEP 4: Once the glue had cured on the hole strips inside the shins, I removed the magnets and clamps. With a light behind the shins, you can see how the hole strips are mounted, hidden inside. Using that light as my guide, I traced the approximate location of the holes with a pencil. This helps me to get a good idea of where my holes are going to be drilled. Yep. I'm going to make some Swiss cheese of my shins. Using a small Dremel sanding band, I carefully cut a notch out, just large enough for a magnet to fit through. Here's what it looks like at this stage when the shins are closed. I'm just focusing on drilling out the holes on the inside edge, following the holes of the hole strip that was glued in. I'm not ready to drill the outer half of the shins yet. Next to clean up my buttons that will hold my magnets. I rough trimmed them all to start. Then cleaned up the corners with a Dremel. I don't want anything poking at my legs! *Important!* If you want to make sure your magnets stay stuck on your shins, you must use e6000! CA glue will not keep the magnets stuck to the buttons; they will fail. I have heard this from several troopers when I have been contacted about their magnets not holding up. I repeat, use e6000 for this next step! I applied a liberal amount of e6000 to the inside of each button, then put the magnet inside to get all cozy. Make sure that you've got the polarity of all the magnets in the same orientation before gluing! Wipe away any excess glue from the top. To make sure that the magnets are firmly mounted in the buttons, I use the magnet intended on going on the opposite side of the shin to clamp it. In the pic below, you can see how I've got all the matched magnet buttons and magnets together as they cure. Back to the shins now. I like this ridge (where the pencil is pointing) to line up at the tops. For me, it makes the closure in the back look much cleaner if this is lined up. I tape it off there to make sure that the opposite side doesn't shift while I'm making my marks for completing the holes. I have an OttLite that fits nicely inside the shin to provide a clear light so I can make outlines for where I'm going to drill out the rest of the holes. Holes were already present on the left side in the photo below. I made sure that I drilled out the holes very conservatively as I went. I used an extra magnet to make sure that the hole was just the correct size for it to fit through. Now time to attach the outer cover strip! I use a 25mm cover strip on my shins for this. I taped off the edge of the inside half to keep any glue from transferring over. Then making sure that the cover strip was straight, I clamped the heck out of it. Praying to the TK gods that it doesn't shift!!!! Now time to wait for everything to cure really, really well. I am going to give these 3-4 days to fully cure just to be on the safe side! STEP 5: One shin is complete, with the outer rear 25mm cover strip glued into place. Woo! Here's a look from the inside, before magnets are installed. Be sure to clean up all excess glue from the inside edges in order to have a clean closure when you're done. If there's extra glue in there, it may not close correctly. I've tucked the outside cover strip to the inside so you can see how the magnets on the "cover strip" half are glued on. No magnets yet. I add a dab of e6000 to the magnet (be sure to check the polarization of the magnet before gluing!!!), and set it so that it fits inside the semi circle and on the outer cover strip. Like this: I wiped away the excess glue from the magnets and then positioned the inner "hole strip" over the magnets to ensure everything is lined up correctly as it dries. I tape the tops and bottoms of the shin to ensure it doesn't shift around during this stage. I'm not completely happy with how the inside cover strip is cooperating here. It sits flat on the top and bottom, but it pulls away in the middle a bit off to the right. I will have to heat bend this before installing the magnets onto the "hole strip". :/ Ideally, the inside cover strip should be sitting completely against the outside part of the shin, and it doesn't want to do that right now. This additional stress could cause the magnets to fail. It's annoying, but I'll need to address this before proceeding any further. Gah! Using the magnet buttons I created earlier, I clamp the magnets into place while the glue cures. Once the glue has fully cured, I'll reshape that inner strip to prepare it for the final magnet button installation. STEP 6: Now that the e6000 has had lots and lots of time to cure, it's time to attach the other halves of the magnets. Make sure that the halves are super clean and free of extra dried glue. It will prevent the shins from closing well. You can do this by touch. Rub all of it off where you feel it. Once everything is cleaned off, close the "hole" half over the "magnet" half. Your shin should be closing correctly at this point. The "holes" should lock around the magnets and prevent the shin from opening at all, even without the additional magnets at this point. If the "hole" strip is not fully engaged over the magnets, you won't have a very strong bond between the magnets to keep the shin locked. Easy part next! Apply e6000 around the prepared ABS button. No need to go crazy with the stuff. You don't want it oozing all around in there. And stick it on! This part goes really quickly. For additional strength, I add some extra magnets on top. Check those clean closures! Left shin. Right shin. I will open these up in a few hours just to make sure that there isn't any extra e6000 that has spilled out and might lock those shins closed where I don't want them locked. Now to allow several days to dry, and these shins will be good to go! Here's a short video so you can see them in action. Have you tried this on your own shins? Loved it? Hated it? Made a few mods of your own to improve this method? Comment below and let me know! Cheers- Cricket TK-104014 points
-
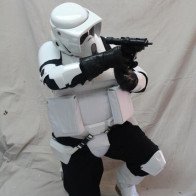
Got it in this morning before work. (I swear I'll post Pics tonight) So Glaring issues off the bat. 1. T-Tracks not long enough (Replacements have already been ordered) 2. Power cylinders are so wrong that is just going to be easier to replace with doopy's/Tino's 3. Counter and scope are garbage, Doopy parts and Tino's to the rescue, (If I could get my hands on a M38 Scope I'd be happy) 4. Grip is a little more square-ish and I think with a little bit of love, power tools and polish I can get it a little more authentic looking I am leaving it as a still functioning Airsoft gun, Now I just have to figure out how to get a tracer unit inside the main Barrel. Load it up with red tracers and let the fun begin I might also put a Tramp Kit in it but, I'd be looking at over a total of $800 on the Build, and I'm not quite to that point. ****Last note: IT'S fracking HEAVY, Which I love, but wouldn't recommend it for a long troop**** Leaving this here for future reference3 points
-
Great work, yours does indeed look better than the RS one. Maybe that mold has seen better days but yours is much sharper.2 points
-
Just submitted! And bonus imperial puppy: Sent from my iPhone using Tapatalk2 points
-
Ha, that's fun! And great to know. Thanks. Went ahead with the spacing I had on the right (trimmed since last picture) and widened the left along the seam just a smidge. Despite not getting done all I hoped over the weekend (next time I'm telling the tree it can decorate itself), I made progress. Not necessarily progress than makes for good pictures - nobody wants to see me gluing things wearing a post-apocalyptic respirator huddled by a pile of firewood in the wintry half-light with a chilly drizzle and thick fog lazily tumbling by - or wait, it might sound like it'd make a good picture but it wasn't nearly as poetic as it sounds, I was sitting on a lunch sized igloo cooler for the love of Mike. But anyway I got work done. And THEN I went to a garrison-mate's house and got help sizing my ab&kidney AND an offer to come over and use their workspace (and belt sander!!) whenever I need it which is just so awesome and generous and I'm quite excited. I also got feedback on my chest plate, which was looking like this: AKA huge. It's been recommended that I start by bending the sides in and the tops down, and see how that goes before trimming. Works for me. I'm making my own holster, and cut that out last night. It was surprisingly easy, using a template I found floating around the forums. I mocked it up in cardstock first, made my edits, and used a utility knife to cut it all out. Really not bad. I'll be casing the leather (getting it saturated with water to make it easier to work with) and punching my rivet and thread holes tonight. Should be a quick assembly after that!2 points
-
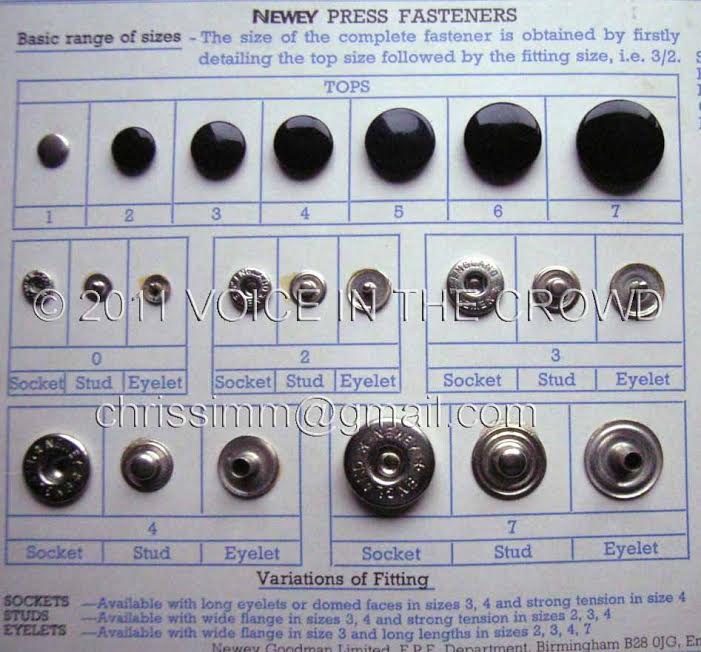
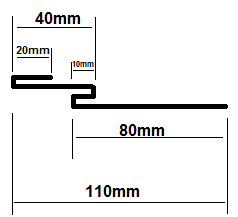
Here's a summary of what we know of what was used on the original suits, courtesy of the images and information provided by Voice In The Crowd: Snaps The shoulder strap snap fasteners (poppers) are Newey size 10. Gallery The other snaps all over the suit are Newey size 5 tops with size 4 studs. Known as a 5/4 configuration. The shin hooks are Newey size 4 Gallery Elastics Thigh elastic is 75mm wide and is 46 cord. Length 230mm total. 200mm long with a 30mm fold over. There is 65mm out of the leg the rest is inside. Of the elastic inside the leg 70mm of it is glued down. The arm elastic linking the forearm and biceps are 50mm 38 cord - one arm elastic total length was 230mm the other was 240mm. Gallery The shoulder strap elastics is 45-47 mm white. Has a squared pattern. Positive match: Ebay Gallery Gallery Drop box elastic is 25 mm white. Gallery Canvas belt is roughly 75 mm wide. Gallery Torso elastics are 25 mm black. The helmet elastics are 25mm black 14 cord elastic with one side having a size 5 nickel cap and size 4 nickel socket. The other strap has two size 4 stud / eyelet. The elastic on the shins with sewn hooks white 25mm wide it is 14 cord elastic, The elastic length is 75mm and has a 25mm fold over where it is sewn. The elastic that goes across the shoulder bells bottom is 25mm 14 cord black and it is 270mm long. 40mm of the 210mm is glued one side and 20mm glued on the other. The strap that goes from the top of the shoulder bell to the big Newey snap that is on the main shoulder elastic has a 3 folds in the 25mm black 14 cord elastic. The way it works is - if you look at the elastic side on like the photo going from right to left - make the first fold 80mm back to the right - then fold at 10mm back to the left - then after 40mm back to the right - leaving 20mm pointing to the right (the part the snap is sewn to. This makes total length of the elastic the 150mm. (see attached picture) Hardware The bracket screws are 5 mm flat head machine screws Gallery The split/bifurcated rivets have a head diameter of 8 mm, a shank diameter of 3.9 mm and a length of 9.2 mm - Positive match: Ebay - Gallery The cap rivet heads are 7.36 mm in diameter and 8.36 mm in the back Gallery Gallery Pop rivet washers are 12.61 mm in diameter Gallery Bracket wire gauge is 1.25mm The bolts that hold the brackets have 5mm wide heads - they are 7mm long and the nut on the other side measures 5.13mm across the flats. The spacing between the holes where the metal brackets are placed was 38mm for the centres of each hole. Thermal detonator Thermal detonator end caps are 20 mm deep Gallery Thermal detonator belt clips are 28.7 mm wide Gallery Thermal detonator belt clips are 68.89 mm tall from bend to tip Gallery Thermal detonator belt clip tip outward bend is 5.79 mm wide Gallery Misc Boots are black chelsea boots, produced by Stuarts Gallery Most likely glue used is Stelmax 1985 (information provided by TrooperMaster)
 1 point
 -
Vonreg is supposed to be an unused concept from episode 9 prob saying too much on a thread about a set armor from a movie on 2015 that won't be ready by 2019 Sent from my SM-G950U using Tapatalk1 point
-
Hey thanks Rat! It seemed like another fun challenge, and since it's so different from the rest of the build I knew it'd be a nice change of pace. It's been super fun so far, and really not that difficult. I'll provide a rundown of my madness-- I mean, method - later. This no-camera thing is getting quite frustrating, though. Me too, Rowan, me too. Kidding, kidding. See, my tactic to avoid such nocturnal ventures is to keep my kit at my boyfriend's house - that way I have to confine my work to reasonable hours, because it's simply not around to be worked on. (Yeah, they're some real great folks! Neither have TKs but have spec ops troopers and such so can help plenty. Side note: this is such an incredible community.)1 point
-
Mag install1 point
-
Gotcha I might be a buyer if someone gets one in and needs to get rid of it. Hearing rumors about a new red trooper for 9 so that might steal my interest away1 point
-
Nice Work so Far! Looking forward to seeing how the Holster comes out.1 point
-
Great build! I especially like the comparison with the RS Blaster and I want to agree that your Blaster is the better one!1 point
-
Oops! That was yesterday's picture! I did paint those rivets! Can't wait to troop! I'll pack my cuffs [emoji16] Sent from my iPhone using Tapatalk1 point
-
Looking great Jen!! While you wait for approval paint the left side rivets Can't wait to see it in person. We'll bust Leia together! I'll even let you slap on the cuff's Rookie.1 point
-
Good job! Glad the TD tutorial helped!1 point
-
Looking awesome Lorelei. Nice call on making the holster. Sent from my 5054N using Tapatalk1 point
-
Please enable 501st accesshttp://501st.com/members/displaymemberdetails.php?userID=4733 Thanks ! TB-73094 Trooperkane1 point
-
Great work Rodney and welcome to Expert Infantry And Sha Sha: Congratz on first Review1 point
-
Thanks for all of the input, this is very helpful. And Cricket, of course seeing your build is incredibly helpful! Hmm... I asked for short thighs, I hope that's not a mistake! I do have short legs though, I have to hem petite pants. I'm sure I will come up with more questions as I try to get organized while I wait on the armor1 point
-
1 point
-
So the Imperial Gaskets are definitely helping fill the gap between me and the armor. At least with the bicep and forearm pieces. We'll see how much it will help with filling the thigh and calf pieces as they are humongous on me and the main pieces I'm worried I'll have to trim. Also I see now what everyone was saying about the limited mobility with real rubber gaskets. I think I will purchase cloth gaskets for more casual events so I can be more comfortable.1 point
-
Hi Carl, first of all: Congratulations on finishing this superb build. It is outstanding in its own unique way and a real reference for those, wanting to do the same. Great that you had the chance for a side by side comparison. And I have to say, yours looks way better than the one from RS Prop Masters. Very well done mate.1 point
-
1 point
-
I do the same as TM. I thought that was the natural way to set them.1 point
-
You have an unusual way of pairing up the snaps. This is how I have always used them. Setting the snaps this way gives you a low profile male snap plate glued to your armour and the bulkier female snaps on your elastic straps.1 point
-
I compared my track side-by-side and in person to multiple screen-used props that have original track on them. They were indistinguishable with caliper dims as well as overall profile and color. No other t-track maker out there has track that matches mine or the screen-used track. Close but not an exact match. Nothing wrong with close but to say that there is no difference is false. The way I see it is if you spend big bucks on an original graflex, kobold clip, original calc strip, refurbished sterling etc.. that you're going to have in your collection forever, and then want to skimp on getting perfectly accurate t-track to save $20 or because you don't like me personally (even though you don't even know me) is mind boggling to me. Any prop that has t-track on it from another maker is always going to be slightly less accurate than the exact same prop but with my t-track. I wouldn't use my track on my props if that weren't true. .1 point
-
This is the money post right here. Rob is also right that GINO bashing gets nothing. What counts is to look against the screen caps as best we can. ANH space packs are the same - all we have is a few behind the scenes photos which don't show everything.1 point
-
I'm not sure Gino-Bashing is the way to go here . Gino has been to the lucasfilm archive and seen the real props...so why wouldn't he build exact replicas ? Get a grip guys, his are the most accurate . You pays your money, you takes your choice . Simple .1 point
-
Well, you would say alot to sell your stuff - well fitting to the EFX team. Having seen things does not say your REPLICATION is better than another - or is your next argument they gifted you a piece frm a saber, blaster, whatever ..... that you handed to the extruding company, to enable them to make the dies for extruding? Having seen them, measured it (how did you do that to ensure measurement of that shape is completly accurate) is not neccessary better than when a professional works from pics. As usual a lot of hot air to muddy the water and impress the new and/or naives, but no proof.1 point
-
There is only one Emperor ranking. To get it, you would have to hunt down the current holder and, er, ummm...*obtain it* from them...1 point