Leaderboard


Popular Content
Showing content with the highest reputation on 05/22/2018 in all areas
-
Lots of extra material with this kit, no need to add shims. That being said, time to trim the junk in the trunk Made the cut on the same line as the 22mm notch Trimming the shoulder straps Instead of scraps pieces to make a larger gluing surface, I used the epoxy putty. Trimmed the smaller plate Trimmed the larger plate, happy with the results3 points
-
Just saw this from clicking through on what I didn't realise was a photobucket image: https://support.photobucket.com/hc/en-us/articles/360004314254-Welcome-to-the-New-Photobucket- Seems they have new management with a more realistic plan in place. Hopefully this is a good thing but they've lost a lot of trust now.2 points
-
2 points
-
And more trimming. Torso and belt. Ab. There is no trim line at the ab to kidney seam. I put my cut line at the pencil mark. A lot of material to remove. I used the dremel and cleaned up with scissors. I rough cut the kidney along the pencil line. There is lots of extra material here if needed. I knew I didn’t need much and just trimmed off a bit to make fitting easier. Chest. Most of the trim lines were visible. I always trace them out with pencil. But I had trouble here. The pull was a bit rough here and at the shoulder bridges. Still doable. Rough area from the pull. Sized the ab and kidney parts and I only need 1cm from the edge of the kidney notch. Torso rough trimmed and sanded. I left a little return edge along the sides of the chest. The return edge along the shoulder tabs will help strengthen them. My left side had less return edge thanks to the dodgy trim line and me not paying close attention. Inner return edges are rounded so they won’t snag on things during fittings and what not. All torso return edges are about 10 mm to accommodate screws for original bracket system - but may reduce them a bit more once the screws are in. You really want to rough sand everything and make sure there are no sharp edges before the fitting and strapping process - this will prevent your undersuit from snagging and less chance of creating a tear in the armour. Belt and ammo belt took about one minute to trim. Turned upside down, scored the seam, used scissors to cut along the corners and snapped the edges off. Sent from my iPhone using Tapatalk2 points
-
This was an extremely productive weekend for my build. To line up the drop boxes I taped them into the desired position before marking off the spot for the rivet. Positioned perfectly Marking the rivet location Rivet set, and gluing the elastic for stability The angle of the photo makes them look misaligned, but they are indeed lined up well with the edge of the ammo belt. Next, I finally decided to try and paint the vocoder (a task I’ve been putting off). I wish I felt confident enough with my painting skills to freehand this, but I dont. Instead, I made my own template. After a few coats, I’ll leave this to dry overnight and we’ll see how this turned out. Finally, I took advantage of the decent weather to escape the dungeon and set up shop in the garage to cauterize and burn holes in snap bases: Starting to feel like the home stretch, with more tasks behind me than in front.2 points
-
Here we go again. After dry fitting the WTF kit to my frame (6'1" 195 pounds) I was not happy with the fit (too much under-suit showing). So, after following Sean and his build of both (WTF and AM) I decided that the AM would be a better fit. Lots of tips and tricks were learned, so I have a little more confidence in this build. My WTF armor will go to my wife after I finish this kit. The family that troops together, something something something... Just got the tracking number, so now the BBB day is fast approaching.1 point
-
That’s correct when paring them up the shorter swoop goes on the inside (conforming to the muscle) but if you are really in for it then it doesen’t matter since the movie-suits on occasions had doubled up part, for example the shins could be two outer parts (longer swoop on both sides)1 point
-
Phew! Hehe No worries. Keep up the good work. :-) Sent from my iPhone using Tapatalk1 point
-
Thanks! I haven't trimmed the shins yet since I'm waiting on my boots from IB!1 point
-
You come first! Armor will be there later, we all hope you get better and we’ll be around to help. Sent from my iPhone using Tapatalk1 point
-
Yeah, that sentence is awkward... I built the patio furniture in less than a week. The kids took a little longer to put together. And I'm going to finally mention that your avatar pic with your baby BB-8 just melts my heart every time I see it. So much cuteness!1 point
-
TKSnake, you can but you will need to modify it. See the black series mod thread in the RO section.1 point
-
When I first read this sentence, it sounded like you had twins and built a patio set all in a week! Before or after giving birth, that would be impressive! (Most impressive)1 point
-
I can try to answer some of this - maybe. The biceps - if you want return edge along the bottom, I would line up the bottom keeping in mind that the tops will be mostly covered by the shoulder bell anyways. I'll let an RS expert comment on the shins - I couldn't tell from the pics but my understanding is that there is no left and right to the RS shins, but I'm not an RS guy. For the paint, the grey does look rough. Did you stir the tin really well with a toothpick or something similar? If you have a grainy texture, this could be due to an old tin of paint. I had this issue as well. You may want to source a new tin from someplace new. I've never tried to sand this paint (I assume you are using Humbrol?) so I'm not sure how that would work. RS bicep. You can't see it in this image, but there is no return edge at bottom Your build is looking great, btw! Keep it up!1 point
-
How much is your undersuit? Sent from my iPhone using Tapatalk1 point
-
Yes, I would trim both the big and small ab button plates so there's no overhang. I'll try to find some reference pics.1 point
-
Excellent work on the snap webbings! You are well on your way. How you place your snaps is entirely up to you, but like many, I glued the webbing directly onto my armor. E60001 point
-
When cutting out the backs of shins and thighs, just be sure not to cut out past the ridges. For teh cod/butt, here are some reference photos:1 point
-
Do something each day, so I cut some pine to fill out the pouches (still need to paint them black) Snap plates, took a little bit to get the technique down but do enough of them and you will learn Bottom of the snap has a slight dome effect, I assume this is normal. E-6000 will be slathered on to the backside and plastic roughed up for better adhesion.1 point
-
I always appreciate good c-section humor! When life throws unwanted things at me, I always try to find some sort of humor in them. I never had a choice about my c-sections (I was pretty upset about this) because both my kids were breech (my kids really wanted to be different even before they were born!). One of my Steven Wright favorites: "I'm addicted to placebos. I'd give them up, but it wouldn't make any difference." Thanks for the laugh!1 point
-
And you are sooooo close to finish There`s no time like the present1 point
-
Totally awesome Greg1 point
-
This is what I did. I found it to be helpful on the thigh. Sent from my iPhone using Tapatalk1 point
-
1 point
-
Hi Stefanie, great job with your armor! Perhaps you should shorten the left thigh armor a little bit. It is looking a bit too long and I guess walking is difficult now. Keep up the great work. Cheers Christian1 point
-
Well I've wanted one for at least thirty years now, so I just can't give up [emoji6] Yea, I saw that you were aiming for a TD. I really have to check out that thread sometime soon! Skickat från min SM-G930F via Tapatalk1 point
-
Yeah there`s no chance we`ll leave you alone1 point
-
I was born by Caesarean section, but you really can't tell... except that when I leave my house, I always go out the window. - Steven Wright1 point
-
Or: Let`s hang out in the c-section kidding aside, hoping all goes well and that you have a speedy recovery1 point
-
At least they are letting people download what is rightfully theirs. That is just about the only thing they can do to get people to even take a second look at photo bucket. Definitely a last ditch effort. They should not have done people thd way they did.1 point
-
Hello everyone, Updates… I got a respectable amount of work accomplish over the weekend. First, I attended an armor party on Thursday and had some help positioning some of the plates to get a feel for what needed to be trimmed. So, I learned that the abdominal plate will need to be trimmed about 1” along the top and 1.5” on the sides. This should also help in allowing the chest and back plate to sit more flush to my body. This will also mean that I will lose the top ¾” side release buckle on the abdominal plate but that is not a real problem. Also noticed that the undersuit from Jim will need some adjustments (it’s a little baggy) and the mesh area along the back neck and sides of the back plate will need to be backed with some black material. Ok so trimming… I needed to take 1” off the top of each thigh and about ¾” off each side along the back of the thigh. So I cut off the cover strip and re-attached it with PC-7 ¾” to the outside, side of the thigh. I cut off ¼” of inch to the inside side and presto. For the CRLs they will need to be closed with Velcro. I think some trimming will need to happen with the side hard plates but that will come once I get a better feel for how they fit. So after some cutting, sanding and fitting, I used PC-7 to seal up all the front seams and add strapping to some strategic parts. I also wanted to reinforce areas where snaps would be used lake the large black area on the inside of the abdominal plate in this picture. Note the abdominal plate is upside down and the top 1” has not been cut off yet. Once all the PC-7 was cured, I sanded all the seams down and added some bondo in areas that needed it. Next, I tried on the arm plates and decided how they would all fit together. I had planned on doing the same “J” cutout on the bicep armor that was used for the movie but decided against it. I opted for snaps and elastic so I made up some snap stud strips on styrene and adhered them to the inside of the armor with PC-7. I also attached the side plated to the back plate with PC-7, they will attach to the front plate with velcro or snaps then get cut down similar to what Yosh did with his side plates. Lastly, I decided to hard mount the shoulder straps to the back plate. I drilled and glued in some nuts in the underside of the shoulder straps. These will be attached with small bolts from inside the back plate and will be removable. The straps will attach to the chest plate with some other method (possibly magnets). So that is what I have accomplished. What I am planning to do is add an elastic suspender system to the abdominal armor that the chest plate, back plate, and shoulder bells all connect to. The bicep will attach to the shoulder bell with elastic. The groin and posterior plates will attach with the straps from the abdominal plate. The thighs will attach with straps and side release buckles from the abdominal plate like the screen used armor. I do not know if I will need some strapping for the forearms and shins at this time. I am holding off on adding any Velcro until the painting is done. I think the armor is coming along nicely and I hope I am staying on schedule. Thanks for the interest.1 point
-
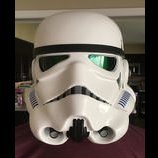
Got the speaker and battery holes filled and cut the cheek holes out. I used a small cutting wheel on a dremel then went back and used an exacto knife to clean them up. And of course my undersuit which I made and make them to sell1 point
-
And here we are: since I couldn't reach the forum on Saturday and since I was busy yesterday, finally this will be the last update of this blaster build. Kinda sad, but there's still so much more to come, I certainly won't get bored Right, let's speak RESULTS: Gotta teach my dog some manners apparently, he's not too amused Anyway, I am pretty happy with how the E-11 turned out - it is definitely not the nicest or most accurate build, but it does look pretty damn realistic and for my very first blaster (or even cosplay-like project), I am quite satisfied! Again, thanks to everyone who contributed to this thread and helped me out when I got stuck, and hopefully we'll read from each other in other threads (maybe even my TK build thread or the E-11 Blaster Display I have planned and want to start in the next couple of days And again, thanks for reading, and feel free to leave some feedback so I won't get into trouble in my next E-11 build Freddy out, see ya out there trooping some day!1 point
-
Nice Cricket. Looking forward to it. I also wanted to say how amazing this build thread is. Maybe it will inspire my fiance' to get herself in some white armor1 point
-
Lord of the Rings The Fellowship of the Ring Sent from my iPhone using Tapatalk1 point
-
Looking good and I like the pink shoulder bells in the background, bright and shiny. Sent from my iPhone using Tapatalk1 point
-
Molds done! Sent from my SM-G925F using Tapatalk1 point
-
Rough trimming continues... I've also finished trimmed and edge sanded the other parts I posted. Dremel and a sanding sponge made that simple but messy work. So far everything seems to be going well. I've found a combination of scoring/snapping and lexan scissors to be a good method. I'm concerned about fitting, especially the arms and legs. I want to get a subtle taper on those parts. Is the recommended process to trim the front of the parts to accommodate the standard cover strip width and then trim the back to create the fit? If so, then I'm assuming to trim the back I should tape it all up for a nice fit, mark a center line, and then trim the two sides to that line. Am I thinking about that correctly? For what it's worth, I'm more-or-less "standard Stormtrooper size" - 5'9" 155#.1 point
-
A few more pictures. Slowly goes it . Sent from my SM-G950F using Tapatalk1 point
-
I spoke to them via chat this week, as well. I asked them if any of the TFA kits or TLJ helmets have shipped out yet and they said -no.1 point
-
My notches don't match my butt plate at all when not wearing it. My butt plate is wider than the kidney. But when I put my kit on, the notches and butt plate match perfectly. Some sort of freaky Imperial sorcery, I guess. Either way, the belt tends to hide it.1 point
-
I used JB weld on most areas which would not need flexing, on those that do I used E6000, I also used bondo (auto filler) without issue, you just have to know how to use it correctly and in what areas. Make sure you rough up the surfaces with course sandpaper before applying glue or bondo, it will help both stick and not peel off.1 point
-
I would avoid bondo. what you want to use is a flexible filler like Evercoat PolyFlex1 point
-
Big Deal, that is good news. They did come highly recommended so its not surprising that they would offer to make the zipper problem right. I am hopeful that our issues are isolated incidents and not the norm. Ok quick update. So I sanded the back plate down and still had a sizable indention where I added the HIPS so I needed to add another layer of PC-7. Hopefully, tonight I will be able to add the back boxes and get a sense of how the groin and posterior will fit. And a special NOTE… So I had mentioned in a previous post that I wanted to build a more realistic E11. I grabbed the HFX for general trooping but I prefer something more “substantial” that has a moving charging handle and trigger among other things. I also wanted a more realistic scope that I could play with and consider adding a reticle inside at a later date. Well, LTM suggested Master Blaster for my upgraded E-11 and at the time that he suggested this, I was already considering Master Blaster. I had considered several options such as: Build it from scratch with a PVC pipe. Buy the airsoft sterling and make it RO compliant. Buy a DoopyDo kit and make it RO compliant. Buy a Master Blaster and make it RO compliant. So, after LTMs suggestion, I contacted Raymond from Master Blaster and asked him if he would make a RO E11 or consider selling me an ANH E11 without the scope, rail, Hengstler, and power cylinders so I could make it RO compliant. Raymond responded to my question and we talked quite a bit. I learned that he is planning to stop making stuff and selling his business due to family and health reasons. So I opted to get a full ANH kit. This is a project I will be working on way down the road but I did not want to miss out on the opportunity to grab one of his E11 kits. Along with the E11, I also contacted Bulldog Props in Japan and inquired about his resin M43s for anyone not familiar with his scopes, he makes a 1:1 (functional) resin kit for the M43 and M19 scopes. I asked Bulldog Props is he could make a 1943 M43 for Rogue One and Solo E11s. His is now working on this kit and I hope to know something in the near future. I am still not sure what I will do for Rogue One power cylinders and Hengstler at this time. Well, that is it for my update, thanks for the interest.1 point
-
Hello everyone, So Monday my boots and gloves arrived from IB. The boots look and feel good so I think they were a good purchase. The quality looks good and they fit as I hoped they would. I understand that companies like IB are there to support our affliction of fandom cosplay so I hesitate to be critical but I feel that I must also be honest. The gloves were poorly constructed. In the picture below I wanted to see how they looked with the hand armor. Putting the gloves on I noticed that the single stitch that holds the 1.75” elastic wrist to the glove was already coming undone (red line and arrow). Further, on both gloves the stitching completely missed stitching the glove to the elastic in several areas. On the left glove the seam on one side of the glove also had poor stitching and large areas of my hand could be seen through the seam. These are not major issues to me because I can sew so I re-stitched everything; however, I can see this as an issue for someone who orders these Anthology Trooper Gloves at $69.90 plus shipping and does not know how to sew. I do not know if I got a bad pair or if this is indicative of IB quality? I hope I do not run into issues with the boots but they look to be good and quality made. Ok back to the armor. After the E6000 had cured, I sanded the inside edges of the HIPS but I was concerned that the edges may wear holes into my undersuit so I applied some PC-7 to the edges. This will accomplish two things. First I smoothed out the PC-7 and I will be sanding it smoother once it cures to provide a smooth surface. Additionally, the PC-7 will permanently bond the HIPS to the back plate. On the outside of the back plate, I applied a layer of fiberglass resin to filling the gaps around the added HIPS. Once that cured, I applied some more PC-7 rather than bondo to fill in any small areas. The PC-7 is stronger than bondo and will not crack like bondo can. I am hoping all this will make these sections of the back plate semi rigid and once painted, will not crack the paint if there is any flexing. I will sand all this down and apply the shoulder boxes once the PC-7 has cured. And that is it for this update, thanks for the interest.1 point
-
There are 2 choices, Jim... You can pick up the supplies at a craft store or online (nylon, elastic, strapping, snaps) and do it yourself, or get in touch with Sara (screen name Alay), who I believe is selling the complete kits. If you do decide to go the DIY route, I have a snap setting tutorial here: https://www.whitearmor.net/forum/topic/44617-snap-setting-101/ Supplies can be found here: https://www.whitearmor.net/forum/topic/31404-supply-list-for-your-tk-build/ Another GREAT item to think about is one of Pencap's thigh garter systems. Makes life SO much easier! I can attach my thighs in about 5 seconds each, and they will never, ever slip. https://www.whitearmor.net/forum/topic/29991-thigh-garter-system/1 point
-
Currently working on cleaning up my paint. Made good use of a toothpick, Mineral Spirits even WD40. I have used a small amount of acetone on the end of a Qtip on stubborn areas. Everything is freehand painted with exception of the vent tubes. Those I used a template from Trooperbay.1 point
-
Here are the pictures of the completed torso. Now I just need to figure out the Han snap elastic size and the split rivets for ab and kidney closure. I purchased 8mm head by 6mm cap rivets to substitute split rivets, which I think will do nicely! http:// http:// http://1 point
-
I was worried that the armor would not fit in the job box. So I did a test fit. Someone said you could use these things as a dressing room. Now I believe them.1 point
-
"Cadet Jason Kaar reporting for training and armor assembly." Hello, and thank you for joining me on this build. I have never done anything of this magnitude before. So this should be interesting. Okay, so to catch everyone up I have been researching like mad since January and finally took the plunge on May 4th. It seamed appropriate. Anywho, I am really excited and can't wait to get started.1 point