Leaderboard


Popular Content
Showing content with the highest reputation on 05/26/2026 in all areas
-
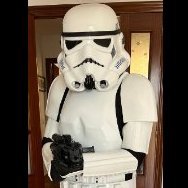
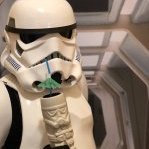
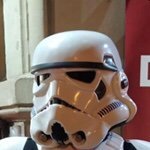
Hi all, I'm really excited to have joined this group. My name is Greg and I'm from Minnesota. I've always wanted a quality stormtrooper armor and after I bought my first 3D printer this spring I fell down the YouTube rabbit hole and ended up finding this forum. I barely know what I'm doing with my 3D printer and don't really know how to modify or create any file yet but I was able to get a copy of the modified Niko files from TKModder421 for the helmet and I got the armor files from Akira-Yuming. I haven't touched the armor files yet because I haven't quite figured out how I'm going to size them properly (Maybe armor Smith app) but I did decide to take a try at the helmet. I printed a few test rings and realized the 100% sized was too small. I have a large head and wear glasses. I ended up printing the helmet at 102% because I didn't want to go too large to where my helmet looked comically disproportionate to my body. I am not exactly a small person though (6’2” 240lbs). After printing at 102% I was able to wear the helmet but I could barely get it on and I couldn't wear it with my glasses so I was blind as a bat. I just printed a few more test rings and have decided to print again at 107%. That should give me just enough space to put the helmet on and wear my glasses with just a few millimeters to spare. I really hope that my helmet doesn't look too big but it is what it is because I couldn't wear the smaller ones. I'm going to start reprinting at that size tonight. Have any of you had to go that size or larger on your helmets? As mentioned, I got my very first 3D printer and I bought a Bambu Labs P2S and although the filament seems a bit more finicky I bought a bunch of white ABS after having watched some other armor builders on YouTube. I am finding that I wish I would have bought a printer with a larger print bed but the 256 by 256 is nice for most things I do. At 102% I only had to cut the dome and back into two parts but now I will have to cut the face as well. We will see how it goes. I'm sure I will ask lots of questions on this page about sizing and about all the not 3D printable parts. Speaking of which, I did purchase the audio/icomm system with hovi tips and amp/mic as well as some helmet fans from @ukswrath on Etsy. My original goal for this build was to build an awesome Halloween costume that will bring a smile to kids faces and also make a really cool decoration for my game room when I'm not wearing it. But after having watched videos and read things on this forum I think I am going to try for 501st approval when my armor is all done. Just the most basic level for now. I followed the local Garrison on Facebook and it looks like they have a lot of fun and it might give me more opportunities to bring smiles to people's faces which I enjoy. I am also an introvert so it would be good for me to branch out and interact with other people. Thanks in advance for all the help I'm going to receive along the way. People on this page seem like a pretty awesome group.4 points
-
Got approved through my local garrison Northern Darkness Garrison in Northern Indiana. Just waiting for my TKID and ill be ready to rock and roll!!!2 points
-
Thanks for the great feedback! That's very helpful and I'll post some updates as I make progress.2 points
-
Thank you to all of you who have donated, for those of you confirmed on our tracking spreadsheet I have now updated your forum profile with the 2026 supporter badge. Some of you have been more than generous, but all of you have our thanks. All donations matter no matter how big or small. It's your generosity that keeps the lights on and the droids working.2 points
-
Greetings troopers, It's that time of year where we need to pay our bills. Last year we covered 14 months to get us a little way into the term so there was no sudden rush just after the elections. Well that 14 months is almost up so we now need your help to cover the detachments costs. The breakdown of costs are as follows: Hosting in backups - $34.56 monthly after taxes Email - Send Grid - $19.95 monthly after taxes Invision v5 Licence - $199 Members owed from previous term - $75 This brings our fundraising goal to $928.12 for 12 months. We'd like to ask for a $5 donation from members, but any value no matter how small will be appreciated. Please send your donation via PayPal friends and family to [email protected]. Please make sure you mention your forum name so we can update your profile. All members who donate will also have the 2026 supporter banner added to their profile, as with the earlier email costs fundraiser.1 point
-
Congratulations1 point
-
Congratulations! You really deserved that one. Looking forward to our next stormtrooper deployment!1 point
-
TK-55582 Southern California Garrison requesting 501st Stormtrooper access https://www.501st.com/member/55582/ TKID: 55582 User ID: 494841 point
-
Sorry for being late to the game! Donated - 88R236207N752243E1 point
-
Fingers crossed Once you receive approval you can request higher TK access below, so you don't miss out on any FISD merch1 point
-
I wash all parts with warm soapy water to make sure there is no release agent or grease from hands on the pieces. Sanding helps the paint to adhere to the plastic. Wet sanding helps the sandpaper to last longer, a few drops of dish washing liquid can also help reduce clogging. A light sand on the primer also helps the paint to adhere to it. I also use automotive acrylic paint, dries quicker and can be sanded and polished in the event of any runs, with any paints I suggest trialling before final application. Note, if using RustOleum (a few have) it is a paint I would not recommend for helmet painting, I find it can clog and come out dry and needs constant tin shaking, it also likes to run1 point
-
I have not done a painted TK helmet but did a death trooper one that has a very gloss black finish (mirror glossy). I did do a wet sand between coats to make sure there were no imperfections that would carry through to the top coats. After the 2K clear coat, I buffed it with a cutting compound and then a polishing compound with an electric car polisher to get the shine. If you are not going for a high gloss finish however, you can likely get away without the sanding between coats as I did on my daughter's clone trooper helmet1 point
-
Sent. Transaction ID : 1TM397436342132161 point
-
Donated1 point
-
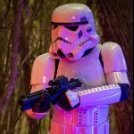
With more items ticked off, I decided to do another suit up today. These are stills from a video so the image quality isn't amazing, and I dressed myself so there are a number of dressing issues, but I'm happy with how everything is coming together. Still TODO from from the fitting/assembly/strapping point of view: - I still need a way to keep the biceps up. I've been considering various methods such as strapping them to the shoulder bells (the same thing I did with my OTTK), or possibly adding some kind of strap with a snap or buckle to attach them to the shoulder gaskets. - There is also nothing keeping the spats in place on the shin, so I'll add some Velcro. - I have an idea to attach elastic to ankle sleeves, and attach them to the bottom of the knee gaskets in order to keep them from riding/bunching up. This is particularly necessary since my shin armor is fixed and I have to slip my legs/feet in vs closing the armor around my shins. - The inside point of the shin armor really digs into the inside of my knee (the top of my tibia) so I am planning on cutting them down some. Looking at the Anovos/Denuo Novo armor, the inside point is quite a bit shorter than the outside so I'm assuming this is fine. - Finally, one danger of taking 8 years to build a set of hard armor is accounting for body size changes. I have been lifting weights consistently for the last 6 years, so my arms and legs are bigger than they were when I first started this project. I already made the biceps slightly bigger, and I am considering doing the same for the thighs. After all the strapping and fitting it will be endless sanding and painting, but I do feel like the end is in sight!1 point
-
Beyond those major updates, it's been tons and tons of small TODO items to inch closer to the finish line. I assembled and tested the holster: Attached the 'kit kat' boxes: (pre-sanding) Re-created the oval detail on the shins: Assembled the spats: Hea Heat shaped the knees and sewed Velcro onto the gasket to attach them: Created a tab/magnet system to keep the sides of the chest and yoke together: A short video showing it in action: https://photos.app.goo.gl/JPp7zLxjMh2unCoD8 I don't have any photos at the moment, but I also added snaps to the ab suspender and the underside of the yoke which keep it in the same place. I also have a nylon strap/snaps as a failsafe for the chest in case the velcro doesn't hold. Initially I tried to make the strap in ABS so that it could actually keep the chest on without any Velcro but I need to reposition the snaps or possibly use slightly thinner ABS because the snaps kept popping out.1 point
-
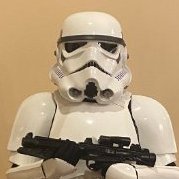
In the meantime, I decided to finally finish assembling and painting the SE-44C that I'd printed a while back. I did make the trigger moveable but otherwise didn't add any electronics: https://photos.app.goo.gl/RgeCtCCKYu8H7RwCA It's not 100% flawless but I'm happy with the result. Thank you to @The5thHorseman for making these incredible files available to us!1 point
-
I've been bad about updating this thread, but I have been working on the costume. First, the shin repair. As I stated above, I decided to swap the shins so that the messed up part will be on the inside. The KB shins appear to be identical, so it wasn't a huge deal. I used shims and ABS paste and some Bondo spot putty to repair the torn calf and it ended up looking pretty good. I'll need some more work to really make it disappear but otherwise I was happy with the result: During this time, I actually realized my feet are small enough compared to the size of the shoes/shins that I can just glue them shut. This also makes it so I don't have to worry about the repair flexing. I went ahead and glued them with E6000:1 point
-
We are up to 40 members that have donated. We have raised $498.94 of the $928.12 needed. So we have $429.18 left to go. If you haven't donated yet, please consider doing so. And please make a note in the PayPal notes that it is for the forum. I'm receiving payments for coin shipping and patch orders as well, so having a note telling me what the money is for saves me some headaches. Thank you, James1 point
-
Bit late , but I just sent a donation over . Great cause ! Glad to help .1 point
-
Sent Transaction ID 1L765227VJ942832H Pete1 point
-
Done.1 point
-
Done. Òscar PC Catalunya Squad Id. de transacción 76R582531S030505D1 point
-
Donated1 point
-
Donated!1 point
-
Also donated!1 point
-
Donated!!!1 point
-
Sent!1 point
-
Sent!1 point
-
Donated 9NE67883BM260351Y Sent from my iPhone using Tapatalk1 point
-
Transaction ID 4YF94794BR00379261 point
-
Sent over from Empiretrooper. Kind regards. Sent from my iPhone using Tapatalk1 point
-
Sent! :)1 point
-
Donated 7MN471391947795421 point
-
Sent!1 point
-
sent1 point
-
sent1 point
-
Sent1 point
-
sent!1 point
-
Donated. Thanks for all your hard work 🙌🏽 3W78643264350770J1 point
-
Donated PP- 0K298806AP1908521 point
-
Donated. Thank you.1 point
-
Sent! Happy to support the FISD, y'all have been awesome.1 point
-
Sent!1 point
-
Transaction ID: 6EV85480X4877264H1 point
-
Sent!1 point
-
1 point
-
sent!1 point
-
1 point