


CloseTheBlastDoor
-
Posts
309 -
Joined
-
Last visited
-
Days Won
4
About CloseTheBlastDoor

Recent Profile Visitors
2,483 profile views


-
 CloseTheBlastDoor started following TKTalkie v3 Released! and My ANH Stormtrooper Build Thread - APPROVED 6/15/26
 -
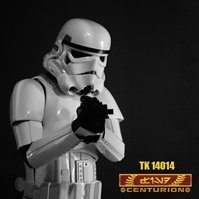
TK ANH Stunt by CloseTheBlastDoor
CloseTheBlastDoor replied to CloseTheBlastDoor's topic in ANH Build Threads
Hmm... glad I have some choices! @gmrhodes13, thanks for all the links! Looks like folks really like Nomex except for the hand plate attachment issues (sounds like E-6000 with latex plates is the way to go). @shashachu Yeah, you're right that HD seems to only have the ridged ones (and not at the fingertips). I do still have my plastic hand guards from the WTF kit, but I would have to trim them down and add straps. I'm thinking I can probably get the Nomex gloves by tomorrow, then see if the WTF handplates can work for all FIVE of my troops this weekend! If I'm brave enough, I might try to cut the latex handplates off the old pair and put them on the new ones before the next troop this Friday. @shashachu looks like we don't have any troops together this weekend -
TK ANH Stunt by CloseTheBlastDoor
CloseTheBlastDoor replied to CloseTheBlastDoor's topic in ANH Build Threads
Wow, it's been a while! I have enjoyed trooping, and it's gonna get busy this weekend! One thing I'd like to change is the gloves. I have the latex rubber gloves from here: https://trooperbay.com/product/accurate-trooper-black-latex-gloves-stormtrooper-shadowtrooper/ They are obviously not breathable, so I also have separate liners when I wear them. This setup has been a pain, comfort and dexterity-wise. I'd like to change the gloves out for something more porous and comfortable, as well as something that allows me to use/feel my fingertips on things like buttons for my voice changer. And I guess I'd have to buy new hand guards, as I don't think the ones I have are going to come off (super glued). Any suggestions for both gloves and guards? -
Sent!
-
TK ANH Stunt by CloseTheBlastDoor
CloseTheBlastDoor replied to CloseTheBlastDoor's topic in ANH Build Threads
Great, thanks! -
TK ANH Stunt by CloseTheBlastDoor
CloseTheBlastDoor replied to CloseTheBlastDoor's topic in ANH Build Threads
I see lots of Devcon products. Are we talking about the clear epoxy, the cream plastic welder, or something else? -
TK ANH Stunt by CloseTheBlastDoor
CloseTheBlastDoor replied to CloseTheBlastDoor's topic in ANH Build Threads
While basking in the glory of Centurion approval, I'm doing a little follow-up on the process. While I was making adjustments to the sniper plate, I noticed that the shin is starting to crack in a high stress area. Should I use the T-shirt and Super Glue method to put a stop to this, and should I try removing some of the return edge? Or something else? -
Request your Centurion Certificate here:
CloseTheBlastDoor replied to justjoseph63's topic in Request Centurion Status
1. First Name: Hanson 2. Last name: Quan 3. 501st ID (TK number): 47826 4. Paper size: Letter 5. The name of the DO that did your final approval: Mario Thanks to all of you! Here you go Centurion. https://www.whitearmor.net/eib/certificates/47826-centurion.png -
WOO, THANKS!!!!! YOU MADE MY DAY!!! Thanks for all of the time you spent with me, as well as your patience!
-
Sure, is this better? Also here, just in case: https://drive.google.com/file/d/17dh1paCUZwmg6lr-SDl55DDqqJ_tNa0_/view?usp=sharing
-
I put this in GDrive here, too: https://drive.google.com/file/d/1ZTnYzgsdKkQUNNdBd-98lShEhc7F97wC/view?usp=sharing
-
Wow, super weird. I think there might be something on the Imgur side, as it is still showing in my browser after a refresh. Although maybe my browser is caching it. I went over to Imgur just now, and the image is just not there anymore. I uploaded again and fixed the post (hopefully). Can you see it now, @shashachu and @gmrhodes13?
-
OK, I had to glue and reglue this twice to get it right (I hope). The front part of the plate is about 5mm higher than it was before. I also had to Dremel down a piece of plexiglas I had that was backing the front part of it so it was thinner. It was just getting in the way. Here it is:
-
Thanks, I'm on it! It's definitely E-6000. Trying again. As you know, it will take a while for the glue to cure. BTW I'm still going to have the situation where the plate edge doesn't come all the way up to the shin edge. That's because the ridge on the shin is preventing the plate from going any higher. I hope this is OK.
-
Thanks, Mario. BTW I updated the full body photos per the initial feedback. My wife, who doesn't know anything about this, took them with my verbal direction. Hope they're OK. Wow, how does this happen? I think those photos are only a few months apart, could it have moved? I'll try and see what to do here. Getting the fit right for this was very difficult, and looking at it today, the inner ridge (that you dashed in red) is lined up right with the ridge in the shin piece (that you dashed in blue). So maybe it was always like this, but the camera angle was hiding it?
-
Thanks @gmrhodes13 and @TKSpartan for your initial feedback. A few quick responses: I have fixed the missing image, showing that the hand plates are flexible latex. For the backs of the shins it looks like I just didn't close them as well. I had cut them down a bit per EIB feedback. I just now did a test fit with just the shins, and they do close down to the point where there is a gap similar to or smaller than what was in the EIB photos. Looks like the left forearm was riding up on the glove. For the other dressing issues, let me see if I can get someone in the know to take photos again. That was what took so long, even though I had this all done 1.5 months ago !
