Leaderboard


Popular Content
Showing content with the highest reputation on 03/12/2021 in Posts
-
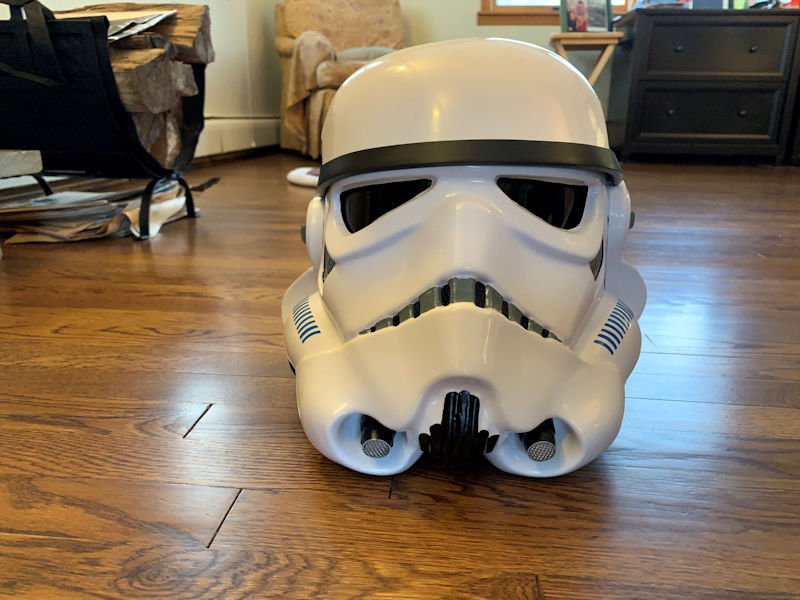
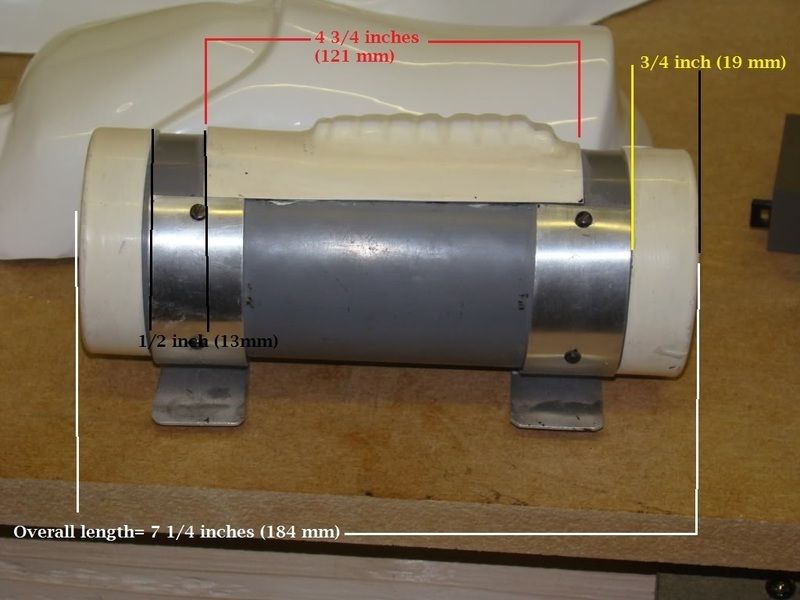
Today‘s update is more of a rework. As you may remember, I worried how wobbly the bacta canister was attached to the belt with just a blank wire. Not only this, the wire was also visible on both end caps and on the canister‘s rear side it even got magnified by the liquid. Searched for a more stable and less noticeable way – and played with the idea to illuminate the bacta like seen in ESB… The only way to hide the light source was to place it inside the upper cap, with the LED facing down towards the liquid. Also wanted to hide the switch, for what the bottom side of the lower cap seemed ideal. But how to run the wires between both end caps without seeing them? If I can‘t hide them, maybe I can use them… Not only that, the surprisingly stable wires (hidden on the rear side) are perfect for attaching this bacta canister to the helmet. I simply ran the 'utility belt' between the acrylic tube and the wires and ended up with a very tight fit. No more wobbling. Next update will show the final project and covers more helmet personalization plus comprehensive weathering...4 points
-
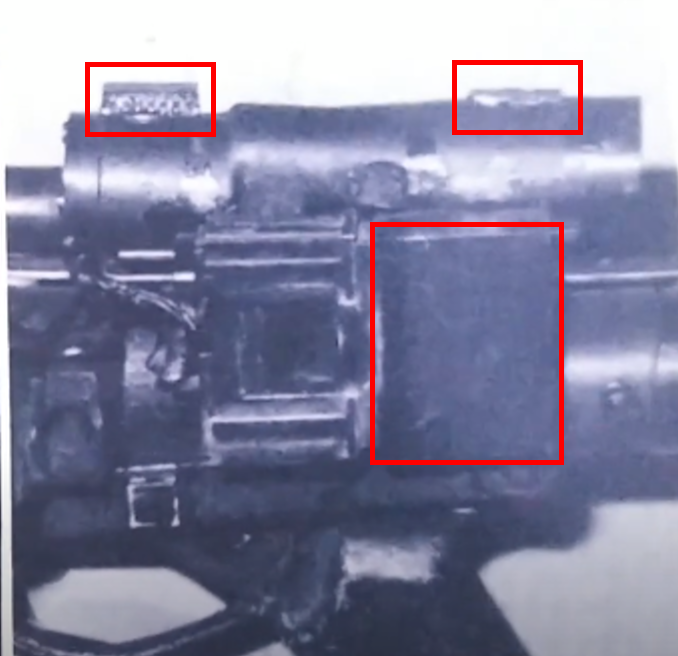
Had some time today and thought I'd try to replicate these new-found greeblies for my Hero blaster.... one down, 2 to go. I think this may be part of the fuel assembly for a 1960 Bristol 406 (just kidding, I have no idea). Not sure if I'm going to permanently attach them yet but I am making silicone molds in case anyone wants free copies.3 points
-
Attention Troopers!! please welcome to the ranks Centurion # 497 - Jakob (Yacorp) of the German Garrison. Congratulations sir! Well, Now we are in the final stretch of making this happen only 3 spots to go !!2 points
-
You are the MAN! Nice detective work, Mathias!!2 points
-
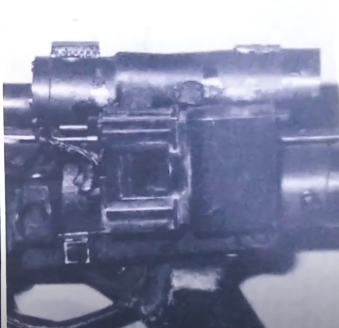
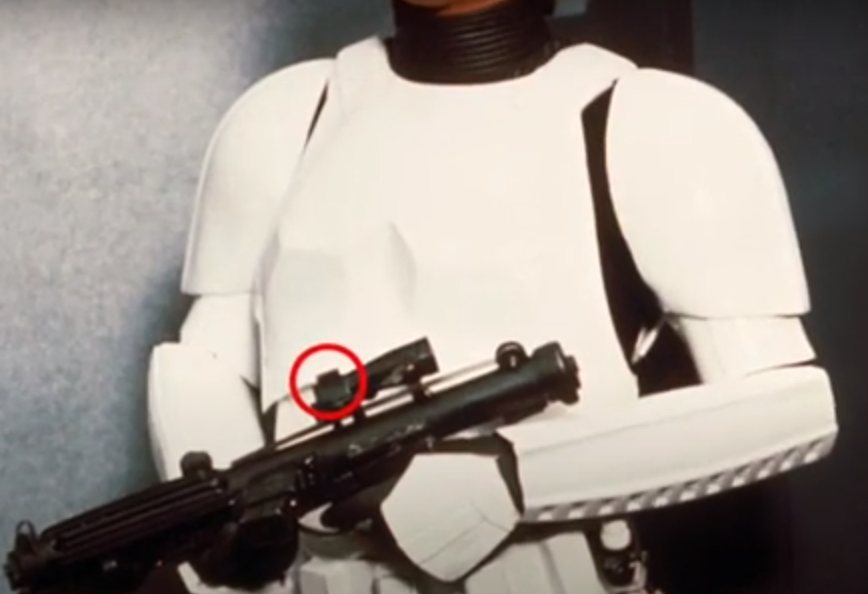
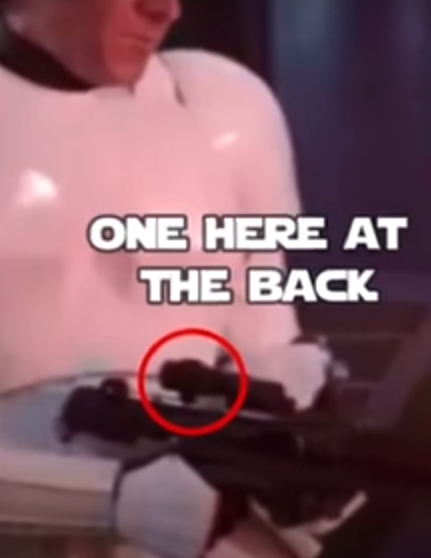
Not sure we will ever find out what the exact item that I replicated is... heck, it could be anything, but since Mathias found the top part (WOO HOO) and the one above the trigger guard (first photo) looks to be just a square button it would be easy to copy. Who would decide on approval for this, Andrew? In studying some of the photos, I was thinking they might have been only on the Sterlings, but it appears that the Sandy has a Bapty with them.2 points
-
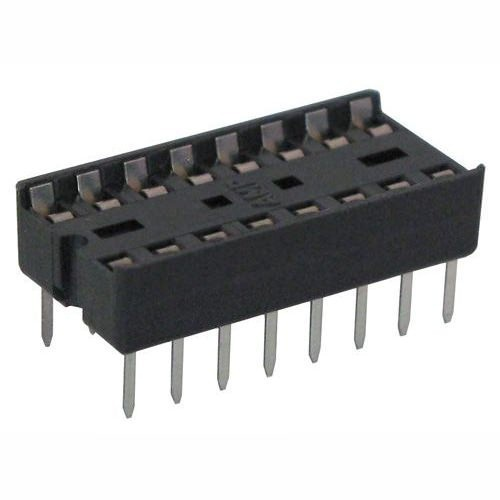
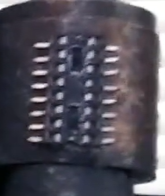
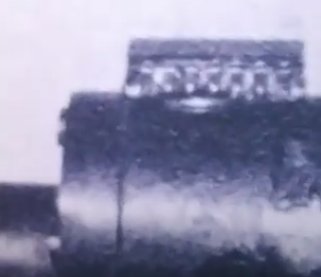
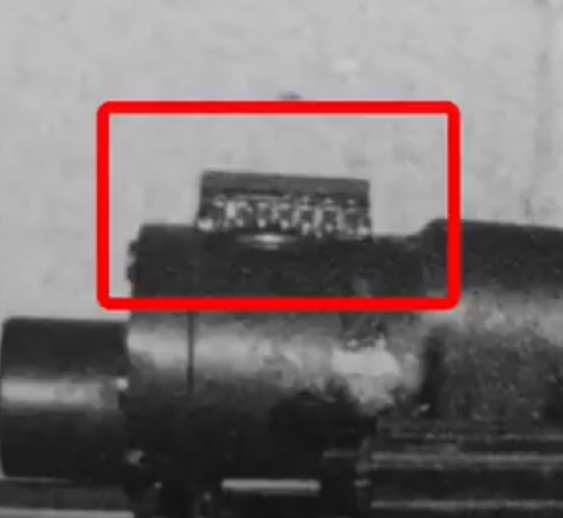
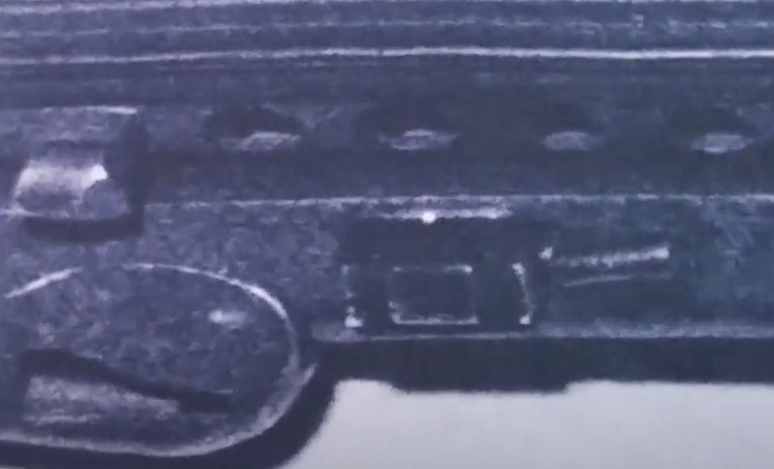
This IC socket looks a whole lot like this with the pins spread out to the sides.
 2 points
 -
Do you guys work for Scotland Yard, the FBI or military intelligence?!? Your ability to scour these fuzzy images and deduce these details is incredible!2 points
-
2 points
-
Pretty exciting when new things are talked about.Nice work Joseph on your detail upgrade, of course after approval any one can add these greebies to their blasters if they wish. As we go for a standardized look, not sure if we would add then to the CRL's unless we can get better information on what some of the parts are, but that is a discussion we can certainly have at some point.2 points
-
OP (MV) Post #44: The Empire Strikes Back (A turning tide in my life) Boy has it been a month, and a year, for that matter. None of us need reminding of the global crisis that has impacted nearly each and every one of us, and I know there's still many more months of recovery ahead, but I wanted to share the recent developments with my personal situation. Many of you will recall that a little over half a year ago I had to put my first TK build on hold due to my family dropping to a single income, and intended to sell my armor. Due to frugalness through a budget deficit, and the extreme generosity of both family and FISD members, I was able to avoid doing so, and VERY slowly worked on my helmet and TD. Almost two months ago my boss at work gave notice of his resignation, opening an opportunity we thought might be an answer to prayer. I had actually been looking for new employment on and off for a couple years, and more adamantly throughout the pandemic, in an effort to better support my family. Providentially, last week I was formally awarded the promotion, along with the duties I had already adopted a month prior. In fact, for the past five months I had already been pulling double-duty at work after one of the three of us on our team resigned, so really I've had triple the workload for the past month. Needless to say there has been no time for my build for many weeks, though back in late January I did make some progress on helmet painting, which will be included in my next build update. Another equally-surprising, yet welcome, blessing has been that two days ago (March 9, 2021) all of the employees at our College had the opportunity to receive our first dose of the Moderna vaccine. I understand that there are differing opinions on such things, but this has been a long-awaited sign of hope and step towards normalcy, for which I am very grateful. Time has definitely been on my mind lately. My BBB day was a year ago last week. One year of domestic and international distress and turmoil. New job duties a month ago, along with the title a week ago. My daughter turns two years old less than a month from now (she was seven months old when I began this journey) and will have her first birthday party. In fact, speaking of my daughter, she recently began identifying and speaking letter names, and guess what two of her first three letters were? T is for Trevor, our dog, and K is for kitty. When I took the below photo a month ago she also knew C, her first initial, but now she also knows M and D for mama and dada, and G for her cousin's name. For those of you that forgot that I periodically include non-build content in my thread, apologies for the rude awakening. =) I do try to keep everything related to my 501st journey in some way, and hopefully some of you will appreciate knowing where I've been the past two months. I promise to get back to my build in the near future; I'm anxious to hear some feedback on helmet paint issues I'm experiencing. Until next time, keep on trooping. MV2 points
-
E-11 Previously Unknown Prop Details Ran across this video and was amazed, I must have looked at these images 1,000's of times but yet missed these. "This video will be about a hidden detail on the E-11 Stormtrooper Rifle, hitherto unknown for some 44 years(?). I came across these photos during my career in prop hire and I want to share this detail with you all" Joe's Props and Artifacts Tour
 1 point
 -
I've done all the research and bought a WTF armor set straight from Walt. I also commissioned the helmet build from him. I have rigged the helmet with the iComm @ukswrathhovi speakers and amp, bluetooth transmitters and a Aker 1506 amp to go in the chest plate. I tried starting the thermal detonator and am already screwing that up. I have the gloves and hand armor (flex stuff), but haven't started them yet. I am pretty sure I have all the parts and paints I need (no canvas belt yet). Hellhounds e-11 on order. Got my soft goods and boots ready to go. Lots of e-6000 and a face mask and gloves. I'm really good with electronics, computer builds, building sheds, landscaping, and other handy stuff. This build scares me. I'm in the EST time zone. Any help would be very much appreciated.

 1 point
 -
Hi folks, It’s been a few years since my last blaster build, ( https://www.whitearmor.net/forum/topic/42658-cableguys-doopydoos-feat-t-jay-kit-anh-e-11-wip/ ) but I’m BACK!! This time, I’m building a new kit to the market from Marc at TroopaCoola. Marc has sourced most of the original parts from the Sterling L2A3 and is now making high quality resin moulds. As per the following video, the barrel is a nicely machined metal barrel, with the other parts made from resin. Unboxing video; Making the unboxing video: As the video explains, the parts included were very well presented and relevant parts were bagged together. For example, the mag, mag well, mag release button etc were all in a small bag. The various parts of the Hengstler counter were in a separate bag, etc etc. Compared with “another” popular resin kit, many parts are much better presented, meaning that there are more separated parts and many that are already hollowed out, for example. I’ve now started with sanding and preparing the parts. Here’s an update on the progress so far; Here’s a random selection of photos that accompanied the videos; More to come soon. :-)1 point
-
Just wanted to share my TLJ Executioner final approval pics and Facebook build page Armor is Jim Tripon Fiberglass kit Gaskets: Geeky Pink Gaskets Boots & Gloves: Imperial Boots Speaker / Voice: RomFX Cooling System: Ukswrath on Etsy Armor Paint by: Mad Scientist Workshop / Auto Paint: Fiat 249 Axe: 3D printed / Diversity Props Pistol and F-11: Heston 3D Solutions Belt: Trooper Bay Build and Submission Pics here: https://www.facebook.com/TK419701 point
-
It will be interesting to see if he'd sell a kit that's compatible with Tino's completion kit. I can't wait till this is available for the public!1 point
-
I will have to check mine next time its put on. Never noticed this detail.1 point
-
Hi Cory, looks good, take in account the measures Glen pointed and consider the following reference images to place the control panel : The control panel should be positioned so that the controls/round washer style detail can be seen . A common issue we see is that sometimes the disc is facing upwards (like the example photo) . Reference Image Reference Image Example1 point
-
Congratulations trooper and welcome to the EI ranks1 point
-
You can find once you start trooping that you may need to make some adjustments, just for comfort and movement1 point
-
Congratulations Jakob... willkommen to Centurion ranks. Finish line is very closer...only 3 spots...1 point
-
Looking good.1 point
-
Just realized I have the clips in the wrong place. Need to move them flush to the side caps.1 point
-
I'm really digging this discussion and am definitely going to save it with my E-11 resources. Once Joseph has his kits ready I'll definitely be hopping on that train.1 point
-
So happy to have made it into the first five hundred centurions of the five hundred-first I'll do some more tweaking on those drop-boxes :-)1 point
-
It's quite likely that both 14 and 16 pin sockets were used. I don't think the prop makers cared about which was which at all.1 point
-
my goodness !! amazing !!1 point
-
You are 100% correct, sir! I just ordered 20 of the 14 pin style. Heck, at 18 cents each with free shipping even if they don't get approved I haven't lost much, lol.1 point
-
I actually thought it was a 14 pin chip socket. Even ordered them from Amazon. Now it looks like a 16 pin from the top picture. But the side looks to be 14. I know a few Sandtroopers who have installed the 14 pins on their replicas. Here was what I looked up on Amazon: BokWin 2.54mm Pitch 7.6mm Row Pitch 2 Row 14 Flat Pins Chip DIP IC Socket Adaptor 25Pcs Here’s the 16 pin to look up on Amazon: uxcell 10pcs 2.54mm Pitch 7.6mm Row Pitch 2 Row 16 Flat Pins Soldering DIP IC Chip Socket Adaptor1 point
-
Hi! Life happened and still caught up on work deadlines... I haven't got the time to squeeze in armor work...and sleep.. Here's to hoping I could get free time soon.1 point
-
Ooh La La!!!! lights!!!!! This turned out awesome! Tino , you are the MacGyver of prop making!1 point
-
No, just glossy white.1 point
-
Congrats Guillermo! Well done!1 point
-
I am very happy my armor was approved for EIB. Mainly due to the massive help from those of you who have followed me. This weekend I will make the recommended adjustments to have a chance at centurion.1 point
-
Thank you for the reference! It does look a lot brighter.1 point
-
Any particular paint you used?1 point
-
It was on the Move Along E11 as well. Front and back. Front looks doubled up and the back looks like a single stack.1 point
-
Hi Jonathan, Thanks for your application and the quick fix with the hovi tips. CRL and EIB Application Requirements All required photos are now in and, after review, we are pleased to welcome you to Expert Infantry rank. On behalf of the DO team and myself, many congratulations! Other-Armor Fit/Assembly In this area we review observations made by your fellow troopers and the DO team. Some observations may lead to suggestions to improve the overall look of your armor. Note that we consider both text (CRL) and pictures (screen caps/reference images) when reviewing submissions Starting from the top, your right shoulder strap is floating a bit high compared to the left, which is sitting nice and flat. You might be able to correct it by shifting the white elastic closer to the ends of your shoulder straps, or a quick heat bath to increase the curve could help as well. A tiny detail for sure, but these little details really improve the look of your armor. Reference Images: As was already pointed out, the look of your blaster could be improved. First, the Hengslter counter on your blaster is a bit far back and low compared to screen-used examples (the green box indicates the ideal position). You mentioned that the entire blaster is a resin cast so it wouldn't be easy to correct, but we felt it was worth mentioning. Next, it might be partly reflections, but it looks like the grip of your blaster has some metal weathering on it. As the real grips were black plastic, they should not have any weathering. This should be a very quick fix with some black spray paint. Reference Images: Centurion Requirements In this section we prepare you for Centurion. More photos may be requested in the future that allow us to make better decisions on possible adjustments. If there are any areas of concern they will be discussed here. Because Centurion photos show much more detail than EIB, items to pertaining to Centurion might be seen there and not here. We try to point out all that we can from what is seen, but the final accuracy is the responsibility of the trooper. The L3 CRL states: There should be a minimal gap between the shoulder armor and the chest/back plates. Your shoulder bells actually look quite good, but we still think the positioning could be improved to reduce the gap to a minimum. I also noticed that your shoulder bells are floating a bit high above your actual shoulders, as indicated by the arrow in the front photo. You should make sure that you have trimmed off all of the lower return edge on the shoulder bells, and you might also need to adjust the strapping holding the bells on. It could even simply be the way you're holding your arms and shoulders in the photos. This isn't an area we're extremely picky about, but we do think there's room for improvement. Reference Images: Finally, the gaps at the bottom of the rear thigh armor should be filled with ABS paste or backed with a square of ABS so that the black doesn't show through. This isn't specifically called out in the CRL text, but this is shown in reference images. Reference Image: And that's it! Just a couple small fixes and you should be on your way to Centurion. In the meantime, on behalf of myself and the rest of the DO team, please accept our congratulations on reaching the rank of EIB!1 point
-
Thankyou Sir.1 point
-
Nice work Joseph1 point
-
It seems the trooper bay is whiter then Anovos. Kind of hard to tell the difference in photo but in person I can see it.1 point
-
Hi David, I think this thread could be helpful , and about the color matching, I'm not familiar with Trooper Bay's ABS white, but when I had that kind of issue when making some Anovos armor repair, I have used some white paint and it matched fine. let see if someone else can give a better tip on this. good luck1 point
-
Congratulations Guillermo and Greg, well done troopers and welcome to Centurion rank. Sent from my iPhone using Tapatalk1 point
-
Justin, the roster has been updated and congratulations brother. Let me know when you get the nod for the EIB and I will update again. Jeff1 point
-
Received my approval today, 3/9/21 and submitted for EIB!1 point
-
Received approval from my GML today! WOOT, finally!1 point
-
Here you go T! [emoji846] Sent from my SM-G950F using Tapatalk1 point
-
Well Tino, the term "Blown away" is not strong enough for the remarkable job you have done on this project. I am sure there will be plenty of members inspired by your build and ingenuity with this thread. Personally I am above and beyond impressed by your workmanship and attention to details.1 point
-
Hello and welcome to the forum, best way to get feedback is posting a build thread like you have. There are lots of builds to follow as well as a full gallery of references, when in doubt ask. Some TD references and a thread here Good luck with the build
 1 point
 -
If anyone is curious what my other bins are like, here are some pics: Clone Trooper - 327th Star Corps: Lights: Swag box with lights: Jedi (tubes store saber blades): Rodian mask and hands (for a Rodian Jedi): Endor Rebel Trooper (this one is just decals and weathering a green case):1 point
-
Hi all, I am excited to say that last week I received my TFA (First Order Stormtrooper) kit, and this weekend I began trimming pieces and getting things moving along (pun intended ). Over two days this weekend, I rough trimmed everything except for the ammo boxes, pouch covers, etc. because my hand simply couldn't stand another minute of trimming with shears after an all day effort Friday. Saturday I went back and completed trimming with a barrel sander on my shiny new dremel on the yoke pieces, back plate, kidney plate, shoulder bells, biceps, thighs, and calves. So that leaves me with just a few more of the main pieces and all of the little stuff left to trim up. I should be able to complete that stuff throughout the week nights or the weekend after the holiday. In going through everything, I found that the AB plate, chest plate, and some of the calf or thigh pieces had an "orange peel" on them from the pull which I wasn't too thrilled about since they will have to be sanded or filled with bondo and sanded to repair, but it's likely I would have to do that on everything anyway since I plan to have an auto body shop do the paint job on my kit for me to match the bucket. More to come soon!1 point