Leaderboard


Popular Content
Showing content with the highest reputation on 02/18/2021 in Posts
-
Hello everyone, and welcome to my science experiment! A long while back, when I was deep in the model-making side of the internet, I remember hearing that truck bed liner could be used to strengthen Styrene. Many years later, when building my armor, for some reason this stuck with me. I winded up spraying some on some of my spare model-making styrene (HIPS .5mm) and testing it out. After a bit of bending, twisting and folding, there was not a single crack. Compared to an untreated piece it cracked 10 seconds in. So naturally I decided to spray the inside of my armor as a form of extra protection. It's been a long while since i did this, and I wanted to try it again to see if it really did work. Because It still confuses me. So this is that test: Here are two identical pieces of the same styrene as before: This is the spray: I sprayed one piece, but left the other untreated. then left to dry To test their crackability, I folded each of them like this: Then I took a small hammer and tried to totally fold that edge Here are the results: This seems obvious to me, but the bed liner does seem to have a a crack-resistance to it (although not 100% fool proof) And in case you're wondering what the inside of my armor looks like now: Pretty dang cool if you ask me. I'm not asking you to spray your armor, but I would love for those of you with access to other types and thicknesses of styrene like ABS to test them out. I would love to see the results and how they differ. And wether or not spraying truck bedliner is the new META4 points
-
Hey troopers, I think we all know that this very forum is a hot bed of experienced troopers and helpful information. Years of experience and TK knowledge. To that end, here are some of the key features, (sometimes subtle, sometimes obvious), that I feel really make an iconic ANH Stunt Stormtrooper, all in a simple, easy to digest video. Topics include; -brow height -eye trimming -ear trimming -vocoder painting styles -hovi tips ...and more Enjoy the video, and please feel to ask any questions or comment. :-)3 points
-
Very cool. I saw some of that rubber paint coating to try but think it would come off rather easy so this is certainly better to try. Thanks for sharing!3 points
-
Totally, don't worry about perfect. Get 'em good enough for 501st approval and then tweak as you have time. It is not uncommon to continually tweak your suit after approval. Whatever you do, don't give up! There are always ways to fix these.2 points
-
I'm not aware of anyone making them but if your interested I made a DIY HOW TO thread a few years ago that's still relevant. NOTE: You may have to search around for suppliers, not all the ones I suggested continue to carry the items. Most links are now updated2 points
-
We should pin this somewhere2 points
-
Sprayed the inside of my helmet black for the same reason as Brien (@Harbinger) with simple spray paint. I totally love it but it got some light wear and tear during the 40+ troops made with it. Guessing that won't happen with Truck Bed Liner.2 points
-
Hello. My Name is Ross Walmsley and i am from the Isle of Wight in England. Christopher Pearson is an active member on this forum and suggested i pop up a post to see if i can become an approved supplier by your selves . I will start from the beginning.. I joined the UK Garrison in 2009 trooping with a FX TK kit and SDS bucket. Our squad (The Vectis Remnant Squad) were given an old X-34 land speeder that the UKG had owned for several years. We restored this and i got my first taste of prop building. This has become more and more of an obsession over the years and we have built a pod racer, Tatooine Backdrop and a brand new X-34 landspeeder for Celebration last year and various other items. About 5 years ago i started experimenting with vac forming in an old oven and made my son a mini biker scout kit. This is when we decided to make a few Sandtroopers to go along with our speeder. Me and a friend bought a second hand home built vac former and started to experiment and modify the machine. This is when the TK/ TD started.. We had an old overcast ROTJ TK kit that was in a pretty bad way. very soft pulls and mould lines on the shin rear, thigh rears, biceps and forearm rear. We used a heat gun to try and get a bit of shape back into the kit and held some parts in wooden frames to support it. coating several times in gel coat we build up a workable layer that we could later grind back and shape. we continued with fibreglass and then backfilled with bonding to stabilise the bucks. When this was dry we broke of the outer plastic and were left with our rough copies. we then attacked with grinders, dremels etc to rework the lost details and remove the mould lines etc. I am a few years into this now and still have plenty of mods to do on the kit as i want to get it to the best i can. This only started out to supply a few members of the Vectis Remnant squad but soon started to spread. I began selling to UKG members and word of mouth took over. I set up a Facebook page "RWA Creations" at the start of this year as i decided to start sculpting various other armour etc. there are plenty of pics in my albums to take a look at. I seem to have built up a good reputation as being self employed for over 20 years i know how to run a business well. Below i will pop up some photos and annotate with my adjustments.. Helmet, originally re shaped, re defined frown, deepened tears traps etc. recently completely reworked as this photo. more depth to traps and tears etc, sharper back cap base, more height to back cap. eye bump. sharpen vocoder and surrounding areas.. Ab. Sharpened all details. added return edges. letter box to centre section. created line to belt zone. WIP... re shaped by pulling sides in, moving lower line below the belt off centre and tidying up more.. Belt, knee ammo, drop boxes, buttons etc. All made from wood. Forearms. Originally had one left one with mould lines on rear. copied split and reversed to get a pair. these were still a bit small and awkward so i made a longer set as seen below. I need to remake these again as they require more shape. Here is my 1mm kit i made last year. this allows me to get in vehicles and on the floor etc. proper stunt suit I have also made bucks for Shadow Guard, Tie Pilot Armour and working on various other items cheers for now1 point
-
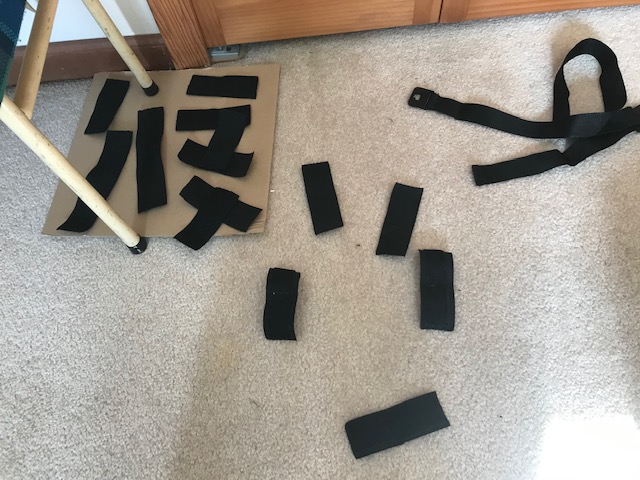
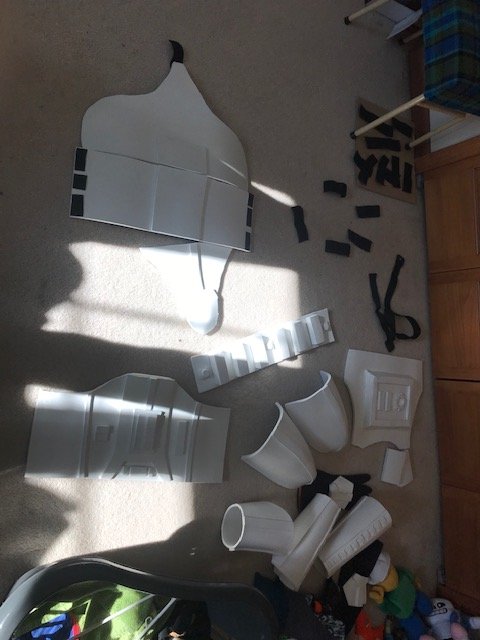
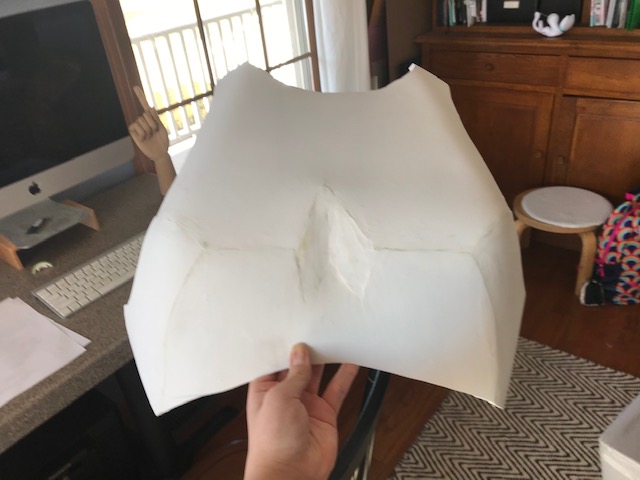
I have been making a stormtrooper out of EVA foam. here are pics plastidiped thighs velcro straps (still need to sew) everything else wip chest I am about 70% done, I still need shins and thermal detonator.
 1 point
 -
Alright, so before I get started I am going to mention that this HOWTO is being done on the BS captain cardinal helmet. If you are reading this from the future and BS has a standard FO helmet on shelves, I would assume that this HOWTO would still apply, assuming it uses the same molds/form as the captain cardinal helmet. EDIT: There is now a white version of the hasbro helmet. It does use the same molds, and this howto will still be an accurate guide on how to modify it. I initially started this thread when I first saw the helmets promotional material to discuss it's accuracy, but I will be summing it up here. While this helmet is extremely good out of the box, it has a few inaccuracies to be corrected for higher level approval (presumably, no one has used this helmet as of yet for an approved build). They are as follows: The tube stripes are not hollow, there is 2 speaker slots on the rear of the helmet, the channel/groove on the chin of the helmet goes around the aerator instead of through it, and there is a missing groove/channel that goes from corner to corner of the lower traps. My plans for this thread are to correct all of these issues, as well as making a few adjustments to some of the parts of the helmet (like the teeth) that have some very small gaps that bother me personally. I will also be doing a total repaint on this helmet to convert it to a first order executioner! If one only wishes to correct the speakers, a repaint of the helmet would not be necessary. However for this conversion we are going to cut several of the pieces, fill in some groves with bondo (or a similar fill), and more. This would require a repaint anyways, regardless of what the base color for the plastic is. If you are planning on using this helmet for a full suit of armor, I would also recommend a repaint so that the colors are able to match exactly. So on with the tutorial! Here is what I am using for this build (will be updated as the build progresses) 1 Black Series FO helmet Small Philips screwdriver A flathead screwdriver, butter knife, or equivalent as a wedge Wire-cutters or a strong pair of scissors 200-250 grit sandpaper Exacto Knife Dremel kit E-6000 or equivalent Super Glue or equivalent Light Grey Primer (spray) White paint (spray) Black paint (spray) matte finish clear coat (spray) 1k or 2k Gloss clear coat (up to personal preference) Step 1: Disassembling the Helmet I initially was not going to do a detailed breakdown on this process, but it proves to actually be quite difficult compared to what I imagined. Remove the strapping from the helmet. I will be replacing this with padding later, as I find it uncomfortable, but it will still be needed to be removed in order to take this apart. Next, remover the battery cover (which is also the entire lower edge of the helmet) and unscrew all of the screws along this edge, as well as all of the screws on the inside. I recommend keeping track of which screws go where for the final reassembly later. Once this is done the small faceplate, rubber eye ring, and the black base should come off rather easily. The black base has two electrical wires that are still attaching it to the rest of the helmet, make sure there is no battery inserted in the battery case, and then cut the wires with a wire cutter or scissors. With a small push the aerator should also slide out of place from the faceplate. Congrats, that was the easiest part of this whole build. Everything will get significantly harder from here. The next step is to remove the inner grey sections from the helmet. You may have noticed that despite taking out the screws earlier, these sections have still held in place, they are secured through a few different methods still. Namely: glue and plastic tabs. For ease of explaining the next few steps, I made a quick diagram above, and numbered the parts 1-5. Section 1 is at the back of the helmet, and will be the first to be removed. 1 has two tabs, one on each side, that join with 2 and 3 (the sections by the ears). It also has five tabs deep in the helmet that connect 1 to 4 (the cap at the top). You will be able to easily unhook the first two tabs at the sides, the others you are unable to reach. Once the first two are unhooked, place one hand at the top of section 1 where it meets 4, and apply lots of pressure, this will push the tabs to an ideal position for removal; while doing this, take your other hand and pull section 1 out from the bottom. This will take a lot of force, don't worry, nothing should break here. The inside should now look like this: Sections 2 and 3 have two tabs at their top, securing them to the cap, section 4. There is also a couple spots of glue on their sides that attach them to section 5, the face plate. Take a small butter knife, screwdriver, or other item to use as a wedge, and slip it into the cracks where the glue is. Mess around until you think the glue is separated. Then repeat what you did for the first plate, and remove these two sections.It should now look like this: The faceplate (section 5) should be easy to remove, and the lens will fall out with it. The cap (section 4) will take some maneuvering as there are a few tabs holding it in place. Once it is removed, the two clip greeblies at the top of the helmet are no longer held in place and they may be removed also. Now we will separate the two large outer sections of the helmet, the faceplate and the cap/back. There's 6 screws total, four at the top and 2 at the rear. At the front where the two meet, there are three tabs glued in place. They are not very hard to bend back and remove the glue with your fingers. her's a better look at them: You can set the cap/rear aside as the only parts left to take apart are on the faceplate. On the right side you will see there is some electrical components, take out the screws and throw them away, however save the small red button/greblie. This also is the same for the electrical components on the black base. Make sure that you follow any local recycling and garbage guidelines/proper safety precautions when throwing away electronic components!!! You will also see there are two black strips of plastic underneath the tube stripes. They are glued in place, and easy to remove. These are also to be thrown out, as the tube stripes should be fully hollow. Behind the tube stripes on each side is a single screw and spacer. This holds on the small trap, unscrew them and remember to keep these small parts! Finally there's only one thing left to remove, the black sections of the face! this was the trickiest part to figure out, but it should be fairly easy for you if you follow these steps exactly: Use whatever you used for a wedge, and wedge it underneath the tear area (beneath the eye) Push the tear forwards and out, this should pop out the small tab behind it. Repeat for the other side. There is a similar but much longer tab at the top of the faceplate, where the large traps are. Theoretically this should also be able to be pushed out like the ones at the tears, but I couldn't get it to move far enough. So I took a small knife and cut the tab in half (only on one side). I was able to pop the tab out after that. The other side at this point slid out really easily, and the whole large piece can be set aside. Finally there is one last small part on the frown, with some jiggling this comes off easy also. I'm open to suggestions on this part: This is the back of the aerator, it seems the metal part was cast into a hole of the plastic, or jammed in there by a machine. I have tries hammering this out, but because of the shape it can't be done on a vice. I tried without it, but it was putting some strain on the plastic, and only making dents on the metal. I think i might have to drill next to it, but I'm unsure if thats the best bet. Any suggestions would be extremely helpful, as masking it off would be a pain in the butt. And thats it for the dissasembly!!!!! Prepping the helmet for modification and paint Take the four large red pieces, and sand them down using 200-250 grit sandpaper. (I used 150 because thats what I had laying around, but 200-250 would be preferred). You could argue that this is overkill, but I prefer to have a non-slick surface when applying primer, paint, and gloss. Next, in a well ventilated area and with a mask on, spray these parts with the light grey primer, as well as the red greblies and the aerator (once I figure out how to disassemble it). I did 3-4 light coats to ensure that all of the ups and downs and details of the helmet were covered. Feel free to do more, but remember there will be more coats applied later as the modifications are made. I also did one coat on the inside, so it won't be bright red when this is all finished. I would love to continue this post, however the next steps will be some of the major modifications on the helmet. I am still not finished with them yet, and will continue with it later this evening. Expect this thread to be updated daily-ish from now on until it's completion! Until then, -Eric1 point
-
Name: Guillermo Chicón Lorente Username: Starkiller_2021 TKID: TK-22021 Garrison: Spanish Garrison Mandatory Information Armor = Armour Factory Props Helmet= Armour Factory Props Blaster= Armour Factory Props Optional Height = 1,82 m (5 ft. 11") Weight = 85 kg (187 lbs) Boots = Armour Factory Props Canvas belt = Armour Factory Props Hand Plates = Armour Factory Props Electronics= None Neck Seal = Armour Factory Props Holster = Armour Factory Props Blaster = Armour Factory Props FULL BODY PHOTOS Full body front and back Full body sides Side details Action photo HELMET PHOTOS Front and back Sides Hovi detail and lens (from the inside, backlit) ARMOUR DETAILS Abdomen close-up Cod and posterior plate connections Interior strapping Wrist opening Sniper plate detail Thigh ammo detail (outside) Thigh ammo detail (inside) ACCESSORIES Neck seal Thermal detonator Holster Belt Boots Gloves BLASTER1 point
-
Correct, most templates and stickers do have a lean that's why it is mentioned before applying them, bit hard to tell from your images if they have a fall but it is only an ideal look1 point
-
gmrhodes you are my hero. what would I do without you thank you very much for the information!1 point
-
I would think they would be fine from the CRL raps/tears and tube stripes shall be decals (with the correct ESB details), Make sure you apply them a pencil with from the cheek, also they should fall from the top at the front . Back //////////////// Front1 point
-
That’s exactly what I did. Then when I was dead certain of where I wanted them positioned at the front, I marked it off on the belt and riveted the elastic to it so it’s not going anywhere and keeps the thighs front and centre. Sent from my iPhone using Tapatalk1 point
-
UPDATE Just suited up, more carefully this time to fix the placement issues. Closed the shoulder gaps Rotated thighs to line up the leg cover strips Made sure TD and belt were straight Lined up the shoulder straps by adding Centurion-style white elastic Gaps in kidney and butt plates I added some padding in the back to straighten the kidney, lined up the tops of the ab and kidney pieces and closed the gaps a bit, however, I simply cannot get them to close any further without losing 20 lbs [emoji20] PS. Still working on the helmet, will update on it as soon as I get the decals1 point
-
Honestly Rodney, there is nothing wrong with what you have. The ones on set were all slightly different, so there is not “one style” that you have aim for. As per the photos I posted above, those were all a little different. Here’s my own sniper knee compared with originals. The sniper knee does not 100% line up with the shin ridge, however, neither do many of the originals. Don’t sweat it just over this part. You’re doing a fantastic job - keep it up. :-). Also, regarding the thigh elastics at the top, just go with the method you prefer. For my first suit, I actually folded over and use some snaps / poppers to allow adjustments if needed. For my latest suit, I glued the loops, like Rob does. As long as you don’t have visible fixings, any of these methods would be okay. :-)1 point
-
I have attached Velcro to it for foam under my shoulder bells! I did not notice any difference between this surface and the surface of the plastic. So take that how you will!1 point
-
Have you tried sticking anything to it? Specifically velcro. Do you get good adhesion to the bed liner? The helmet idea sounds great. But my concern would be whether the velcro would stay. I’m currently considering just lining the entire helmet with the hook side of the Velcro but I know I won’t be able to cover everything. If the bed liner protects, darkens and is able to handle the adhesive from the Velcro, well then I have a winner for sure.1 point
-
Welcome to the FISD Cory, looking forward to your build. Awesome helmet setup btw1 point
-
Only joined this site 2 days ago and already it’s been a massive help. I was on the verge of buying a hero helmet from Original Stormtrooper and put the brakes on immediately after reading some of the threads. After more research, I’ve started my journey to be in the 501st by purchasing my helmet from RS Props. Looking forward to sharing the journey and brown box days with you all, as well as the valuable support and advice. Tim1 point
-
Thanks! How can I find my local Garrison's contact info? I'm an hour outside NYC.1 point
-
You can do this Rodney, you're almost there. We've all been where you're at brother1 point
-
Sprayed mine with just a basic satin black to stop any reflection to be seen through lenses.1 point
-
Great work so far!1 point
-
Cory, I'll echo what the others have said. Check out the build thread of others to get some ideas. There are also some great video on youtube of members building their kits or kits for others. I watched this series a few time when I built mine. https://www.youtube.com/watch?v=onQkQVB3JVw&t=1s Also, don't be afraid to reach out to your Garrison. Most of them have and "armorer" that would more than likely be happy to assist you. I know with COVID armor parties are bit more difficult, but If done with some proper social distancing and mask, you might be able to get a one on one. I know you said you were in the EST, but where are you located geographically? I've built two kits, so I'm not expert, but I'm happy to help as best I can.1 point
-
I did this to the inside of my helmet, more to cut down on light leakage, but totally worth it IMO.1 point
-
Welcome to FISD. Sounds like you are already on your way and many here will offer their help. Research and questions will get your armor ready for service to the Empire. Sent from my iPhone using Tapatalk1 point
-
Hi Cory, welcome to FISD. A good resource for build your armor is to take a look to other's building threads and post a lot of photos here. We are here to help.1 point
-
Hello and welcome to the forum, best way to get feedback is posting a build thread like you have. There are lots of builds to follow as well as a full gallery of references, when in doubt ask. Some TD references and a thread here Good luck with the build
 1 point
 -
Tabs it is! Awesome thnx1 point
-
CRL's are only made if someone builds the costume, there are many variants in the games, we recently saw The Force Unleashed game version TK CRL approved. Currently we have people working on remnant stormtroopers, incinerator and motar, but unless they finish these costumes there will be no CRL. Here is some information on new to the legion costumes and CRL's https://databank.501st.com/databank/Costuming:CRLGuide1 point
-
Ben, Glad to move our conversation from the FB group to here. Please see the very similar question I asked during my 3D Print ROTK Build: https://www.whitearmor.net/forum/topic/49826-the-bigjasonis-rotk-3d-print-build-thread/page/4/ About 2/3 of the way down page 4, we had a discussion about what I was calling "holes." I ended up making full on tabs, but am now replacing these with something way more accurate. Hope this helps.1 point
-
This is very sound advice. I did this to my doopydoos E11 using a fine drill and a finishing nail that I snipped the head and tip off of. A little e6000 everywhere and it’s solid as a rock.1 point
-
Thanks Mario and Tony. You guys have definitely helped a lot. Part of this approval is yours too.1 point
-
Y'know I literally said we should make one of these to Andrew like a week ago. Great timing.1 point
-
Thanks Glen!! As promised I am going to post what I do have done now. Before going into the bondo and paint process, I did manage to finally get that darn aerator out of the surrounding plastic. It was very messy, but an slowly chipping away with an exacto knife did the trick: Bondo And Sanding In order to hide some of the modifications, as well as any crimes you made up to this point in the mod, we will be using my favorite smelling resin: Bondo This stuff is made to repair stuff on cars or something, idk never used it for that. You can find this like everywhere, Walmart, Fleet Farm, Home Depot, Menards, and like any auto shop in existence. Go out sopping and have some fun, collect them all There's lost of different sizes of this stuff, but assuming you didn't slice the helmet in half on accident, any of the smaller sizes will do. Bondo is a 2 part resin, meaning there's the gray playdough like stuff, and this other colored (red, blue, whatever) activator. You will notice you get a lot more of the grey than the colored, and thats because you don't need much of the activator for this to work. SAFTEY NOTICE Don't get this on your skin. It burns real bad, and water makes it worse. Although some people out there seem to have built up an immunity to it, I'd really recommend not trying it out. Instead, wear a pear of rubber or latex gloves; and rather than touching the bondo directly, use pop-sickle sticks/tongue depressors for large amounts and some flat toothpicks for smaller amounts. You may also want to do this in a well ventilated area or with a mask. However as I stated earlier I love the smell so I never do that. I am very much in the minority here. Ok so how do you use this stuff? Well, step one is to prep. Make sure you know exactly where you are applying the bondo: The speaker slots on the black neck ring The seam formed from the previous posts, where we cut and glued the plastic around the aerator any places where you slipped up and cut where you weren't supposed to I recommend doing this in separate batches, it'll take more time but bondo is time sensitive so this will make your life easier. The next part of prep is to figure out what you are mixing on/in. DO NOT USE CARDBOARD. This never works. ever. Instead use a hard surface, like a painters pallet, or a very smooth stone plate or something. If you're cheap like me you can just take the lid off of an old ice cream pale or tupperware container. Get your popsicle sticks ready, its time to mix! Step 2 is to mix and apply Pour out/scoop out some of the grey part onto the mixing surface. It should be approximately enough to cover the entire surface of what you are filling and then some. My rule of thumb is guess what looks to be 1.5 of what you think you need. With bondo it's always ok to have too much! but you have to do this all over again if you have too little. Then, just take a tiny smidge of the activator (the colored stuff) and put it on the grey. You really do not need much at all, it should roughly be proportional to the amount given per the whole container. So just eyeball it. Too little and the bondo won't cure well and you'll have to sand and start over. Too much and you won't have time to apply it. It sounds way scarier than it actually is. You'll be fine Take you sticks or whatever and mix it until the color of the mix is consistent throughout. You're supposed to have about 5 minutes to work with it at this point, but that will vary. Try to avoid making any air-bubbles, but they are almost inevitable. Now with your sticks, apply it to the surface over what you are filling. Spread it around and try to get it how you like, but remember what really matters is what it is filling in, the rest will be sanded in. Special side note for the speaker slots: Since these are fully hollow, take a second stick and cover the back of them, it will make your like way easier. Here's how beautifully messy my application turned out: Step 3: Sanding I recommend starting with a course grit sandpaper and work your way up to a fine one. I used 100 grit for knocking off the large rough patches, 250 for leveling off, and 400 for smoothing it out and matching it to the surface. I also went across the entire surface of the helmet with the 400 grit to get everything to match nice and smooth. Be patient. You may notice there may be some air bubbles you can't get rid of like this: Just go through the process again and you should be fine! Here's what it should look like (including fill ins from mistakes) Priming and Painting PT 1 Put on 2-3 light coats of the grey primer on the helmet pieces that needed bondo/sanding. You may need more or less, you just want enough so the surface is one uniform shade of grey. This is white paint we are going to work with, everything underneath will show if theres not enough primer. Wow so nice and smooth right? Ok so now for the paint. I am using rustoleum's gloss white acrylic automotive enamel. or something like that, I don't actually have it with me at the time of writing this post but I'm pretty sure thats its full name. SPRAY IN LIGHT COATS. This is white paint, everything shows. Any pooling or dripping will take 15 minutes of sanding and 12 more coats to hide. Trust me, if you think you sprayed too little, you sprayed too much. Lots of very light coats from multiple angles of approach will do the trick. I lost count of how many I did, but it was close to 15. This will take a long time (20-ish minutes between coats) so plan accordingly. (but look at the pictures below for results) Also remember to paint the black neck ring also. Do this on a different day or in a different location. even if you are care-full, small particles of the paint will float in the air and wind up on the white coat. This next step is for executioners only, so you may skip to the next post if you're just doing a plain TK. Carefully mask around the border of the black stripe, you may do the whole helmet, but i like to wrap everything else with newspaper and seal it with painter's tape. Then take some matte black paint and spray carefully. This will only need 2-3 coats because black is dark. Duh You may be asking to yourself: "Eric, why are we painting the black stripe before applying the gloss?" The answer is I am impatient, and the gloss was still in amazon's warehouse. Ironically now I have to wait way longer because of my covid encounter and school. Once it is dry remove the paper and tape and you should have something similar to this: Thats all for now. I actually winded up being the klutz that I am and I dropped parts of the helmet. Nothing too bad happened except the area around the aerator cracked bad and has to be completely re-done in the future for me. It'll be a little while until I post the last update, as stated before I am unfortunately in a crunch on availability to work on this. However I'll still be on the boards, and I am working on a fun post coming up that I promised a long while ago regarding spraying the inside of your armor with truck bed liner???!! So go ahead and check that out when my little science experiment drops later this week And with that I'm signing out for tonight1 point
-
So I didn't get as much done today as I would have liked. Apparently, I underestimated the amount of sanding I had before I could spray anything. Additionally, I fiddled around with strapping, made a vocoder file, and started sewing some soft parts for another project. So, by the time I started working, half the day was gone. Fortunately, I did get the prep done on the bucket and was able to lay down my final layer of primer before I do the gold paint trick. I think the vocoder turned out great; I just kind of stuck it to the chin just to make sure it fit well. I'm printing another one tonight at .1 layer height and 40 mm/sec to really catch the detail and ensure I don't have to sand anything on the back side. I'm not sure if there's a "market" for these things, but I'd be happy to start pumping them out if anyone needs one. Also, in these pics, you can see how the eye bump turned out. It doesn't jump straight out at you like an OT helmet, but it's just enough that if you're looking you catch it. I really like it. I tried painting the forearms in the dark and got a little carried away. You can actually see the runs right there on the "bumps" (I'm not sure what they're called). This had to be the worst place possible to get runs, so I'll reassess the situation tomorrow and update you all when these are complete. This is the only thing I have left for the arms, so I want to get them finished ASAP. Speaking of, I put the upper body armor together along with the strapping and ended up with this. I was actually working on this during a break on Friday morning. Though the shoulder straps looked good (not pictured) I really didn't like how stiff they were and how they were fitting in the trapezoid slots (also not pictured). As soon as I got the shoulder bells sitting correctly and took my measurements to install the snaps, I hit up Jeff @11b30b4 and ordered a set of his flexible straps. I'm really looking forward to trying them out and making them an official "uniform item." But, since this project is a 3d print build, I'll keep the originals as a back-up. Also, tomorrow I'm going to print a set with TPU just to see if it can be done. The shoulders look low in this pic because the weight of the shoulder bell is pulling down the strap. However, when I "gear-up," everything fits perfect. I'll do the biceps tomorrow, but right now I'm just having fun walking around the house wearing this. The only problem is my kids think this means I need to have things thrown at me. If my armor's scratched up when I get around to taking pictures, it's my own fault. So that's it for Saturday. tomorrow I'll have a gold helmet, and hopefully white primed abdominal, cod and belt. If I get there, I can start working on the legs and hopefully have this done by the fourth. Originally, my goal was Halloween, but that was before I had another project tossed at me which I intend on dedicating October to. Also, if I can get the armor done before my under suit arrives from The Dark Side Closet, I'll be stoked.1 point
-
Jason, so looking over your questions. First the shoulder strap CRL at Level 3 states “These shall be inserted behind the chest tabs and into slots of the back plate.” If you are building a Rogue One then this should be fairly simple since there are the two trapezoids on the top of the back plate that the shoulder straps insert into. The wording for this CRL is really to distinguish between how the Rogue One shoulder straps are vs the OT shoulder straps which lay on top of the back plate and are held in place with white elastic. Next, the helmet CRL for level 3 does add the eye socket bump “There is a small bump in the left eye socket under the lens as an intended flaw to pay tribute to the original trilogy designers.” This is something that is not required for levels 1 and 2 but if you have not painted the helmet already, simply adding a small bump of body filler and blending it in will be all that is needed. Next, “ALL” of the extremity armor is clam shell constructed. This means that one end is left open to don and doff the armor. This includes the shins, thighs, forearms, and biceps. The level 3 CRLs for all the extremity armor state: Cover strips will cover both the front and back joints. Biceps are loosely held closed in the back with elastic, shock cord (bungee cord) or white Velcro and are designed to remain flexible. So, there is nothing in the CRLs that state you must permanently close one end of the armor, only that the armor should be constructed to allow for one end to be open. How you decide to close the open end is up to you. I tried to be as inclusive as possible, allowing for bungee cord (which how it was done for the screen used kits) but also Velcro and elastic since the same results can be achieved and no one is producing RO armor with the proper mounting brackets inside the armor for the bungee cord. When you submit pics for approval, I do not know if your GML will require images of how the armor is closed; however, I do not believe it should really matter as long as it looks correct when you are wearing it. What the approval team for EIB and Centurion will want to see is up to them and given that there really isn’t a lot of differences between the different levels, I would think that they would want to see detailed images of how the extremities are closed but I could be wrong. Lastly, the level 3 CRL for the gloves does state nylon. “Gloves shall made of a nylon material”. I will ask Andrew to make a change to this to read “the base material of the gloves will be a black synthetic material similar to Lycra, Spandex, Elastane, or Nylon”. This change in wording will be more accurate and address the real issue that the gloves are not rubber like the OT gloves were. The gloves made by Endor Finders or Imperial Boots are exactly what you need. They are basically gloves very similar in construction to mechanix gloves. I hope this helps and feel free to reach out to me if you have further questions.1 point
-
Jeff, Thanks again for the feedback. It just dawned on me that you made the 11B3OB4's ROTK Build thread. I think I've referenced that thread more than any other; thanks for the awesome resource. I'll talk about the shoulder straps in a minute. The third pic you referenced is indeed the trapezoids that go on top of those boxes. The designer sent it to me as a separate file to see what I thought. Here's a pic of the two sliced together. For the chest and back, when I inserted this pic, I noted that the "shoulder strap slots" automatically gets separated. So, I printed them separate from the chest and back. These are the trapezoids you talked about, I just didn't know what to call them. I keep going back and forth on whether I should have printed them on the chest and back instead, but I feel that I made the right decision because this eliminates the possibility of a misprint on the smaller detail parts, especially since there's a cavity underneath. When I attach them I'll probably regret it, but I'll be crossing that bridge this weekend. You can see it attached in this Meshmixer pic. Here's the golden trapezoids and shoulder straps after wet-sanding. When I started sanding last night, I realized that the paint wasn't 100% cured, so I decided to hold off for another day. However, after wet sanding the slightly "soft" paint, these got real smooth. I really don't want any more paint issues, the helmet broke my heart. So, here's an idea I had after I saw the silicone shoulder straps on Jeff's 11B3OB4's ROTK Build thread, "can I make flexible shoulder straps with my 3D Printer? I've heard about how good flexible filament is for armor prints, but I've been nervous about printing with it because you really need to get the slicer dialed in. Plus TPU comes in various forms, so it's kind of important to test different products to see what works best for your application. Initially, I picked up some Inland TPU from Microcenter, because I wanted to make the rear portion of my ab armor with it, but after running a test print, I laughed pretty good at what came out. https://imgur.com/H9FwHaT I chose the Hovi Mic Tip as my test because it was the smallest piece I had and was only a 45 minute print. They look innocent enough But they're very flexible. I could never make armor with this brand. The Zyltec filament Nikko Industries uses is pretty good for these applications because it's somewhat rigid. With mine, I may try to make some shoulder straps, but that'll be more of a test than anything else. I guess TPU that's this flexible needs to be dyed rather than painted, so I'm really not confident that they'll match the rest of the armor. I'm very interested in the silicone straps.1 point
-
Jason First, I am jealous of your build volume. I have a Prusa I3Mk3 and I love it but that CR-10 has a huge build volume. I could have really used all that volume when I was printing my shore trooper. Ok so your build looks good so far and I have only one suggestion. There are two boxes on the belt that have some top detail you need to add. Also, I would recommend you print the boxes separate and then add them to the belt. Keep up the hard work, Also I added you to the RO build roster1 point
-
Art, The helmet came from NerdForgeDesigns on Etsy https://www.etsy.com/listing/808047010/ro-style-stormtroop-helmet. I'm actually working with them to get a couple tweaks done to the model i.e. vocoder and rear tears. Though I'm happy with how the helmet turned out, the vocoder gap needs to be increased a bit and the tears were almost impossible to cut. I asked if they could modify the file so that the teeth, tubes, and tears are not filled; they said they would tweak the file. Absolutely great customer service. As soon as they're done with the file, I'm going to print another helmet and start tracking the progress here immediately. I may turn the current helmet into a Jeddah Sandtrooper. The armor has been a small adventure. It came from akira-yuming on CGTrader.com https://www.cgtrader.com/3d-print-models/art/other/star-wars-rogue-one-tk-first-imperial-stormtrooper-armor. The reason I call it an adventure is because I've thrown something like 20 suggestions to them for adjustments, and they've made them all. This includes everything from the rib cage flare on the chest armor, to correcting the hand plates. Every time I've reached out to them I've thought they're going to get sick of me, but on the contrary, they've been extremely helpful and have even hit me up with unexpected changes to the armor based on the CRL and movie references. They've got a perfect 5/5 Star rating on CGTrader, and respond quickly (typically at night while I'm asleep). Hope this helps. Both designers have gone above and beyond what I would have ever expected, and I will be buying from them again. I've already been working with akira-yuming on their Captain Rex armor. Please see the below pictures for examples of how these guys have worked with me. NerdForgeDesigns: I talked about this in my original post. This is the "bridge" that extended from the left tube to the vocoder. This was a result of holes in the mesh. I notified the designer and they corrected their file within 30 minutes. Also, I'm kind of glad I caught this because this was before I knew that I could print a helmet without dome supports. Look at that mess in the middle of the bed. This is the corrected file. No bridge, no holes, and no dome supports. akira-yuming: Original chest armor pic provided by designer. notice how wide it looks and there was absolutely no flare on the bottom. The redesign looks awesome and printed out even better. I'll post pictures of this later. Original back pic sent by designer. Notice how there's no "flare" on the sides for the "arm holes" and no curve on the bottom. The new design follows the CRL reference. Changes were made within hours. Also, the 8mm indent is missing, but I thought this should be added by the costumer as the position may change a little based on the shoulder strap placement. Some of my notes on the hand plates included increasing the "fanned out" shape of the top trim, making it flush with the rear trim, including the indent, and decreasing the thickness. New hand plate is consistent with R1 shape, it's thinner, and includes the indent. Changes were made within hours. Finally, here's some changes they found through their own research. When they were able to find things in the CRL, on the forums, and in references that I missed, and then make the corrections without me requesting, it was confirmation that I found the right designer. Pic sent by designer annotating the correct shape of the shoulder bells. Corrected design. Pic sent by designer showing the chamfer on the belt ammo boxes. I'm not sure if anyone has caught this. However, I just noticed that for Centurion level, the CRL states that "The ammo boxes across the front are all made separately from the main belt and are secured to it." That's interesting. I can't tell from any pics that these are supposed to be separate, but I may slice this myself and see how it goes. The front belt doesn't take incredibly long to print. Corrected belt. Very detail oriented.1 point
-
Ross, just a quick word if I may to say that I truly appreciate the transparency and openness of your work to this community. I understand that you have a strong following in the UK, and I believe it's beneficial for the rest of the membership on FISD to have first-hand information about who you are, what you do, and how your armor came to be.1 point