Leaderboard


Popular Content
Showing content with the highest reputation on 12/03/2020 in all areas
-
Howdy! I’m Scott from the Dune Sea Garrison / Jundland Wastes Squad. Getting into all this has been a journey that I wish I would’ve started so much sooner. I always liked the stormtroopers and then I saw a video on YouTube showing a never ending parade of them going down an escalator at a convention. I was dumbfounded. If there’s that many of them in one place surely, I can find a kit myself I thought. Many years later, when my employer made a “whoops” that resulted in owing me a handsome amount of backpay I ordered a kit from Anovos and joined FISD. Having been bitten by the bug I started working on some foam armor for the younglings in hopes we three could march around the neighborhood together come October. My first troop was in 2019. My favorite so far has been going into hospitals and cheering up the little ones there. Seeing a kid in a hospital bed have their expression change from despair to utter excitement and joy has been amazing! My boys have outgrown their foam TK’s and now join me at every event they’re allowed to rocking a Gonk droid and Jawa costume as Galactic Academy cadets.3 points
-
Perhaps should have been more clear in my initial post but.....I’m just stepping down from Staff, not from FISD so I’ll be seeing all of you I get that the ”stay safe everyone” could have had a meaning of me leaving all together (sorry for the misunderstanding) but I’m just nice like that2 points
-
At least you were fortunate enough to remove the covers without destroying them or the belt itself, can't tell you how many of those I've jacked up over the years. Great job2 points
-
Biceps - Trimming So far using the lexan scissors to cut the majority of the return edge off and then using the half round file fine tune things have worked well. I can hog off a lot of material fairly quickly. To avoid making groves when using the file I used a diagonal motion, sliding my hand right or left as i pushed the file forward. The needle files, particularly a flat one, was used near the ridge bumps just as a precaution. Sorry for the bad lighting. I was working in a small spot in the dungeon/basement.2 points
-
I noticed that too. I will go back and straighten them out little later. Good thing is its e6000 and not that anovos glue.2 points
-
An interesting read on brow trim heights2 points
-
I would have to say the KEY moment was actually using Magnets to pull the face and cap together where they should be. I tried clamps but mine were of a kind I couldn't really get them through the eyes right. SO while keeping the rear eye's in alignment with the backcaps' side indentations, I test fitted the new slots on either side, being careful not to reveal the forward area of the slots, keeping them behind the backcap. (hard to understand right?) Screwed the ear portions into the faceplate. Happy with that I then proceeded onward to the ears. Now those little buggers are HARD to sand right for helmet perfect fits, being the helmet isn't by far, perfect. But I muddled through it with alot of you guys' help. So the right ear I had very minimal problem getting it dremel'd sanded and test fitted x12. That went right on perfectly, but the left - ugh what a nightmare. While Rob claimed the left was easier than the right - I heartily disagree. But, after a bit of work and time, I finally got it on and looking - meh? Maybe some bondo? or gap filler This was my Second Try. Thank goodness the folks at RS provided 2 pair of these. I'm leaving well enough alone. The Brow looks fantastic and the helmet feels tight now. Time to put the Mics in, or whatever they are. Used a mini-file to poke the holes in the existing dimples and gave it a few in and out pulls to sand the holes a bit. A washer and nut on either side and it's looking great! Now we're cooking. Time to get the S Trim in, then the eye film. and finally the padding and helmet snaps.2 points
-
Now turning my attention to the back cap. I am liking how gloriously WHITE, shiny and new the PVC is. I've also found that it's better to NOT use a flash. It just appears very washed out. Alright - after alot of sanding, it's time to mate them together. And this could get harrowing using Rivets. Once committed to using Rivets you have to be of a mindset that you get one shot at this - at least I was of that mind.2 points
-
There is also the passage from the book Storm troopers Beyond the Armor, from set decorator Roger Christian as follows. He is discussing the communicator that 3PO used and how he created it. "I was in the production design office showing him some plumbing units that he could design into a set. A call came from the floor, from George he says 'I need a communicator, NOW!' " I undid a pipe, and out fell a filter. And I looked at it and saw it had a little grid on the end, and I went, "OH MY GOD" I ran to my room, stuck one little ring around it, ran to the floor, and put it in Georges hand, and he said, 'Perfect'". So there is a few different sources and members of production that discuss the volume of plumbing parts used that lends credence to the fact these tips were indeed part of plumbing accessories.2 points
-
Hello troopers Greg here. I am super excited to be here with the FISD to start my first TK build. I am Boba Fett ROTJ SE and Tie Pilot ANH with the Southern California garrison Orange County squad. I will be building A ANH Stunt TK. Ok my AM armor is on order right now from Dave's Darkside Depot. Everything else has been ordered and coming in. Boots from Imperial. Neck seal and holster from Darmans props. Blaster from HellHounds Props. All the other little things have been ordered as well. I am super excited to get this build going. I will be striving for Centurion Level. I will do a build page as well.1 point
-
So I saw this video recently ( https://youtu.be/o78HcBmKoqE ) and I am curious about your guys opinion on these technics when it comes to making shims for the body armor. The video isn't star wars related but when I saw it it got me curious about modifying tk armor you know.1 point
-
Nice work on the strapping, it is a good idea on stress areas to use double snaps, shoulders are a good one to have a spare, I've lost two from those over the years. You may also find nylon a little restricting, if so change over to elastic as it has move give and you'll be able to bend and stretch more1 point
-
You can use either method both are fine all the way up to Centurion, angled corners are more screen accurate though.1 point
-
Interesting about those cover strips. They all have a 45 degree cut in them at the ends. Personal preference on them would be to round them off. Is the 45 degree cuts required/common/desired? Any sharp edges is something I would like to avoid.1 point
-
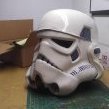
OK I scrapped off the drips while they were still soft and started sanding away. I did an initial rough pass with 80 grit sanded wet. It actually gives the helmet an interesting layered "Boba Fett" style weathering look that I may use on other projects in the future. More to come soon. My TrooperBay order is ETA this week or early next so I'll keep sanding and (CAREFULLY this time) repaint this bucket1 point
-
Great to get some more entries here from our trooper brothers and sisters. [emoji1303] To catch you all up on my own story, since starting this thread back in 2018, I’ve switched jobs, had another child, built a LOT more helmets and another set of armor, started an ever growing stormtrooper based Facebook group, seen my YouTube channel grow in popularity, started building my C-3PO costume and plenty more besides. One of my highlights was being one of 16 UKG troopers on the blue carpet at The Rise of Skywalker European Premiere in London almost a year to the day. That was wonderful. Anyway, still checking the boards daily and helping where I can. Also now an “armourer” for the uk garrison, helping more troopers prepare for 501st clearance. Hope to see lots more posts added below. Come on, troopers - yelp is a little about you and spread the love. Best wishes Dan :-) Premiere C-3PO1 point
-
Thank you for your service, Daniel. I had no doubt you would stick around and continue to critique without mercy. JK, your commitment to FISD and this crazy hobby is truly commendable.1 point
-
Thanks Tony, I appreciate that and...dito1 point
-
Thanks for the clarification. You're a valuable asset to the community in any capacity, couldn't imagine you not helping out.1 point
-
Did some strapping last night.1 point
-
It is an interesting watch. As a new builder, I can tell you the horror of using the heat gun. I destroyed several pieces of ABS trying to learn how to use it. As with most building tools, experience is key. Test and practice on scrap. I found the hot water bath method works in most cases with the ABS.1 point
-
Congrats Ken! Welcome to Centurion.1 point
-
Your build is looking amazing. Keep it up.1 point
-
Thank you And I only stepped down from Staff, not stepping down from FISD1 point
-
No gun show going on here! So more uniform in size will work for me. Thank you!1 point
-
Coming along nicely Rodney1 point
-
I know you are still in the refining stage, but a set of needle files (about 4 bucks at Lowe's- link here) followed by some sanding will do wonders for the teeth openings.1 point
-
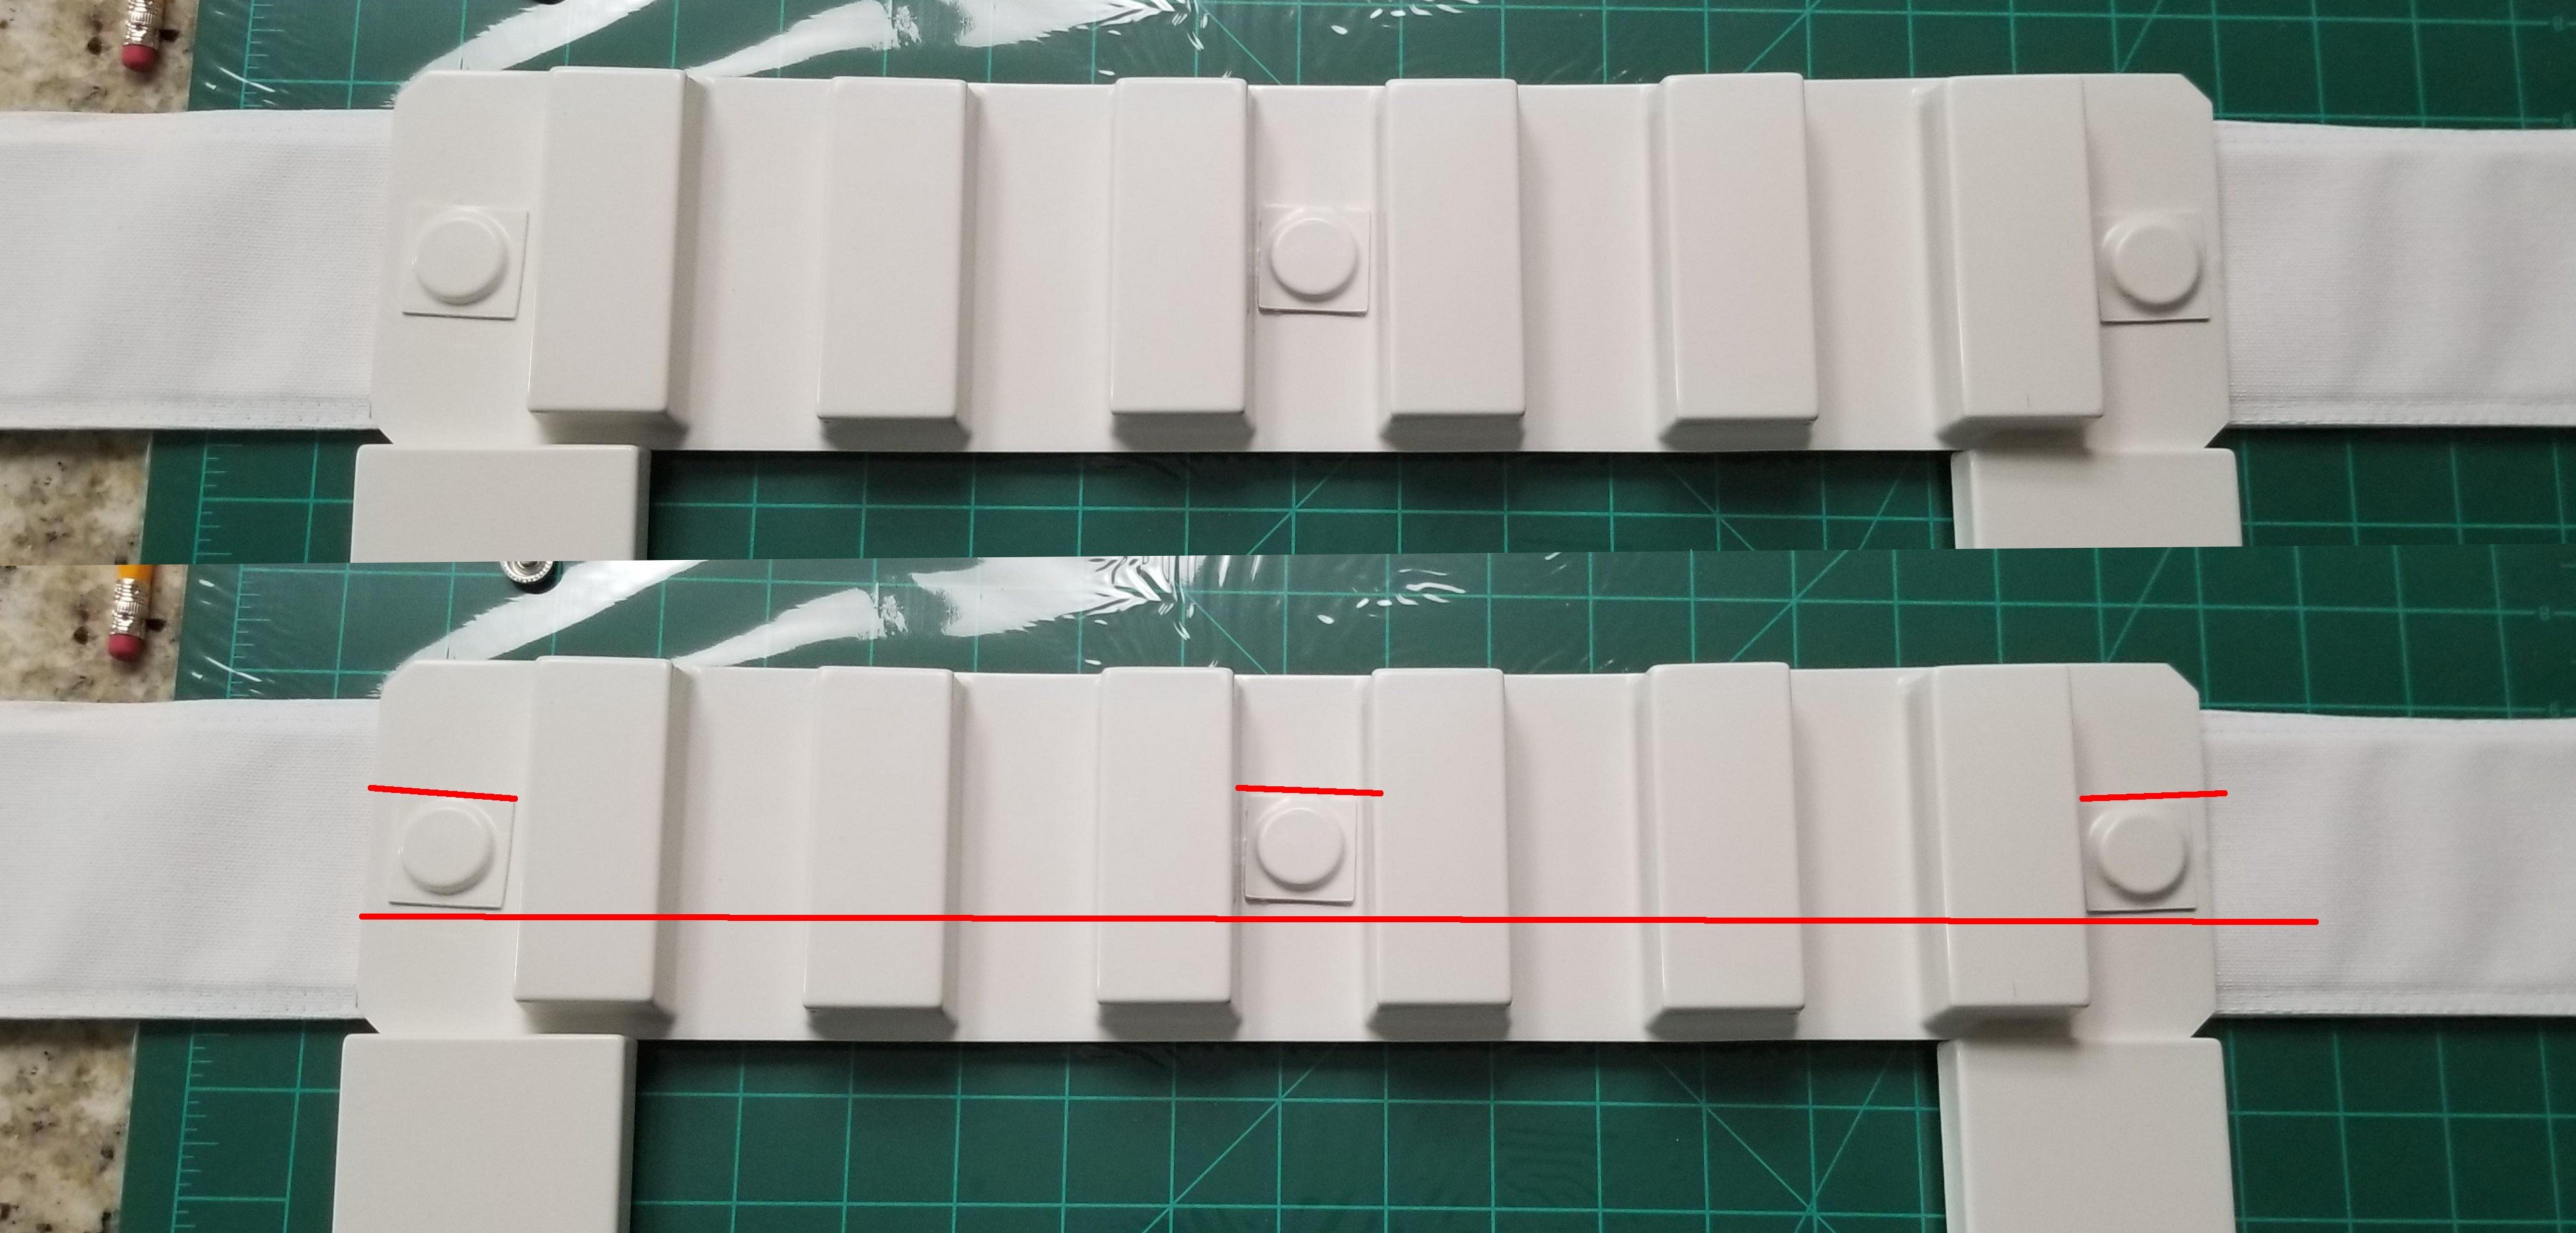
Yeah, those biceps will need to be reduced in circumference. Cutting down equally on both sides (front and rear) in small increments until you get a good fit... not too loose, not too tight. Pic 2 shows a suggestion I just offered in another build thread. Note the overlap and suggested cut line. Although it's a personal preference, I am not a fan of return edges in most areas for various reasons, and this (link here) thread may help explain. This is what I strongly suggest on the ab-button plate trimming: Reference image1 point
-
Biceps Untrimmed I have been working on my kit very slowly but haven't posted any updates. Back in August I decided to heed the words of many members and start with my biceps. The helmet can wait until last! While I've seen photos of untrimmed parts I've not see any sizes. So as I go I'll try to post the photos and sizes. The AM biceps, as shipped, measure just over 52 cm or 21.5". Left bicep is definitely more oval than the other. Both outside pieces are really more square.1 point
-
Came out great, nice work, just watch the angle of the belt buttons a couple look a little off
 1 point
 -
Thank you Joseph and the rest of the staff. So excited! I'm already fabricating new aluminum clips to lower the TD (and I'm working with Glen to move those pan heads closer to the edge. I'll also clean up that sniper knee plate. Screws in the bottom of the helmet are already loosed up. Looking forward to helping others with my experience. :-)1 point
-
Hey David great work so far. It's not a deal breaker but if you're shooting for the higher levels of accuracy your vertical Ab plates should have squared corners. Here's a reference photo1 point
-
That's what I need to do.1 point
-
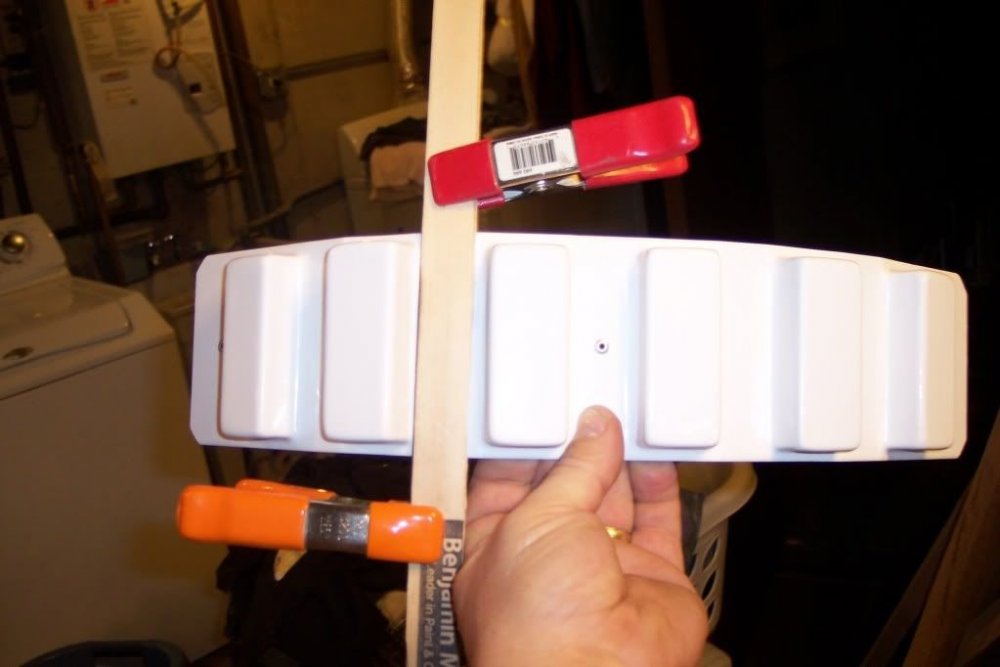
Just a small tweak. I'm not sure if you did it but it does help to stop your snaps popping off if you curve your belt, less strain when it is curved Clamp two pieces of wood between the belt spacing then gently push downwards
 1 point
 -
@gmrhodes13 Wow, thanks, that is exactly what I was looking for. So as it stands, with: 5,649 total, and 1,011 EIB and 485 Centurion, that makes (rounding) about: 18% of troopers go on to reach Expert Infantry 8.5% attain Centurion. (real numbers 17.8969% for EIB, and 8.5856% for Centurion with today's count). Thanks for helping me put my achievement in context, and also amazing to see how popular the TK category is Legion-wide!1 point
-
Onward to the belt boxes. created my pencil lines and ready to trim. Not really impressed with the dremel much on these. I tried dremeling these as close as I could but eventually succumbed to the thought that a belt sander with a sanding wheel was going to do these so much more cleanly. Very pleased with the belt sander. Test fitted and glued. I ordered some ZAP a GAP today and the Kicker spray as I'd watched so many tuts that I knew eventually I was going to need it primarily for strapping. At least I think so. For now, using some Loctite super glue gel.1 point
-
Agree with Glenn, with experience you can use a Hot gun ar even the induction cooktop or electric stovetop .1 point
-
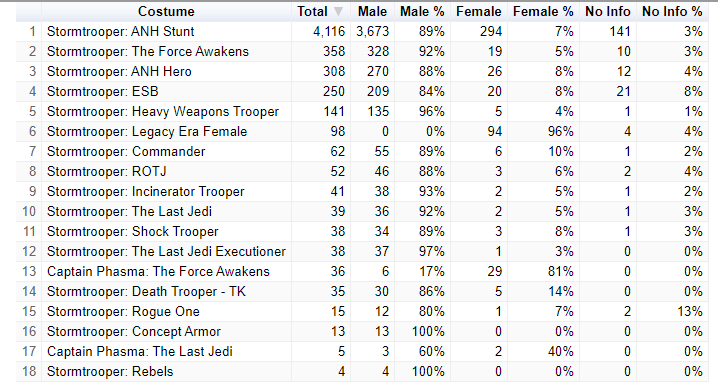
And the breakdown of those

 1 point
 -
Well at this time I'm kinda screwed although I did find that I was of the correct notion that I did in fact need to match the biceps with my current, not too tight, not too loose, which reminds me I need to buy an undersuit. I picked up something off a site called 'Light In a Box'. Compression/Running pants and shirt - black. I hate doing sizes over the internet, but I guess I'll find out. The grand total was like $40. About the price of a single Under Armor Shirt, which I have a devil of a time even finding one without all the white, yellow, red, blue, green pinstriping. It's probably junk, but very form fitting and probably too small and the material of pantyhose. But I digress - It's time to take a really good look at just what the contents of the Big Box are. So here I laid everything out just to make sure I have all the correct things required for this build. I'm not ready to open that bag yet. Looks like I'm kinda screwed right now for buiding anything with cover strips so, I'll just pick a project or two for each day from here. The biceps are kinda off the table for now so I should put them back out here and pick another.1 point
-
It's an interesting video, with ABS plastic you have to take care with heat, most people use a hot water bath method to help ABS plastic conform or bend, I use a heat gun but that's after a lot of practice, heating ABS is a funny thing, it can go from slightly bending to molten miss within a blink of an eye. Most of the shimming normally needed is with flatter pieces of plastic so I'm not sure if the process in the video would be of help.1 point
-
This is very cool. So close1 point
-
Yup, and for EI to truly be a success we use the MEPD / deployed numbers. Historically about 40% of sandtroopers are MEPD deployed. To get to that number, we'd need to have 2,260 EI and we just passed 1000. If we could get each EI to help one person go EI, wouldn't that be incredible?1 point
-
There are 5648 active Stormtroopers in the Legion1 point
-
Thanks @justjoseph63, I was glad to make it in time. I had a question for you or anyone else, how many standard approved troopers are there. To put in another way, once we reach 500, is there a percentage we can calculate of troopers that make it to Centurion? Same question for EIB. I just can't find a place where those sorts of statistics are (especially because I believe this includes all of the FISD costumes).1 point
-
My thinking was just to keep this one going, so sort of a re-introduction to the re-introduction1 point
-
James Forte 95926 EIB Letter Size Sha Sha http://www.whitearmor.net/eib/certificates/95926-eib.png1 point
-
Ah good point! I hadn't thought of that. Sent from my LM-V600 using Tapatalk1 point
-
Congratulations Ken... Fantastic job...Welcome to the ranks...1 point
-
Congratulations Trooper Welcome to The Centurion 500 Well done !1 point
-
Congrats! Everyone is killing it! And big clap for the team working through approvals. Sent from my Imperial Comlink1 point