Leaderboard


Popular Content
Showing content with the highest reputation on 10/14/2020 in all areas
-
As one who approves armor for EI and Centurion I can feel your pain, brother. Allow me to explain as best as I can.... We all know that there were more TK costuming mistakes in the OT than there were laser cannons on the Death Star. Gaffer's tape, twisted parts, ill-fitting biceps... well, the list goes on, and all were seen onscreen if you look closely enough (as we as SW fans tend to do). They were on a budget, and I'm sure they never dreamed that a legion of fans would scrutinize every aspect of the costumes that we wear today. Please, no hate (or PMs) on this one, but in my personal opinion ESB in particular had more than it's fair share... it's like the special effects supervisor, production designer and art director had no interest in continuity and let some really sloppy looking TKs appear on the film. But, it is what it is, and at least we have the basics of what the armor should look like and the main differences between ESB and ANH are fairly straightforward. Are the CRLs perfect and 100% precise? Nope. Due to the fact that we are always finding new/more accurate screen caps and references they are and always will be an ongoing venture. Most folks are not aware of the fact that changing a CRL is not the easiest of tasks and is not done without a lot of discussion and participation/opinions of the general membership. In some cases this can take weeks or even months, but the final determinations are made with the input of our members. Please keep this in mind.. As listed in the reviews for higher levels, Note that we consider both text (CRL) and pictures (screen caps/reference images) when reviewing submissions. What this means is that we do not depend solely on the CRLs, but in many cases we can actually see what was seen onscreen on most troopers (discrepancies aside) and include these in our reviews. Unlike the MEPD, we do not insist (or suggest) that a TK look like a particular trooper in any film in order to reach higher levels, but rather we look for the "ideal" set of armor... the perfect trooper. This ensures continuity in the ranks. To sum up, we in the D.O. staff are pretty forgiving in some areas, but we have to maintain standards and I hope that this answers your questions! Always, always, ALWAYS feel free to post up here or PM me if you have any concerns.... you are a Rockstar on the FISD, brother, and I'm gonna' stay on your case until you join the Imperial Attaches!3 points
-
I'm going to kind of echo my Garrison mate, friend, and TK-Twin @equuspolo's concern over on his ESB Centurion thread (but also as a show of deference) here and say... I did not know that the mic tips for ANH-Hero helmets were supposed to have a black interior, and definitely never heard black mesh. As he said, I strive to build to the Centurion standard outlined in the CRL... which is what I believe the DO's should hold us to. Suggestions for improvement are one thing, but the line between suggestion and requirement can get a little blurry, and if something is required for Centurion, I'm of the opinion that it should be stated clearly in the CRL (in red). I know there isn't always a 100% consistent standard across suits in the movies, so the CRL AND the DOs suggestions shoulddd reflect as such. That being said, I absolutely welcome this as an opportunity to learn and appreciate the DO's scrutiny and advice SO MUCH. I want to look my best and appreciate y'all helping me get there. But I would absolutely prefer to know ahead of time and build to that standard instead of having to correct. And yes, I often review previous approved Centurion threads to know what to look for... but the "extra" standards aren't always consistently applied, especially over time and as DO's change. I know it's easier said than done, but I would recommend adding additional info to the CRL, as it currently reads for EIB: "Correct Aerators/Hovi-MIX tips are present. Screens used shall be of a wide type mesh, with the rim of the mic and the inside white or painted white." And at present, nothing pertaining to the mic tips is stated for Centurion. This is just an example specific to my situation, but in general... if it's being called out for Centurion, it should be in the CRL is my point. I'm not trying to make it harder... but not trying to make it easier either. ALL OF THAT BEING SAID... Hey look, I got a new set of mic tips from Tony and repainted them appropriately. Satin black exterior, interior, and mesh... And just look at my tiny white small projections located on the center of the interior used to disperse and dispense fluids in controlled amounts over a particular area! I'll reassemble once dry and repaint the vocoder as well (ran out of proper semi-gloss paint)... I'm happy to rise to the occasion, but for the record, it could be more clear from the get-go! /rant <32 points
-
@justjoseph63 @gmrhodes13 @CableGuy It's always interesting and so useful all this information, . Thank you guys . As Ardeshir @equuspolo I love to learn something new to add to the records. Thanks2 points
-
Apparently 12 ANH helmets where used in ESB, one of those being a Hero, great read at Star Wars Helmets http://www.starwarshelmets.com/original-ESB-stormtrooper-armor-helmets.htm Hero is in the middle rear of the image below Lots of quirks in ESB, did you notice the guy with his belt upside down, in the middle front, check out his side boxes (No drop there) Also notice most biceps are every low and some rotated, bicep hooks where not used to give the lower appearance2 points
-
More updates! More frustrations... Helmet Still in the same spot... maybe paint this weekend... I hate paint... Chest/Back Made some progress here! My shoulder tabs arrived from Mr. Paul's, but I did end up having to do a bit of problem solving, as my setup is different than the way a Shoretrooper is assembled (and I guess not quite fully accurate to the studio suits). With Paul's kit, he recommended bonding the aluminum supports to the front of the chest to support the shoulder bridges, but... well, that's not going to work with how Jim's kit is designed... As you can see, the step in the bracket and the curve is the opposite of what would work to attach it to the chest armor... So heck, I just attached them to the back armor instead! They needed a little extra bending persuasion to work, but not much... Paul also supplies some 2" or so elastic with an extremely firm stretch that works with the bracket.... here's what they looked like after a lick of paint and a little scuff to promote adhesion, but before install. And here they are assembled and ready to install. You'll note that little N52 neodymium magnet that's going underneath... there was some space anyways and it serves a purpose... The purpose? There are corresponding neodymium magnets countersunk and epoxied into the rear of the shoulder bridges to hold them down! Hard to see, but the slightly dirty circle towards the top. These are getting repainted... more on that later. Here are some pics of the process to get the shoulders attached.... I glued a corresponding snap into the shoulder bell, then put some silver Sharpie on it to use to transfer a mark for the position with the bell in place. Corrected for the center, measured, and replicated it on the other side... Punched holes and trimmed the excess... And installed snaps! You can see how the elastic sits on top of the support and holds it all together... Here it is all installed! Added the biceps using velcro and elastic... And here's the whole top half, more or less assembled! (minus the shoulder bridge-to-chest attachment, which I'm glad I didn't epoxy in just yet...). Even though it's backward, it still puts the support tab and attachment point in almost the exact place, so I'm happy. At this point, I felt good trying on the top half of the armor for the first time pretty much ever! Used some clamps to hold the bridges in the front since I didn't glue them in yet... I definitely figured out that my back armor is sitting too low, and that my barrel is too high... unfortunately, I cut my suspenders too short and they are maxed out, so I'll need to remake them. And to bring the chest up, the only thing I can think of is to shorten the shoulder bridges another couple bumps. I SHOULDDDD move the area where they insert on the back armor down lower for accuracy, but honestly that's more work than I want to get into at this point, so I'll trim a couple bumps off. I'm currently at 16 visible ridges, and this canon reference shot shows as few as 12, so I think I'm good. They look like bigger ridges than Jim's (and much bigger than the urethane ones from Jeff), so they might be a little longer in actuality, but I think it should fix my problem without looking too bad. I'm going to trim them, grind a few ridges off the front (back has the magnets, so no go), then repaint, THEN hopefully finally epoxy them in to the front. The bridges will click in nicely at the rear and the chest armor has magnets added to the front lower sides that click in nicely with the underarm connectors as well. Hopefully adding longer suspenders to bring the barrel DOWN, and shortening the bridges to bring the back UP will improve the look significantly, and make it so the barrel is not visible ABOVE the underarm connectors (despite the notch I cut into the barrel). I'll also be lining it with some craft foam to keep it from scratching the barrel where it overlaps. I promised you magnets... there are some magnets! Ab/Belt Still some work needed here - final paint after the myriad repairs, then I can attach the belt boxes. I did add strapping to the belt drop boxes, so those are ready to go... I went with 2" black elastic. Fight me. Arms Nothing exciting here... half of the bicep is glued with E6000 on each side and ultra-thin velcro on the other. Both sides of the forearms got velcro so far. I did notice that my wrists were WAY too tight, and I struggled with getting the forearms together by myself. Not sure I could have done it with gloves on, or that my wrist would have fit with gloves on. I may try to heat and widen the wrist, or remove material. Unsure how to remedy this. The gaskets were also pretty bunched up and uncomfortable at the elbows, but that might just be a how it is (any FOs with rubber gaskets out there? haha). I may redo these with magnets and elastic to make them easier and more comfortable to put on and to allow a little more stretch. We'll see. Legs I did glue on the sniper knee and right thigh ammo belt... nothing fancy to talk about, just some E6000 and clamps/magnets to hold in place while drying overnight, again, don't think I've posted them. I started on my garter system, based loosely on the FOTK reference for thigh strapping here. I picked up a tacti-cool looking belt, and some strapping/buckles. I glued snap tabs into the thighs... Then started making corresponding straps with adjustable buckles, leaving a little extra to use as a pull tab to disconnect them when needed. I'll post some more photos as I keep working on em, but can hopefully suit up my bottom half soon! I think that's it for now. I felt bad about not including many pics in my last post, so I added plenty to this one, and went back and added some to the last. Since this is my own personal thread (as previously mentioned, not so much a "How-To" and more of a chronicle of my descent into madness, a la "Hearts of Darkness"), I like include some personal updates, so if anyone was wondering... I did see my oncologist recently and it's looking like from my last blood work and scans, that the months of chemo and radiation were successful and that no further treatment is necessary for my cancer at this time! Nothing to do but wait for my next scan early next year with fingers crossed! So that's cool. I got engaged recently (to DZ-71490 no less!), which was also awesome and one bright point in an otherwise trash year! And finally, just kinda cool... took a decent photo of my current helmet collection after getting the new shelf on the right and moving my TV over on the wall (ignore the mounting holes that need to get filled haha). Left, counter-clock-wise to right: - Anovos ESB TK - HFx Productions ANH blaster - Hellhounds ESB blaster - TM ANH-Hero TK - screen-used Anovos ANH-Stunt TK - Wasted Fett with minutefett paint ROTJ Boba - WIP Jimmiroquai fiberglass Anthology TK - Colabo LidTech clone fiberglass aerohelmet from my downhill skateboard racing days I think that's it for now! Until next time!2 points
-
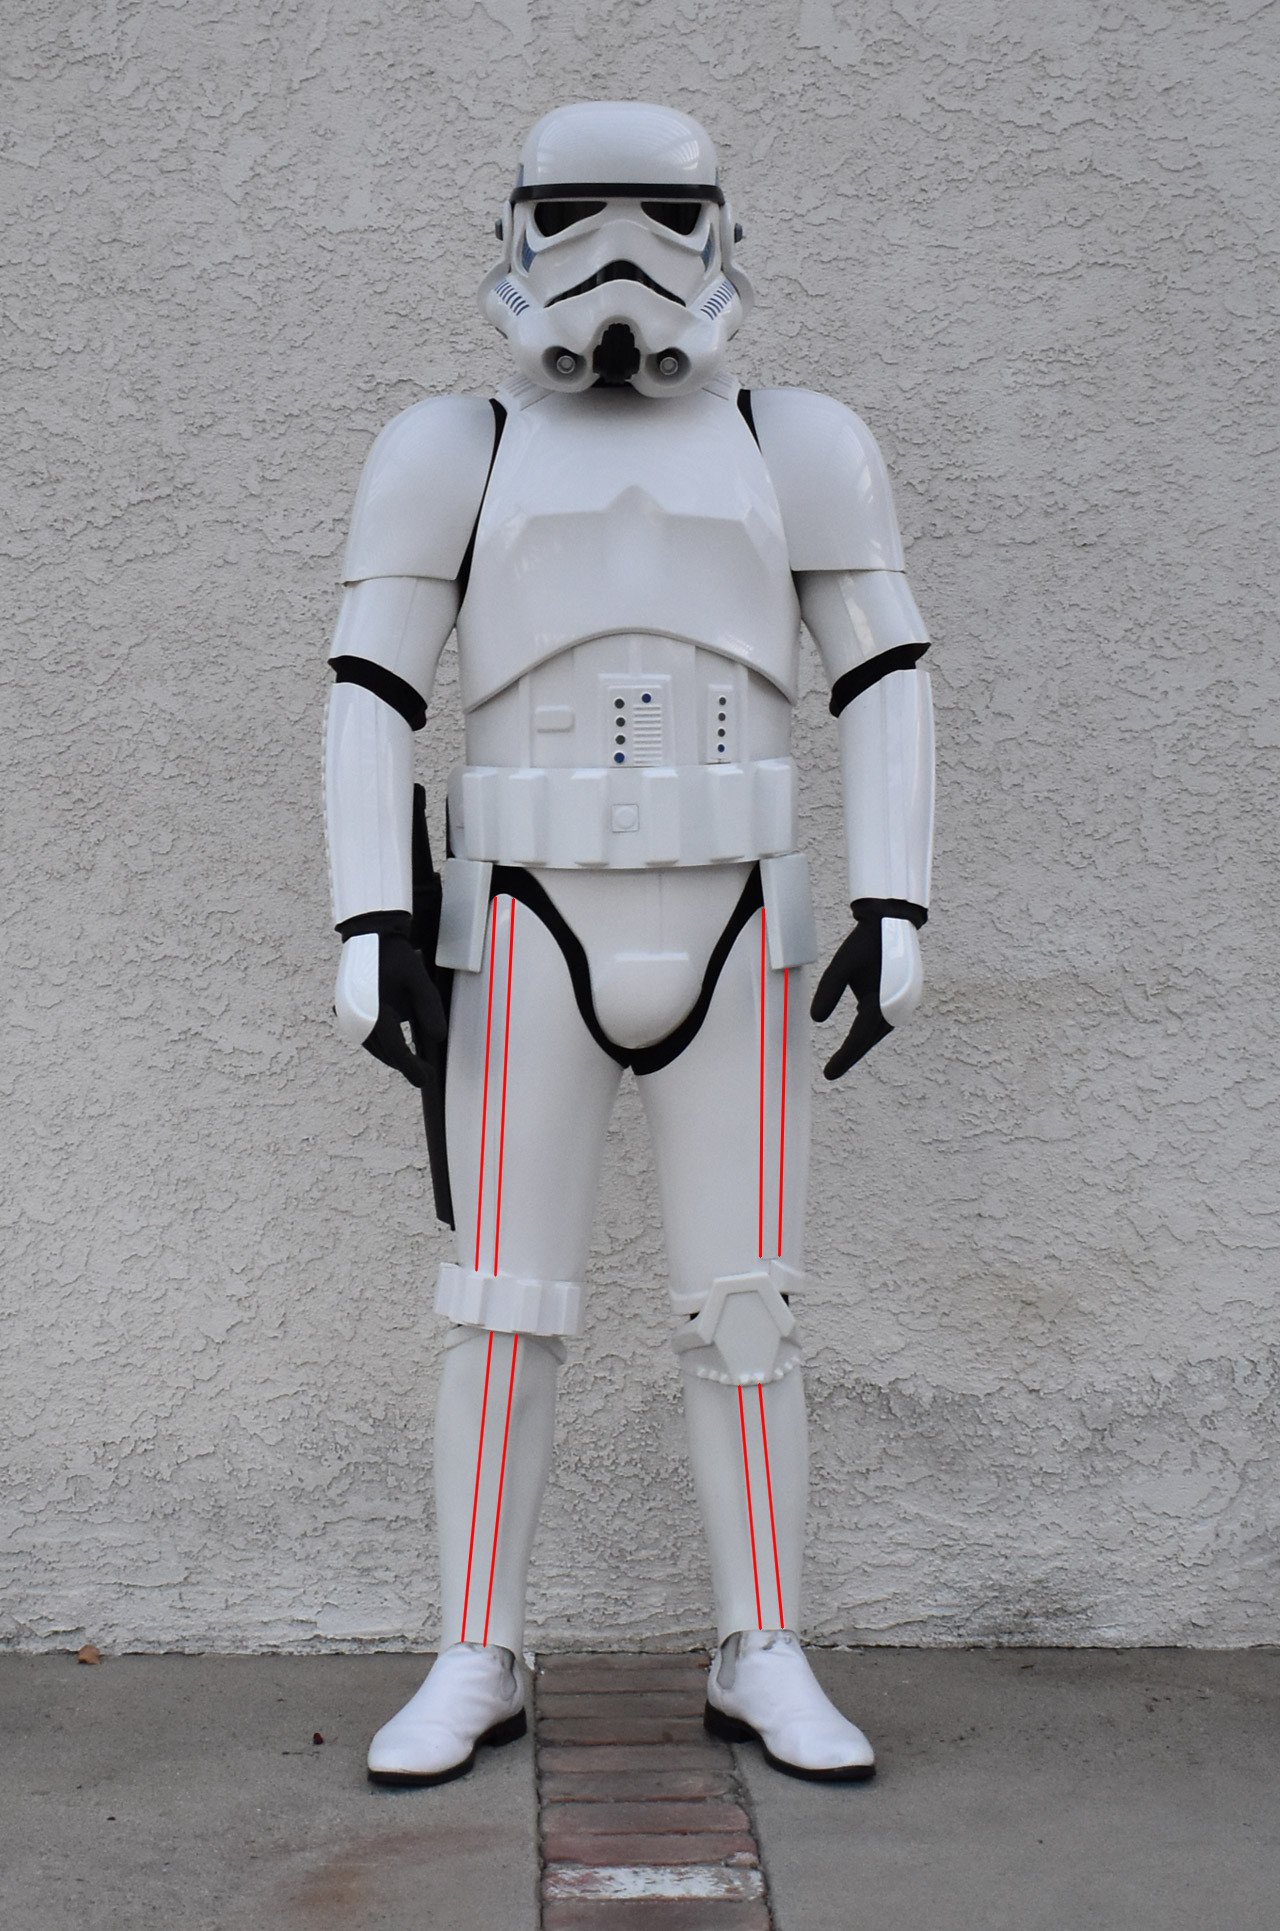
Ok, so for my own knowledge I have a few questions and I think they should be up for everyone else who may be interested in seeing. Also, let me state this, as many tend to get frustrated. This is not that. In fact quite the opposite. This is just for more understanding in the build process for future builders. I build in reverse. I don't build for basic and work up. I build for Centurion and submit to basic and work my way up that way. So below I have a few pictures for references. Now having said that I need to state the following two things first. 1: I agree that we need to set a standard that we all try to meet. Fully agree in this and I think the FISD CRL is AWESOME and our DO's are incredible. Thank you for all of your knowledge and experience, guidance and encouragement. So that is first and foremost for me to state. but 2: Anyone who knows empire strikes back can see that the stormtroopers are a train wreck at times if not in almost every scene. Biceps spun around, Shoulder bells falling down, Shins completing sealed in white Duct Tape, posterior plates inside the rear of the thigh armor, belts off set, abdomen armor riding low and over the breastplate, etc etc etc. So I am curious as to what tolerances there might be in the standards. We know in ANH they have issues as well, but ESB has a different set of issues. So What I thought would be considered good to follow is the standard set in the CRL. As I build and I recommend others in their builds, is to build with Centurion or at the very least EIB standards in mind. It is much more difficult to do Basic to EIB to Centurion with respect to certain parts, such as belts or the 6 side rivets. Once the snaps or holes are punched they are difficult fixes for most people. Photo References for Discussion. In this first picture we clearly see a low brow helmet in the stunt style. I like this, that is why my helmet has a lower brow. That same trooper has his belt at an angle along with the trooper second from the left. Also, if he straightens his hand out we can see that his hand plate will ride close to the forearm guards like the two troopers on the left. More like traditional medieval hand plates. Also the angle on the trooper to the rights drop box. It is also hanging behind his belt. Also the low brow hero helmet, I am curios if that helmet has bubble lenses and would it be approved with bubble lenses. Here is an example of a trooper that has his belt hanging practically off and nevermind the breastplate falling behind the abdomen armor this is my favorite trooper in the movie. In this one you can clearly see that his belt is cover more than half of both bottom buttons which puts his belt at a slight angle. I assumed this was the standard on the ESB Tk's Again we see another example of a belt riding exactly along both button lines which would place that belt at an angle. and this particular trooper has double dimpled bicep guards. And here is an example that has multiple troopers with their biceps riding over their shoulder bells and a the low brow trooper in back with his belt considerably dropped and at an angle. But more importantly, the troopers have different levels of gaps in their thighs. so the two troopers in the front are a good example. I only bring these up as examples that ofcourse show costume anomalies, but at the same time to ask perhaps we need to make it clear either in the CRL or when the FISD process begins for EIB and Centurion approvals a specific tolerance in certain things. I only say this because some things are a bit difficult to repair or adjust after a build has been done. I have not yet had too much a serious issue with that. But If you build with centurion standards in mind, in reverse, then it should be good to go as you step through the processes. If I read in the CRL that the belt shall ride up to the line of the buttons or cover some of the button and build to that, then it is difficult to perhaps make that adjustment in the belt again. Furthermore, let me say this, I ask this in all politeness and in hopes of being able to mentor more clearly other builds with other people. Because I have heard quite a few discussions in person regarding belt placement. For me, the CRL has set the standard. So I am curious why there may be so many opinions on it. Thank you for reading this.2 points
-
NEW In Memoriam Detachment Leader Deployment Office Census 2020 Merchandise Just For Laughs Hall of Fame INFORMATION & AWARD PROGRAMS Common FISD Acronyms and TK Glossary Pre Approval Forum 3D Section Field Exercise Award Master Armorer Program Imperial Attaché Program Fire Teams EIB & Centurion: What do these terms mean? Advanced Tactics Awards Public Relations Staff List 2020 Follow FISD Penny McCarthy passed away September 18th of undisclosed causes. The American actress frequented various fan conventions, including the London Film & Comic Con (2018); Star Wars Celebration in Chicago (2019); the Power of the Force convention in Germany (2019); and most recently the Los Angeles Empire Con (Dec. 2019). You would not recognize the diminutive actress if you walked by her on the street. But to millions of Star Wars fans, they will remember Penny McCarthy for her non-speaking role in the Cantina on Tatooine as a Devaronian, a devil-looking alien. In the original Star Wars, she also acted as a Cantina Band member, a Jawa who misses R2-D2’s bolt, and was Carrie Fisher’s hand-double. (Her hand served as Princess Leia’s hand, which inserted the Death Star plans into R2.) Our condolences go out to her family and friends. "Buckets Off" John Cannon sadly passed on Sept 19th, he played a Stormtrooper in Star Wars: Episode IV A New Hope and Star Wars: Episode VI Return of the Jedi and a Holographic Imperial Officer in Star Wars: Episode V The Empire Strikes Back. Our condolences go out to hid family and friends. "Buckets Off" On the 4th of September, 2020 Shane J. Hawkins (ID-78299) passed away. Shane was a recent recruit of the Great Lakes Garrison. Despite his tour beginning amid a world-wide pandemic, Shane found occasion to troop in costume. Shane brought gifts to brighten the lives of children recovering at the Upper Peninsula Health System Hospital in Marquette and trooped his own chemo sessions, in an effort to bring continued awareness to Cancer research. In his free moments, Shane was a well-seasoned chef. Shane is survived by his two beloved sons, Jamesson and Charles. Our condolences go out to his family and friends. "Buckets Off" On the 25th of September, 2020 Francisco Quiñones (IC-9597) came to peace. Some years ago, Francisco was an active member of the Puerto Rican Garrison. And while he required a wheelchair to troop, he never let his challenges slow him down. Even after retirement, Francisco’s love of the community burned brightly. Our condolences go out to his family and friends. "Buckets Off" Greetings troopers It's October folks, can you believe Halloween is almost upon us! The excitement of last month with achieving our 1000 EI approved was a great celebration for the Detachment but we will soon reveal our next milestone campaign once the dust settles from Victory 1000. While we are still on a high lets look back at what we have managed to achieve this term in bringing you the best FISD can. It's a good reminder that many members have worked hard this year, involving themselves in our detachment plan initiatives to change things up and keep he forums interesting. Also keeping you all updated on the Detachment plan in the form of a health check keeps us transparent with you the membership, all based on what we set down to bring you in the February elections. Many of the plans were made to bring our forums up to date, and remain staunchly relevant to the old and the new. Some have been very large and time consuming endeavors, but ultimately hugely beneficial for everyone. First order battle group continues to expand with the latest additions being build thread sections for Captain Cardinal and Commander Pyre, and new Reference galleries for these and captain Phasma. The FOBG section will continue to expand into the future but we are glad there finally exists a good home and one stop resource outlet to support our First Order family. I personally was very pleased that I had the chance to get this idea off the ground finally, but please If you have anything to contribute to this section it is there for you. Visual checklists and guides are almost complete across all our CRL's for EI and Centurion with some big hours and outstanding drive from wignut65 (Jeff) DL's blog to keep you in the loop and behind the scenes with what's going on is alive and well, and I will continue to put these out on a regular basis. Forum refresh is complete with the colorful banners created by gmrhodes13 (Glen), personally I think they are all awesome, I hope you folks do to. New Vendors list completed, and it's great to see a FO specific list with so much content. I'd like to thank all our vendors for the outstanding products they produce and supply with consistency, you make becoming a highly screen accurate Stormtrooper that much easier. A few minor CRL amendments to make life easier for GML's and members alike. There are several larger updates to be started on where membership will have plenty of input so keep an eye out for those in the near future. March to 1000 special event merch Now revealed, the 11" patch and the pin, exclusive to the 1000 EI's will go on sale once we achieve the number. We leaked teaser pieces of the design over the last couple of months to build the anticipation and excitement and no doubt we had a few members trying to piece them together in an attempt to work out the total design. Look out for the sales thread to go live. CRL Translation team. This has just recently started with our first CRL being translated into Spanish. Many languages to follow but as we got through this process we are still finding a few errors in the CRL's themselves that need to be fixed. Stay tuned for updated progress on when they go live. Trading card issues now look to be resolved and moving forward again thanks to much help from Hoda (Eric) We now have a new spreadsheet and system with Tray finishing up the last few outstanding cards. Series 7 cards are all but closed out and we will move to series 8 and all on a print your own basis. This should make trading cards more affordable to those not US based, but there will be a new additional step to take when you have your cards made. More on this when it is ready to go. Rogue One complete CRL re-word of the CRL and possibly new more accurate images and CRL model. This is a big task and if not for one of our first R1TK centurions and his excellent attention to detail, it is almost at the LMO approval stage. basically all the grey areas and things we just didn't know when the CRL was originally written have been fixed and are now accurate. We have also added more accessories to this costume so you can feel comfortable, fully approved to carry Binders T-21 blasters or even wear a Pauldron. As we always do with any major CRL re write, anyone currently working on this costume will follow the existing CRL, unless they chose to wait and go off the updated version when it goes live. This will cover everyone from basic approval up. Thank you to Jeff (TK20980) 11b30b4 for making this happen. The clean up of old irrelevant posts, and restoration of broken Photobucket links and watermarked images has been one of the most time consuming items on the plan list this year. The clean up team have been hard at work pouring over post after post and thread after thread fixing those issues to make the forums more eye appealing and usable to it's fullest potential. We have set up a post so you the members can also help out with the clean up. It's very straight forward, and helps take out some of the hours of searching to find threads that need repair. I would say we are now 65% of the way through this process. Addition of more costume galleries Although not in the original plan, we have been working on adding additional costume galleries and adding more images to some of the existing costumes. Glen "Q" Rhodes has been hard at work re building some of the older ones and adding some new imagery for costumes that didn't have a gallery of their own. Also now complete New OT and FO Photo Checklists for EI and centurion, completed by Justjoseph and the DO team, with some help from yours truly these are now better than ever and include the exact style of photos required. Viewable on the forums or in a downloadable PDF. Take the guess work out of the equation, completely period. What's still to come The DO's are working on a new guide to make it even easier to get your application for EI and centurion right the first go. They are focusing on the top items that applicants get wrong so this will hopefully all but eliminate the same mistakes being made by applicants in the future. Staff position compendium will start in a few months with the notion to make a job description for each staff role clear and understandable. This guide should make it easier for anyone wondering what is entailed in all roles from the top to the bottom. EI Gallery recovery. Monumental task that requires some back end manipulation to attempt to bring it back to it's former glory. Then it needs to be updated with over a years worth of EI submissions. This is going to take a lot of time but we will get a start on it if we can recover the old data. Future merch possibilities. We would love to get a coin run happening later in the year and are floating a few other ideas so stay tuned. More CRL work CRL revamps for TLJ/TroS and Phasma TFA TLJ. these are rather large projects that will take time but we are aiming to fix any of the errors and update with new information and images. RotJ CRL, yep we are finally in discussion regarding a weathered Endor variant to add to this CRL. This cant be done without a CRL Model, so if this interests you please be sure to send the XO's or myself a Pm. Remnant Incinerator Trooper (The Mandalorian) CRL will be under construction later in the year as we currently have a new member Nicker (Nick) building the costume for the CRL to be created. As you can see, we have already accomplished much of what was planned, and have been adding extra items to our list as we progress onward. This keeps the team accountable as we make good on achieving the goals we set out for the detachment, and continue to enrich our members with the best content and experiences possible. Once again I would like to thank all the members who were involved in making many of these plans a possibility. We are also very open to member ideas and input as this is your detachment and TK playground to enjoy. With Unquestioned Loyalty Andrew Franke TK11469 "Sly11" Detachment Leader D.O. Dept. Announcement! Mario (TKSpartan) has been a "Deputy" D.O. for some time now and has done an outstanding job in this capacity. He has gone above and beyond in his duties, so on behalf of Sha Sha, myself and the entire Staff I take great pleasure in announcing that he has been promoted to full-fledged Deployment Officer. Keep doing what you have been doing, brother, and congrats! With Unquestioned Loyalty Joseph Pedigo TK-10963 "justjoseph63" Deployment Officer With Unquestioned Loyalty Sha Sha Chu TK-19233 "shashachu" Deployment Officer With Unquestioned Loyalty Mario E RT TK-48117 "TKSpartan" Deployment Officer 501st Legion 2020 Census has begun, it is the responsibility of all 501st approved members to fill out the census each year which you can find here You must be registered on the main forums to participate in the census:here I didn’t’ troop because of Covid-19 Due to Covid-19 many didn’t get the opportunity to troop during this census period, Legion Command has advised that GCO’s will determine how they want to proceed in regards to a members trooping activity and status, as such check in with your local garrison command. Here's what the charter says about activity definitions: Operations Protocol/Membership An Active Member is defined as a member in good standing who meets the following requirements: Meets all 501st Membership Requirements (i.e. ownership of an approved costume, is over 18 years of age, etc). Has an approved membership record in the 501st Legion Membership Database Maintains active contact with their Garrison CO or GML. Active contact and participation will be confirmed during the annual Legion Census held each year during the month of October. Maintains contact information/membership record in the 501st Legion database either through their Garrison CO or GML. Participates in at least one Garrison or Legion activity per year while wearing an approved 501st costume owned by said member as recorded in the Legion Census. (One year is defined as the period from Legion Census to Legion Census). Examples of an activity include, but are not limited to conventions, charity events, or any activity designated as an official event by a coordinating administrative unit of the Legion. Members who serve in military branches are exempt from activity level requirements if their service renders them unable to meet these requirements. These Minimum Activity Level Requirements should be administered as justly and with as much common sense as possible. A member may retain active status, even if they do not meet all of the requirements listed above at the discretion of their unit Commanding Officer or Legion Command. Filling out the census only takes a few minutes and you also have the opportunity to update your contact information ie: address, email, phone and so on. The LAST EVENT TROOPED is the most important piece of data. Because our trooping year was cut short due to Coronavirus, Legion Command has recommended membership status changes are left to the discretion of the Unit Commander so please check in with your local command prior to filling out your census. NOTE: members who were not able to troop should enter "COVID-19" as their last troop. Any questions you have in regards to the census please contact either your GCO (garrison commanding officer) or your GML (garrison membership liaison) Census form layout With the last forum update the viewable area of the census may not be full page, as such change your page magnification to 75% and you should see the whole page. Note: make sure you tick the box "Is the above information correct?" please tick YES If you have any problems with the logging in please contact the LWM team here: [email protected] So stand up and be counted troopers, you have until 31st October. FISD Standard Shield Patch 5" Residual Refund/Donate Thank you to everyone that supported our most recent Detachment logo 5" shield patch run. After processing all orders and payments we are left with a small residual balance of $359.72 This residual occurred because we hit a price break that was very nominal, so in all transparency this is where we are at with it. To look at the number of patches that were shipped out to members and excluding the 5 mandatory that we must ship to Disney LFL on any merch run over 149 pieces, the total of patches was 1684. Dividing the amount across the residual we get .2cents per patch overcharge. Now as was done with last years shirt run Anthony (redforce) who helmed the patch run is offering you 2 choices. Option 1. Refund of your .2cents per patch you ordered. Option 2. Donate that .2cents to the MAW foundation. As you know, not being able to troop this year has hit many charity organizations hard, so this is an opportunity for us to do a tiny bit more for them. This thread will be open for 30 days, to give everyone a chance to chime in as to what they would like to do, and all you need post in your reply is Refund or Donate. After the 30 day period, we will assume you wish to donate and we will commence the donation process. The Donation receipt will be provided to the Legion command team for transparency, once said donation is made. VICTORY 1000 Yes at long last we have reached the magic 1000 and with this we see the sales thread open for the Victory 1000 11" patch. You can find the sales thread here Just a note of THANKS to all those who have pre-ordered this patch! We are well on our way to our goal (and LIMIT) of 500. but we ask that those who have inquired about totals (including postage) please remit the funds as soon as possible so that the run does not have to be extended indefinitely. The sooner we reach it, the sooner you get your merch! *Note* the run has been extended and will now be closing 10/31/2020 Approved EIB ONLY Merchandise For those of you who are one of the original 1000 to earn your EI badge, in addition to the 11 inch patch that can be purchased we are adding an exclusive piece of merch just for you! It will have blue enamel lettering (as seen below), a silver metal outline and will be approximately 1 1/2 inches in width. You can find the sales thread here *FINAL DAYS* closing 10/18/2020 TRADING CARDS - SERIES 8 Looking for trading cards? series 8 has just begun, information and ordering here Happy Fall days Troopers!Please welcome TK - 19511 Freddy to the Stormtrooper Hall of Fame!https://www.whitearmor.net/forum/topic/47884-25-tk-19511-troop-log/?do=findComment&comment=698772 With Unquestioned Loyalty Aaron Gibson TK-99725 "Pyrates" Curator Hall of Fame INFORMATION & AWARD PROGRAMS Are you new to the FISD and wondering what the heck all those abbreviations and strange sounding terms mean? To help you @justjoseph63 has started a list of the most commonly used ones that will give you some insight. If you have ANY questions about a particular term that is not listed or suggestions for new ones please contact Joseph. You can find the list here Pre Approval Forum allows future Troopers the opportunity to submit photos of their completed build to be reviewed by the Staff, Imperial Attaches and others in preparation for forwarding it to their GML for approval. Any and all advice/suggestions given will be specific, constructive, helpful and respectful. Please note that this program will NOT take the place of your local GML, as Detachments are not chartered for costume approval and can not override a GMLs decision, but is instead a peer review program designed to help you look your best and offer guidance and positive feedback. You will have the opportunity to ask questions about your completed armor, weapons (if applicable), accessories, etc. and get accurate information from the experts here at the FISD.. the definitive home of TKs worldwide. For more information on this program, please visit the link here Contributor Awards Don't forget to visit our 3D section when next surfing the FISD forums, there is plenty of useful information to potentially help you on your next TK adventure. You may be a designer wishing to showcase your latest designs or prints, or maybe looking for a file to print your very own Blaster or Laser Axe. You might be feeling may generous and share with our community a new TK related 3D file and maybe win yourself a 3D contributors award so check out the details below and be part of the in house 3D community. Here is a link to the FISD 3D Contributor program. Don't forget to create a troop log here on FISD and get awarded for your adventures The list of accomplished troopers keeps growing, so get on board and register your troops today. Simply start (or update!) your troop log, keep the running total in the title, and post (at least!) a date and name for the official 501st event where you wore your TK! Once you've hit a milestone count, go over to the "Field Exercise Awards -- Post your milestones here" thread to request your profile be updated! Simple, right? Milestone post example: Milestone and Troop Log Title: [100] TK12345 My troop log Date and Event: 8/23/2019 -- Death Star Cooking Class Photo: Pictures are not required, but are highly encouraged! Your picture may end up in the Stormtrooper Hall of Fame Award Recipients September - October No recipients this month The FISD Master Armorer program is an optional, detachment only incentive award to recognize individuals who have directly helped another 501st stormtrooper to achieve Expert Infantry status. Some people spend countless hours helping others, and want to reward their results as well as incentivizing new people to help as well. To register a “win” in the program, the assistance must have provided hands-on help trimming, building, and/or fitting of said armor for the person who was awarded Expert Infantry status. Other program notes: • Helping remotely, giving advice, or taking payment in exchange for help does not account, all work must be voluntary and without expectation of compensation. • The assistance must be for a period of 30 minutes or more. Spending 15 minutes tweaking someone’s fitting or taking photos does not count. • "wins" can be retroactive, e.g. if you helped 5 people in 2017 already, those can count as long as they are fully documented. Award Levels • 5+ “wins”: FISD Armorer Badge • 15+ “wins” FISD Senior Armorer Badge • 25+ “wins” FISD Master Armorer Badge The process • Person applying for the award will create an application thread to track the help they give. • For each “win”, they will list the person they helped achieve Expert Infantry status by copying their EI approval thread. • For each “win”, the person who was helped will validate that this person helped them. You can find the master award area here https://www.whitearmor.net/forum/forum/182-fisd-master-armorer-program Are you an approved TK that spends more time on the boards than the average Trooper? Do you enjoy using your knowledge to help out future and existing Troopers? If so, we would like to invite you to join the Imperial Attaché program! Members of the I.A. team are chosen to help out not only those here on the boards, but on a local level as well. Our aim is to have at least one in each and every Garrison, Squad and Outpost in the entire legion to be the eyes and ears of the FISD on a local level. A suggested level of EIB or above is preferred, as part of the duties include assisting those aiming for levels 2 and 3, but is not a requirement. Being active on the boards on a regular basis , welcoming new members and helping out where you can is, though. Some of the benefits: 1. Access to exclusive Attaché merch., including patches, etc. 2. Having the Imperial Attaché title under your name. 3. Being a part of the team that welcomes new and prospective members of the FISD. 4. Being the "go-to" person in your Garrison, Squad or Outpost. 5. Exclusive access to the Attaché HQ area, Imperial Propaganda Machine (newsletter) and merchandise discussions. For a complete list of Imperial Attaches, go here IMPERIAL ATTACHE AWARD Imperial Attaché Award for those attaché's who have gone above and beyond [minimum 1 year of service] You can find a list of prior recipients here Attaché Merchandise For those of you on the Imperial Attaché staff, the official I.A. patches are available You can find the thread here (Imperial Attaché's ONLY) ATTACHE ROCKER For those of you on the Imperial Attaché staff, the official I.A. rockers are now available. You can find the thread here (Imperial Attaché's ONLY) Attaché Ambassador HELLOOOOO Attaches! For those of you who may not be aware, the 11 inch Victory 1000 patch is now ready for pre-order. The run will be closing on Oct. 31st, but the limit we can sell is 500. After that, it will be too late. For those that have already purchased one, THANKS! For those that haven't, the information can be found in the sales thread here. With Unquestioned Loyalty Frank Peranteau TK75139 "Frank75139" Attaché Ambassador http://www.retailhellunderground.com/.a/6a00e54f10a098883401bb08f64447970d-pi Update Your Fire Team Info: Hi all, I've been doing some housekeeping in the approved Fire Team area, mainly to make all the posts in a uniform, easy to see format. The original post were in a different forum theme and those font colors were hard to see in the current theme. Anyway, please check any teams you may be a part of and see if they are still active, members up to date and the logo still works. Please contact me directly if any of your information is incorrect or you need your logo updated. For the full list of Fire Teams here Thanks! With Unquestioned Loyalty Mark Ryner TK4584 "captsafe66 " FISD/Fire Team Director So what exactly are EIB (Expert Infantry Badge) and Centurion levels? These programs were designed for those who choose to take their armor above and beyond the minimum requirements for basic 501st Legion approval. It gives you the chance to show a level of dedication and pride that takes your armor closer to being as "screen accurate" as possible, without as much extra work as you may realize! It also works on giving a better look to the Legion as an entity, and you can bet others will take notice of your hard work. The 501st has a list of detailed requirements for Basic approval, (level 1), EIB, (level 2) and Centurion, (level 3) which can be found here in the Costume Reference Library, (CRL) http://databank.501st.com/databank/Costuming:FISD_CRL Here are a few of the questions people may be wondering about: 1. "I am a (tall/short/heavy/thin) Trooper. Can I still apply? Of course! These programs are open and encouraged for all sizes of TKs, as long as the costume is correct and meets the guidelines. There are many specific build tutorials to every option, as well as a vast network of fellow TKs on the FISD to help you out and offer suggestions. 2. "How much extra will I have to pay for extra items"? The cost is actually quite reasonable, considering the few extra supplies you will need, which are listed in the requirements area. While it may run you a little more to implement these additions to your costume, they will go a long way to improving accuracy. All needed items can be found for sale on this thread: https://www.whitearmor.net/forum/forum/16-ongoing-sales-project-orders/ While blasters are not required for basic approval, for EIB and Centurion levels they are, and may need upgrades (also listed in the CRL). 3. "I haven't even got my kit yet, is it too early to start planning"? Actually, aiming for Centurion is easiest to do right out of the box. 4. "I have my basic TK approval, can I still get in these programs"? In a word... absolutely! 5. "Are there any "perks" to this extra work and cost"? Besides knowing that you have a great looking set of armor, the 501st and FISD believes you should be deservedly recognized for your achievement(s), and allows you to wear the appropriate embroidered "rocker" badge of rank (available for a very minimum cost) on your shirt, helmet bag, etc., as well as rank decals to put on your armor bin. You will also have access to select "challenge coin" runs, receive (free) a cool certificate for your new rank, and have your title posted below your name in your FISD signature. Plus, once you reach these levels, you will have the extra knowledge to help out those who are looking to apply as well. 6. "Is it hard to apply, and what happens then"? After basic approval, all you do is make sure your armor is up to the standards set forth in the CRL, post a thread with the required photos in the appropriate area (see below), and wait a bit for the D.O.s (Deployment Officers) to address it. (Hint: Studying other people's threads before you submit can be a GREAT help). These are also listed on the main page of the FISD site. While waiting for approval, you will get some comments from others who will offer suggestions and constructive advice to help you out. If you should need any changes, the DOs will let you know, so you can adjust accordingly. Don't be dismayed if you do need changes... it's all for your benefit! After you are approved for EIB, then you can submit for Centurion. EIB https://www.whitearmor.net/forum/forum/19-request-expert-infantryman-status/ Centurion https://www.whitearmor.net/forum/forum/72-request-centurion-status/ Photo Checklists To make it easier (and faster) to get you approved, we have updated the Photo Requirement checklists for both OT and FO and included visual examples of what we as D.O.s are looking for in order to move you along at an expedited rate. These can be found here: Expert Infantry: (For all non-FOTK costumes) Centurion: (For all non-FOTK costumes) FOTK: (EI and Centurion) Just remember that the FISD is here to help you every step of the way with whatever other questions you may have, but if you can't seem to find what you are looking for in your research, just ask away here on the forum. This area lists all those who have gone above and beyond basic approval toward screen accuracy. FOR September - October the 1st Imperial Stormtrooper Detachment would like to congratulate: Expert Infantry Badge Award: Daniela "Dani" TK72216 EIB 1001 Tudor "Welshtudor75" TK91175 EIB 1002 Ed "Black1705f" TK17050 EIB 1003 Ardeshir "equuspolo" TK42128 EIB 4th Award Lluis "Quinquer" TK15711 EIB 1004 GREAT job on your approval, now on to Level 3! Request your free EIB certificate here --------------------------------------------------------------- Centurion Badge Award: Dave "Helotech" TK98695 Centurion 473 Bryan "Labaki" TK Centurion 474 Sergio "Keko" TK10650 Centurion 475 Outstanding job on reaching Centurion, Troopers! Request your free Centurion certificate here If you see any of these Troopers around your Garrison or Squad, be sure to congratulate them! Newsletter If you have any interesting stories or photos or something you think newsworthy please send them to me via pm With Unquestioned Loyalty Glen "Q" Rhodes TK-85421 "gmrhodes13" PRO Newsletter Staff List 2020 Detachment Leader (DL): Andrew Franke (Sly11) TK11469 Executive Officer (DXO): Tim Waychoff (Dark CMF) Deployment Officer (DCA): Joseph Pedigo (justjoseph63) TK-10963 Deployment Officer: (DCA): ShaSHa (ShaSHaChu) TK-19233 Deployment Officer: (DCA): Mario (TKSpartan) TK-48117 Lead Provost Marshal (DCOG): Steven Sheades (starsaber25) TK-10466 Provost Marshal (DCOG): Chris Pearson (themaninthesuitcase) TK-10911 Provost Marshal (DCOG): Aaron (Bronx) Gibson (Pyrates) TK-99725 Fire Team Relations (PRO): Mark Ryner (Captsafe66) TK-4584 Personnel Officer (PER): AC (Novatie) TK-5597 Content Editor At Large (PRO): Christoph (Danny) Lauber (Ripper_L) TK-55550 Content Editor Awards (PRO): This will be handled by the XO’s Newsletter Publisher (PRO): Glen Rhodes (gmrhodes13) TK-85421 Attaché Ambassador (PRO) Frank Peranteau (Frank75139) TK-75139 Social Media Relations (PRO): Teresa Nuthall (Soulart) TK-41307 Social Media Relations (PRO): Jim Ferrell (Rat) TK-95970 Imperial Propaganda Machine: Brien Edick (Harbinger) TK 92802 Imperial Propaganda Machine: Eric Ho (Hoda) TK 77520 Systems Administrator (DWM): Eric Brager (Darth Aloha) TK-9674 Systems Administrator (DWM): Mathias (Locitus) TK-2959 Detachment Founder (DF): Paul (Daetrin) TK-8020 Replica Section Curators (PRO): Dan Branton (CableGuy) TK-42911 Replica Section Curators (PRO): Daniel Melin (The Swede) TK-99665 Don't Forget We're on Facebook, Twitter & Instagram Facebook: www.facebook.com/whitearmor Facebook Group: 1st Imperial Stormtrooper Detachment (FISD) Official Twitter: www.twitter.com/FISD501st or @FISD501st Instagram: www.instagram.com/fisd501st On behalf of the 1st Imperial Stormtrooper Detachment Command Staff and the Imperial Propaganda Department http://31.media.tumblr.com/tumblr_m9yfp014BM1qedb29o1_500.gif
 1 point
 -
The addition of the rims of hovi tips being white was a relatively recent addition to both Stunt and Hero CRL's, it was shortly after this some more research showed that the Hero mic tips where actually black inside (I think it came up in a higher level application, but I may be wrong), it is certainly something that should be added to the CRL Should we add a white tape option too1 point
-
They are screen accurate. I prefer double snaps on mine just in case one fails you have a backup1 point
-
Here is a picture of the snaps, just for the matter of completion. I e-mailed Ross and he confirmed these to be used for attaching the shoulder bells to the shoulder straps as I suspected. These snaps are relatively new to Ross's straping kit, so he didn't have the back when he made the video and Dan got his kit. Speaking of shoulders...1 point
-
I did a quick search and couldn't find much either... likely mostly because not many people use the original style "bracket" strapping, because it's pretty awful. Not much in the way of adjustment, and makes your return edges very prone to cracking. There's a reason it isn't required to be used at any level of accuracy. There's some info about it here and I know Joseph sells the brackets and has some info in his sales thread (as do a few other suppliers), but if you're going to ever troop in this armor, or if you fall outside the "standard" stormtrooper body size/shape, I would consider using the much more popular method of elastic and line 24 snaps (even if you add non-functioning screws to simulate the look of the original brackets). Hope that helps!1 point
-
Frown has too many teeth cut out, vocoder shape is off, mic tips are painted incorrectly, tube stripes are shaped incorrectly, ear bar shape looks off... hard to tell what else from just that front view. But it also appears this may be a 3D print? Printed helmets are veryvery rarely accurate or good looking for OTTKs, as - put simply - that's just not how they were made for the movies. Once we start seeing little details like that that look off, it's usually clear that this maker is not familiar with our standards (or screen accuracy in general) and it's a signal to keep looking. I would start with the threads suggested above and research, research, research. There are tons of great, vetted options that have been proven time and time again to yield excellent results for a reasonable price. Also, it should be noted that the majority of the stormtroopers shown in The Mandalorian were based on the Rogue One/Anthology style armor, not ANH (with a couple exceptions where ANH helmets may have been used on the Client's Remnant TKs... and, well... us... some of Moff Gideon's posse), so that's something to consider, and again... research, if that's your goal. You just took a step into a much bigger world, but we're here to help support you on your journey and I'm glad to see some local guys reaching out! Step one is reading through those threads1 point
-
TheSwede is totally correct, but I will add this to the discussion - I simply don't think WE (meaning the 501st) will get a Beskar version at all. It seems that characters are distributed between the two clubs (Rebel Legion and 501st Legion) based on their allegiances and status as a "good guy" or "bad guy". I have heard it discussed, though not officially, that since in the early part of the season, Din is working FOR the Empire, that the "pre-Beskar" armor will be accepted for the 501st (and in fact a CRL is out now, please find it here). HOWEVER, later in the season, once his allegiance shifts and he is now working essentially AGAINST the Empire to protect the Child... he switches to become a "good guy", so the full Beskar armor will very likely NOT ever become a 501st-approved CRL, instead going to the Rebel Legion. Again, this is still unconfirmed, but very likely the case.1 point
-
I appreciate it! Yea, it's a little too high, but worse, the suspenders are maxed out, so I can't bring it down if I wanted to (and I do). Bringing the back up by shortening the bridges should help too. I trimmed a couple inches off the barrel top already, so I've got the new suspenders on order. Yep, I'm going to add a side strap as well, but waiting on deciding how I'm going to attach them to my garter belt first, so I can get the angle right. Idk if I should sew em, use Velcro, snaps, or what. I did add the snaps to the thigh drops tho, so this should give you a feel for what it'll end up like. This is the left side.1 point
-
That you should visit the Bounty Hunters Guild for http://thebhg.net/forum/index.php?/discover/unread/1 point
-
1 point
-
Thank you Craig. I did rubber gloves with hard hand plates. I did the elastic strap, but I velcroed my hand plates for extra security to the gloves. This is not a difficult build in my opinion and a fun one. You will for sure enjoy it.1 point
-
Great posting here! Understand the frustrations. Strive for perfection knowing that you’ll NEVER really achieve it! Lessons to be learned.1 point
-
Im going for this build also. So I’m watching and learning with highest of interest. Hang in there buddy. I’m on your coattails. Question: are the centurion hand plates hard or synthetic? I read a couple posts that suggested ESB is silicone on black latex. Sent from my iPhone using Tapatalk1 point
-
Awesome, just took a look and their prices are also very good. Hope they get back up to speed soon.1 point
-
Hello Nicolas and welcome to FISD! Good luck on your journey of becoming an Imperial Stormtrooper! I look forward to seeing your progress1 point
-
1st part today! Small eagle counter.....1 point
-
Congratulations and welcome to the EI ranks!1 point
-
Looking GREAT, sir! I wish all the submissions we receive had such fantastic photos..1 point
-
Using that term was easier than saying "the small projections located on the center of the interior used to disperse and dispense fluids in controlled amounts over a particular area".1 point
-
Hello Nicolas. I have some intel for you aspiring trooper. 1. Great call on taking the plunge. Looking forward to seeing those BBB pics and your "new birthday" lol 2. Welcome to the Carolina Garrison. If you haven't already, please go to this website http://www.carolinagarrison.net/ , register, and fill out this membership form, (again if you haven't already) http://www.carolinagarrison.net/?page_id=915 3. I highly recommend you read through some of these https://www.whitearmor.net/forum/forum/193-request-tk-pre-approval/ to understand what others have done during pre-approval. (This is the step I am on lol). Once you are to that point, perhaps someone more veteran than I can help you. Yet, that's a good spot to start. I am also in the Carolina Garrison. Welcome! I just drove through FBragg on my way back from a Garrison meet up in Atlantic Beach! I was both a blast and an eye opening time. Looking forward to getting to know you a bit more. Oh... and welcome!!1 point
-
Welcome!!! Sent from my SM-G975U using Tapatalk1 point
-
Welcome aboard Nicolas and great to see another R1 TK in the making.1 point
-
Alight I'm jumping in head first: with the helmet I'm planning to make an ANH HDPE helmet replica similar to what CableGuy did here: I've started trimming and, like on my first helmet, I've gone with the rough "box cutter" eye shapes seen on screen used helmets like the "move along" trooper seen here And here is my first attempt at replicating that helmet a few months ago I haven't tried to replicate any particular helmet since this is my trooper. I simply did it in the same mindset of "lets get these helmets made quickly so they can be on set for this weird space movie" that I'm sure the workers at SDS had in 1976. of course not all original helmets are the same and having nice completely cut out eyes is not innacurate at all. Here is another original ANH helmet that was on auction at propstore this year. It has fully cut out eyes. I am currently putting together a trooperbay order for the rest of what I need to complete this helmet so stay tuned1 point
-
Azuma, Thanks for finding those items. Typically the designer is very quick to make changes. However, I think I wore them out over the weekend. I made a few requests to change the lower leg armor and then started sending recommendations for their Phase 2 Clone Armor. They made the changes to the leg armor, but then sent me a message that said they were prepping for an event and needed to take a break. I told the designer that I was done bugging them about the TK armor, so I'm not going to hit them up again until they reach out to me about the clone armor. However, if you wanted to request some changes, they may be willing to adjust. For me, I've asked so much of them, I needed to extend some professional courtesy. Also, please check all the files in Akira-Yuming's download section since they have included several updates but didn't take any of the old files down. Some of these have previously been addressed. When I'm done with the build, I'll make a list that has all the corrected files. For the back armor, I'm looking at the pics from other builders. I believe the back "box" is actually in a pretty good location. When you place the armor in your slicing software the shoulder trapezoids will likely be disconnected. I printed mine separately and placed them according to proportional fit. This is also how I determined the placement of the 8mm hole. Jeff (@11b30b4) and @yoshix both covered this in their builds where they actually filled the hole in their armor and moved the shoulder trapezoids/ straps further down closer to the box. Regarding the pill-shaped groove, this is present on Inferno Squad Tie Pilot back armor, but not the ROTK. Also, based on others' pics I'm less concerned with the shape of the trapezoids and more with the fact that the ones on the rear do not have a "rectangular tab protruding from the bottom." Lastly, only the cog sticks out past the box, but it's not noticeable unless you position the armor perfectly. This is easy to simulate in the slicing software, but I can't tell unless I look just right at my back armor. I guess you could slice the cog in Meshmixer before gluing it down; this isn't something I would bug the designer about. Regarding the gaps, I kept adjusting them and then realized that they kind of take care of themselves when you put the armor on. Nothing was more apparent as when I widened the gap on the abdominal armor and then put it on. The gap that I had widened to 4 inches spread which left me looking like the stormtrooper in the picture you posted. Also, it looks like you posted the pic of the leg armor Akira-Yuming made for us bicyclists/ people with +sized calves which makes the "bell-bottom" look a lot smaller. But regarding the gap in the brim, please see the pics below. The left is me squeezing the leg to "most people sizing," which eliminates the gap. For this, I references several other builds which show people with smaller/ bigger gaps depending on their "proportions." For the thickness of the brim, and the gap between the trim piece and rear right brim, I've got some extra plastic if others agree that this needs to be corrected. This reminds me of one thing I may not have hit on too hard during this build thread, but discussed with viewers during the conference last week. Since I'm doing this build thread as a pseudo-tutorial, please bear with me for a few minutes. First of all, one size does not fit all and adjusting armor post-print is extremely difficult. For reference, please see this pic: This is my discard pile thus far, or as I like to call it, 'the pile of lessons' learned.' Of course the helmet was a paint issue and the macrobinoculars are from a clone build, but the rest of the pile represents pieces that I spent a lot of time printing only to find that there was something off. Immediately, my eyes are drawn to the thighs that I asked the community for help on. After I got some feedback, I altered the file myself and re-printed rather than asking the designer to change them. Their original work would probably work for most, but not for me. This is one of the reasons why garrisons host build parties, to help ensure people's armor is "proportional to the wearer in scale, fit and size." Next, for those thinking about getting into 3d printing, I go back to the small discussion I had with @TheRascalKing on September 3rd regarding the practicality of 3d printed TK armor. Please look at this pic and determine for yourself; this pile represents approximately 240 hours of printing. However, as I stated then, after I'm done screwing everything up and either fixing it, or requesting that the designer re-work their file, I think we'll have a practical option for people to download. Also discussed was the topic of community feedback, which is critical when going down this road. Take a look at the cod piece right in front of the pile. The original file looked like this: I call this file the "underwear model" or "bikini cod." It was a mix of the OT and ROTK design, but either way it was wrong. I outlined how I chopped the armor on August 30th, but @gmrhodes13 was quick to point out a few more needed changes. This was one of the files I couldn't adjust post-print, so the designer corrected it. Finally, this takes a lot of time. I've already missed my goal date. However, I'm still on track for my original deadline. Adjustments need to be made based off expected and unexpected circumstances. However, I'm also the idiot who's doing two simultaneous builds. To finish up this tutorial/ response, Azuma, please feel free to request changes from Akira-Yuming. They said they're taking a little time off, but based off my previous experience with them, they'll probably still respond much faster than most builders. Also, getting to go out last weekend and see other TKs really helped a lot. Though there were no Rogue Ones, I was able to take note of the form, fit, and functionality of their armor as well as identify items I should look for in my build. I'll put a build update up here in a little bit.1 point
-
Great work, just watch your coverstrip alignment next time you kit up
 1 point
 -
Several people have expressed interest in vacuum forming lenses for their Nico Henderson ROTK helmet. If you printed out the helmet, then making and dyeing the lenses is fairly simple. You will need the following: Vacuum Forming Machine- this seems to be the main problem for most people but for lenses you do not need a 24” x 24” machine or a $1,000.00 investment. Punished Props has a ton of videos on YouTube and in this your tube video they will show you how to make a cheap and small machine for less than $50.00. https://www.youtube.com/watch?v=Gx66mS7U2vY Once you have made a Vacuum Forming Machine, you will need a cheap toaster oven like this one: https://www.walmart.com/ip/Mainstays-4-Slice-Black-Toaster-Oven-with-Dishwasher-Safe-Rack-Pan-3-Piece/110482692 You will need a cheap electrical hot plate single burner stove like this one. https://www.walmart.com/ip/Mainstays-Single-Burner-with-Adjustable-Temperature-Control/812501747 You will need an all metal (6 or more quart) stock pot like this one. https://www.walmart.com/ip/Imusa-6-Quart-Blue-Enamel-Stock-Pot-with-Matching-Lid/32802656 You need bailing wire or a few wire clothing hangers and something to cut the wire with. You will need a pack of Jacquard iDye Poly Fabric Dye in Green. Most craft stores have this brand but if you cannot find it in the color you need, you can also use Rit DyeMore liquid in Peacock Green. Make sure its “DyeMore” not the regular Rit Dye liquid. Next, you will need some .04” thick clear PETG plastic sheet. Do not use acrylic, because of the moisture in acrylic, it will have bubbles in it and will be hard to see through. For the PETG, you can get these sheets on Amazon in various sizes, just make sure you get a size that can be cut down to fit your vacuum former. A pack of 10 sheets 12” x12” should cost you $25.00 ish, but if you want a larger supply, its cheaper to buy a full-sized sheet from a plastic supplier. In Metro Atlanta, one supplier is Calsak Plastics. A sheet of 0.04” x 48” x 96” cost me $40.00 ish, and this gives me eight 24” x 24” sheets for my vacuum former. Lastly, you will need: Cooking Thermometer like this one: Or you could use a digital one, but you will need to take repeated temperatures. https://www.walmart.com/ip/ProAccurate-Cooking-Thermometer/22843133 Nitrate gloves Xacto Knife and/ or Box cutter Plastic bucket about the same size as the pot Metal straight edge ruler or yard stick Wooden paint stirring stick Drill bits (1/8”) and a drill/ cordless drill 150 grit and 220 grit sandpaper Filler putty, I used plastic wood filler this stuff: https://www.homedepot.com/p/DAP-Plastic-Wood-X-8-oz-All-Purpose-Wood-Filler-00541/206667345 Primer spray paint A release agent such as Smooth-On Ease Release 200 spray or in a pinch you could try an aerosol cooking spray The Nico Henderson helmet files comes with an eye buck file. If I remember correctly, the files only included one eye so you will need to copy and mirror the stl file. I printed these out in PETG with 25% infill and 4 parameters at 0.10 mm Detail. Next, I wet sanded the bucks with 150 grit then 220 grit then I applied a layer of plastic wood filler. In this pic you can see the two sets of eye bucks along with two bucks for my Shoretrooper. Once cured, I lightly dry sanded the bucks with 220 grit. Next, I applied two normal and one final heavy coat of primer (10 minutes between each coat) and let them dry for 3 days. Next, I cut my PETG to size using a straight edge and a box cutter. The PETG comes with a thin plastic cover on both sides of the PETG. Leave this protective cover on during the heating and forming. Only remove it once the lenses are done and ready to be dyed. Next, I laid out my bucks on the Vacuum Former. First pull, the TK lenses came out great but the Shoretrooper lenses not so much. See the webbing between the two Shoretrooper lenses, it comes up into the lens area. I rearranged the bucks. The second pull was successful. Next, I cut out the lenses making sure to not crack them. I also leave some PETG tabs on the lenses, so I hang them. Use the drill and a small bit (1/8”) to drill out holes on the tabs to hang the lenses. Cut up some bailing wire to make a hanger, once you are satisfied, remove the plastic protective cover on both sides of the lenses. When you hang the lenses, make sure they do not touch the bottom of the pot and they stay submerged. Next, I filled the pot and the bucket with enough cold water to cover the lenses. With the lenses out of the water, place it on the burner and bring it to a boil then add the dye and stir till everything is dissolved. Turn the burner off and let the water cool to 130° F. Turn the burner back on to its lowest setting. You want a steady temperature between 130° and 140°. DO NOT GO OVER 150°. The PETG will deform and ruin your lens if you go over 150°. Once you have a steady 135° ish temp, ENSURE you have removed the protective plastic from both sides of the lenses then place the bucks mounted to the bailing wire hanger inside the dye bath for 5 minutes. NOTE- leave the lenses on the hangers throughout the dyeing process. Remove the lenses from the dye bath and rinse in the bucket of cold water, the tint should be light. Again, place the lenses inside the dye bath this time for 10 minutes, then remove and rinse. Lastly, place the lenses inside the dye bath for another 10 minutes, then remove and rinse. This should be dark enough for the TK. Remember the inside of your helmet will be dark, so the lenses do not need to be too dark. If you want them darker, just keep dyeing and rinsing for 10 minutes at a time until you get the desired darkness. Once you are done with the dyeing, remove the lenses from the hanger and use dish soap to wash the lenses. Be careful not to scratch them. Cut them to fit your helmet and install them.1 point
-
The saga continues. This is 2 days worth of work in the following photos. I've sanded the major parts of the bucket and put filler on them. One part I found slightly aggravating was the vents I then began sanding the smaller parts. Jeff worked on the belt and then the lenses. Jeff also trimmed the breastplate and back plate That's it for now. Been super busy at work. I'll try to post more often. Thanks!!1 point
-
Lluis Quinquer TK 15711 EIB A4 Mario - Tk Spartan Thank you!!! De nada! http://www.whitearmor.net/eib/certificates/15711-eib.png1 point
-
Yea I saw that angle after I took the pic. I took the front pic last believe it or not and it unsnapped and sat above the snap on it, and didnt notice it until after the photos and I was unarmored. Its level in the other pics. So I am going to ask for grace in that photo as I am starting a job that is going for a few weeks and not sure I will have time to reshoot the photos. Same with the handplates. So, it is a photo issue that I apologize for and will ask for Grace in them. Appreciate the compliment and help and suggestions as always. Thank you beyond words Glen.1 point
-
Wow... as a new member and only built one set of armor, I’m blown away by the efficiency and precision that is documented here. Nice chronicle. Sent from my iPhone using Tapatalk1 point
-
they are multiplying!1 point
-
Hey guys, been a while, I do apologize! Work and life have been crazy and I've been stuck in that last 10% or so of my build for a little while. I'm constantly trying to figure out not just how to make things work, but how to get them to work WELL! So let's break down my list of excuses as to what's been holding me back. It's pretty much 4 categories: the helmet, the belt, the shoulder bridges, and final strapping/adjustment. The Helmet: Not much to say here. It's still sitting in primer (well, sanded back clear), waiting for it's final coat of white and clear, then the grey/black details. I'm waiting to finish the belt so I can respray both at the same time, since cracking open a can of 2K clear is a commitment. I have the satin grey, flat black, and a black fine detail paint pen ready to go, it just makes me nervous with the masking to ensure I get the details sharp. The Belt: Had a pretty bad issue with the belt that has been extremely irritating and time consuming to fix and has led me to question my paint method as a whole. I didn't document much of this (sorry) admittedly because of how frustrated it made me. I was using a piece of 2" blue masking tape horizontally across the middle of the belt to help me mark the holes for my belt box attachments, and when I went to remove it, I ripped about 2"x10" of the clear coat off the center of the belt. It must not have fully bonded to the 2X paint underneath and peeled off like a film. It was thick enough that it left a jagged, noticeable edge where it was removed, and obviously a difference in sheen. I was pissed. The belt is a pretty noticeable part of the suit, so I knew it needed to be fixed correctly, which meant more sanding and a respray. I tried to spray a couple coats of white to bring the level in the exposed area back UP, while also spending several sessions sanding the clear on the rest of the belt DOWN to try to level it out. I thought I had it good to go and sprayed the whole thing again... only to have the clear continue to peel up. At this point, I used a piece of tape and intentionally ripped off any remaining clear that was loose, then sanded almost all the way down to the fiberglass, before spraying with white again, which is where the belt is at now. Ready for clear. Again. Unsure if this was an isolated incident with the 2K or what, but between this and the cost, I think I would just use Rustoleum's gloss clear if I did this again. Not sure the 2K is worth it. Which brings me to my next difficulty - attaching the belt. I had the realization the other day that this suit would potentially be very difficult to put on by myself, should I need to without a competent wrangler, which got me rethinking some of my assembly methods. Hence where the magnets come in! I started with the idea of making the trauma plate easier to install on my own and added 4 big neodymium magnets to it in the center and top corners. I may dial the gap in more in the future but I wanted to keep the flare at the bottom to account for the back belt. I cut some craft foam and covered the bottom side of the panel, hopefully keeping the scratching/rubbing to a minimum (which I'll address in a couple other places as well, and will be watching for as I wear the suit... some day haha). And installed! It goes on easily by itself and aligns nicely. Next I wanted to find a convenient and secure way to mount the belt to the barrel, and figured I would give the same big neodymium magnets a shot. I sprayed some with flat white so they blend in a little better and epoxied them to the back side of the belt, and corresponding ones to the inside of the barrel. I also put magnets on the ends of the belt, where they overlap, and I'll add a little of my ultra-thin velcro to the very edge to hold it all together. I did need to end up trimming about 2" off both sides of the rear belt assembly, as it was too long and the overlap was hitting somewhere up by the belt boxes. I'll need to repaint the ends, and I wish I had noticed and fixed this before final paint... But it's okay because I had ANOTHER paint issue on the belt! When I was testing out the magnets, I left one on the front overnight by accident and it bonded to the paint or something, because when I removed it, I got this: So that was fun to repair. Again. I have all the holes drilled, screws ready, and the elastic prepped for the drop boxes - just waiting to assemble until after final paint on the front belt. And finally, the last belt component is the thermal detonator. Started masking it so it will be ready for gray when I do the helmet details, then I will mount it to the rear belt. Planning to use screws for everything, along with a little E6000 to hedge my bets. Hopefully if I ever need to remove anything, it won't take the clear with it again... The Shoulder Bridges: Next on my list of sorrows were the should bridges and their attachment. I had originally ordered and intended to use rubber/latex shoulder straps from Jeff/11b30b4, but was having a heck of a time deciding how to mount them and was way overthinking everything. Between this, the fact that they had yellowed pretty significantly, and that I eventually ended up snapping one while trying to bend it to the proper curved shape (they are cast flat), I ended up giving up on them and went back to the hard ones from Jim. The ridges are larger and look more accurate, but I was (and still am) concerned about them cracking. I think I've decided that I'm going to glue them in the front with epoxy, then use neodymium magnets embedded in the bridges to keep them in the pockets at the rear, essentially "hard-mounting" everything, more like many clones do. I also ordered a set of Mr. Paul's (of TotalGrunt/Shoretrooper build fame) metal shoulder bell/bridge supports. These are apparently the most accurate way to ensure your shoulder bells are supported and sit correctly, and include the elastic/snaps to attach the bells, so I'll post up how that process goes when they arrive from the UK. Final Strapping/Adjustment: Obviously this is the very last step, but I'm curious what new and exciting problems I'll run into as I figure the last of this out. I haven't actually put on the full suit in MONTHS so I'm curious how it'll go. I don't think I've post since I started applying the ultra-thin Velcro, but I'm pretty stoked on it. The only concerns I have had are that it's actually a little stronger than I anticipated, so I don't need to use as much as I did on most of the pieces (I may trim it back later) - I don't want to put TOO much strain on the pieces when I WANT to take them back apart. I also ran into the issue of the adhesive pulling the clear coat off again, so I started scuffing up the spots where I applied Velcro to help mitigate this. Otherwise, it works and looks great and allows for a much more flush look. Magnets probably would work well for areas like the shins and forearms as well, but I'm over it and just want to finish at this point. I also need to create the belt drops to hang my thighs with... it's on my list. I'd like to improve over my current OT-style design and incorporate the correct-style clips, but need to do some more research. If anyone has any good solutions, I'd love to hear/see them! From the top down, a checklist (mostly for me, but might as well post it here): Helmet - final white and clear, helmet detail paint, install visor and vocoder, install interior padding, install fans/mic Chest/back - epoxy in shoulder bridges and shoulder bell supports, finalize chest-to-side panel connections, install craft foam lining Ab/belt - epoxy in magnets for belt attachment, final white/clear on belt, install belt boxes, paint thermal detonator, install thermal detonator Arms - install shoulder bell snaps Legs - glue sniper knee, create garter system for thighs, install garter system I'll keep grinding away and maybe add some pictures later this weekend, but there's a pretty big update down for ya!1 point