Leaderboard


Popular Content
Showing content with the highest reputation on 08/24/2020 in all areas
-
While surfing one of my favorite movie info sites I found this little article. https://screenrant.com/star-wars-first-stormtrooper-tragic-tale/5 points
-
Finished the helmet (with some minor detail work left). Below are the photos showing the painting and the removal of the tape. Finished Helmet: Next I will begin the chest armor, yoke and backpiece.4 points
-
So, you are tackling that ROTK and you hit a snag. How to do this or how is everyone doing that. Well this is the place to ask and respond to others so that we can all share knowledge with out having to read every build thread to find that answer you need right now. Let’s keep it productive and if someone has a different method to do something, please keep in mind that there is more than one way to skin that cat. Further, it is still a good idea to read through the build threads. We need to support each other and keep everyone motivated. This thread is simply meant to be a quick reference. I will start it off with a few tips. Masking tape- Although you will need a lot of standard blue painters’ tape, when painting the smaller detailed areas on the helmet and abdomen, I recommend you mask these areas off with smaller width and higher quality masking tape. Tamiya is what I use. Tamiya is model masking tape and comes in small rolls with widths between 2mm through 18mm. You can get Tamiya masking tape from Amazon and most hobby model shops. I normally use the Tamiya to mask off the detailed areas like the teeth, tears, traps, and ear bars then use the blue masking tape to bridge between the Tamiya tape and whatever you use to cover the larger areas (plastic bags, paper, etc…) https://www.amazon.com/s?k=tamyia+masking+tape&ref=nb_sb_noss_2 Needle Files- If you going to cut out your vents on your helmet, most of us will use a Dremel to do most of this but then you need to clean up these cuts to make them uniform and smooth. Needle files are the way to go. You can get a set of these small files from Amazon, Harbor Freight, and hobby stores. https://www.amazon.com/Hardened-Strength-Barrette-Crossing-Equaling/dp/B07PPYWSCY/ref=sr_1_10?dchild=1&keywords=needle+files+set&qid=1598290682&sr=8-10 Adhesives- For those of us new to cosplay, you will see people mention CA and E6000. So what the heck are these? CA Glue CA is short for CA glue or commonly known as Super Glue. The CA is the chemical abbreviation for Cyanoacrylate Acid. So yes, that stuff that will make you fingers stick to each other and tear off skin is what a lot of us use for building costumes. In addition to basic CA glue, it also comes in a variety of thickness formulas and you can also get an aerosol can of CA glue accelerator to make the glue instantly set. Another trick to use with CA glue is to apply a bead of the CA glue to a crack in plastic then drizzle some baking soda on the wet CA glue. The baking soda with cause the glue to instantly cure and the baking soda creates a plastic that will fill the crack. You can sand it and paint over it. We use this method to fill gaps and fix broken parts of costumes. Obviously, you can find CA glue everywhere, but the accelerator may be a bit more difficult. Try searching on Amazon or google for Name brands like 2p-10, Zip Kicker, Loctite, and Stick Fast. E6000 E6000 is a perchloroethylene adhesive. Its application is very similar to silicone adhesive and provides a few characteristics over CA glue. This is from the product data sheet and can explain it better than I can. E6000® is a unique SELF-LEVELING, non-flammable industrial adhesive formulated to meet high-performance requirements. It permanently adheres to more surfaces than virtually any other adhesive, providing exceptional adhesion to wood, metal, glass, fiberglass, ceramics, masonry, concrete, asphalt, leather, rubber, PVC, neoprene, vinyl and many plastics. E6000 maintains its flexible bond in extreme cold temperatures, will not crack or become brittle and is excellent for bonding items subject to vibration. For applications that are exposed to direct sunlight, paint over E6000 after curing or use E6800 UV formula. So, the big thing here is that it is flexible, that means you can use it on armor in places you want to flex and where Ca glue would crack or cause the armor to crack. Its also safer to use on plastics than CA glue which may weaken or melt the plastic. The trade off here is that E6000 needs time to cure and must be clamped in place while curing. When you look at someone’s build thread and you see several round silver things suspended on the armor, almost always they are rare earth magnets that are on the inside and outside of the armor holding things together while the E6000 is curing (normally 24 hours). So, with adhesives, there are a lot of options, but these are just two examples of what most of us use. One type of adhesive may not be the most ideal for aspects of your armor and you may want to consider using different adhesives for different parts of the armor. Ok that’s what I have for now. Toss out your suggestions and questions and lets find those answers.3 points
-
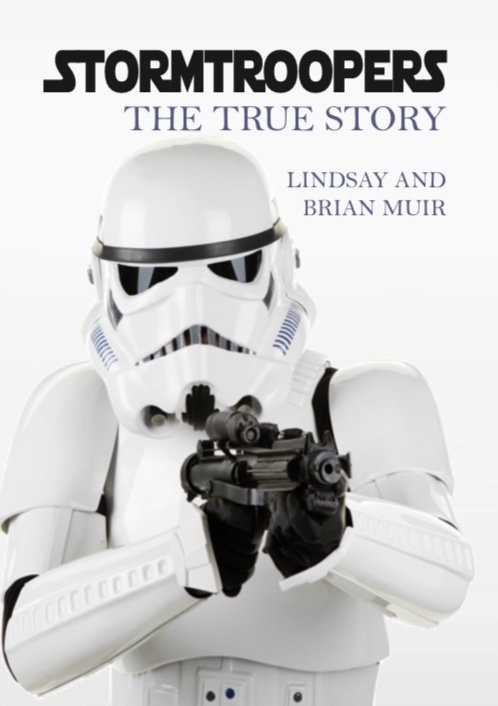
Hot off the press this week! The true story of how the iconic Stormtroopers were created , which subsequently led to a high profile multimillion pound court case. With the endless controversy and conflicting stories reported in the media and on the internet, this book reveals the facts from the crew on the production in 1976 Hit the link for your signed preorder https://www.brianmuirvadersculptor.com/store/c1/Featured_Products.html
 2 points
 -
Hi all, Introducing myself as per instructions. Been a 14th century re-enactor for years but my kids are way more into Star Wars and I've been a fan my whole life so I feel trooping will be more my thing now. Looking forward to doing troops with my kids when they're old enough and building a suit of my own. Leaning towards a TM or RS ANH stunt suit so far. Been reading the forums for about a week getting my head around the lingo and requirements. Made contact with my local garrison now so I guess it's just a waiting game for the armor to be delivered I guess. Can't wait.2 points
-
Late to the party here but I used a french blue polyester/ spandex fabric i found at Joanns. I took a roll of blue painters tape with me and match the color with a breathable fabric. For the tears and traps I used a similar fabric in black. Page 3 of my build shows the fabric and the receipt.2 points
-
Hey, welcome back! Sometimes stepping away for a while is the right thing to do, but glad you're back into it again. Sent from my iPhone using Tapatalk2 points
-
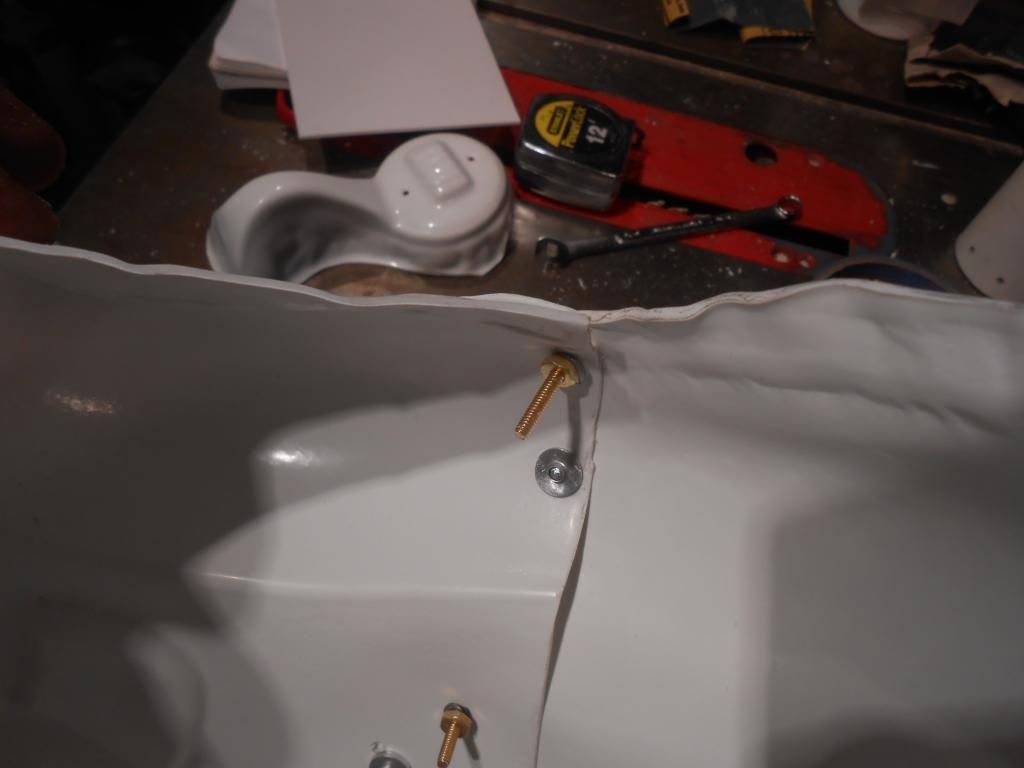
The single cap rivets are actually perfect (and screen accurate) as long as the head size (diameter) is about 8 mm.2 points
-
CONGRATS to Alexander Schwaninger (azoroes) TK 22504, our latest addition to the rank of Expert Infantry! Almost down to single digits now, folks...2 points
-
That's great! I'll fix that as soon as I'm home and provide new pictures (May take a while. It's 08:27AM over here )2 points
-
Got a little progress on the belt and it's awaiting a clear coat and chrome. Another reason I went with T&A's Phasma kit is because he also provide the belt material, pouches, and boxes. I believe its just a ribbed rubber floor mat that is cut to size. The boxes are resin blocks that were trimmed and sanded. The two pouches on the left hip are a canvas fabric sewn to size. The kit was missing the covers for the pouches but fortunately I had some 3mm komatex plastic from a previous project. I measured the pouch flaps and cut out the lengths, rounded out the corners, and took a file to the long one for that line across the upper portion. This will get chromed and then attached to the pockets. I'll likely grab a bit of foam to fill out the pouches for shape. Maybe pop trading cards into one of them. Alright here's a DO NOT DO: Plasti-dip and rattle can red for the cape? Nope. Observe. The plasti-dip and aerosol paint just absorbed into the fabric. You can see the left side has rubber and paint, the right side is paint on fabric. This method is useless. The paint also soaked through the fabric to the other side. Some of you may have already known this, but news to me haha. I reached out to the Phasma builders and was tipped off that this was a route to take to get the rubber-like medium on the cape: Liquitex Professional Acrylic Mediums, Gloss Gel -- I got the 16oz bottle and arrives later this week -- this will be the rubber like medium Jacquard Textile Paint 122 Black -- I believe I can add a bit of this to the Gloss Gel to keep the black color on the cape. Jacquard Textile Paint 106 True Red -- This will be hand applied for the stripe. I'll get a test swatch going once this arrives next week. There are splatters of the gel coat on the cape. Should be fun to replicate. Pockets and straps are cut! Sewing to commence through the week. I've seen a bunch of folks, even the crl images, where the straps are a leather like material. Double checked the D23 images and pretty sure its the cape fabric, coated. The others may be TLJ, which I just noticed specifies leather straps... Bummer that the strap lengths are not mentioned, but their widths and locations are. TLJ's CRL does mention them, so we'll use those lengths for now.2 points
-
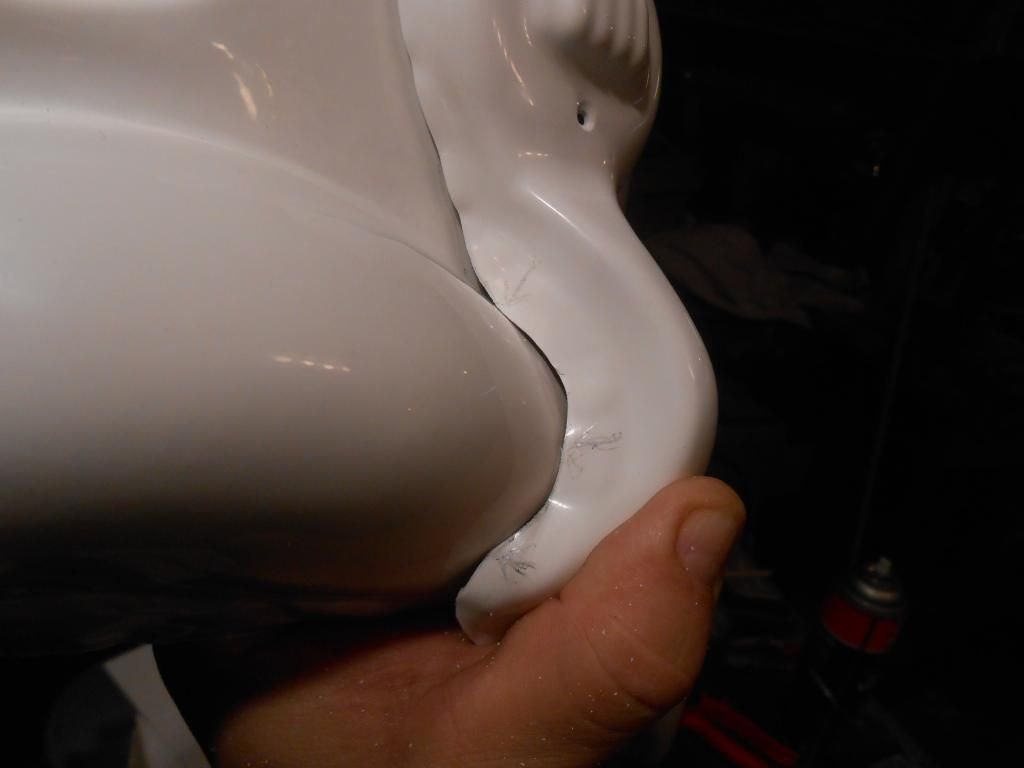
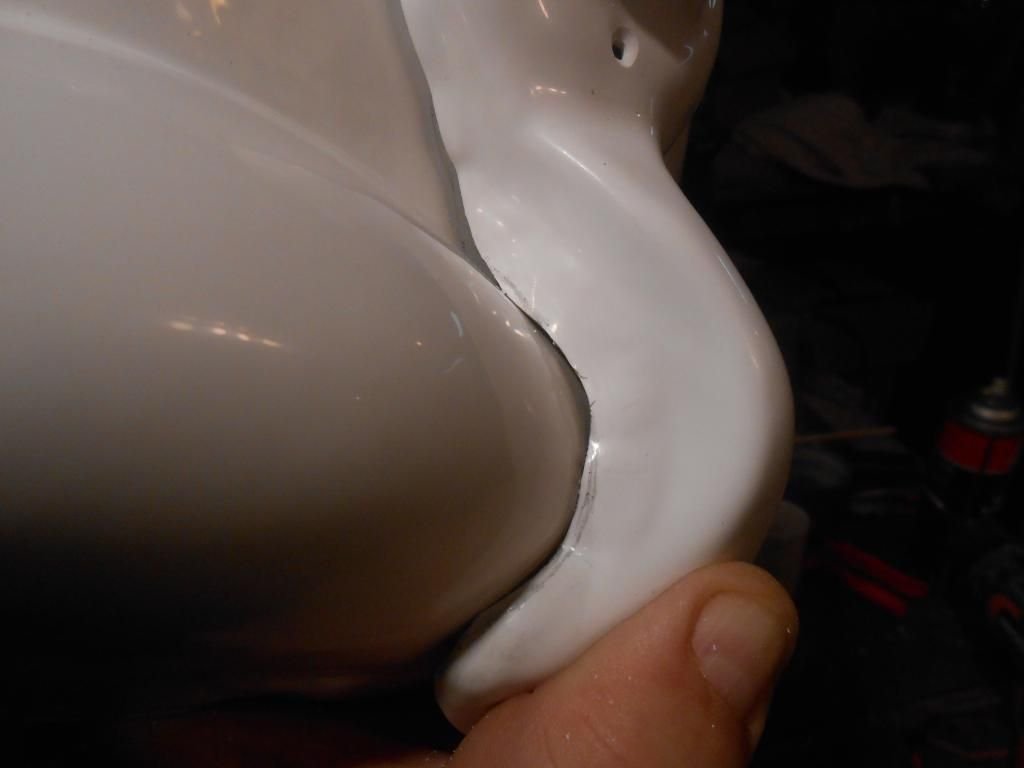
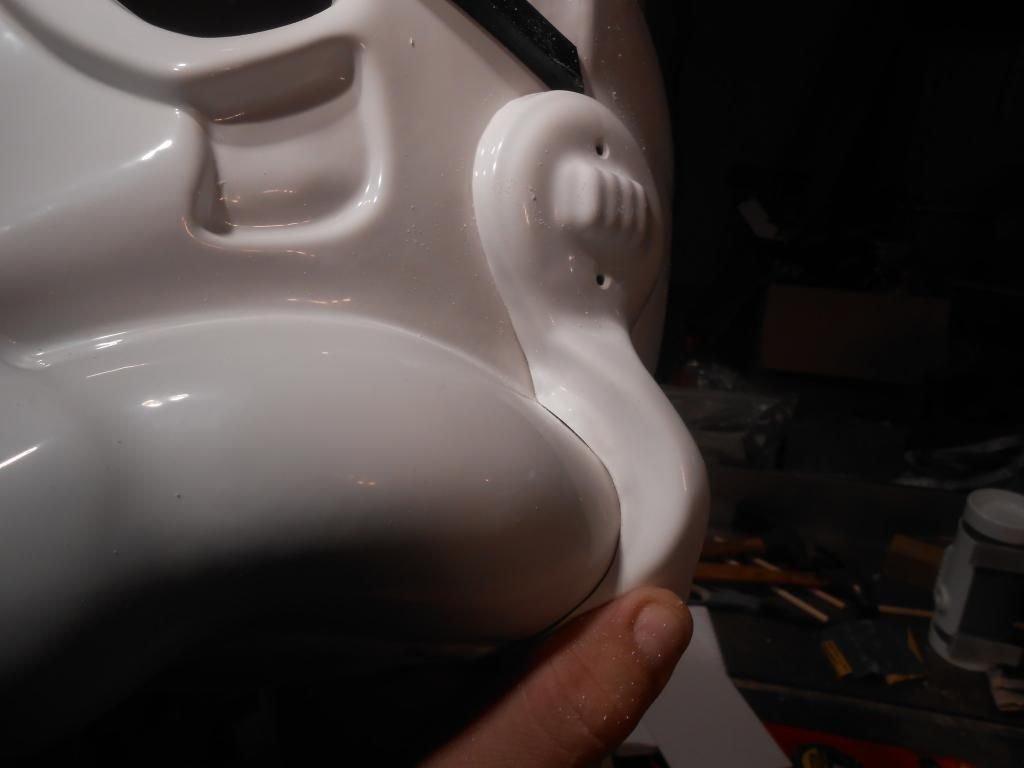
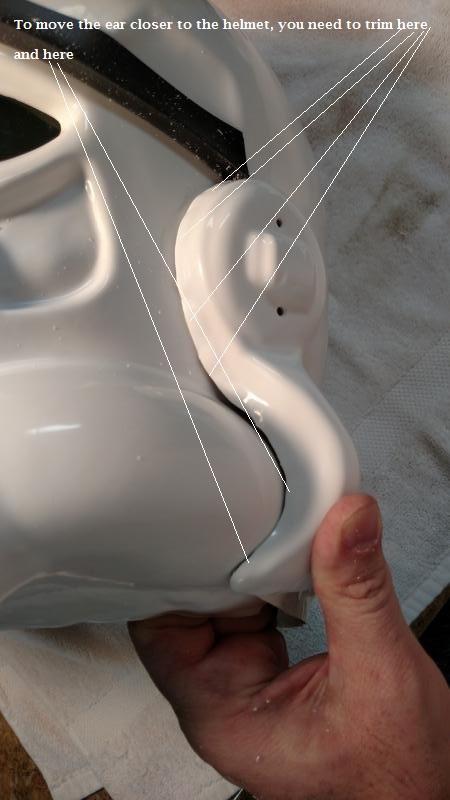
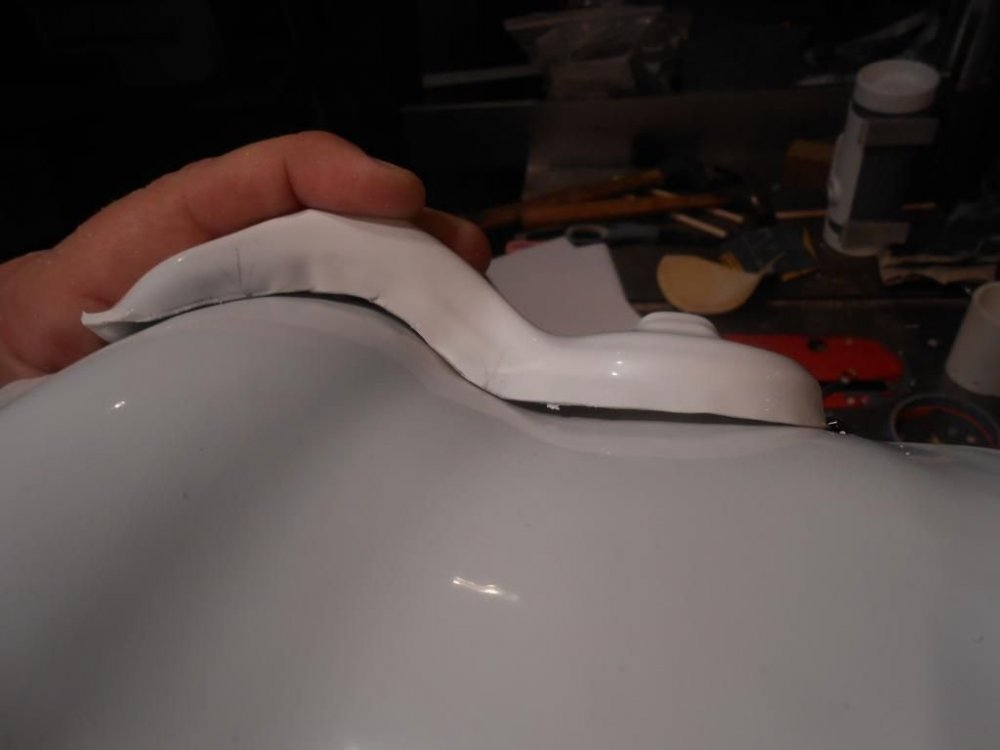
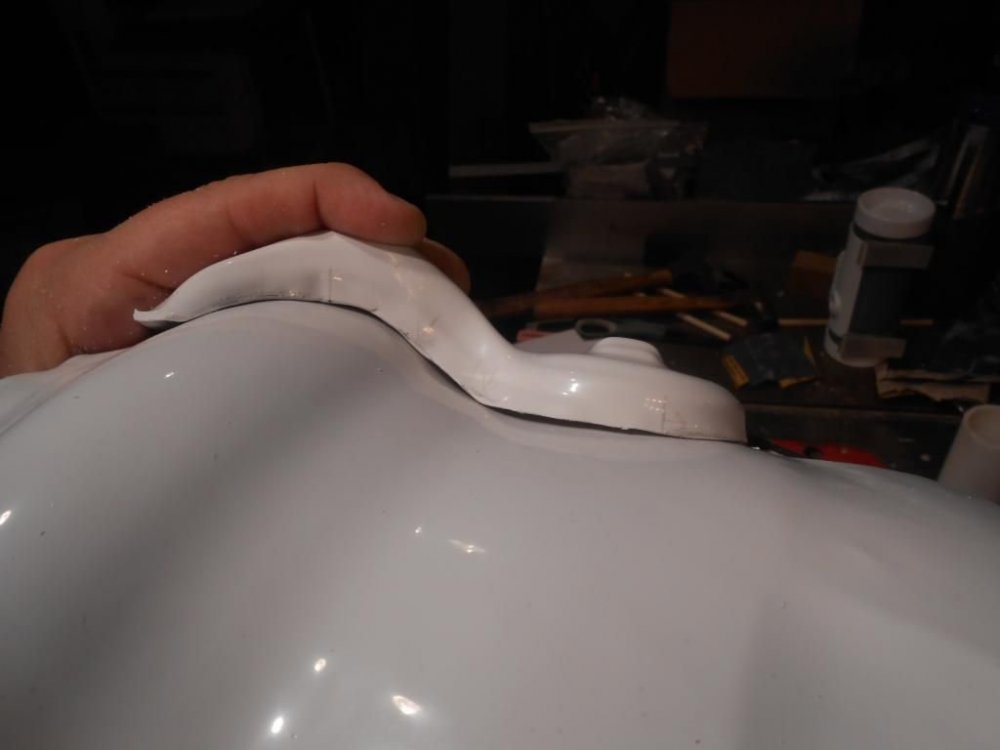
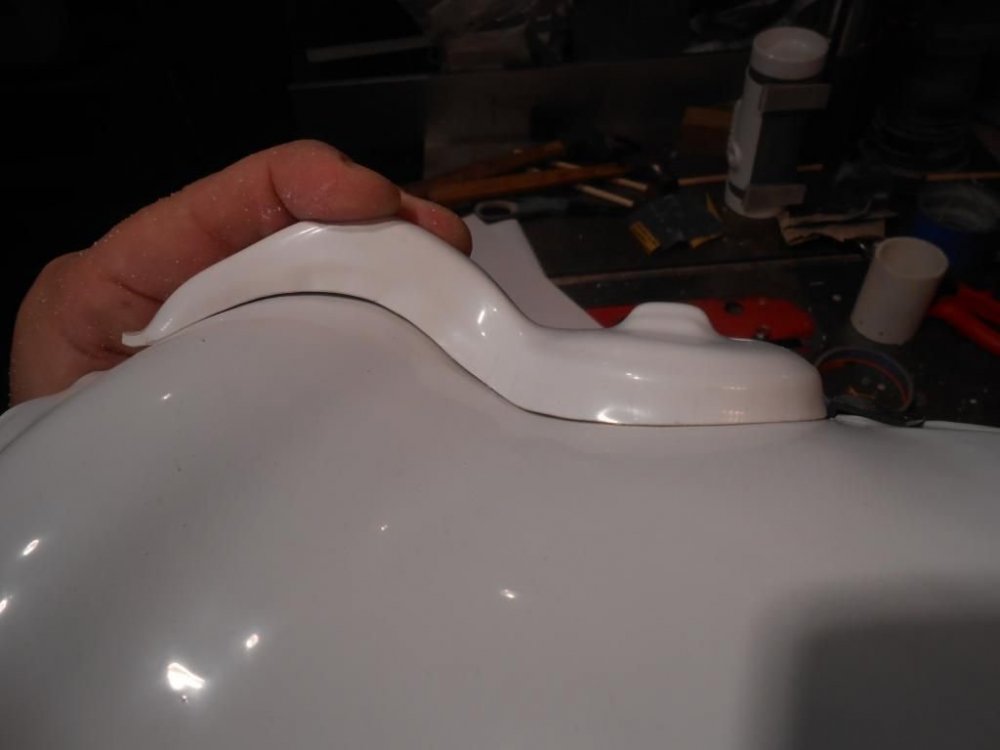
Doesn't matter how large the images are in Imgur they will copy across as there is no limit so you don't have to reduce the size of them. The top round section is quite thick and is what is holding the ear outwards, if you trim these sections it should come in more BUT ease into it, a little bit at a time, you don't want to trim too much all at once These may also be of help
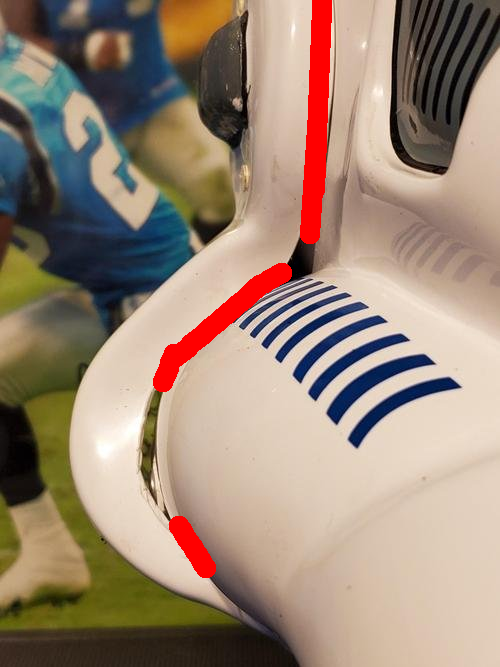 2 points
 -
Hi rez TKC screenshots, restored by gmrhodes13 High resolution stormtrooper commander images 32 images, restored by gmrhodes13 https://www.whitearmor.net/forum/topic/14409-hi-rez-tkc-screenshots/ https://www.whitearmor.net/forum/topic/18019-high-resolution-stormtrooper-commander-images-32-images/2 points
-
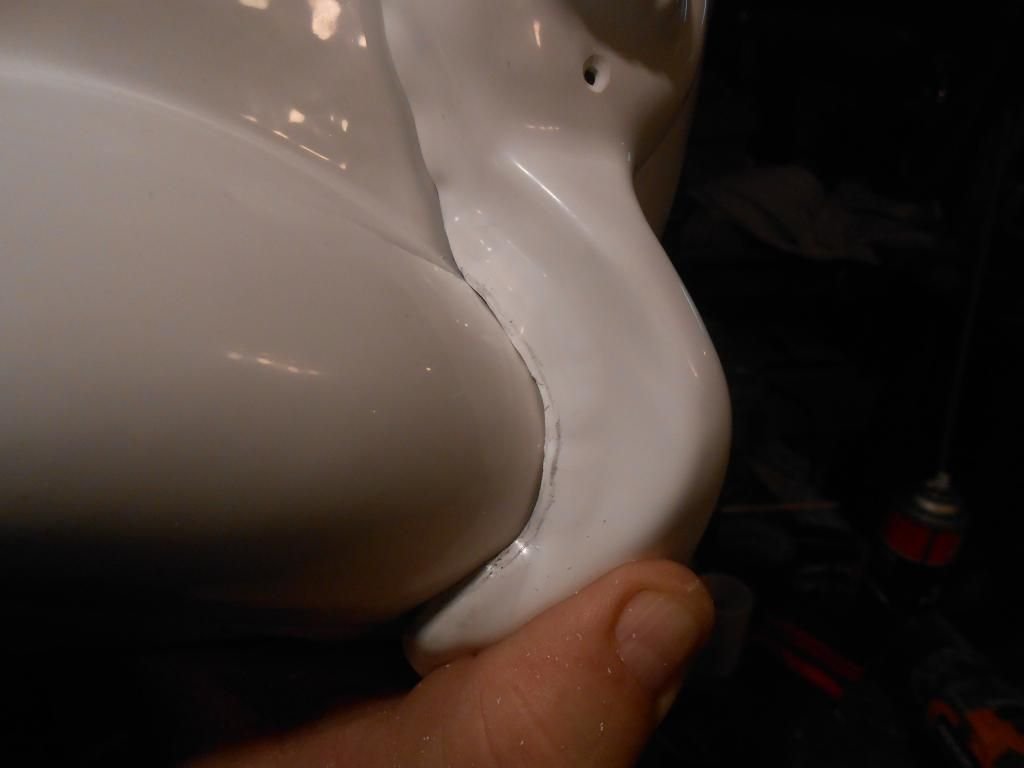
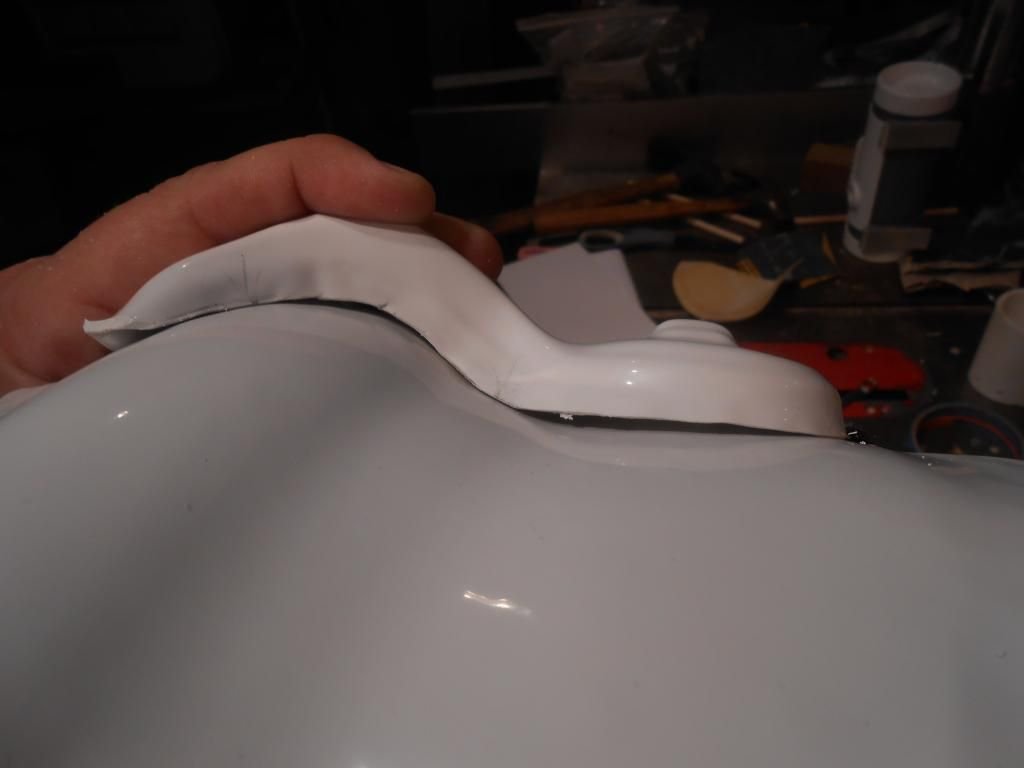
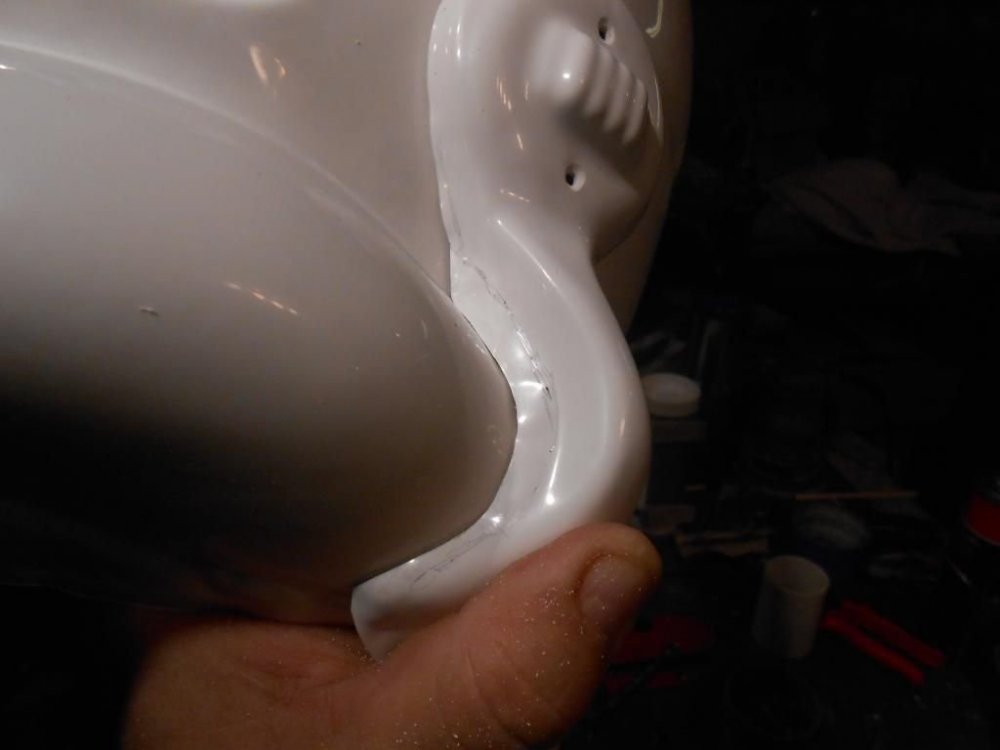
You should align the top and trim the bottom to suit2 points
-
I am TK-15028 and I was recently approved for my ANH Stunt in Garrison Carida, eastern Pennsylvania. I am a lifelong Star Wars fan and finally realized my childhood dream of becoming a stormtrooper. This community has been awesome! The information here and the advice I've received from members of the detachment has been instrumental to my progress and the hands-on help I received from a fellow garrison member, TK-14023, accelerated it. This past weekend was a garrison gathering where I got to meet my fellow members in person and I can't wait for my first troop!1 point
-
Born in 77' I grew up with Star wars. Was always impressed with the Stormtroopers. Thought they had the coolest armor and loved the E11. Went to Universal Studios in Florida when it opened up and the Starwars attraction had this boy in awe. Theyhad a stormtrooper suit with an E11 on display and I so badly wanted it. Never in my life did I want somthing so much but it was out of reach and not for sale. Now I have a son and his love for Star Wars is a bonding thing for us. He was searching You Tube and showed me videos of poeple making E11 blasters and I had to have one .I bought a Sterling pistol and a parts kit and made the necessary modifications to make it look like the original. Welded on the shroud. Welded a stock on in the closed position. Located a M38 tank scope on ebay along with repair parts for it . Fabricated a mount using instructions from this site. T tracks. Its a dream come true and the ultimate bonding experience with my son. You should have seen him light up. I couldnt have one when I was his age and being able to give him the experience was priceless. ButI have another itch. Armor. I would love to take part in the Legion .Being stuck at home during this covid gave us time for the blaster so figured why stop there. Im located in Kansas so feel free to reach out. Help is appreciated.1 point
-
Very clean build so far Dan, keep it up1 point
-
Appears the photobucket account is no longer active so unfortunately they can't be retrieved1 point
-
My current plan is to have any foam padding be attached via velcro so I can replace them if they get too smelly.1 point
-
1 point
-
I pulled the clamps and magnets off and the E6000 seems good! In response to @11b30b4's question, I was able to step into it when the snaps are set to the tightest. It was snug when pulling up, but the elastic stretched fine, and I can loosen the snaps if needed, especially once I put the undersuit on. The sides looked BAD. I wet sanded to 1,000 and I'll spray another coat of gloss black tomorrow. I also got some gloss white on the belt. Pinholes, still... But my notch fillings worked out unnoticeable! I fitted the barrel with the suspenders and E6000'd the snaps on. It was a pain getting the magnets to hold right, but I think it's all setup right. I'll check on it tonight, but hopefully they cure properly and I can wear it tomorrow!1 point
-
Have a look at the first thread in the Getting Started section, lots of info there. Also check out the build areas, many builds have the makers names in the titles, you can see the different makes, how they look and sizing. You will have not issues with RS or AP Also consider what version of Stormtrooper you want to build, one make doesn't suit all. List of CRL's is here https://databank.501st.com/databank/Costuming:FISD_CRL1 point
-
You will find that with a lot of makers armor1 point
-
I'm sorry to hear you're having a not good time with the rivets, we really appreciate your efforts and believe me ,all that effort is worth it when you see your EIB badge under your name, your certificate and the extra bonus, "Being part of the EIB 1000. " Thanks Trooper !!1 point
-
This is fantastic1 point
-
Ugh. So, tried to fix the original ears. Including trying to fix the countersink issue using the technique in one of the tutorials. Somehow I managed to screw that up, so now 1 hole on each ear is too big for my current screws. May be salvageable if slightly larger screws than the 6/32" screws I have are acceptable? Moved to the second ears. Used the toothpick/pencil/rubber band method. Only got the one ear done so far, and pretty sure I over trimmed it. I'm gonna put it down for the day and go bang my head on the wall.1 point
-
Dan, we have address the outline in the revision as well as the wording for the painting of the ear bars. Actually, it's one of the many things that prompted me to ask for the update to the CRLs. Thanks for the suggestion.1 point
-
Coming along nicely Mark1 point
-
I'm hoping to either lift it over my head and slide it down, or step in and pull it up. I'll find out today if either of those methods will work1 point
-
Ruky, I know if a pain in the butt to mask and a real kick in the pants when you get bleed. So, I suggest you use more precision masking tape around the edges of the paint zone then use the blue stuff to attach the plastic bag or whatever you use to cover the larger areas. I use the Tamiya masking tape and it comes in a variety of widths from 2mm through 18mm. This stuff is awesome. I work with the Tamiya tape around the teeth, tears, traps, and ear bars then I uses the standard blue painters tape to attach the larger masking stuff. Page 4 of my build you can see the Tamiya (yellow) masking tape. I have all the sizes but i use the 6mm and 18mm the most. Don't get discouraged, get mad and kick that helmets butt.1 point
-
At some point I just gave up on getting all of the pin holes covered. Glazing putty on them then sand and apply primer and damn if there wasn't more pin holes. I don't know if the glaze got sanded out of the holes but I worked for several days to get as many covered as I could but in the end, my armor still has lots of them. On the positive side, you really have to be searching for them to see them. Keep up the good work.1 point
-
Got beaten trying to get the the sniper knee right, so took a break to focus on rl stuff. Sent from my SM-A520F using Tapatalk1 point
-
Mate!! I was just thinking I hadn’t heard from you since the armour party back in Feb! Nothing useful to add other than I’m glad to see you back at it.1 point
-
Been a long time between posts, have just finished my 4th degree and now have some time to finally finish my kit, hopefully before the 2 yr mark kicks in. As going for centurion and being a perfectionist won't be done in a week, going to be a bit more systematic rather than jump between pieces like I have been doing previously. I bought a lexan welding face shield and cut it up for lenses, see photos below. Was thinking of pulling the helmet apart so I can get them in perfectly, fixed with sugru. Then reassemble with some rivets instead of some of the hidden screws. Any thoughts on this approach? Sent from my SM-A520F using Tapatalk1 point
-
This entire 501st detachment Merchandise thread has now been restored or archived by Sly11 https://www.whitearmor.net/forum/topic/42619-what-type-of-beret-to-buy/ https://www.whitearmor.net/forum/topic/10985-leftover-challenge-coins/ https://www.whitearmor.net/forum/topic/8902-closed-eib-gold-challenge-coin/ https://www.whitearmor.net/forum/topic/10430-shipping-fisd-tshirt/ https://www.whitearmor.net/forum/topic/11259-closed-fisd-tshirt-makeup-run/ https://www.whitearmor.net/forum/topic/16591-feedback-wanted-what-to-do-about-ei-tab-patches/ https://www.whitearmor.net/forum/topic/17954-interest-thread-fisd-10-inch-patch-5th-anniversary/ https://www.whitearmor.net/forum/topic/18001-interest-2012-fisd-calendar/ https://www.whitearmor.net/forum/topic/18443-closed-shipping-10-inch-fisd-5th-anniversary-patch/ https://www.whitearmor.net/forum/topic/13911-closed-fisd-mugs/ https://www.whitearmor.net/forum/topic/22099-project-feedback-eibcenturion-badge-pins-on-hold/ https://www.whitearmor.net/forum/topic/25494-closed-joint-ops-challenge-coin/ https://www.whitearmor.net/forum/topic/21835-project-feedback-fisd-lapel-pin/ https://www.whitearmor.net/forum/topic/24965-closed-fisd-v2-eib-only-gold-challenge-coin/ https://www.whitearmor.net/forum/topic/24946-closed-fisd-v2-challenge-coin/ https://www.whitearmor.net/forum/topic/3365-closed-fisd-hoodie/ https://www.whitearmor.net/forum/topic/32666-free-swag/ https://www.whitearmor.net/forum/topic/31299-closed-2015-fisd-challenge-coin/ https://www.whitearmor.net/forum/topic/33976-closed-fisd-fotk-challenge-coin/ https://www.whitearmor.net/forum/topic/18944-10-patches-sold-out/ https://www.whitearmor.net/forum/topic/21673-official-501stfisd-t-shirt/ https://www.whitearmor.net/forum/topic/38765-leftover-coins-closed/ https://www.whitearmor.net/forum/topic/37044-fisd-racing-shirt-run-is-closed/ https://www.whitearmor.net/forum/topic/38450-fisd-anniversary-patch-closed/ https://www.whitearmor.net/forum/topic/39617-fisd-patches-eib-centurion-rockers-coming-soon/ https://www.whitearmor.net/forum/topic/16971-fisd-patches-get-em-while-theyre-hot/ https://www.whitearmor.net/forum/topic/38764-closed-fisd-anniversary-patch-make-up-run-is-closed/ https://www.whitearmor.net/forum/topic/38565-last-of-the-anniversary-coins/ https://www.whitearmor.net/forum/topic/38256-10th-anniversary-challenge-coin-closed/ https://www.whitearmor.net/forum/topic/40580-closed-fisd-limited-racing-shirt-sales-thread/ https://www.whitearmor.net/forum/topic/40113-official-fisd-name-badge-sales-thread/ https://www.whitearmor.net/forum/topic/39811-closed-fisd-patches-eib-and-centurion-rockers/1 point
-
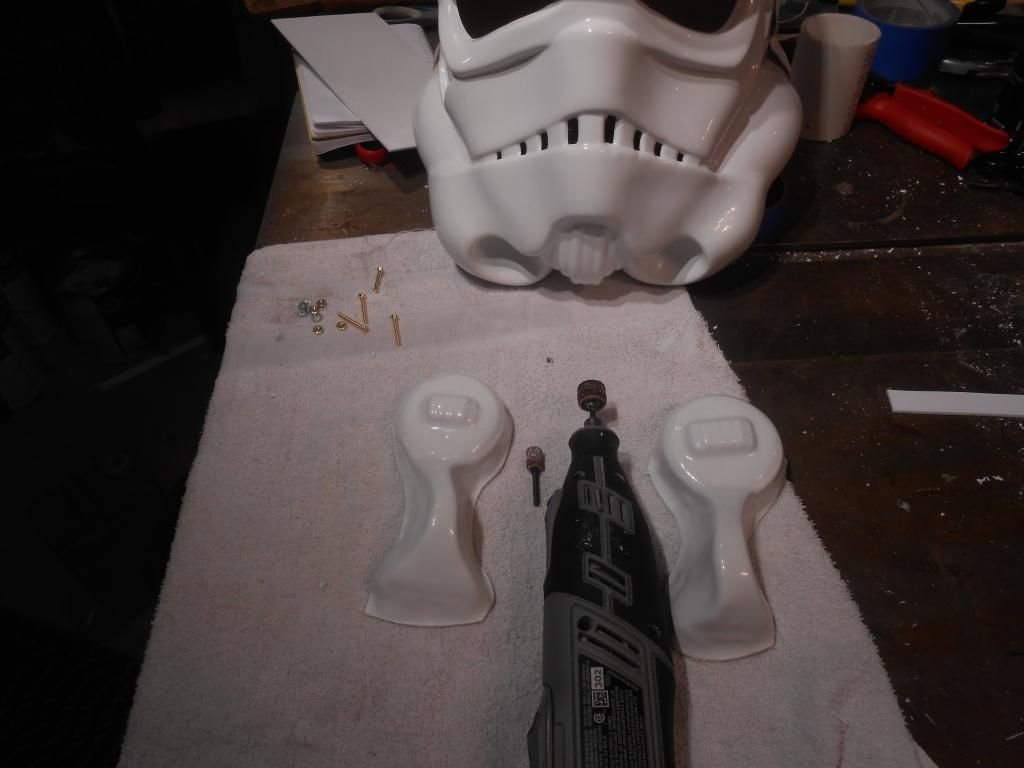
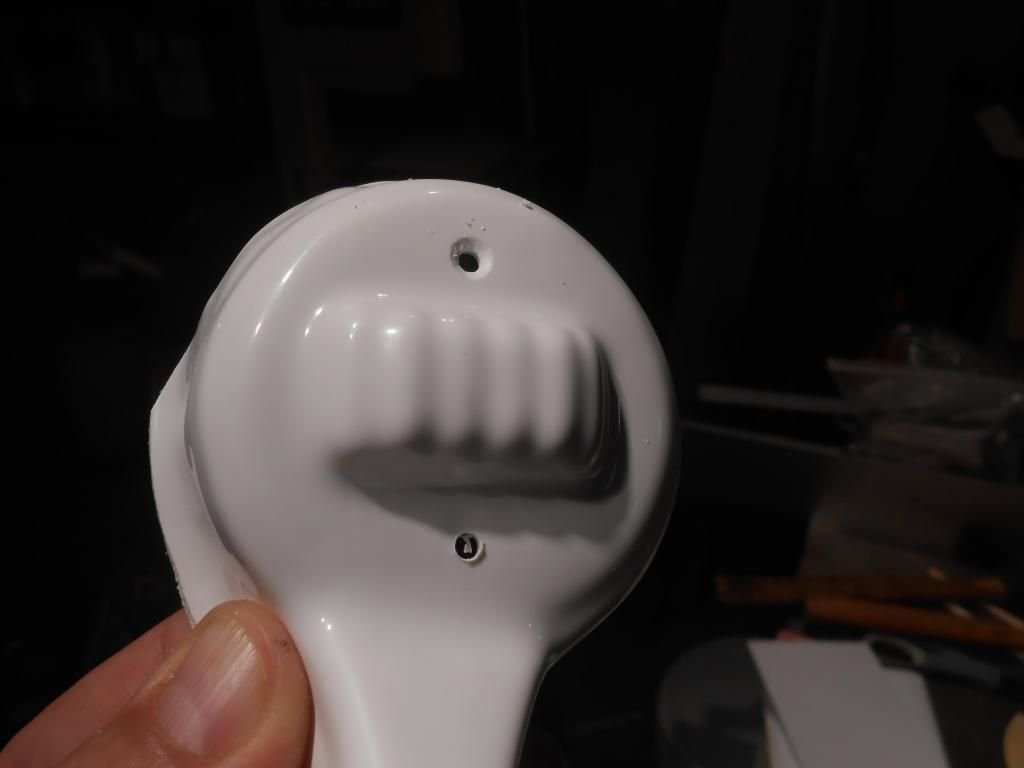
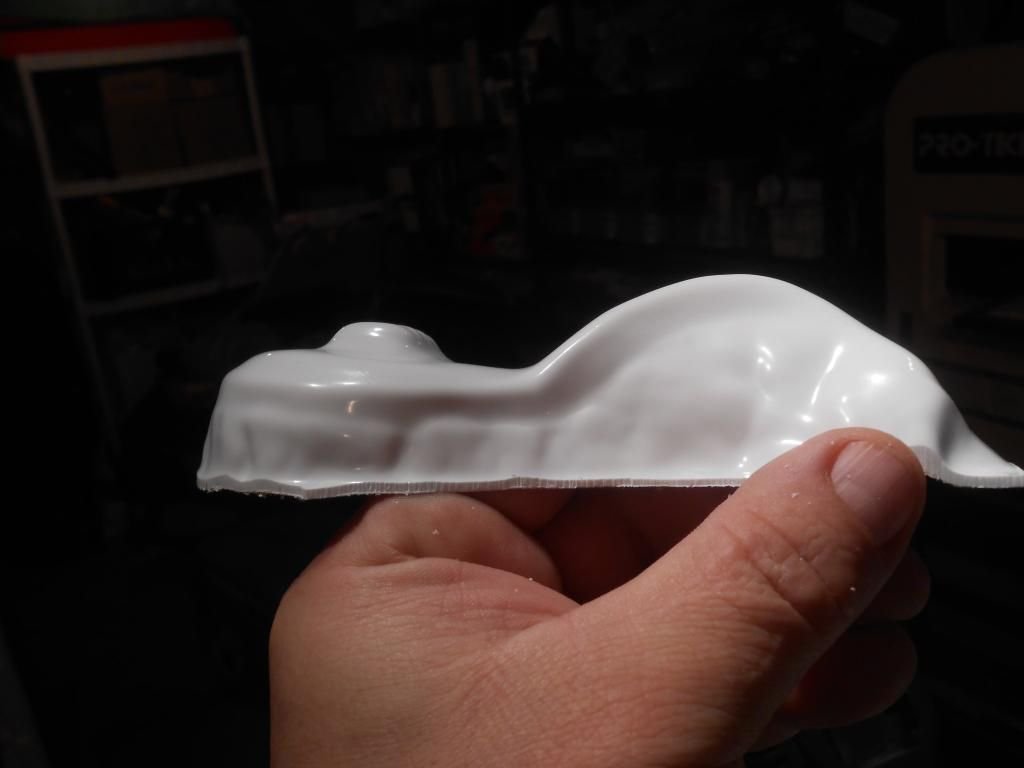
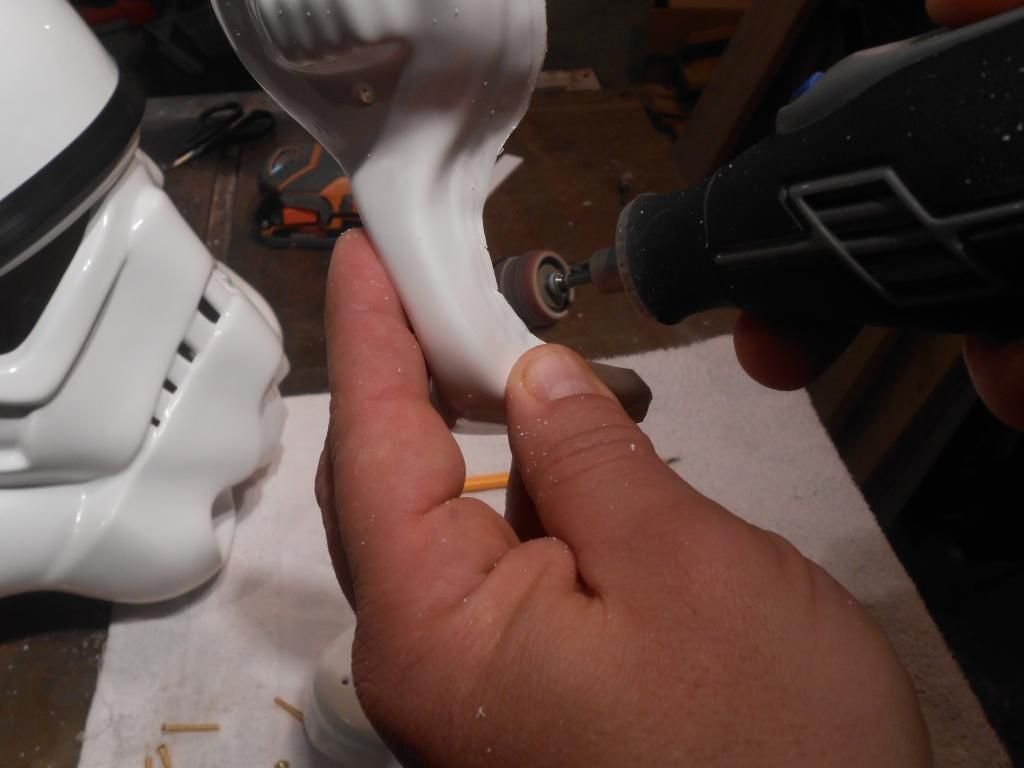
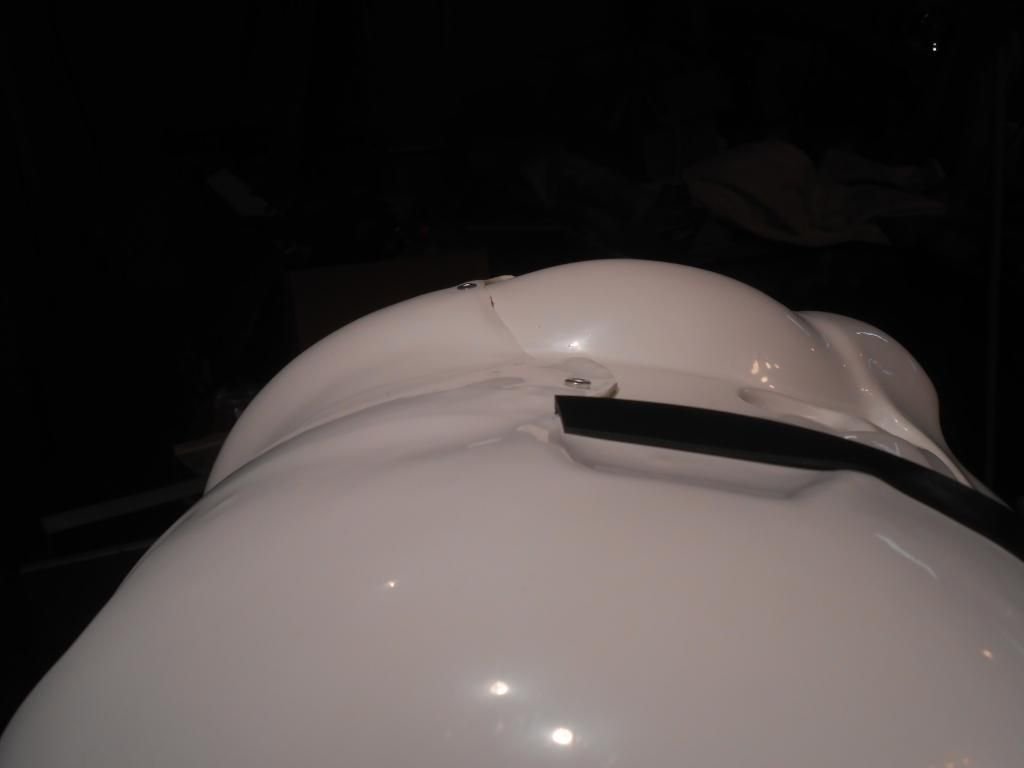
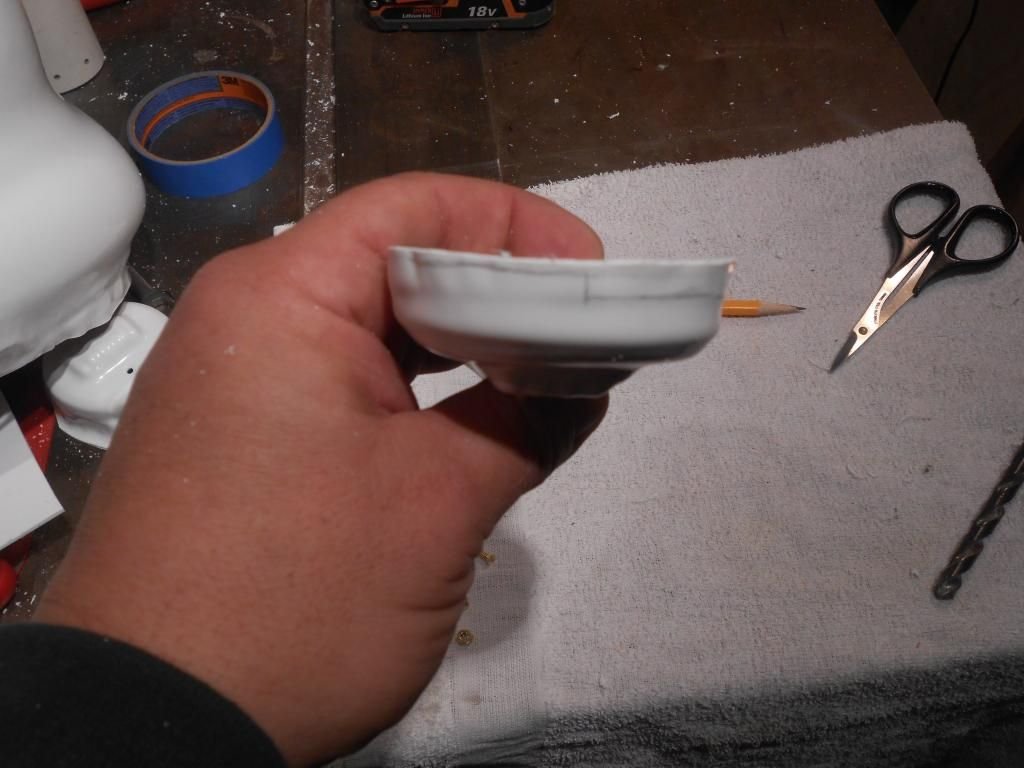
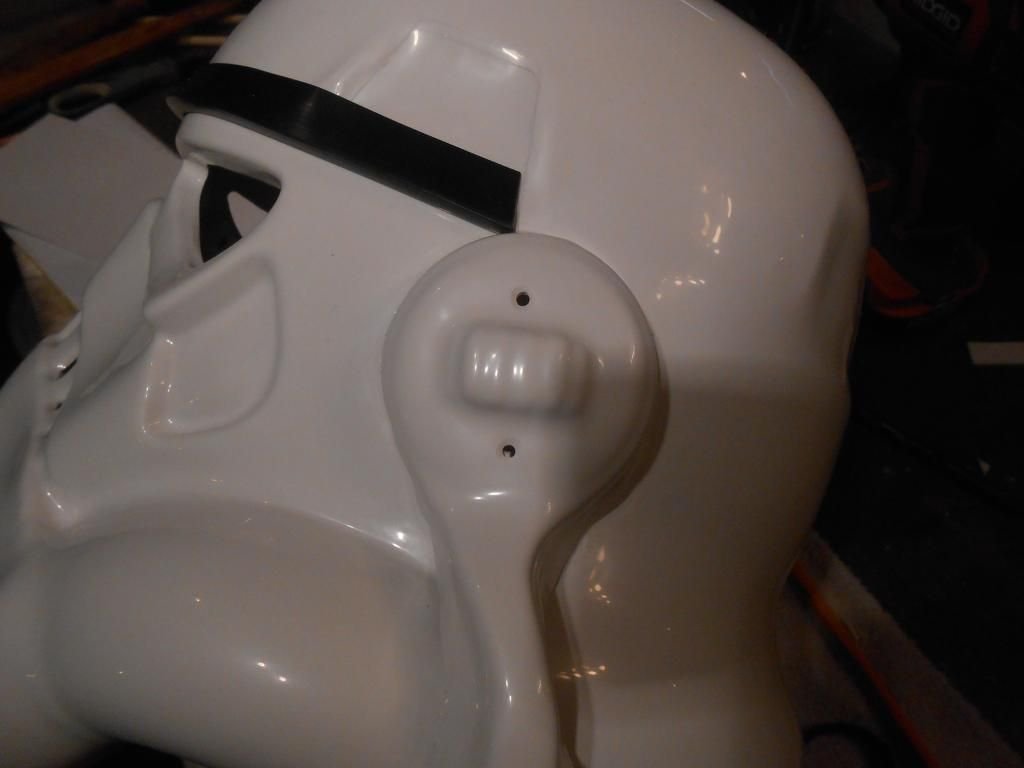
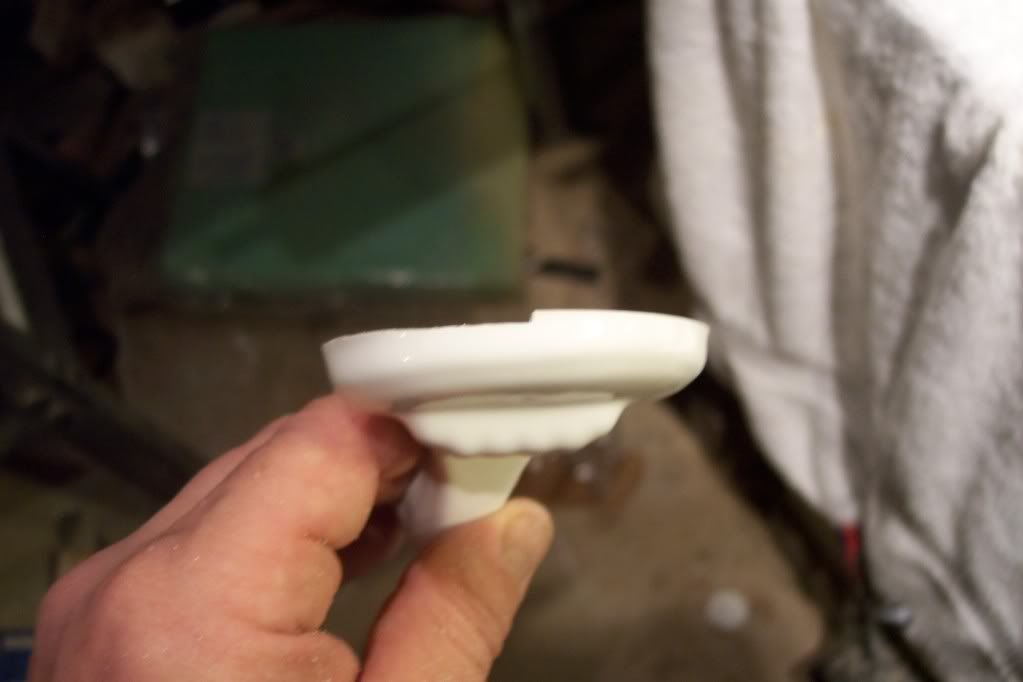
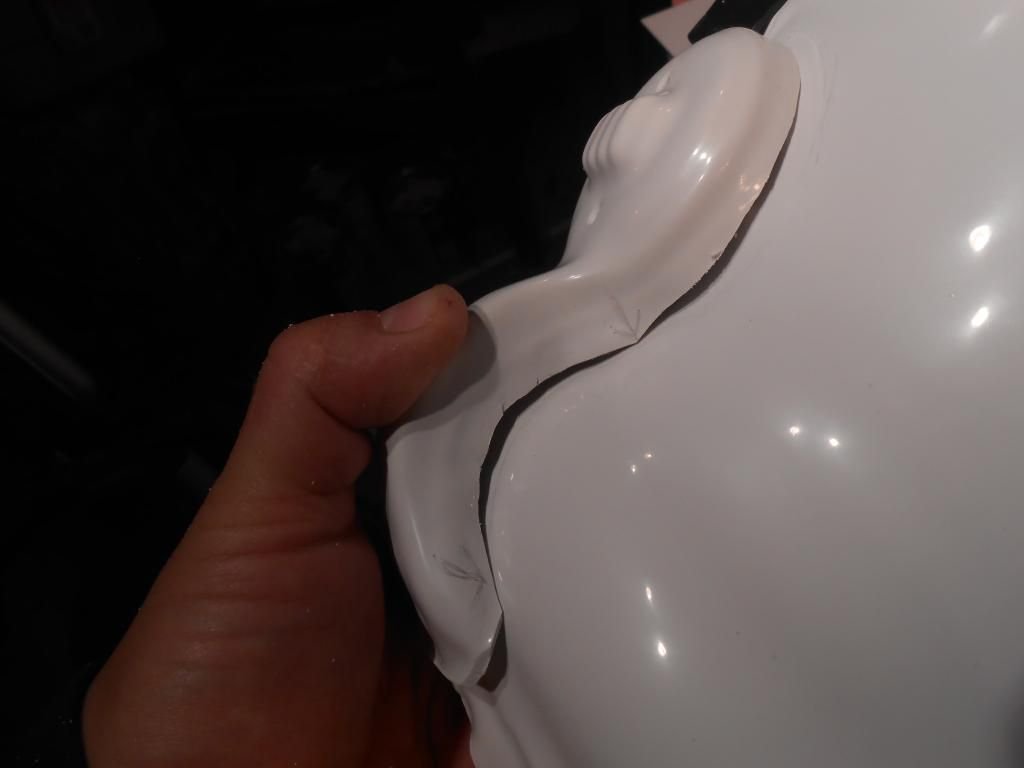
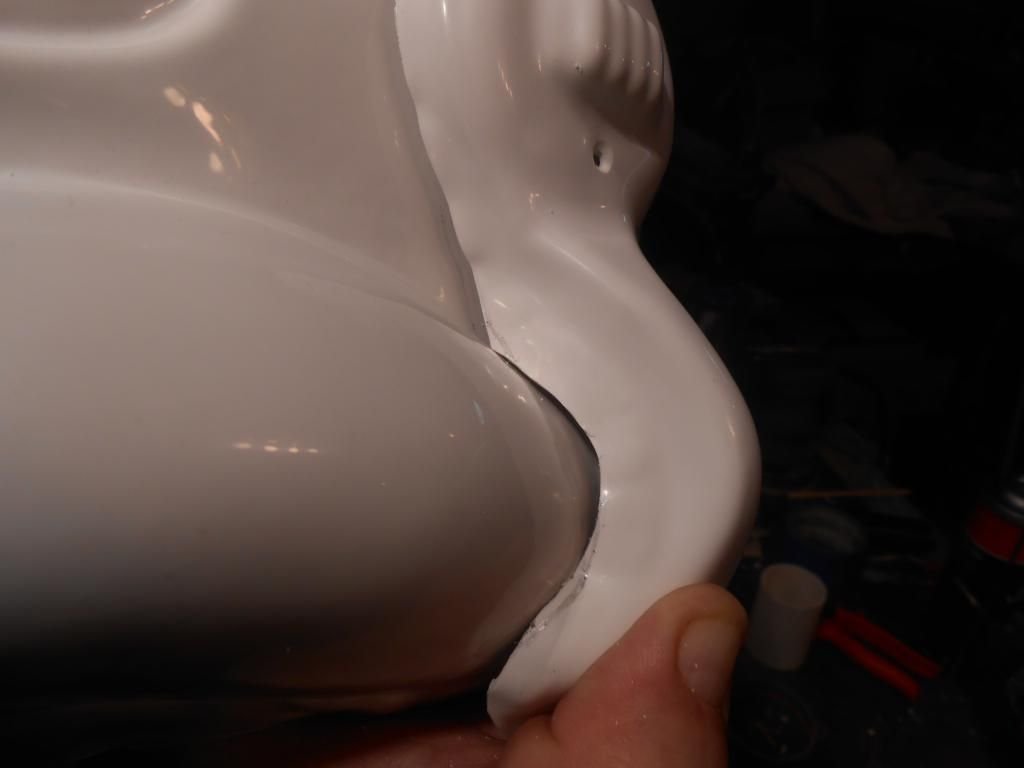
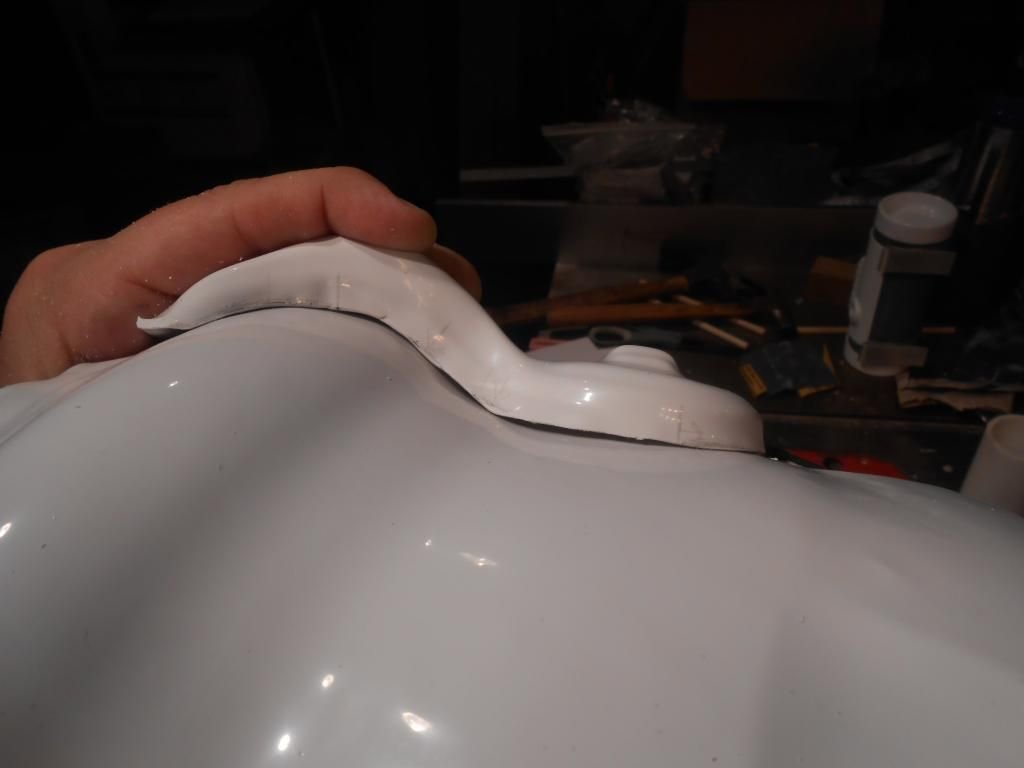
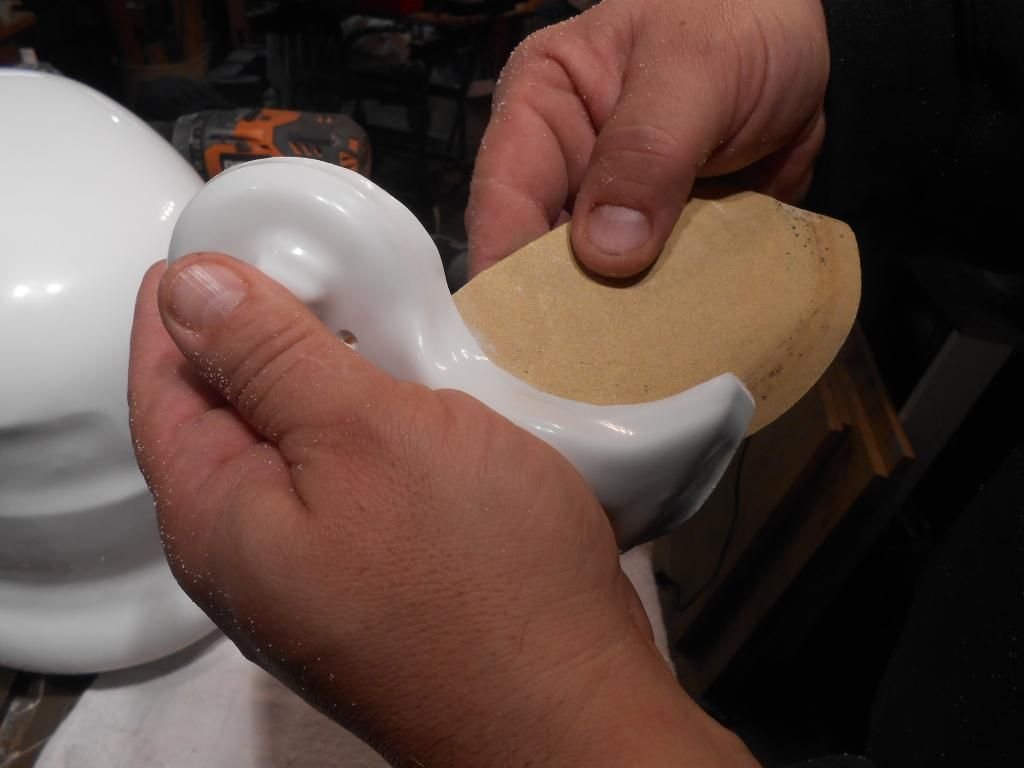
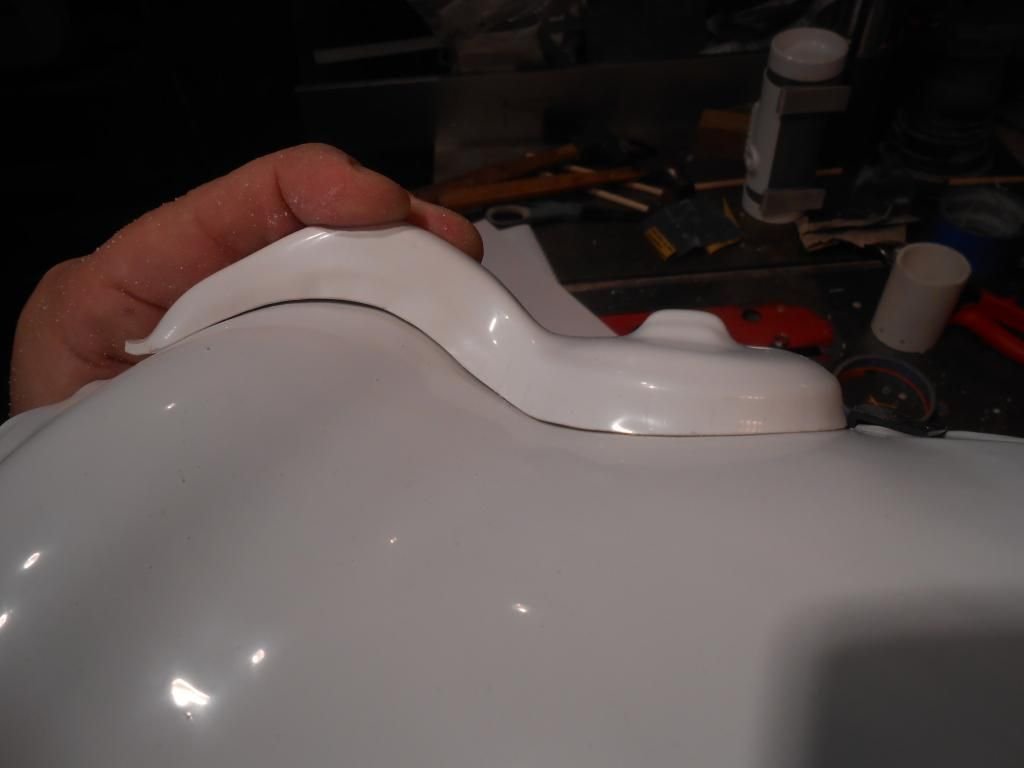
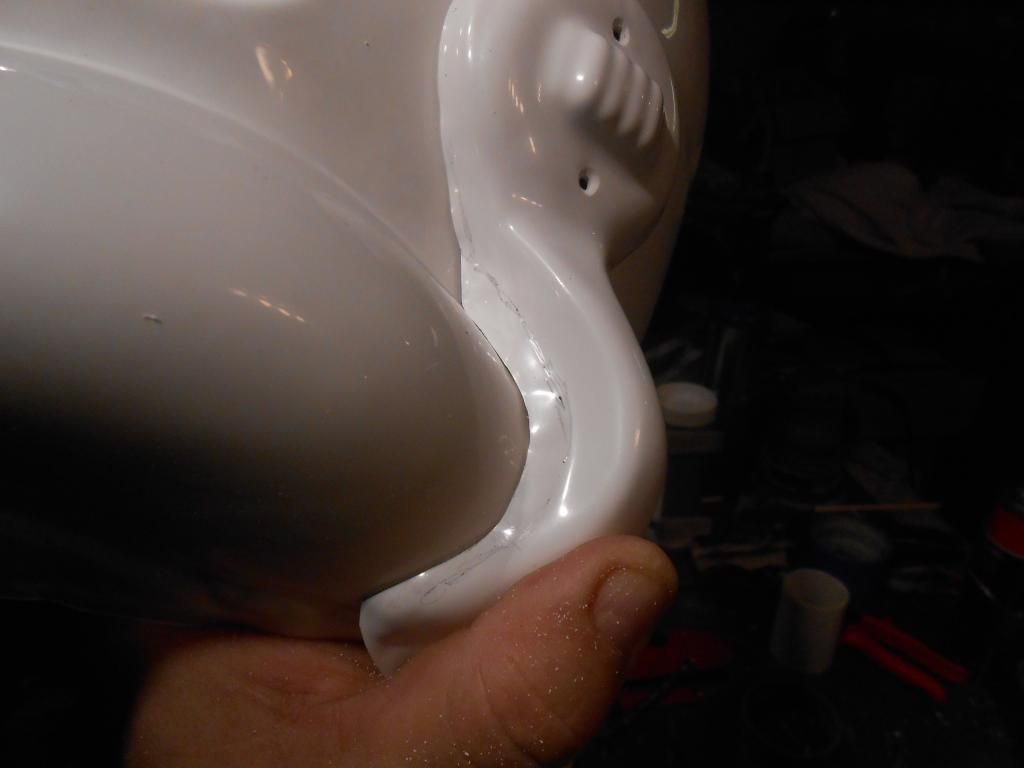
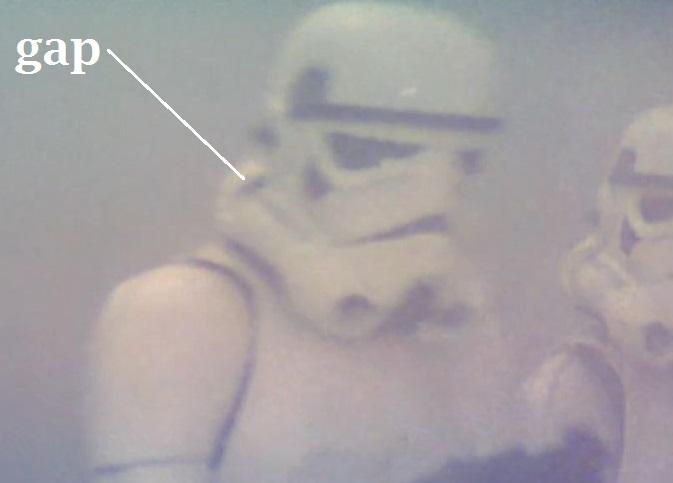
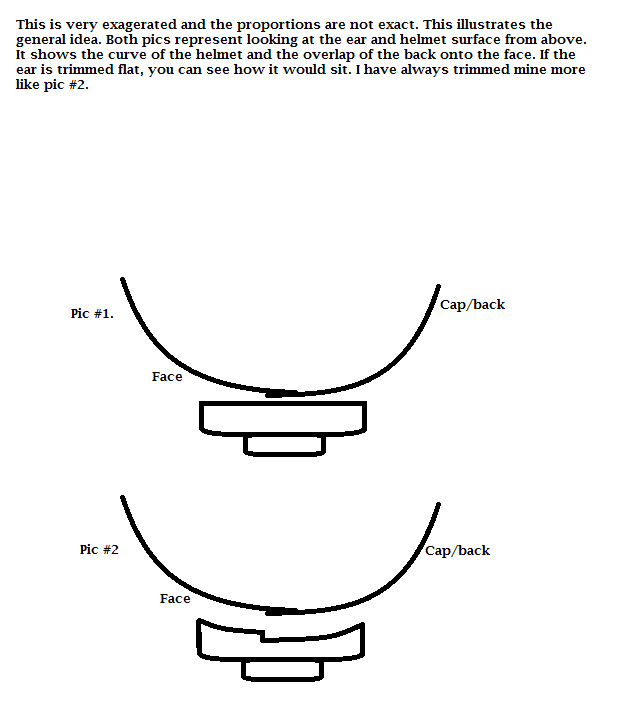
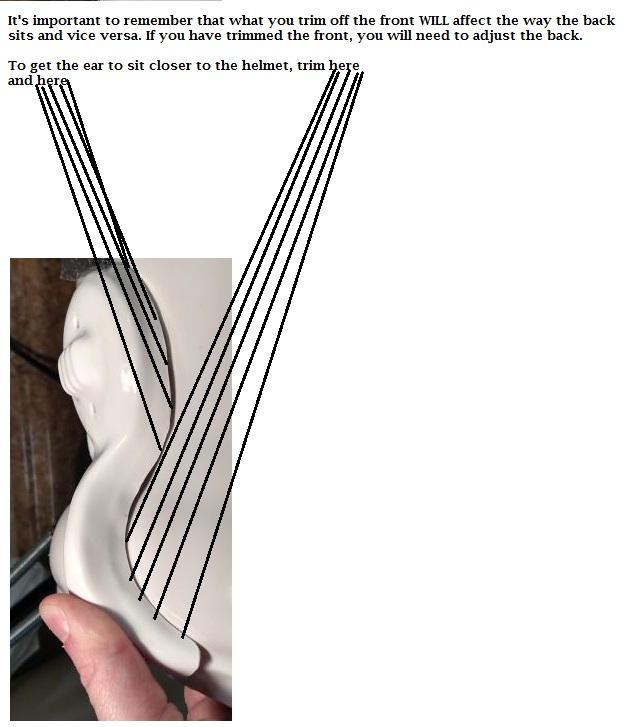
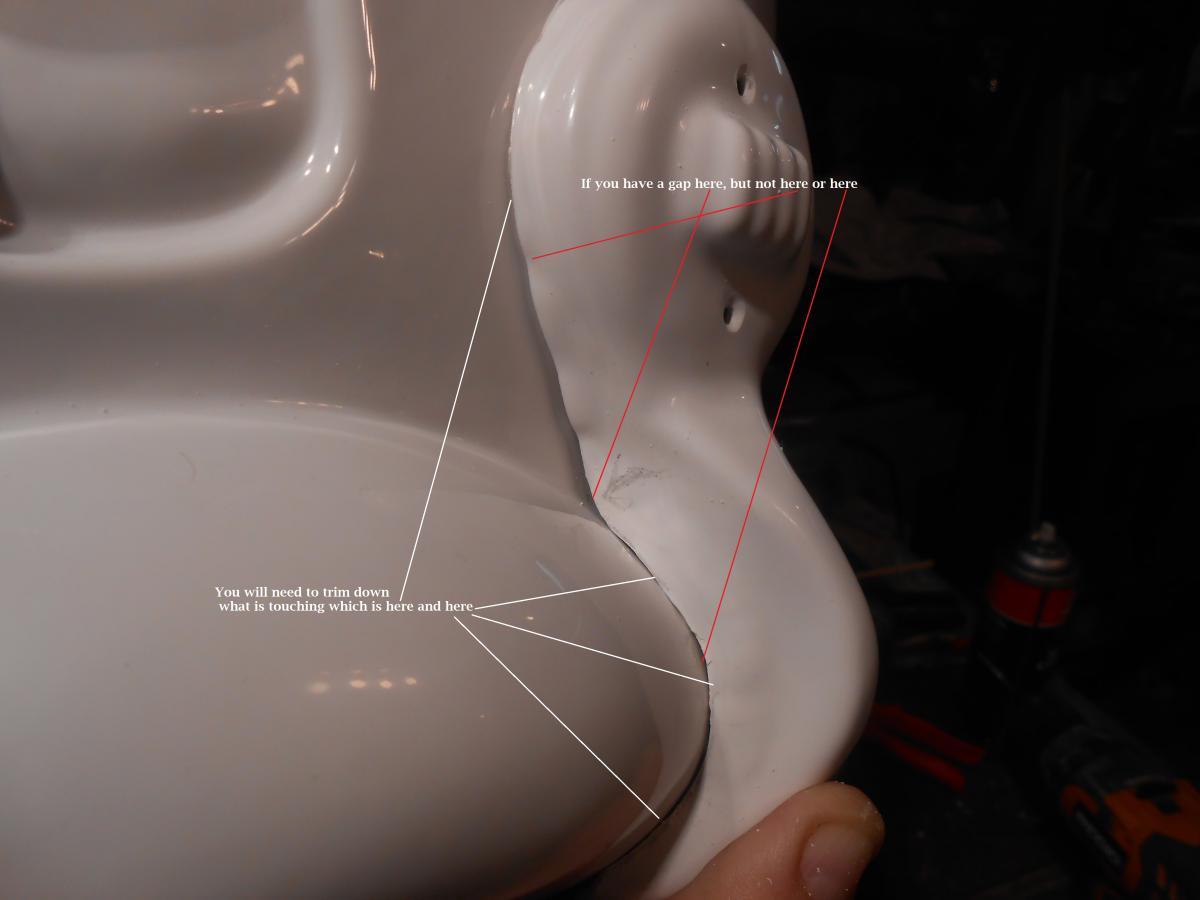
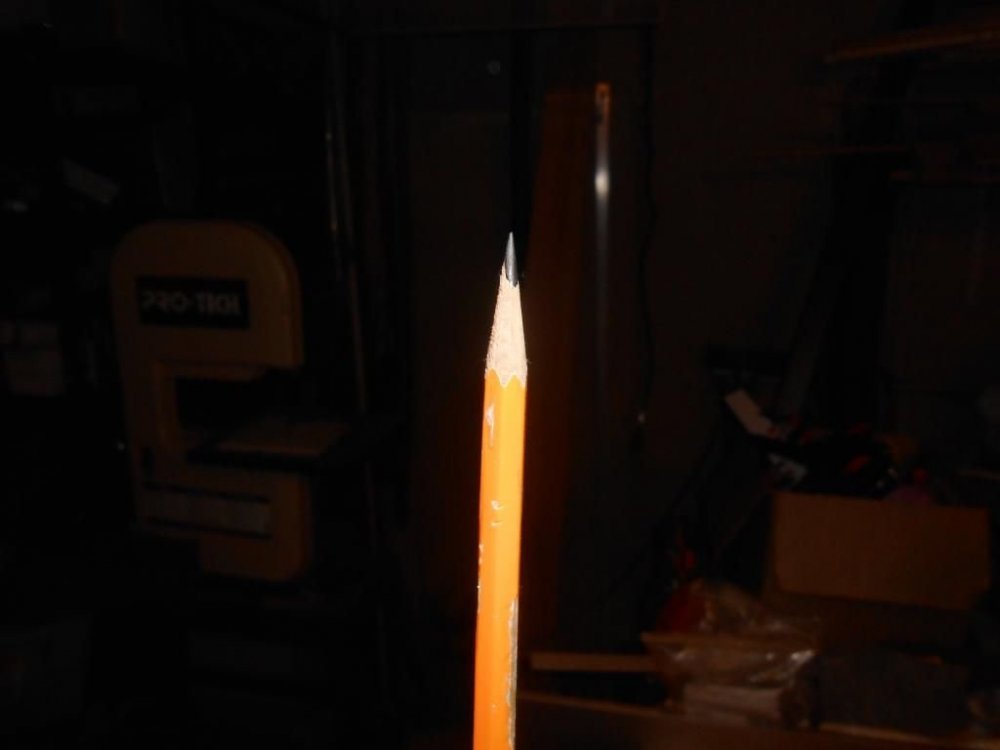
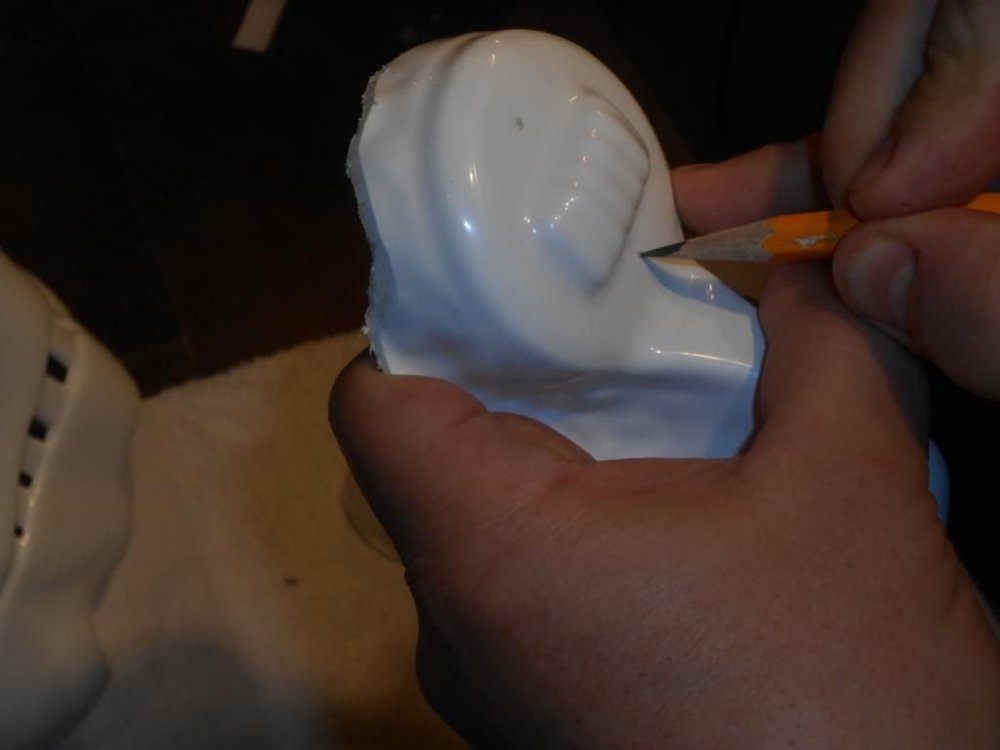
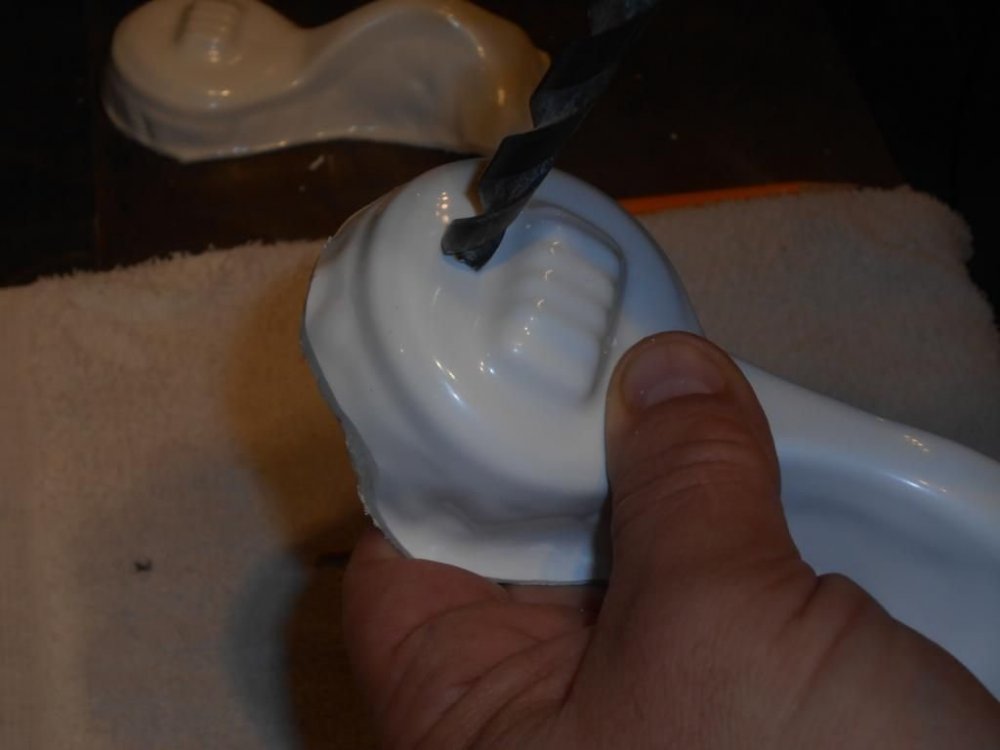
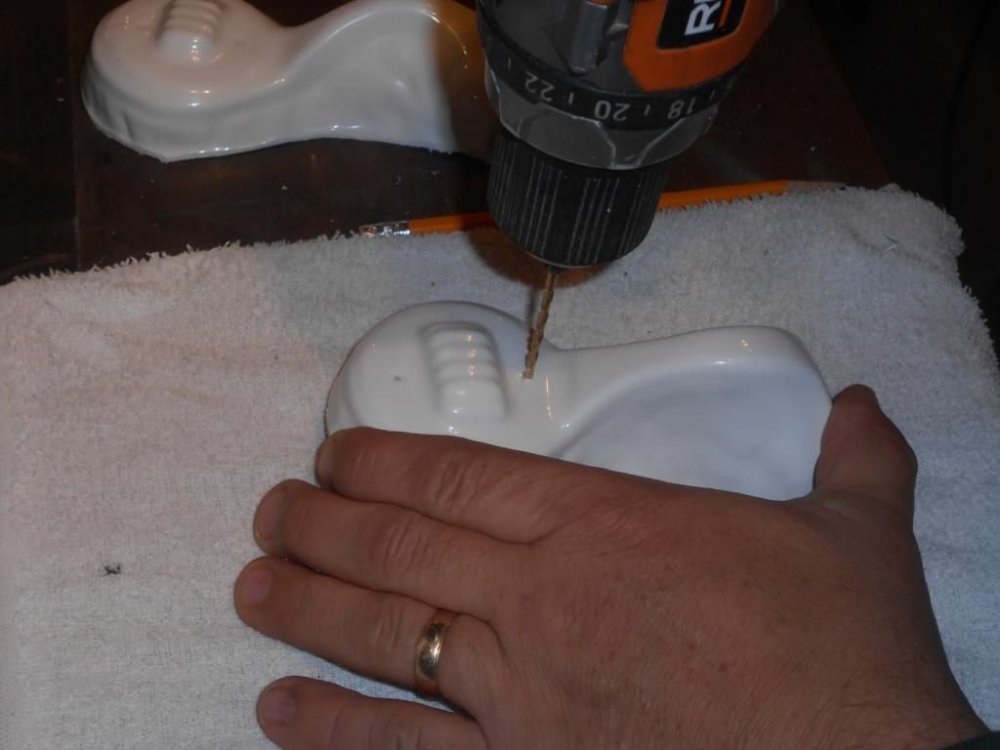
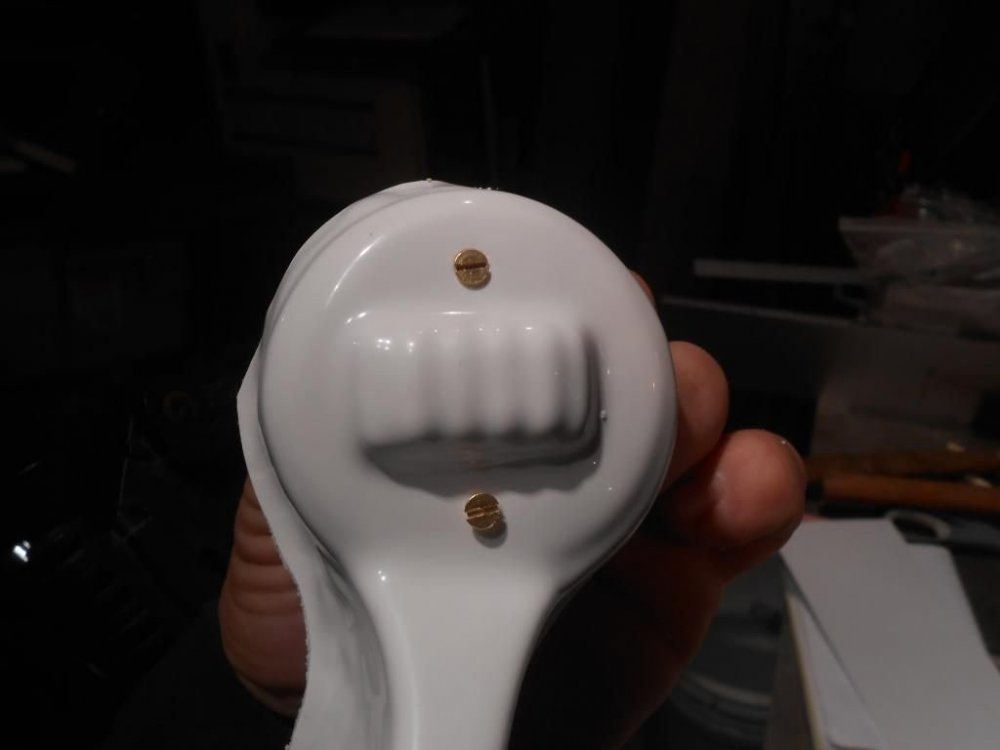
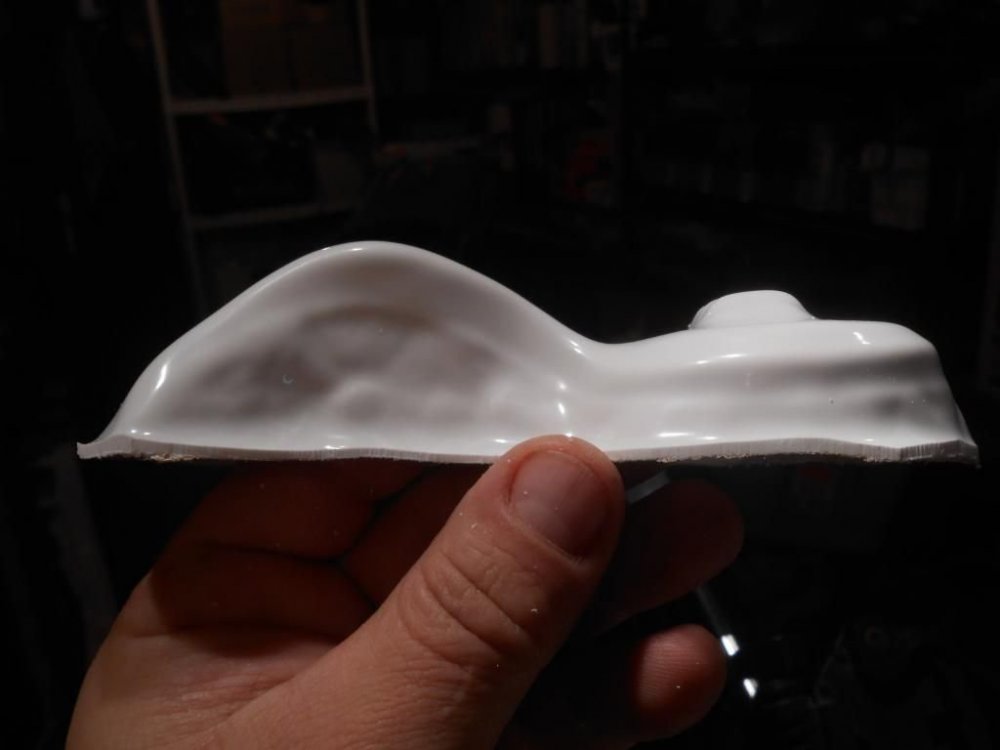
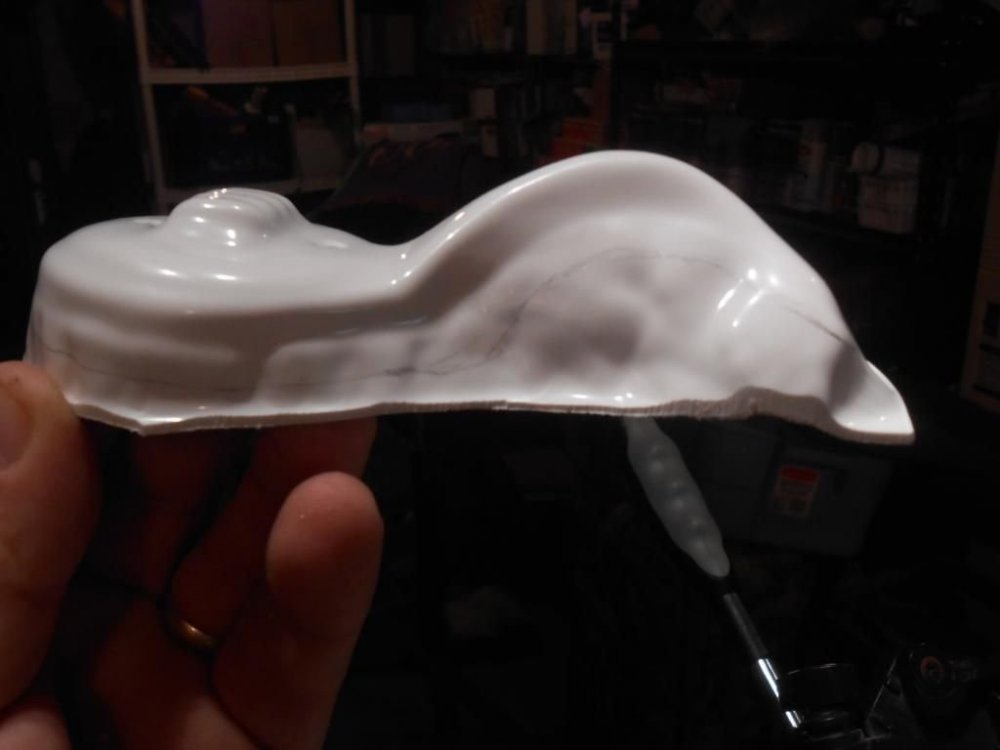
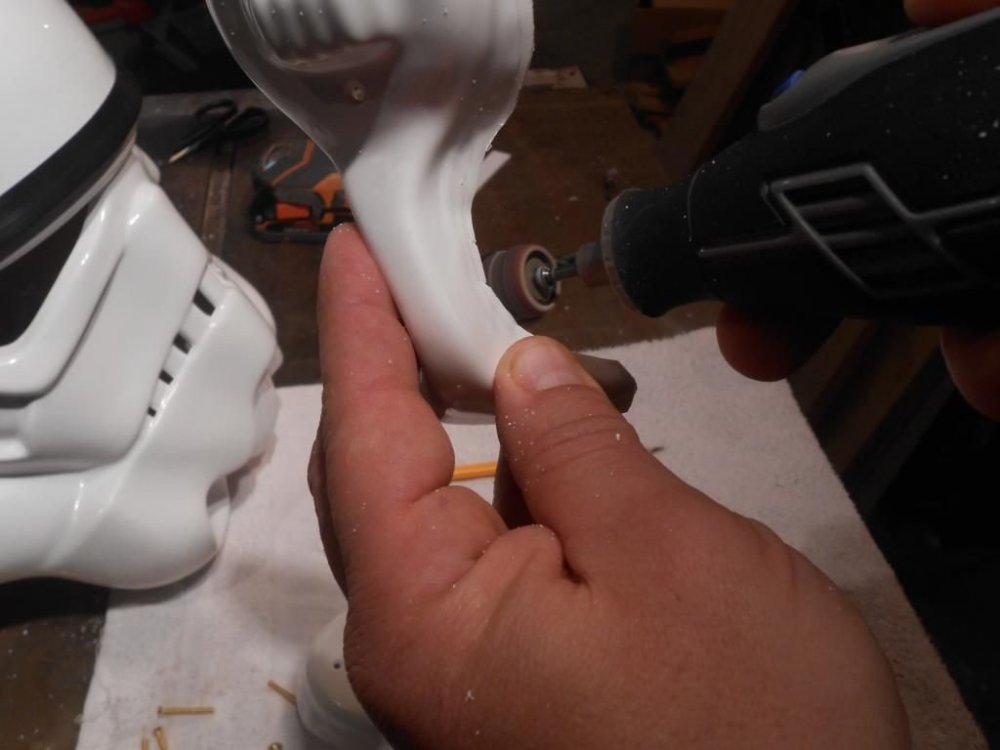
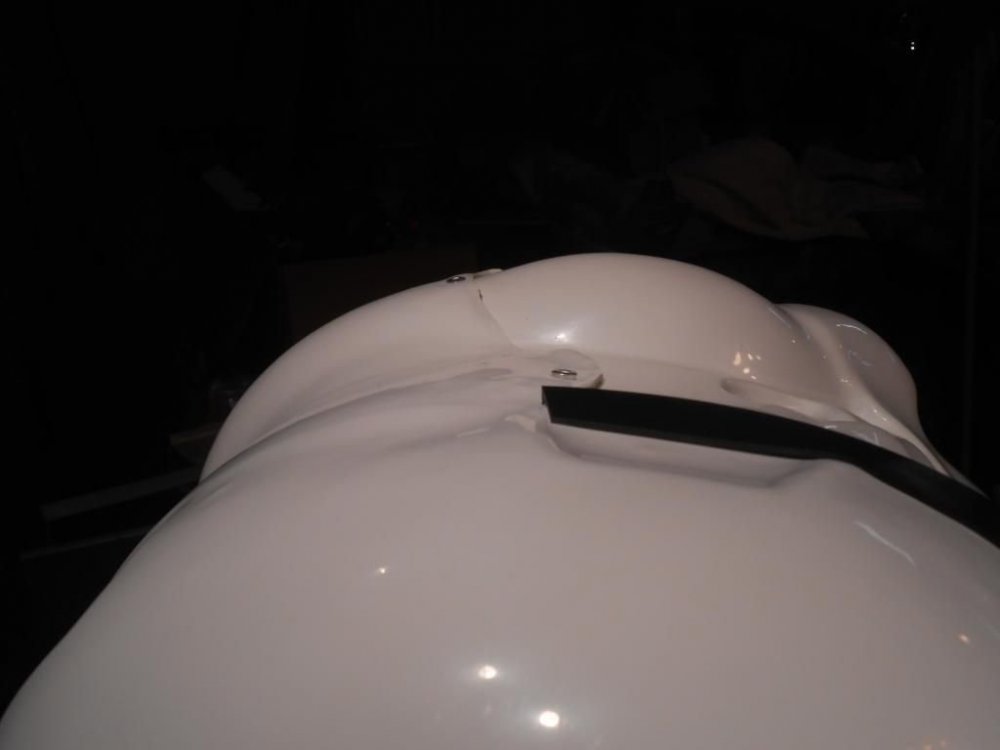
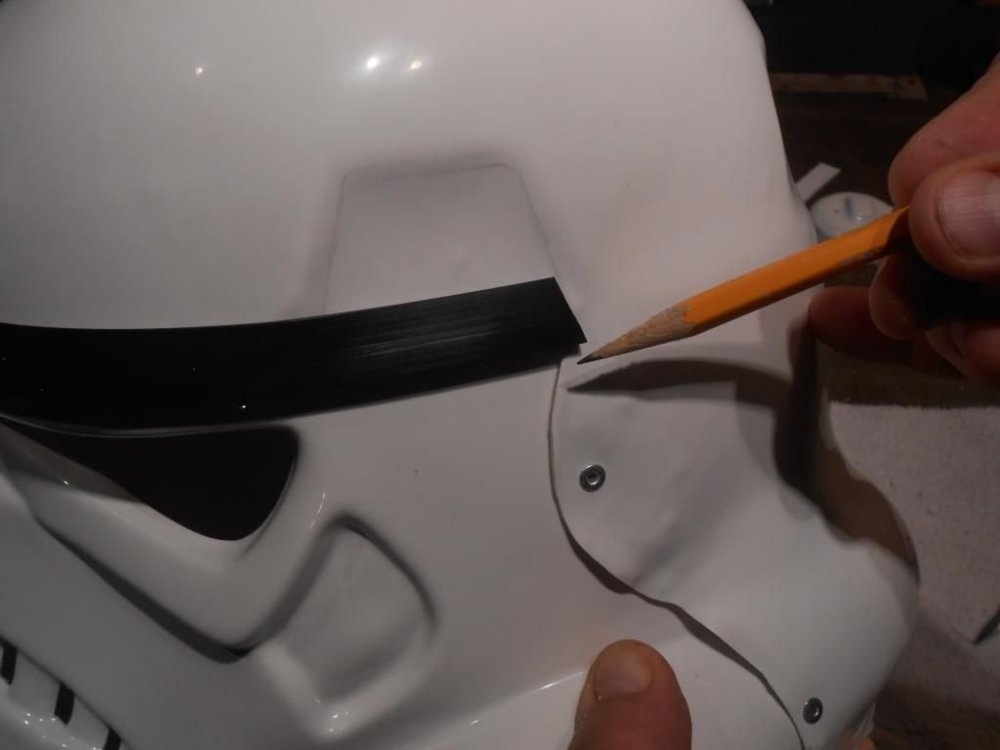
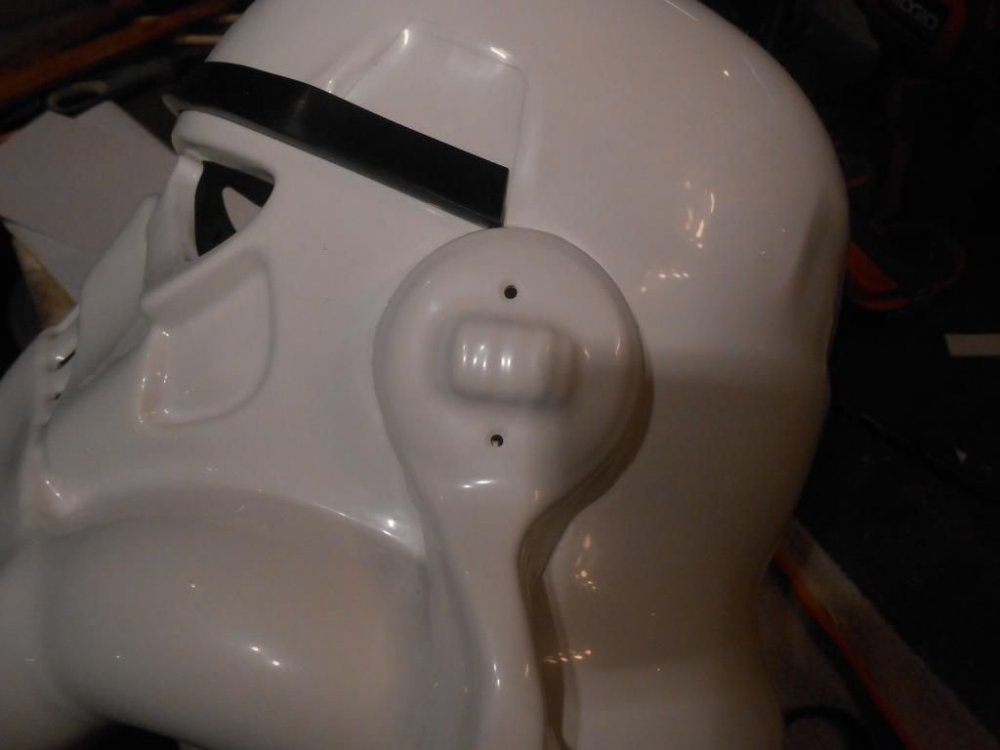
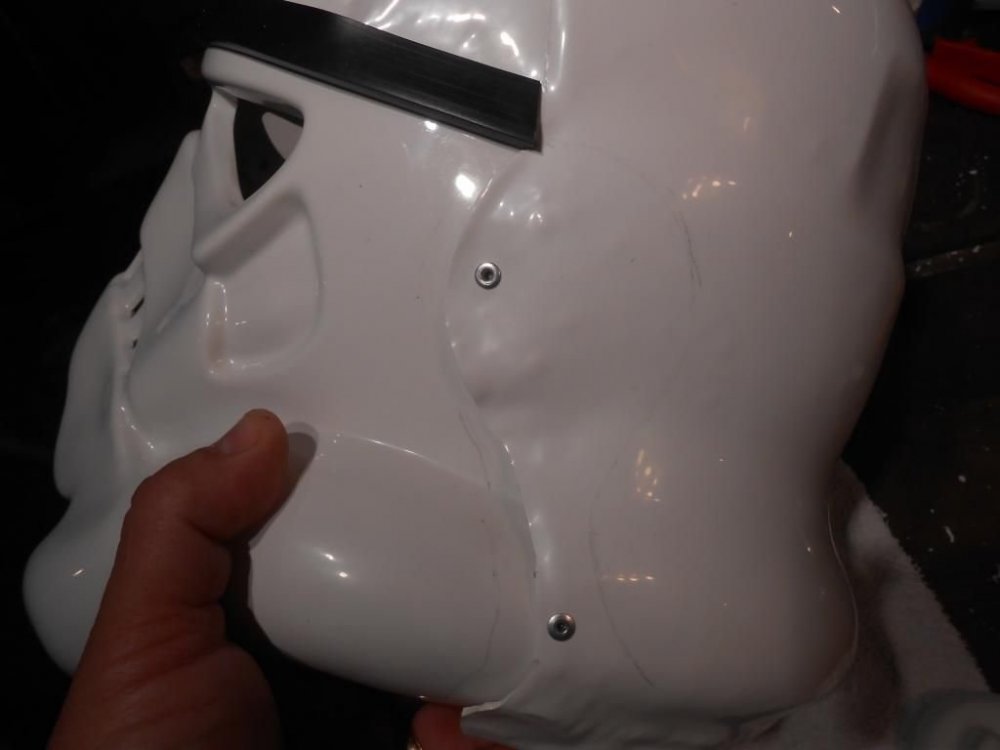
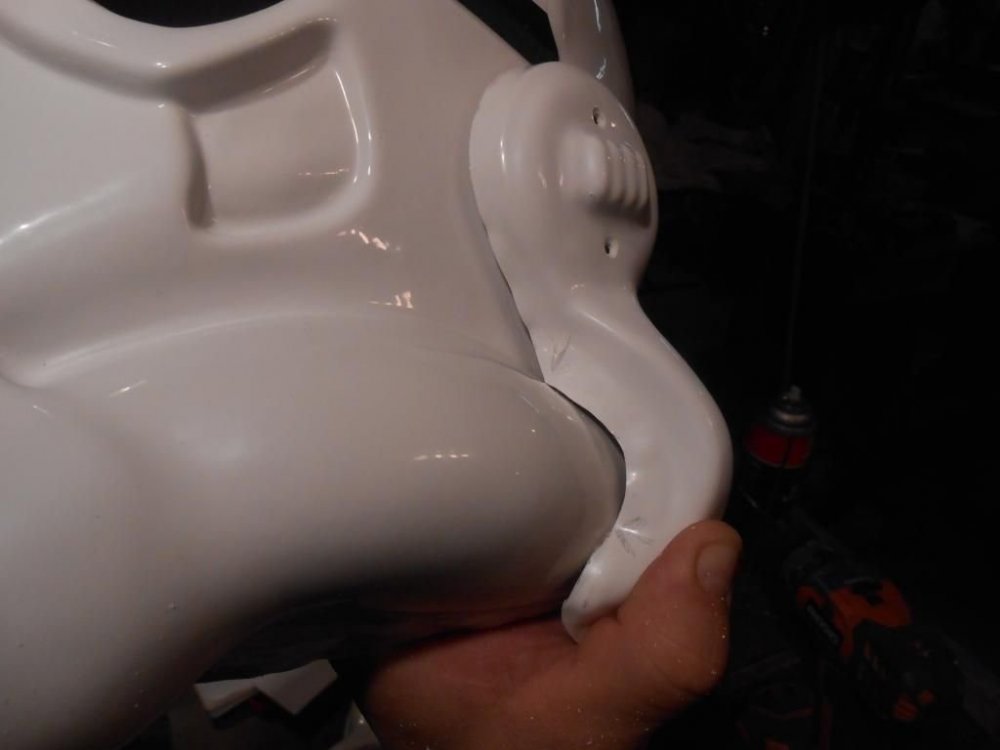
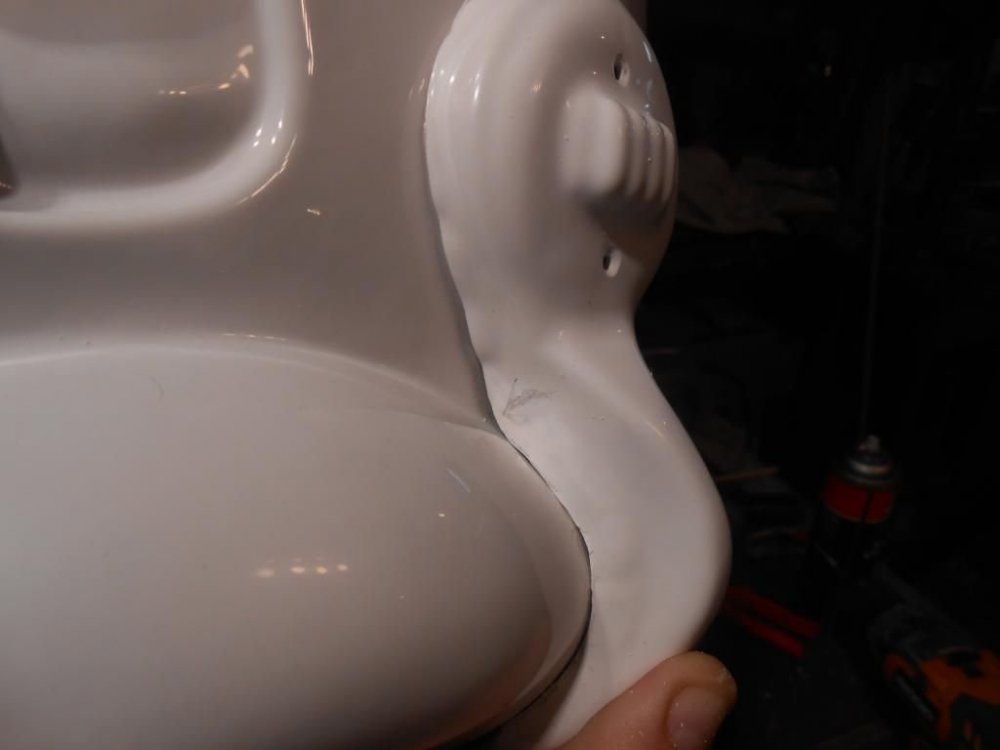
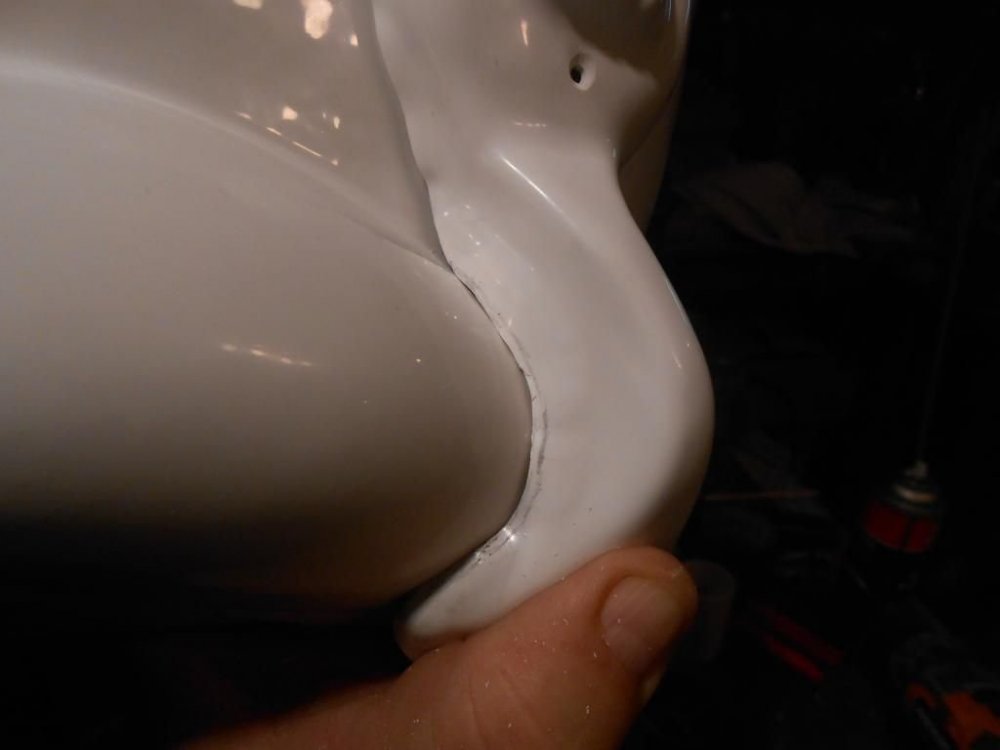
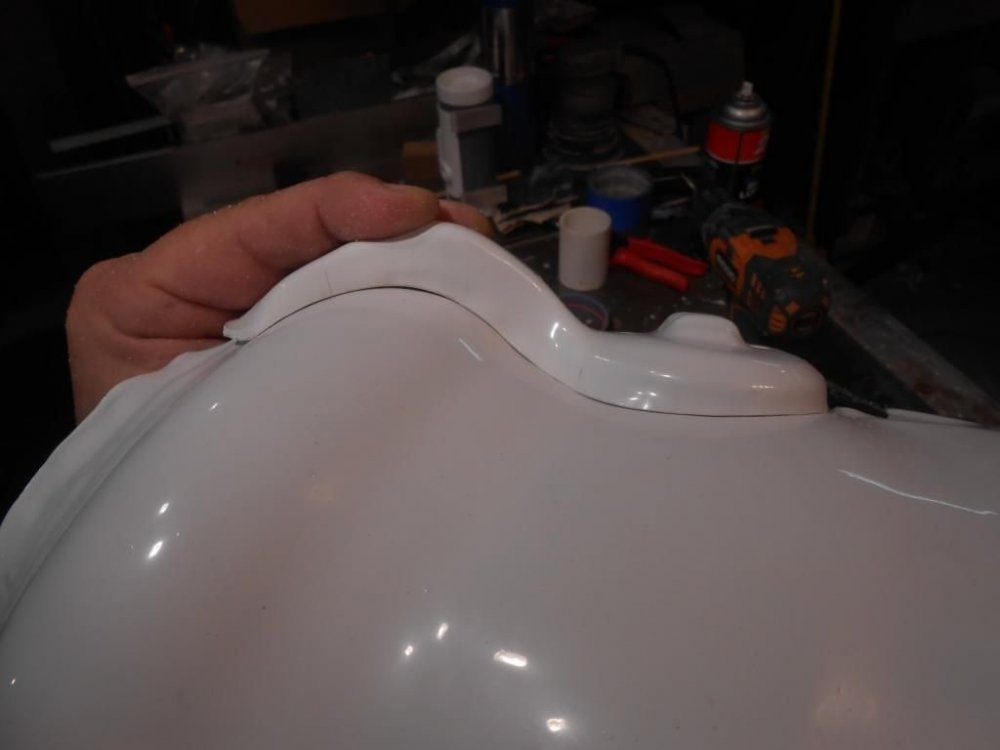
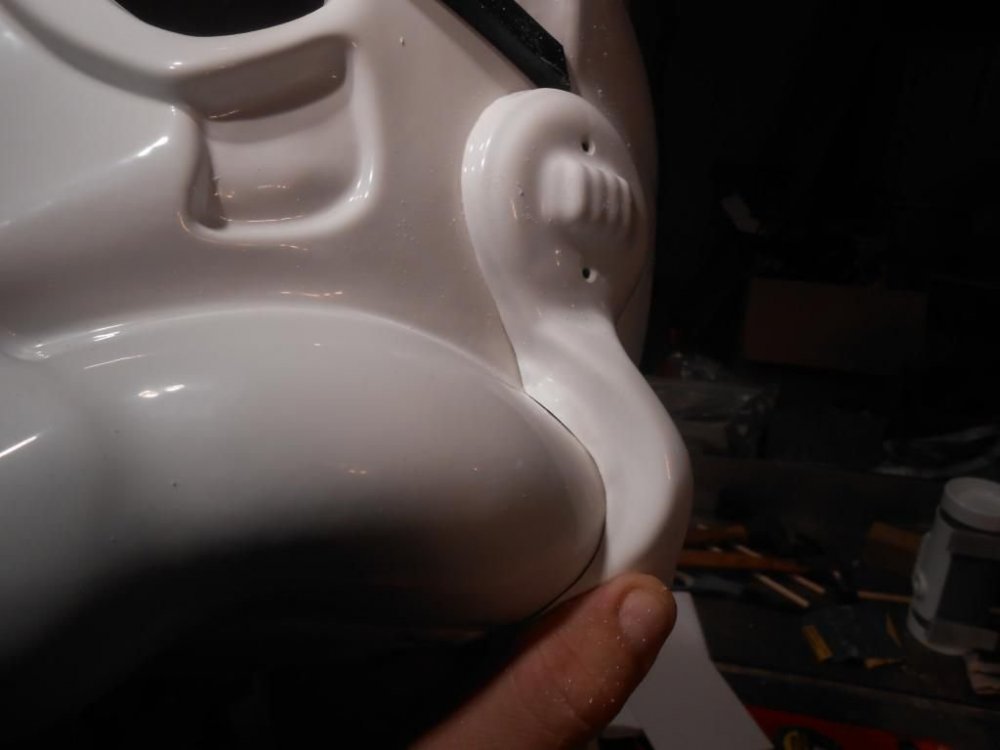
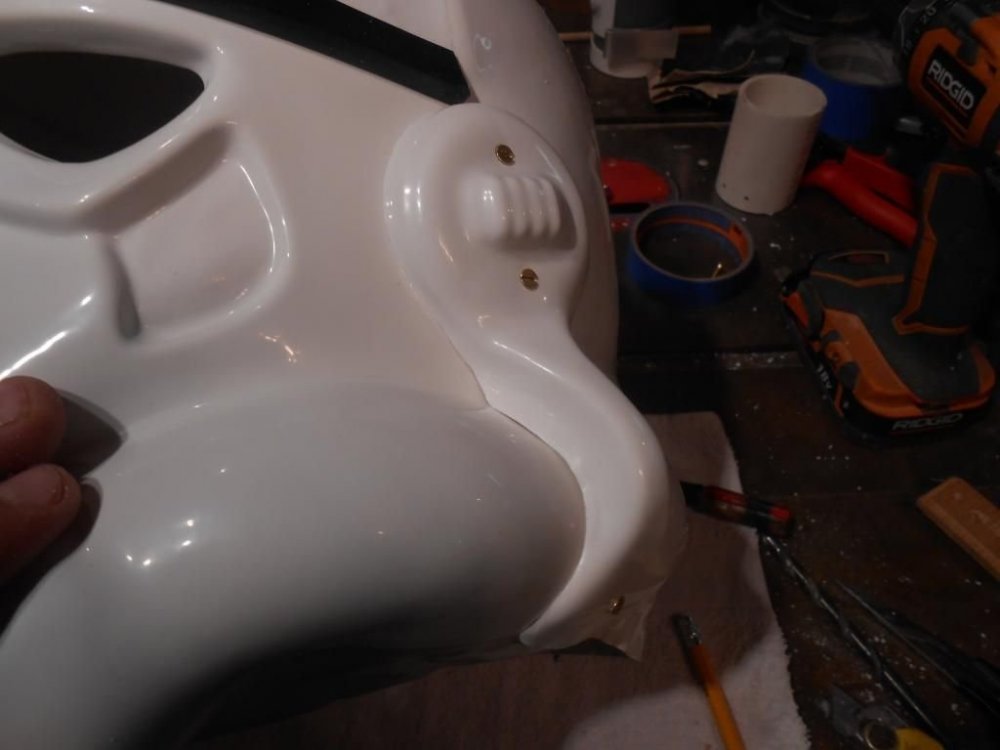
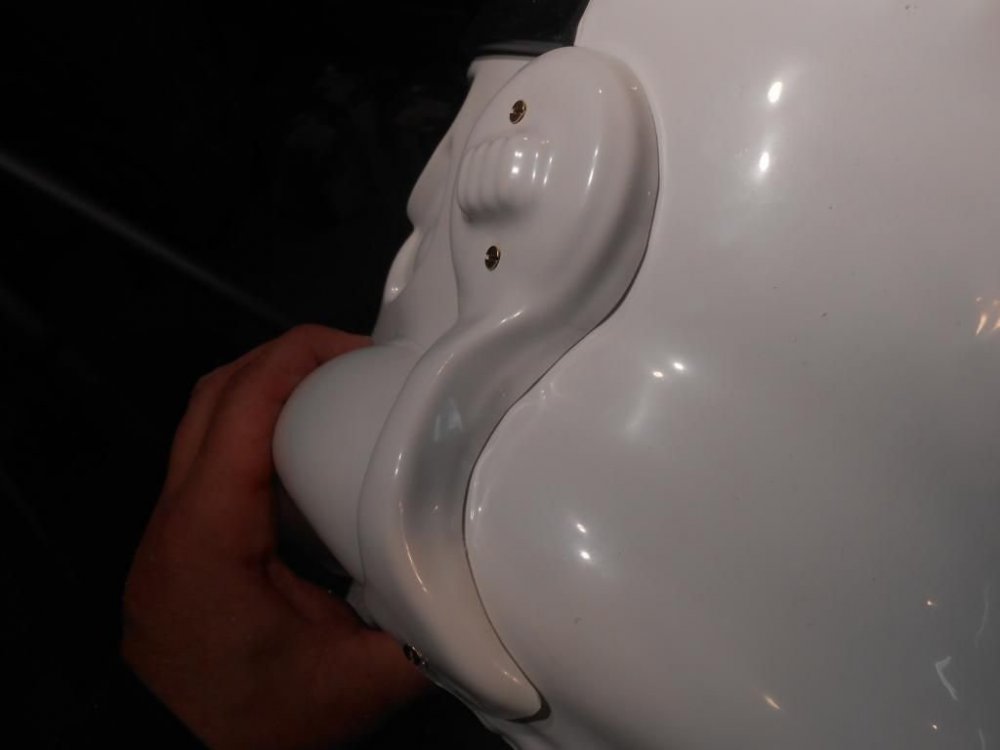
Hey there troopers!! Unless you have your armor maker build your helmet for you, every other armor build will have a helmet and every helmet will have ears to trim out. THE EARS!!!! GAHHHH!!!!! These words have struck fear deep in the butt plate of troopers all over the world. First and most important thing to remember is the the ears on the original helmets were FAR from perfect.For this reason alone, you really shouldn't be so hung up on making your ears sit so flush that there isn't even the slightest gap. However, there are some of you that are perfectionists and there is nothing wrong with that. In either case, whichever result you plan on achieving, having a basic understanding of your approach will help you to avoid making that embarrassing call to the armor maker asking for another set of ears.(Unless you were lucky enough to buy ATA that supplies two sets!! WAY TO GO Terrell!!!!) Keep in mind that there are both things to do and NOT to do. Your equipment can make this more of an art project than a worrisome task. These are my weapons: With a light, controlled touch, you can shave 1/2 millimeters at a time in a specific area or along a line edge. Along with removing the material is knowing what and how much material to remove. NEVER JUST EYEBALL IT!!! To properly monitor this, you will need one of these: Lastly, you will need patience. I know you want to see your lid done!!! After this, you are some paint and a few decals from struttin' your stuff!!! BREATHE!!!!! Let's get to it! will need patience. I know you want to see your lid done!!! After this, you are some paint and a few decals from struttin' your stuff!!! BREATHE!!!!! Let's get to it! The helmet has been riveted at the ears and along the cheeks so nothing moves. I have removed the vast majority of flashing from the portion that was on the vacuum table. I will first drill out the screw holes. Although the indents are there, shadows can play tricks on your eyes, so I mark them so no mistakes are made. I will slightly wiggle the bit to EVER SO SLIGHTLY increase the hole so the screw moves freely but is still well fit. Once the holes are drilled, it is time to countersink them so the screwhead sits flush. IMPORTANT!! Do not use anything but your hand for this step!!! NO DRILLS OR DRILL PRESSES!!! If the bit grabs the hole, it will go right through and there will be nothing you can do to stop it! Just spin it in your fingers and you will have precise control. You can see the difference in the two holes. As well as the difference in the way the screw rests within the holes. Note the shadow coming from the non-countersunk screw. Although there is still a slight shadow on top, this will all but disappear when the ear is tightened down. Now comes the fun! First thing to note is the original mold lines. These are ATA so the mold lines from the original helmet are here. Other armor makers may not have these. Consult the dozens of helmet reference pics we have here if that is the case. But if you have these lines, it is important to remember that these are from the helmet that these were off of....NOT YOUR HELMET!!!! The position you have your cap on your face to make the brow line higher or lower will affect the way the ears sit on the sides. For this reason, the ears must be trimmed to YOUR HELMET. The only kit I know of that the mold lines on the ears comes close to the final helmet without a huge degree of trimming is AP. As long as you use the dimples they suggest, the ears will sit correctly following the mold lines he provides. Anyway, back to these! It is important to note that your ears should look like seam covers and NOT 1978 headphones!! Note how thin the ears are on Han's helmet: You can see the mold lines on the back side very clear as well. I will start bu marking off a general line and trim that. I will smooth out the scissor edges and do a test fit to see where to start. I'm sure there are those of you that don't have the mold lines to start with and are wondering what to do. Note that the top of the ears always comes close to the brow trim and the horizontal ridge that runs around the back of the helmet. If you need to take a measurement between the brow and the cheek/tube crease and use that mark so you don;t trim too much off in that corner, do that. You can always trim more but you can't replace it if you think you trimmed too much. It doesn't need to be perfect, but there shouldn't be so much space that birds will want to nest in there!!! Here is the basic understanding of your approach: You will see this re-stated in the next pic but I can;t say it enough: What you trim away on the front can/will affect how the ear sits on the back. Don't work too long and remove too much without checking the other side from time to time.: Another thing to consider for those of you interested in a really clean fit, is that the helmet surface where the ears are is NOT FLAT! That's right!!! It's curved. Keep this in mind when trimming the round portion. This here is another area to consider if you want that super close fit. There are halves that overlap each other. If you want to, you can notch this out once you have decided the final resting spot for your ear. This is exaggerated, but it just shows what I mean. So here is my first fit. I know.....pretty horrible. It will get better. But first, and I believe this is where a lot of issues happen, I will determine my ear location: and mark it lightly with a pencil. This makes sure that my alignment and the trimming I do will all stay the same. If you ear moves around and you trim it willy nilly, things will be off.......I promise!! Now once you have a basic understanding of what will be affected if you trim certain areas, then you can proceed. TAKE YOUR TIME!!! Note what is touching and what is not. Trim what is touching the cheek to close any gaps that are not touching. My picture failed of the notch that I put in the top most portion of the ear so this one is from another build: Take note that this shows the right ear. I am working on the left so far. Anyway, You can see here, that the arrows point out what is touching and preventing the gaps from closing. Here are the spots on the back. Since you never want to eyeball a cut, I mark off what I will trim. After trimming that, you can see what is touching now (arrows) Noting what is touching, I mark what is to be cut. Now although the fit is tight around the cheek tube, I have a gap in the corner. The arrow points it out. In order to move the round portion closer to the surface, I need to take more out from around the cheek. There is a lot here so I can afford it. I will mark it anyway. After that trim, you can see I have a good general fit. Still needs a bit of honing, but a good fit. What have we NOT done?? The back! So let's go there for a bit. Without wordy describing, you can see the gaps, what is touching and my marks of what is touching so I know where to trim: Sometimes I like to even hit the INSIDE edge of the ear wall so that I am assured that the oter edge of the wall is the only thing touching the helmet surface. I do this with sandpaper so nothing gets out of control and too thin. So now we have a really nice fit in the back. Now is when I notice an issue after I got back to looking at the front. I traced out the original mold lines seen here: In my opinion, the ear is too thick around the curved portion. Using the same methods I used to get to this point, I reduced the curve by another few millimeters or so all the way around including the round portion. So after some additional tweaking and final sanding, the back side fits clean as does the front. I marked, drilled and installed the screws around the rank bar. I never pre-drill the lower location until the ear is fit. As you can see, I needed to drill it at an angle so the screw penetrated the face portion. When tightened, this drew the face up nicely to the curved section of the ear. and the result...(dramatic music please!) It's about as close as I am going to reasonably get it. Note how nice and flush the screws are in the recesses! The same will be done with the other side, but the same principles apply. I want to note that there have been other great ways to accomplish this either through a tracing wire or a toothpick attached to a pencil as a guide that rests on the helmet surface. This is just how I do it. To me, planning, staying constant, slow and steady yields good results. I hope this helps someone.


 1 point
 -
Feedback left on your build thread1 point
-
Your images is showing very small so hard to see detail, it appears you do have a bit of an opening on the side, this is a great thread for ear trimming1 point
-
Hey there, Troopers. So, the thighs are now sized up and the shins are nearly complete. I was able to follow the original sizes for the thighs and, as below, took inspiration from the shape and form of an original set of armour. The shins are around 15mm wider circumference around ankle compared with the original RS measurements. I believe this is due to the size of my boots at the top - a little wider than originals, by the seems of it. Original bra hook and elastics method - currently gluing in place. More to come. :-)1 point
-
Alrighty, got some progress to post. I've been busy trimming and trying to see what pieces go where! Hand plates, pretty straight forward. I still need to drill the holes in the front of these. Kneecaps. Seem a little warped, maybe a little heat can set these back in place? Shoulder Bells and the little piece that goes behind them. Spats, these already seem like they are going to be annoying to put together. Got some alignment issues where I'm sure I didnt trim it down enough, but I'm not entirely sure where to stop. I need some good build examples to follow! Ab and belt boxes. At least I think. Theres a lot of these little boxes on this kit. I know the long rectangular ones are probably for the belt. I'll figure out where these go later. Butt plate. I left the top part there for the belt and ab plate Biceps, got some alignment issues with these. Might have trimmed a little too much on one of them. Cod piece. I realize this is TFA cod and if I want EIB status or higher I'm going to need a TLJ cod. Unfortunately KB Props doesnt make TLJ cod. Not sure where I'm going to find this piece right now, so this will have to do...or maybe I can pick up a TFA bucket to get EIB till I can get the right cod piece for TLJ. I also threw together one of the forearm pieces. I think I trimmed this correctly, at least I hope so... I know a long greeblie is supposed to go in that middle part of it, but I'll wait till the forearm is further along before throwing that on. Forearm is pretty spacious, but I think once I have gaskets and gloves on it shouldn't wobble about. The length is a little bit of an issue, but I think trimming the biceps would be easier than trying to modify this forearm. Still not done trimming, haha.1 point
-
I remember as I was getting my kit ready for EIB, I found a video on youtube with @Sly11, and @ukswrath going over an EIB submission. I'm assuming it was during last Celebration in Anaheim. For you guys that are pushing for the last few spots to 1000 EIB, it is a great informative video on what is needed. I highly recommend checking it out.1 point
-
This was really just for my own curiosity, comparison of Han and Luke's holster attachments. So guess we need both But seriously though I guess if you are within this range you should be good to go1 point
-
On the Ab/Kidney, I trimmed equal amounts off of each. I ended up trimming some off of the butt plate and even added the notch, which isn't a requirement but does help some with mobility and is generally covered by the belt. The ammo belt looks good, but you may need a bit more radius at the bottom. It's difficult to tell from the photo. Also, don't forget to chamfer the corners of your cover stips.1 point
-
Ok, update on progress. Here are the photos of the TD and brackets as they were. Here is what happened when I tried to rework one off of the first set. I picked up a small table vice from Harbor Freight this morning and beat a little more space into them over the shaft of a screwdriver. I do believe this weakened them slightly and will likely be only a temporary fix until I receive or make replacements. I did email Dave with photos of the brackets I received in hopes that he will help me out. Regardless, here is the end result. And...on the belt... I also re-evaluated the backs of the calves and realized that even though they do close to no gap at the top, the velcro strip is so narrow that it doesn't always hold them tight. So, on Glen's advice, I glued some strips on the inside that were originally cut off the shins to hopefully make the gap less noticeable should it occur. I'll eventually transition to a magnet system once I am more comfortable with the process. Additionally, on the advice of Glen and Mario, I reduced the size of the small ab plate just a little more. I believe this is about as small as I can safely make it. I do also have a whole set of replacement decals if it comes to the point I need to do something with the thicker black lines on the traps. I could possibly trim part of the decal to make it thinner. Anyway...I sit in nervous anticipation for an email from the GML. ***Update*** I reached out to Dave and he’s taking care of the brackets. I can’t recommend him enough when it comes to delivering a quality product with great communication and customer service!1 point
-
Wow, that's amazing, what an amazing honour. I'd like to thank the D O 's who's patience and guidance along the way was first class. Brilliant, just can't wait to troop now! Thanks all ☺1 point
-
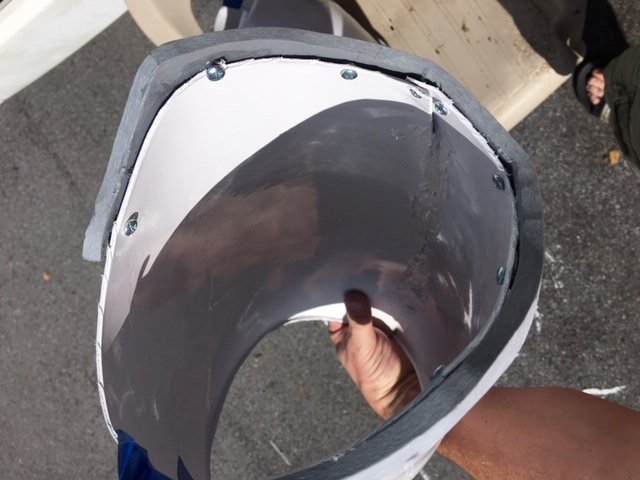
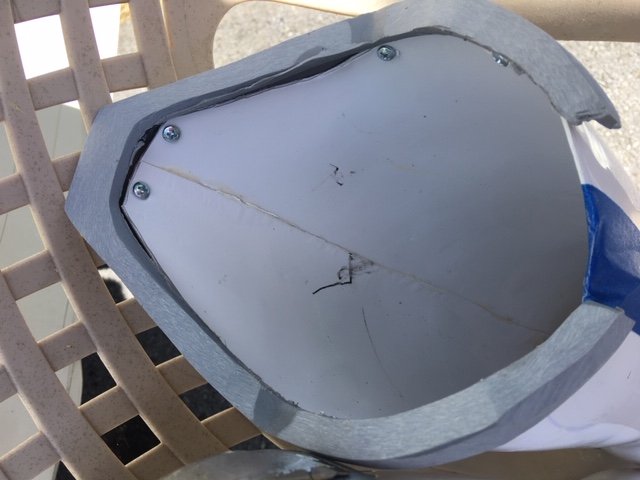
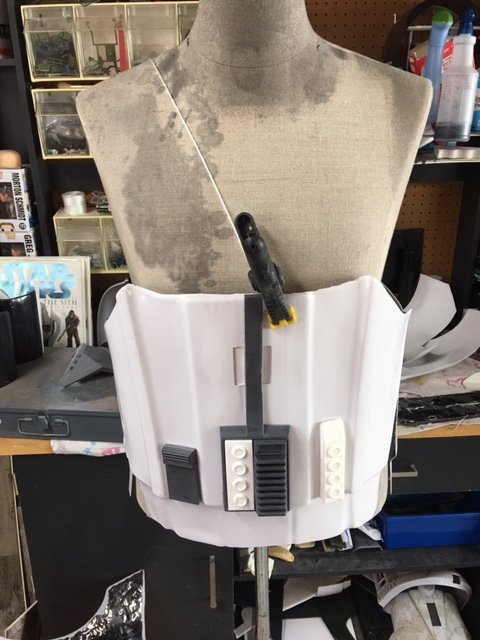
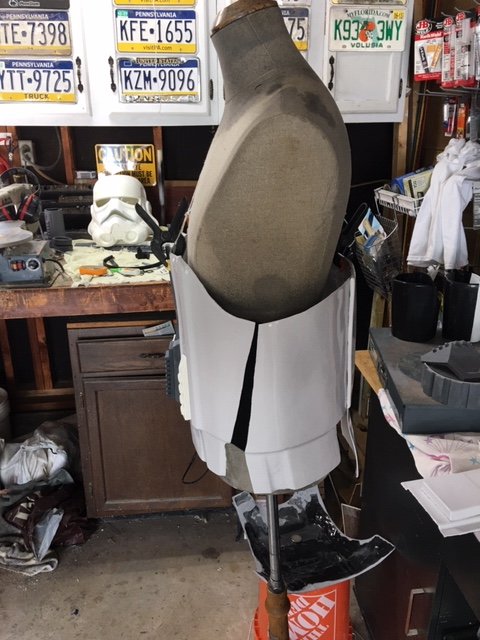
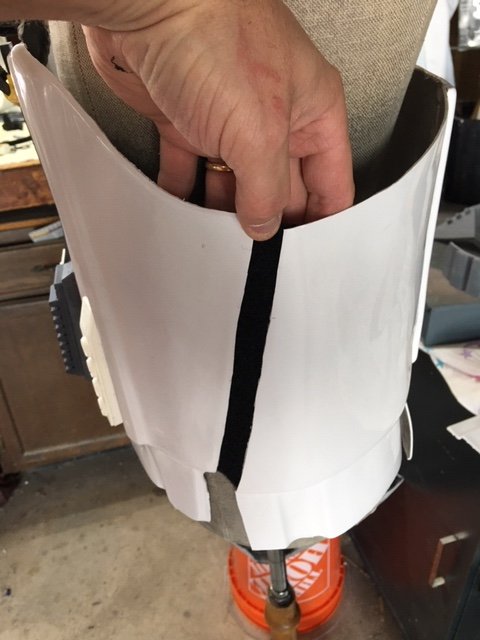
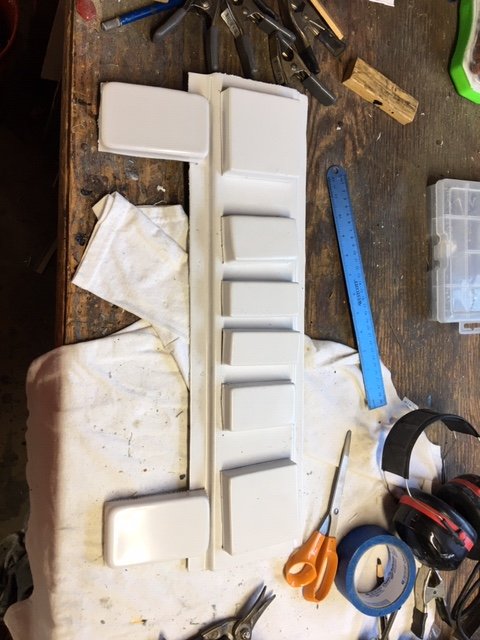
So I got some E6000 this morning and went to work this afternoon when I got home. It's "better" but not great. I still used small screws and drilled them in from behind to hold the resin in place to the ABS pieces. I started by heating up the resin pieces and molding them to the ABS pieces an used clamps to secure while they cooled down. They aren't perfect but they will work fine for basic approval. I have them taped up and baking in the sun so they warm up and form better. I'll do this the next few days so they form and stay that way. I also tore the center section off the ab section and modified it. I also used screws from behind to secure it. I also test fitted the entire ab section to my body and it held good. I'll add suspenders later. Notice the black on the sides? That is the velcro that opens up. I might end up adding 2" on the front side of the ab section so it is further back like in the movie. It'd also give me a little more room. I also rough cut the belt and boxes out. The next step here is to heat the belt up and form it. My shop is above and behind an automotive garage and there are 55 gallon drums outside. I'll heat up the belt pieces and form them over the drums. I won't cut out any of the belt notches until it is formed and contours with the ab section. I am seeing the finish line here now. The resin to ABS was holding my brain up but now I got it.
 1 point
 -
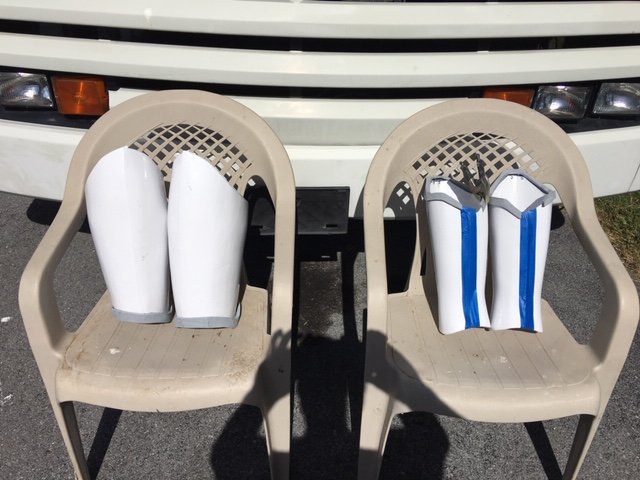
OKAY, I'm way behind on updates for this thread, apologies! I've had some setbacks in the build, which got me so frustrated, the last thing I wanted to do was rehash them! Normally trooping helps remind me why I invest so much time and money in these suits, but since that's essentially off limits for now, it's been rather disheartening. Still finding time to work on it here and there tho, and I AM getting close! Here's a few updates to hold you over. Okay, let's start with an easy one that went well. Handguards are smooth and glossy and velcro'ed onto my Endor Finders gloves easily. DONE! All body panels are done in paint - I just have the helmet left to (re)paint. I didn't have enough clear to get it glossy and smooth, so I ended up deciding the orange peel was TOO much and sanding the clear off until it was smooth again. It'll get painted this week, then on to the colored details. Added in the rear zipper closure from Rogue Repro... I also tied a little cord on it so I can zip and unzip it myself! Next, I started gluing in nylon web tabs with Line 24 snaps in them in order to attach the suspenders! As it turns out, gluing onto the paint was not a great idea, and the FastHold took the paint off with it. Frustrating. The back panel came out well though, with almost no pinholes or paint issues! I also masked and painted the blue, then the grey details on the ab. Another setback... snapped the stem on the brand new can of blue. Got blue everywhere, but luckily, got enough on the ab first. I'll clean em up a little, but that'll do. Also tried masking and painting the side stripes... and they came out awful. Ordered some "precision" masking tape (seen in green) before repainting... Better... I'll keep adding to this as I can - there are some more photos and updates to share but it's too hot haha1 point
-
KB Props Gauntlets came in wicked fast once they were ordered! For those of you not keeping up, the T&A Gauntlets that came in the kit didn't quite fit my forearms, so I ordered a pair from KB Props, and here's the big diff: The extra inch or so at the front of the gauntlets allows for the back end to be wider. The tapered resin gaunts are great, but I couldn't do the size. Having both sets now, I've found that I can use the Resin top shell and the KB Props lower panel has enough abs on it to make a gauntlet mod. Likewise, the abs gauntlet can use the resin lower panel. Huzzah. I think I'm coming out of this with two functional gauntlets, where I only expected to get one. Here's the side by sides if anyone's interested at all. Really glad I don't have the modify the gauntlets beyond a simple swap of parts. I've pulled the blaster off the shelf and may start some work on that to pass the time. The next time I get to work on the armor, I hope its a three or four day stretch so I can do all the final prep and chrome the last day. So close, but so far.1 point
-
I think it came out good! Definitely has some orange peel, but I expected that. It's very light in most places and maybe approaching medium in a few, but not a dealbreaker anywhere. Same with the white coverage - couple of tiny spots I missed, but overall pretty darn even and smooth. I'm happy with it. Might cut and buff the chest but otherwise I'll leave it be. Definitely no weird reactions, runs, or cracks. My prep largely paid off, it looks like. Sweet. You know, I sprayed just a matte black primer on the vocoder and it looks pretty good for "rubbery"... probably just that, I guess! Brought all the pieces inside this morning - will attempt to re-prep the garage and spray the rest today or tomorrow so they can dry and I can paint the colored details!1 point
-
Oh Dan, I'm not too proud to contribute here. I put the paint templates (roughly fashioned after the Dave M helmet and available from TrooperBay) on the wrong sides of my bucket. In many cases, these links are to the first of many consecutive posts. Here is me screwing up my templates like a total idiot: https://www.whitearmor.net/forum/topic/43437-wooks-first-build-anh-stunt-tk-ap/?do=findComment&comment=589733 Here is me getting called on it (Looking at you, Dan ) https://www.whitearmor.net/forum/topic/43437-wooks-first-build-anh-stunt-tk-ap/?do=findComment&comment=592275 Here is me fixing the issue: https://www.whitearmor.net/forum/topic/43437-wooks-first-build-anh-stunt-tk-ap/?do=findComment&comment=594834 And Dan, if I do this again, I fully expect you to call me on it immediately.1 point