Leaderboard


Popular Content
Showing content with the highest reputation on 06/10/2020 in Posts
-
The loop side of my velcro finished drying last night. I rough trimmed that velcro before gluing, and I still need to go back and trim any little bits that protrude past the cover strip's edge. I'm going to proceed with gluing the hook side of the velcro tonight, and then I'll evaluate how flush the backs of my shins can close. If there's still a significant gap, I'll pull the velcro off and do a hot water bath. A few posts back I got a little too excited with my thighs, thinking I could keep a 40mm return edge behind the front 20mm cover strip. Luckily some of you steered me straight on that. I started by pulling apart one thigh (I had all inner strips glued, shown below). Good thing E6000 is more forgiving than the Emperor. I pulled off all the glue from the thighs and inner strips, re-sanded everything, then glued and clamped the inner strip to one piece of the thigh. That was it for tonight. I misinterpreted the arrival of my ABS sheet, so I'm getting my thighs all ready for that day. To keep the thighs as large as possible, I will be using a 20mm wide shim in the rear of both and I'll make 25mm wide cover strips that match the backs of the calves. Behind those 20mm shins I'll have 50mm wide inner cover strips, creating sufficient strength in the joint.3 points
-
Wooooooo! Thank you team! I appreciate the review and hope to make the Detachment proud.3 points
-
Hi Justin, and Thank You for your submission for Centurion level HWT! CRL and Centurion Application Requirements All required photos are now in and, after review, we are pleased to welcome you to Centurion! On behalf of Sha Sha and myself, congratulations! Other-Armor Fit/Assembly In this area we discuss areas that could benefit from additional improvement. Note that we consider both text (CRL) and pictures (screen caps/reference images) when reviewing submissions Nothing to see here: Move along! Great to finally see this, brother, and welcome to ranks of the few, the proud, the HWT Centurions!3 points
-
Hi there. I’m new here, but not to costuming, I have a 501st approved (UK Garrison) TD and am currently building the Remnant Incinerator Trooper from the Mandalorian. I have received my R1TK kit from 850 Armor Works, and am printing a Nico Henderson lid. I am also printing the flamethrower and backpack. I have ordered the following to finish off the parts list: - Boots from Crowprops; - Gloves from Endor Finders; and - Undersuit and knee gaskets from Darkside Closet. Any tips or advice would be greatly received and is there likely to be a CRL available in the near future? I am following the R1TK CRL at the moment.2 points
-
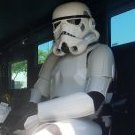
NFORMATION: 1. First/Last Name: Andreas Johann 2. Future Garrison/Squad/Outpost: German Garrison / White Shadows Squad 3. Armour Maker: 850 Armor Works 4. Helmet Maker: modified Black Series Rogue One Helmet 5. Cloth Belt Maker: 6. Neck Seal Maker: Darmans Prop Shop (ordered and on its way) 7. Boot Maker: painted Chelse Boots 9. Blaster Maker: DoopyDoos with T-Jays completion kit 11. Height: 5’ 8” 12. Weight: 88 kg 13. TK Type: Rogue One The shin is only twisted on this foto. What do you guys think of my build?2 points
-
Some other examples2 points
-
Did some vent holes today. I'm pretty sure with the final 3D print these will be spots that will want to needle file some more for better appearance. The blue behind is just a plane to show how it would look, but I'd probably recommend using some other material for this rather than 3d printing something to put there instead.2 points
-
Hi Peter, Thanks for your application! It was a pleasure following your build on Facebook over these past weeks. CRL and EIB Application Requirements All required photos are now in and, after review, we are pleased to welcome you to Expert Infantry rank. On behalf of Joseph and myself, many congratulations! Other-Armor Fit/Assembly In this area we review observations made by your fellow troopers and the DO team. Some observations may lead to suggestions to improve the overall look of your armor. Note that we consider both text (CRL) and pictures (screen caps/reference images) when reviewing submissions Just a small nit here - your shoulder straps aren't hugging the curves of your shoulders as much as we'd like, leaving them to stick up a bit in the back. A hot water bath and some gentle bending should correct that. It also could be that you're missing the white elastics to hold them down (address in the Centurion Requirements section below.) Reference Images: Centurion Requirements In this section we prepare you for Centurion. More photos may be requested in the future that allow us to make better decisions on possible adjustments. If there are any areas of concern they will be discussed here. Because Centurion photos show much more detail than EIB, items to pertaining to Centurion might be seen there and not here. We try to point out all that we can from what is seen, but the final accuracy is the responsibility of the trooper. This is more of a photo request than a change - when you submit your Centurion app, could you please take the rear photo with your arms relaxed? The L3 CRL states There should be a minimal gap between the shoulder armor and the chest/back plates. and your front gap looks perfect, leading me to believe that the rear gap is simply due to the way you're holding your arms. Reference Image: Next, the L3 CRL States: The plastic shoulder straps need to be held down in the back via a white elastic band to the white fabric that connects/bridges the chest and back piece. You may have straps there, but I'm not seeing them in the photos. If you haven't added them yet, that will also help keep the shoulder straps from floating up. Reference Image: And that's it! I honestly struggled to find things to suggest in this application - you've clearly done your research and taken a great deal of care during your build. Congratulations again and we'll see you at Centurion!2 points
-
Here is our local forum link https://501st.jp/forums/index.php Two san will process your registration and then you should be up and running in no time there. hope to see you on there soon!2 points
-
Yeah, I have been trying FB. I just hope all is well. I hope for COVIDs sake it has not tried to attack a trooper! If that is the case then Covid will need some self isolation from the empire!2 points
-
And some added work on the helmet, including the ears for visual reference The biggest changes are extending the rest out downwards to complete the backside top to bottom. I've also reshaped the face so it has the curves and dips in the right parts.2 points
-
Hello, fellow troopers! I’m thrilled to be here. My hands still hurt from holding the Lexan scissors too tight and cutting through 2mm acrylic-capped ABS. Do you feel my pain? Ha ha! Anyway, I can’t wait to get out there and troop! If Only You Knew: Well, I thought I needed to buy everything under the sun to make this kit, and after buying way too much stuff, I realized, man, I only need glue, my dremel, some sandpaper, blue tape, and some magnets. A few clamps, too. But I just had way too much stuff lying around that I never, ever used. In that case, I made the job seem harder than it was because I thought I needed all this “stuff.” Top 5 things I learned: 1) Take your time. Accomplish only one “big” thing each day. Today I’m working on the right shin. That’s it. If you go too fast, you will screw up! 2) Don’t start without mentors. Make sure you have some guidance from experienced troopers and send them pictures as you build. 3) Listen to your mentors. If you ignore them, you will make mistakes! Stubbornness does not equal screen-accuracy! 4) Your family may not be as excited about you getting your thigh piece to fit as you are. Don’t be disappointed. Once they see you fully suited up, your appearance will blow them away. 5) When using the dremel and sanding roller, hold the piece tightly against your chest and use smooth, light strokes. Ignore the dog licking your leg no matter what. Oops!: My kit was a little big on me, and after fitting it, the entire torso was sitting too low and the thighs had no room to move. I had to redo my shoulder straps (tighten them up), and cut the neckline on the chest plate to give myself more room, and then take a full inch off the backs of my thighs to get them to fit properly. It was a pretty big challenge, especially when I thought I was nearing completion. Time to "embrace the suck" and take a risk! And so I did... Warnings I received were mostly about being too OCD versus screen-accuracy. Sometimes the screen-accurate way looked ugly to me, but in most cases I got over that and learned to love the asymmetric and wonky nature of these kits. A funny thing happened on my way to the Death Star: I decided to become a stormtrooper after teaching a Star Wars class at the University of Central Florida: https://news.cah.ucf.edu/news/star-wars-telep/ https://www.fox35orlando.com/video/637681 I invited the Makaze Squad to visit my classroom and talk about the 501 and about trooping in Central Florida. After hearing the fun and inspirational stories, I couldn’t help but want to be a part of this great community. That was last October, so it’s been an eventful eight months to say the least. My armor did take a long time to reach me (ABS plastic shortage when I ordered) so I was taking pictures of myself looking like a James Bond henchman from a 60s movie, LOL. I kept telling my friends, my armor will come soon! This is the best I can do for now: Shout Outs: I received great tips and advice from my armor builder, Troopermaster, who treated me like a good friend and answered all my questions as though he was standing by his phone, waiting for me to ask. This was a GREAT first experience with an armor builder, and that made it even more memorable. I also received incredible help from Gary Collins, Sr, his son Gary, Derek Zink, and Daniel Branton. All of these generous troops spent a lot of time answering my questions, sending me pictures and videos, and trying to put me at ease as things didn’t come together as I’d planned. Of course my family put up with me and with stormtrooper parts lying all over my kitchen and formal living room. The place looked like a plastic warehouse and smelled like E6000, ha ha. Finally, I’m really excited to be here, to start trooping, and to put some smiles back on people’s faces during a very challenging time in this world. In that way, I guess we are entertainers and should help make people forget about the cares of the world, at least for a little while. TK-33348, ready for duty!1 point
-
[EDIT 6-17-20: Please do read this entire thread but the packs are done and the files are HERE: https://www.thingiverse.com/thing:4462006 ] Hey all! I'm an approved ANH Stunt TK with aspirations to become a HWT. I started my pack project about two years ago but got derailed by life. I'm building two packs, one for me and one for a friend currently building a TK. The first pack is almost done and has used my initial 3d printed parts to test it, and after building that I have gone back and modified my files. I'm going to post screen captures first to see if there are any issues or CRL conflicts before I start printing them to make the second pack. After everything is approved and assembled, I will be releasing the files to my Thingiverse for any future HWT that want to use my parts to build their pack vs. scratch building everything. I used ukswrath's build, the published approximate dimensions needed for each component, and screen grabs from the game to base my parts on. The base of the pack is still an oil can, the radio base is still a "memories" box, the upper center tube is a wipes container, and the side tube is PVC. CRL: https://databank.501st.com/databank/Costuming:TK_hwt UK's Build: Game Screen Grabs: Pack Specs: First, here is my "rough draft" pack. It is currently only lacking 1" webbing straps, weathering, and the chest MP40 pack before I consider it complete. Bear in mind the rendered parts are the current revision, mostly just added some radii and screw holes for the corner screws. Upper Left Button Box. I've made each sub component that is painted a different color a separate part for ease of assembly. The frame the buttons fit into actually sits in a pocket in the button base so that everything will easily line up straight. The parts will just be glued together unless there is any reason to add holes for screws? The buttons are based on the same dimensions as the rubber bumpers used in UKWrath's build as they seem popular. The bumpers could be used in lieu of the printed buttons, but its way cheaper to just print them IMO. Top Middle Wipe Tube cover. I'm still using the standard plastic dollar store wipe tube. I could just print a tube with a flat back but honestly for $1 its not worth it, although with the covid pandemic wipes have all but vanished. I may go ahead and make a file just to have it available though. I've seen some people just use black electrical tape to make the cover, others use cardboard, others use sheet plastic. This 3d printed part just makes it look more "real" IMO. Upper right flap vent box. I really thought this would be tough to draw but it turned out to be simple. The vent section prints as a separate part that fits into a pocket in the base. No more cutting of strips and trying to glue them together perfectly as this prints and looks great. The look is more akin to the UKWrath build than the game as the vents go all the way to the bottom of the part. The CRL also shows the vent flaps going lower. I can mimic this if people think matching the game is better than matching what most people seem to build? Lower left radio. I have made two files for the faceplate as it is larger than what my printer can fit. The top section is the "screen" and the lower section is for the knobs. I am still attaching this to the cut-down heavy cardboard "Memories" box as my printer can't make something that large for less than what the box costs. I have also made a file for the knobs with holes to screw into the plastic faceplate. They're roughly the same size as the plastic caps from the oil can base so either could be used but with holes perfectly centered on the printed part I'll just let the machine make them. Center right is the angled box with tombstone shaped vents. Per the game, this box is angled although most builds have it as a flat box due to limitations of scratch-building nice parts. Again, the faceplate is a separate part for painting and assembles with glue. There is a neat trick that if I print the box upside down, the face that points outwards will have some drooping plastic bridges that look like vent media underneath the faceplate (see the pic of my test pack). I've removed the corner screws from the original part and added those screws to the outside of the base instead. Lower right Drop Siphon. Again, the upper black section and the lower tapered grey section are printed in two parts. I have left a lug on the tapered section and a hole on the upper section so that they will easily line up for assembly after painting. Also, I needed this to print in two parts so that they would fit onto my printer. The upper section has the cap integrated into the design with the same rough size and shape as a juice lid used on many builds. The upper black section also has a flat base on the back to allow for simpler mounting to the oil can base. The grey tapered section has 8 1/8" holes evenly spaced around it for placement of real rivets. I could just integrate 3d printed rivet look-alikes but honestly I like the look of real hardware on the 3d prints to give it a bit more realism. And lastly are parts for the 24" PVC tube mounted on the right side of the pack. Instead of buying a vacuum formed TK shoulder strap or PVC caps I have just made files to print look-alikes. The tube stripe prints with the same diameter bend as the OD of the pipe so no need to heat it up with a heat gun and crinkle it to death. The caps could be sourced and cut down from a hardware store, but if I can print perfect parts that are ready to go right off the printer I'd rather just make the file. The biggest concern I have for making it approvable are my "clamps" that attach the pipe to the side of the pack. They make the tube stick out from the body of the pack a hair, but I don't think its enough to hurt. I know some people just screw them on or use toggle screws but I wanted something that looked a little more military and polished. The clamp first attaches to the side of the oil can with 1/4"-20 screws and then the PVC pipe is attached to the clamp via screws. I think it looks super neat and it is very, very solidly mounted so its worth the slight deviation from the norm. So.... please give me any input or criticism to make these parts more accurate, buildable, etc. I'd like to make any modifications to my files before I print up a second batch for another pack and before I release them to the wild on Thingiverse. I can also drop the files on FISD just have a backup source if I can upload STLs.1 point
-
Sup all! My name is Iman. I had joined the forums about 5 years ago, but due to some complications I had to put the dream of trooping on the back burner till I could get back on track. Now that I have things in order, I can finally focus on getting this ball rolling. Im in the process of saving up for a self build ANH trooper kit from RS Props. Hoping that I could get some help once I recieve the kit. (I have no idea what I'm doing in regards to putting the pieces together lol) Looking forward to my new adventure!1 point
-
Thank you for the helpful tips! I will keep them in mind when using heat to reshape the arms or gluing going forward. One of the things that stopped me from continuing my progress four years ago was the shins.... they scared me so much. That meant it was time to tackle them now. Measuring a 10-11mm-wide flat ridge from 1/3 from the top and 1/3 from the bottom of the shin I used a ruler to draw a line connecting these points so that I had a straight guideline. If each shin half front is trimmed to 10-11 mm, this will allow for the needed 20mm-wide cover strip in the front. As you can see, even with it cut to appropriate measurements, there's a bit of plastic sticking out that will need to be heated up and poked back inward so that the upper ridge lies flat. All four of the shin halves look about the same so I didn't bother to take pictures of every single one. I think I did okay with the straight edges but I will have to go back and make some feint angled cuts to get the tops and bottoms of the halves to come together more smoothly. Right now it requires a bit of force or leaves some gaps, because the armor curves naturally. The dremel and the ruler are my friends for making these adjustments.... I also have to do that for the biceps. I just want to confirm the shin half pairs before making adjustments for them to fit each other (see below). For the back of each shin half, I cut as little as possible. I think I can avoid shimming if I leave all of the excess plastic. And parts that are folded funny from being at the edge of the mold I plan on bending with heat to fold back into place, or simply cutting off the bottom of the shin (which I will 100% have to do for my height. However, I am going to wait to trim the shins height-wise and width-wise until I have my boots in about a month. It seems not smart to start trimming without the boots). The red circles in the above photo show little bumps in the plastic that are a consequence of under-trimming the back. The bottom plastic spike will be cut off when I trim the bottoms once my boots arrive, and the top will be easily fixable with heat. Matching shin halves was the tricky part. I think I finally got it.... But I cannot tell which is which leg! Send help! I've stared at countless shin photos and it is so hard to tell. Is there a specific curve to look for? Moreover, one shin halve sticks out among them all. I believe the longest shin half is the left outer shin half (as once confirmed when I messaged Walt himself from Walt's Trooper Factory, and shown previously on this thread). Therefore in the photo above, where I show the four shin halves together, the shin pair on the left is the left leg, and the shin pair on the right is the right leg. Would that be correct? You can also see below how what is believed to be the left outer shin half sticks out far below the left inner (or even the right inner, which I tried fitting as well).1 point
-
Congratulations Justin1 point
-
Congratulations trooper and welcome to the EI ranks1 point
-
Congratulations, what a beautiful set of armor!1 point
-
Congratulations trooper1 point
-
Impressive most impressive !!1 point
-
Excellent Justin. Knew it. Look forward to trooping our HWT's together brother. Congratulations.1 point
-
Hi, Sha Sha! Thanks so very much for going over my photos and for awarding me EIB! I'm so happy right now! Building my first stormtrooper kit was a great experience and came at a good time to keep my mind off all the problems of the world! Also, I want to stress that I know yours is a volunteer position, and I want you to know how much I appreciate your time! I'm looking forward to making those corrections you noted, taking some more pictures, and putting together my centurion application. Every trooper I've met has been warm, welcoming, and so very helpful. This really is a wonderful community, and I'm proud to be a part of it! Thanks again. I keep wanting to say may the force be with you, LMAO! For the Empire!1 point
-
Fantastic work Justin, congratulations!1 point
-
Congratulations Trooper !! Welcome to EIB, just a few adjustments and go for Centurion !!1 point
-
As I also had problems with painting my bucket. I went to a store to let them mix the right colour and fill it in a spraycan. They did a really good job. It took a while to find the right sort of white. But in the end it matches very good. I didn´t want paint my whole armor, because of cracking and flaking, as the ABS is quite flexible. Finally I ended with a bucket that has its flaws. But from a decent distance it looks quite good. Oh, it´s a BS R1 helmet1 point
-
It is good to see Nico's helmet. It gives me some ideas on what I can do with mine for some of the detailed spots.1 point
-
Congrats Peter! Excellent work!1 point
-
Thanks all! Yeah I will definitely start providing files as they are available so that I can get some further guidance or so as I build things. I figure so long as I get the helmet pretty good I can do practically everything else no problem (much less detail) My goal is to be able to provide a service to everyone in providing something that could be of worth. And being as I don't have a 3D printer yet and hope to get one within the next year it's something that I will for sure love to see comments/recommendations based on how others have printed and what needs adjustment. I hope to someday provide the files for everyone to be able to print their own R1 trooper if they wish.1 point
-
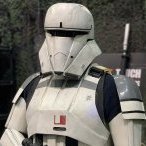
The majority of StuntTroopers (most likely all) did not have those ”gaps” filled in. The exception in below images is probably a Sandtrooper. Your helmets is approvable to Centurion regarding the frown (as long as there’s no paint on the gums, center tooth seem to be a close call).1 point
-
This looks GREAT! It's very kind of you to tackle this with the intention to release the files for free, and I'm sure you'll learn a lot through the exercise! I know I'll be interested in printing it! In case it's of any help, Nico Henderson completed a 3D Rogue One TK helmet earlier this spring, and you can check it out here. But you probably already knew that anyway. Nico is famous for modeling the Shoretrooper helmet that is most (along with Sean Fields' free files) used by Legion ST builders. @mr paul might also be a helpful resource for you, in case you ever have any questions! Keep up the excellent work!1 point
-
got to paint some parts the clear coat kinda messed it up a bit leaving some drop marks nothing too noticeable not perfect but i am not going to beat myself up about it too much1 point
-
Theres a reasonable number of HWT EIB. 12 at my last count but that was about 100 approvals ago so there may be a few more now. EIB numbers are issued 1 per person, so you get a number for your first EIB but not your second if you follow. So you may be 2-10 EIB approved costumes but only 1 EIB#.1 point
-
Welcome aboard Emma Sent from my SM-G960F using Tapatalk1 point
-
Hey Kyle, awesome work there. Would like to print it if you make the files available at the end. If you need some help while modeling feel free to ask im not a pro but learned some things modeling my TFA helmet.1 point
-
Thank you [emoji4] Sent from my iPhone using Tapatalk1 point
-
I'm in love.....I love the smooth finish...1 point
-
You are an artist!!!1 point
-
Thanks. I did, but triple checking since I can't return them. Thanks for the help! Edit: Ordered! Thanks again!1 point
-
You may very well need some heat to get them to close properly1 point
-
Hmmm shiny...great build and fantastic thread.well done trooper. Sent from my SM-J610FN using Tapatalk1 point
-
@TKSpartan thanks! I'm trying to do EIB Level for my initial approval, but we'll see. Shoot for the moon, right?1 point
-
Thanks for that link, Dan! I've actually been going through your build video series, and appropriately, Part 3 was next in the queue. I just took a six minute break from work and watched it, and flat sandpaper seems like a great idea. I planned on using that technique on my belt and ammo edges (and possibly for smoothing cover strips) and now I'll definitely need to employ that on my L3 wrists. Your information has been very insightful already, and I'm sure will continue to help me get through my build! Thanks again!1 point
-
Thanks Joseph for helping out here. I haven’t found a vendor in Japan for the S trim but can help source some for Hideya if he needs help. Hideya san, I have sent you a PM reply and can help with ordering some S trim for you if you are interested . Feel free to contact me about ordering some s trim1 point
-
Helmet is coming along very well ken1 point
-
It looks just right, great work !!1 point
-
Yep I for sure get that. I can understand why people choose to sell for a high price, it’s a lot of work, but since I’m doing what I can for learning modeling while I’m working on trying to develop a game and lots of stuff I figure I might be able to share some files here and there as I get them going. Sent from my iPhone using Tapatalk1 point
-
Thanks Mario1 point
-
OP (MV) Post #22 It's been almost two weeks since I posted an actual build update due to my efforts being temporarily redirected at compiling the resource list from my previous post. Which, by the way, has now been moved to its own thread in the Getting Started Forum. Here's the direct link for future access: But first, an outline of the items which will be included in this post, in case the extensive photos clutter up the format too much. Raw UN-cut and ROUGH-cut photos of the torso pieces, sniper plate, shoulder bridges, drop boxes, TD, and ab buttons Kidney orientation (top and bottom) Ab/button box dip clarification New equipment: Cut resistant gloves + Rivet tool Holster stretching results 501st donation Leaderboard reputation points? Lego TK template Some of you may be wondering why I continue to post raw PRE-cut photos of my armor pieces—the reason is simple. I want to provide future ATA builders or individuals on the market for any armor an idea of that to expect on their BBB day. To that end, here are some looks at armor pieces both pre and post rough cut. Note that in most cases I have simply approached where the final cut lines will be, and intend to cut and sand more as I begin fitting. As a reminder, clicking each photo will open a full-sized high-resolution version of the image, and my posts are also formatted to best display on a computer, rather than Tapatalk. Uncut Rough Cut Uncut Rough Cut Rough Cut Uncut Rough Cut Uncut Rough Cut Uncut and Rough Cut Uncut and Rough Cut Uncut and Rough Cut Uncut Rough Cut By the way, though I know I still need to trim the ab plates even more, a discovered a little trick for cutting right at the end of the curve so as not to accidentally remove too much of the flat area. As shown in the photo above, press your curved lexan scissors blade right up against the edge on the underside. I also discovered that a blister was starting to form on my thumb after all the scissor trimming of the ABS, so I grabbed the closest pair of gloves I had laying around, which were extra rubber gloves originally for my suit. Authentic armor crafting. I should also point out that I have yet to do any trimming on the kidney piece (and sides of the ab for that matter), as I first wanted to determine which sides are the top and bottom. I reached out Terrell, the ATA armorer, and he informed me that the edge with the extra ridge is the bottom, which is what I expected. Better to ask for clarification than be sorry later. Here are some images which show the proper orientation of an ATA ab piece. Rough Cut In that same vein, I also checked with Terrell about the dip in my ab piece which I observed and made note of in a previous post. I'm not sure how I missed this in my research, but apparently this dip is a "feature" of TE-derived armors—at least on suits in which the armorers haven't altered that feature. As this is apparently intentional, I'm now wondering if I should leave it as-is, or ever so slightly bend it a little closer to flat with a hot water bath. My OCD self wants flat, or at least flatter, so at least the button plate will sit more flush. Here's a quick shot I sent some of my work buddies yesterday. Slowly I'm growing a stormtrooper! In other news, yesterday I received two more tools, shown below, which will help me with my build. For months I've fought the advice to get cut-resistant gloves, but I finally broke down and decided my safety is worth the money. I opted for the NoCry Ambidextrous Level 5 gloves on Amazon; 14,000 customer reviews must be a good sign. The other tool was a TACKLIFE Hand Rivet tool from Amazon, and frankly I'm not sure how I left that off my shopping list months ago. Now for an update on my E-11 holster stretching, which I first documented a couple posts ago. It appears that my single round of water soaking my 8oz Darman holster will actually be enough, as there are only a couple small rub spots left (front sight tips, bayonet lug, and edge of folding stock). I fear that if I stretch it out any more I'll risk the blaster wobbling around, or worse, invite pesky rebels to grab it if I don't have the strap engaged. For now I will try applying some Quick Draw Holster Lubricant (from Amazon, shown below) to see if I can alleviate that little bit of rubbing on my rubber blaster's weathering. I also want to take a moment to bring attention to the current Legion/Detachment fundraising campaign which Glen posted about the other day. In light of the fact that many of us spend hours per week (or day!) on this forum, I would ask you to consider donating a small amount to the drive, which is specifically for Legion and DETACHMENT web hosting. Want to continue to see whitearmor.net as your homepage? Step up and give a little, as I did. There's no amount too small, and every little bit counts! Moving on to a weird, and practically unimportant question. This morning I noticed that on my FISD profile there is now a "DAYS WON: 1" note. I've seen this on the profiles of other troopers, and understood the numbers to indicate days in which that individual received the most liked posts. Is that correct? I spent a little time on the "Leaderboard" section of the "MORE" navigational tab and saw the rankings are related to "reputation points," nine of which I earned two days ago. Are those simply accrued via likes? Again, I know this is of little importance, but I'm just curious about the system. And finally, my semi-traditional non-build anecdote. Recently I went on a search to locate a digital copy of a Lego stormtrooper helmet template which I first came across in a Lego Club magazine when I was a child. I had actually stumbled across a digital source about half a year ago, but failed to save it properly. Alas, many google searches later, I found it, and behold, the template and the actual Lego helmet I built as a 12-year-old back in 2001! Yes, this piece has been on first my parent's shelf, and now my own, for the past 19 years. Looking at it, I can really see how white ABS apparently yellows with age. Quote Responses: @LTM and Christine - I'm counting down the days until I can finally meet and troop with you guys in person!1 point
-
BTW this build thread has a lot of great information and detail. Worthy of being pinned in my opinion.1 point
-
Conflict Resolved. The Origin of TK-51878. Born in 28 BBY during a time of conflict on Kalevala, the fourth planet in the Mandalore System, the child who would one day become TK-51878 led a conflicted life. With his eyes cast ever upward to the dome encapsulating his birth city of Sundari, this child dreamt of a life of adventure and discipline in the stars that he could not see. His city, like the other bio-cube cities on Kalevala, would have been un-inhabitable desert if not for the ingenuity and technological adaptability of his people. The Galactic Republic had rendered his planet - home of the renowned Kalevala Spaceworks - almost completely un-inhabitable so many years ago. Because of the actions of the Galactic Republic, many Mandalorians cast-off their traditional warrior ways, giving way to the current government, a pacifist agency that called themselves “The New Mandalorians.†These former warrior-clan members had settled on Kalevala, made their capital here in Sundari, and built the black dome that protected the city from the white sands of the desert left behind after the Mandalorian Excision. This conflicted child was the son of a member of the Mandalorian Royal Guards, educated at the Royal Academy of Government - a New Mandalorian leadership academy located in the capital city. A bright student with a laissez faire attitude towards assignments, he had no difficulty in moving through the various levels of leadership within the school’s massive halls. His teachers foresaw a bright future for the young boy. At the age of eight years old, they felt that it was inevitable that he would rise to serve as his father, in the Mandalorian Royal Guards. Fluent in both Mando’a and Basic, his way had been paved, his path had been set. It was his for the claiming. It was his birthright, so to speak. He clearly demonstrated the potential to follow his father’s example. Though he managed well enough in school, it was his extra-curricular training to which he not only paid full attention, but also fully committed his energies. This training came not from an institution but from his grandfather, and it conflicted rather ostensibly with the training he received at the Royal Academy. His grandfather had been a member of Jaster Mereel’s True Mandalorians who had fought against the Death Watch of Tor Viszla and the ideals of the New Mandalorians. It was the Mand’alor (leader of all Mandalorian clans) Jaster Mereel and later, his adopted son Jango Fett who fought to maintain the Canon of Honor and the six Resol’nare (the basic tenets) that the Mandalorians had lived by for millennia. The boy relished the days he spent with his grandfather. He loved to hear the stories of the honorable True Mandalorians and their fight for the traditions of his people. His grandfather taught him the ways of the True Mandalorians, and the boy grew to hold the Canon of Honor and the six Resol’nare deep within his young heart. Because of the training of his grandfather in the combat arts, he had no peer within the Corps of Cadets at the Academy. His loyalty to his people and his family was second to none, as would be expected of any True Mandalorian. The boy led this conflicted life as he entered his eighth year. Therefore, it happened that in the year 20 BBY, that forces undetectable and unimaginable to most eight year olds, would resolve the conflict within the boy. The boy and several of his fellow cadets discovered that the ongoing food shortage was a falsehood perpetrated to fuel the Black Markets of the Mandalorian sector. This word passed to the New Mandalorian Duchess Satine Kryze by way of the students. Duchess Satine told the students that she would handle the issue and that they should not get involved. Her nephew Korkie Kryze was one of the students that made the discovery. Korkie felt that Prime Minister Almec needed the information, so he arranged a meeting between himself, three of the other students, and the Prime Minister. The students were placed under arrest and a wild chain of events unfolded in the aftermath. The Duchess requested assistance from the Galactic Republic, and Jedi Padawan Ahsoka Tano was dispatched to Mandalore. Tano managed to rescue the students and in the process determine that Prime Minister Almec himself was behind the food shortage and the black markets. In the meantime, the Prime Minister had taken the Duchess captive. Ultimately, Tano was able to free the Duchess and capture Almec. During the time of the Prime Minister’s absence, a faction of the resurgent Death Watch, led by Pre Viszla seized power on Mandalore and Darth Maul, backed by a group of Mandalorian Super Commandos (the descendants of Jaster Mereel’s True Mandalorians) led a coup against the New Mandalorians on Kalevala. An assassination attempt against Duchess Satine’s life killed several members of the Royal Mandalorian Guards, including the boy’s father. The boy felt the sting of his father’s death, as any boy would. However, it also opened his eyes to the truth. The long-standing conflict within him was resolved by the intervention of fate. The pacifist ways of the New Mandalorians were responsible for the death of his father. Had the True Mandalorians of his Grandfather, of Jango Fett, and Jaster Mereel been in power during his young life, the Battle of Sundari would never have taken place. His father would still be alive. Kalevala would exist in a strong, peaceful state that no faction or individual in the galaxy would dare to challenge. He understood for the first time, the depth of responsibility that the governments that he had learned about at the Royal Academy had to the people that they governed. He knew it was the government’s responsibility to defend its people. He knew that a life of discipline and honor similar to that of the uniformed True Mandalorians was the type of life that he must lead. He knew that he must live honorably and defend the people of the galaxy from weak and powerless governments, and he knew that the only way to ensure that all of these things happened was to serve in the best military unit employed by the seated government within the galaxy. Less than one year later the Galactic Republic gave way to the First Galactic Empire and brought with it the forming of the Stormtrooper Corps with their strict discipline and pristine white armor. Once again, the boy cast his eyes upward…1 point


.thumb.jpg.77bd551337f7adc46a4b151e703df6be.jpg)